Azure Logic Apps
An Azure service that automates the access and use of data across clouds without writing code.
2,837 questions
This browser is no longer supported.
Upgrade to Microsoft Edge to take advantage of the latest features, security updates, and technical support.
' cx='32' cy='32' r='32' /%3E%3Ctext x='50%25' y='55%25' dominant-baseline='middle' text-anchor='middle' fill='%23FFF' %3EM%3C/text%3E%3C/svg%3E)
Hello,
I am trying to create a logic app to send results from a log analytics query in csv format through email.
I am able to send the results as an html table with 'run query and visualize results' + 'send an email', that is working perfectly.
But when I try 'run query and list results' + 'create csv table' + 'send email', I can't find a way get the output of the create csv and put it in the attachment of the mail. In the email step I can see for the create csv table 'we can't find any outputs to match this input format'
What am I missing ?
Sorry I am just a beginner in Logic Apps.
The 'create csv table' step is configured with the dynamic content 'value' for the from the from field and the field Columns is configured as Automatic.
Thanks in advance for your help
Marc
Hello,
It is solved, there is a see more button that you sometimes need to click to see all the outputs.
After clicking on it I was able to see the data.
Marc
' cx='32' cy='32' r='32' /%3E%3Ctext x='50%25' y='55%25' dominant-baseline='middle' text-anchor='middle' fill='%23FFF' %3ES%3C/text%3E%3C/svg%3E)
How did you do? Would be able to guide me?
' cx='32' cy='32' r='32' /%3E%3Ctext x='50%25' y='55%25' dominant-baseline='middle' text-anchor='middle' fill='%23FFF' %3ECH%3C/text%3E%3C/svg%3E)
The actions should look like something like this:
{
    "definition": {
        "$schema": "https://schema.management.azure.com/providers/Microsoft.Logic/schemas/2016-06-01/workflowdefinition.json#",
        "actions": {
            "Create_CSV_table": {
                "inputs": {
                    "format": "CSV",
                    "from": "@body('Parse_JSON')"
                },
                "runAfter": {
                    "Parse_JSON": [
                        "Succeeded"
                    ]
                },
                "type": "Table"
            },
            "Send_an_email_(V2)": {
                "inputs": {
                    "body": {
                        "Attachments": [
                            {
                                "ContentBytes": "@{base64(body('Create_CSV_table'))}",
                                "Name": "attachment.csv"
                            }
                        ],
                        "Body": "<p></p>",
                        "Subject": "Email with attached CSV",
                        "To": "someone@somewhere.com"
                    },
                    "host": {
                        "connection": {
                            "name": "@parameters('$connections')['office365']['connectionId']"
                        }
                    },
                    "method": "post",
                    "path": "/v2/Mail"
                },
                "runAfter": {
                    "Create_CSV_table": [
                        "Succeeded"
                    ]
                },
                "type": "ApiConnection"
            }
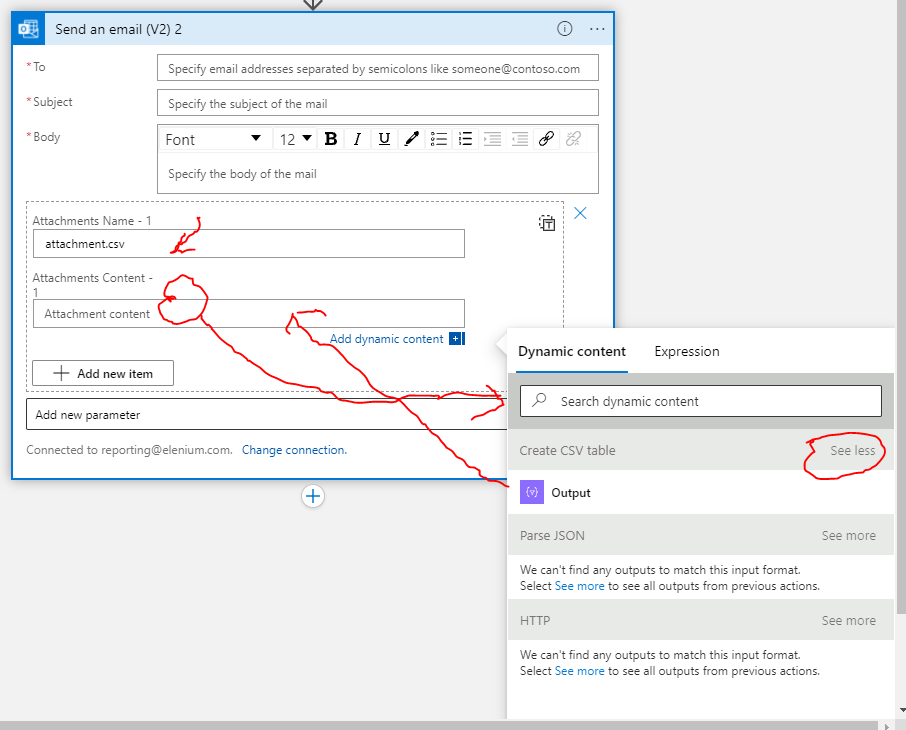
If you want to do it via the designer, in the 'Send an email' step, click the 'Add new parameter' dropdown and select 'Attachments'. Wait, and the following will appear. Add an attachment name (it's required, and a run will fail if you don't add one). Click on the 'Attachment content' input field and click the 'See more' link next to 'Create CSV table' to show the 'Output' from Create CSV Table. Drag this into the 'Attachment content' input field.
' cx='32' cy='32' r='32' /%3E%3Ctext x='50%25' y='55%25' dominant-baseline='middle' text-anchor='middle' fill='%23FFF' %3EBM%3C/text%3E%3C/svg%3E)
Hi ,may you please a complete overview of how you put the logic together, from the query to sending the mail, I am new to this, i have requirements to send mail with csv format