Tutorial: Build a multitenant daemon that uses the Microsoft identity platform
In this tutorial, you download and run an ASP.NET daemon web app that demonstrates using the OAuth 2.0 client credentials grant to get an access token to call the Microsoft Graph API.
In this tutorial:
- Integrate a daemon app with the Microsoft identity platform
- Grant application permissions directly to the app by an admin
- Get an access token to call the Microsoft Graph API
- Call the Microsoft Graph API.
If you don't have an Azure subscription, create a free account before you begin.
Prerequisites
- Visual Studio 2017 or 2019.
- A Microsoft Entra tenant. For more information, see How to get a Microsoft Entra tenant.
- One or more user accounts in your tenant. This sample won't work with a Microsoft account. If you signed in with a Microsoft account and have never created a user account in your directory, do that now.
Scenario
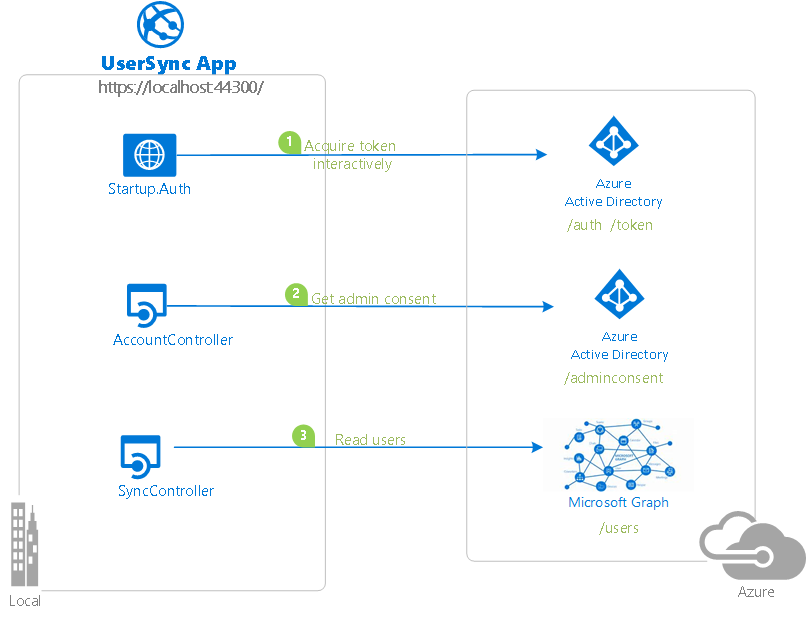
The app is built as an ASP.NET MVC application. It uses the OWIN OpenID Connect middleware to sign in users.
The "daemon" component in this sample is an API controller, SyncController.cs. When the controller is called, it pulls in a list of users in the customer's Microsoft Entra tenant from Microsoft Graph. SyncController.cs is triggered by an AJAX call in the web application. It uses the Microsoft Authentication Library (MSAL) for .NET to acquire an access token for Microsoft Graph.
Because the app is a multitenant app for Microsoft business customers, it must provide a way for customers to "sign up" or "connect" the application to their company data. During the connection flow, a Global Administrator first grants application permissions directly to the app so that it can access company data in a non-interactive fashion, without the presence of a signed-in user. The majority of the logic in this sample shows how to achieve this connection flow by using the identity platform's admin consent endpoint.
For more information on the concepts used in this sample, read the client credentials protocol documentation for the identity platform.
Clone or download this repository
From your shell or command line, enter this command:
git clone https://github.com/Azure-Samples/active-directory-dotnet-daemon-v2.git
Or download the sample in a zip file.
Register your application
This sample has one project. To register the application with your Microsoft Entra tenant, you can either:
- Follow the steps in Choose the tenant and Configure the sample to use your tenant.
- Use PowerShell scripts that:
- Automatically create the Microsoft Entra applications and related objects (passwords, permissions, dependencies) for you.
- Modify the Visual Studio projects' configuration files.
If you want to use the automation:
On Windows, run PowerShell and go to the root of the cloned directory.
Run this command:
Set-ExecutionPolicy -ExecutionPolicy RemoteSigned -Scope Process -ForceRun the script to create your Microsoft Entra application and configure the code of the sample application accordingly:
.\AppCreationScripts\Configure.ps1Other ways of running scripts are described in App creation scripts.
Open the Visual Studio solution and select Start to run the code.
If you don't want to use the automation, use the steps in the following sections.
Choose the tenant
Tip
Steps in this article might vary slightly based on the portal you start from.
Sign in to the Microsoft Entra admin center as at least an Application Developer.
If you have access to multiple tenants, use the Settings icon
 in the top menu to switch to the tenant in which you want to register the application from the Directories + subscriptions menu.
Browse to Identity > Applications > App registrations.
Select New registration.
Enter a Name for your application, for example
dotnet-web-daemon-v2. Users of your app might see this name, and you can change it later.In the Supported account types section, select Accounts in any organizational directory.
In the Redirect URI (optional) section, select Web in the combo box and enter
https://localhost:44316/andhttps://localhost:44316/Account/GrantPermissionsas Redirect URIs.If there are more than two redirect URIs, you'll need to add them from the Authentication tab later, after the app is created successfully.
Select Register to create the application.
On the app's Overview page, find the Application (client) ID value and record it for later use. You'll need it to configure the Visual Studio configuration file for this project.
Under Manage, select Authentication.
Set Front-channel logout URL to
https://localhost:44316/Account/EndSession.In the Implicit grant and hybrid flows section, select Access tokens and ID tokens. This sample requires the implicit grant flow to be enabled to sign in the user and call an API.
Select Save.
Under Manage, select Certificates & secrets.
In the Client secrets section, select New client secret.
Enter a key description (for example, app secret).
Select a key duration of either In 1 year, In 2 years, or Never Expires.
Select Add. Record the key value in a safe location. You'll need this key later to configure the project in Visual Studio.
Under Manage, select API permissions > Add a permission.
In the Commonly used Microsoft APIs section, select Microsoft Graph.
In the Application permissions section, ensure that the right permissions are selected: User.Read.All.
Select Add permissions.
Configure the sample to use your tenant
In the following steps, ClientID is the same as "application ID" or AppId.
Open the solution in Visual Studio to configure the projects.
Configure the client project
If you used the setup scripts, the following changes will have been applied for you.
- Open the UserSync\Web.Config file.
- Find the app key ida:ClientId. Replace the existing value with the application ID of the dotnet-web-daemon-v2 application that was previously recorded.
- Find the app key ida:ClientSecret. Replace the existing value with the key that you saved during the creation of the dotnet-web-daemon-v2 app.
Run the sample
Clean the solution, rebuild the solution, run the UserSync application, and then sign in as an administrator in your Microsoft Entra tenant. If you don't have a Microsoft Entra tenant for testing, you can follow these instructions to get one.
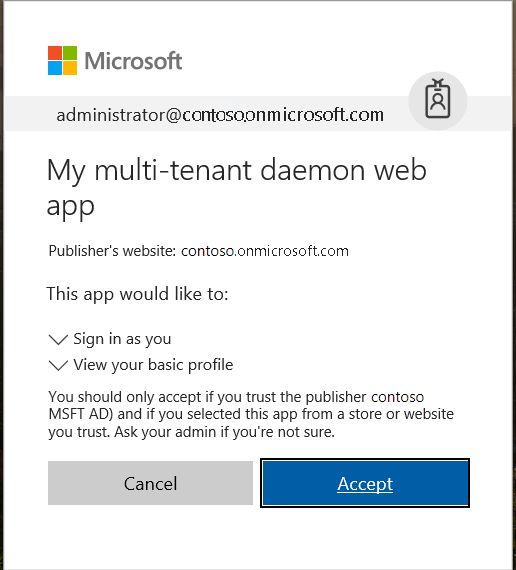
When you sign in, the app first asks you for permission to sign you in and read your user profile. This consent allows the app to ensure that you're a business user.
The app then tries to sync a list of users from your Microsoft Entra tenant, via Microsoft Graph. If it can't, it asks you (the tenant administrator) to connect your tenant to the app.
The app then asks for permission to read the list of users in your tenant.
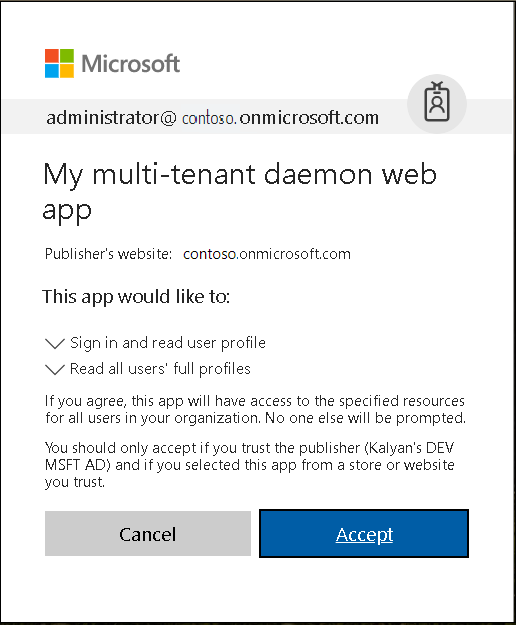
After you grant permission, you're signed out from the app. This sign-out ensures that any existing access tokens for Microsoft Graph is removed from the token cache. When you sign in again, the fresh token that's obtained will have the necessary permissions to make calls to Microsoft Graph.
When you grant the permission, the app can then query for users at any point. You can verify this by selecting the Sync Users button and refreshing the list of users. Try adding or removing a user and resyncing the list. (But note that the app syncs only the first page of users.)
About the code
The relevant code for this sample is in the following files:
- App_Start\Startup.Auth.cs, Controllers\AccountController.cs: Initial sign-in. In particular, the actions on the controller have an Authorize attribute, which forces the user to sign in. The application uses the authorization code flow to sign in the user.
- Controllers\SyncController.cs: Syncing the list of users to the local in-memory store.
- Controllers\UserController.cs: Displaying the list of users from the local in-memory store.
- Controllers\AccountController.cs: Acquiring permissions from the tenant admin by using the admin consent endpoint.
Re-create the sample app
- In Visual Studio, create a new Visual C# ASP.NET Web Application (.NET Framework) project.
- On the next screen, choose the MVC project template. Also add folder and core references for Web API, because you'll add a web API controller later. Leave the project's chosen authentication mode as the default: No Authentication.
- Select the project in the Solution Explorer window and select the F4 key.
- In the project properties, set SSL Enabled to True. Note the information in SSL URL. You'll need it when configuring this application's registration in the Azure portal.
- Add the following ASP.NET OWIN middleware NuGet packages:
- Microsoft.Owin.Security.ActiveDirectory
- Microsoft.Owin.Security.Cookies
- Microsoft.Owin.Host.SystemWeb
- Microsoft.IdentityModel.Protocol.Extensions
- Microsoft.Owin.Security.OpenIdConnect
- Microsoft.Identity.Client
- In the App_Start folder:
- Create a class called Startup.Auth.cs.
- Remove .App_Start from the namespace name.
- Replace the code for the Startup class with the code from the same file of the sample app. Be sure to take the whole class definition. The definition changes from public class Startup to public partial class Startup.
- In Startup.Auth.cs, resolve missing references by adding using statements as suggested by Visual Studio IntelliSense.
- Right-click the project, select Add, and then select Class.
- In the search box, enter OWIN. OWIN Startup class appears as a selection. Select it, and name the class Startup.cs.
- In Startup.cs, replace the code for the Startup class with the code from the same file of the sample app. Again, note that the definition changes from public class Startup to public partial class Startup.
- In the Models folder, add a new class called MsGraphUser.cs. Replace the implementation with the contents of the file of the same name from the sample.
- Add a new MVC 5 Controller - Empty instance called AccountController. Replace the implementation with the contents of the file of the same name from the sample.
- Add a new MVC 5 Controller - Empty instance called UserController. Replace the implementation with the contents of the file of the same name from the sample.
- Add a new Web API 2 Controller - Empty instance called SyncController. Replace the implementation with the contents of the file of the same name from the sample.
- For the user interface, in the Views\Account folder, add three Empty (without model) Views instances named GrantPermissions, Index, and UserMismatch. Add and one named Index in the Views\User folder. Replace the implementation with the contents of the file of the same name from the sample.
- Update Shared_Layout.cshtml and Home\Index.cshtml to correctly link the various views together.
Deploy the sample to Azure
This project has web app and web API projects. To deploy them to Azure websites, take the following steps for each one:
- Create an Azure website.
- Publish the web app and web APIs to the website.
- Update clients to call the website instead of IIS Express.
Create and publish dotnet-web-daemon-v2 to an Azure website
- Sign in to the Azure portal.
- In the upper-left corner, select Create a resource.
- Select Web > Web App, and then give your website a name. For example, name it dotnet-web-daemon-v2-contoso.azurewebsites.net.
- Select the information for Subscription, Resource group, and App service plan and location. OS is Windows, and Publish is Code.
- Select Create and wait for the app service to be created.
- When you get the Deployment succeeded notification, select Go to resource to go to the newly created app service.
- After the website is created, find it in the Dashboard and select it to open the app service's Overview screen.
- From the Overview tab of the app service, download the publish profile by selecting the Get publish profile link and save it. You can use other deployment mechanisms, such as deploying from source control.
- Switch to Visual Studio and then:
- Go to the dotnet-web-daemon-v2 project.
- Right-click the project in Solution Explorer, and then select Publish.
- Select Import Profile on the bottom bar, and import the publish profile that you downloaded earlier.
- Select Configure.
- On the Connection tab, update the destination URL so that it uses "https." For example, use
https://dotnet-web-daemon-v2-contoso.azurewebsites.net. Select Next. - On the Settings tab, make sure that Enable Organizational Authentication is cleared.
- Select Save. Select Publish on the main screen.
Visual Studio will publish the project and automatically open a browser to the project's URL. If you see the default webpage of the project, the publication was successful.
Update the Microsoft Entra tenant application registration for dotnet-web-daemon-v2
- Go back to the Microsoft Entra admin center, and then select the dotnet-web-daemon-v2 application in App registrations.
- On the Authentication page for your application, update the Front-channel logout URL fields with the address of your service. For example, use
https://dotnet-web-daemon-v2-contoso.azurewebsites.net/Account/EndSession. - From the Branding menu, update the Home page URL to the address of your service. For example, use
https://dotnet-web-daemon-v2-contoso.azurewebsites.net. - Save the configuration.
- Add the same URL in the list of values of the Authentication > Redirect URIs menu. If you have multiple redirect URLs, make sure that there's a new entry that uses the app service's URI for each redirect URL.
Clean up resources
When no longer needed, delete the app object that you created in the Register your application step. To remove the application, follow the instructions in Remove an application authored by you or your organization.
Get help
Use Microsoft Q&A to get support from the community.
Ask your questions on Microsoft Q&A first, and browse existing issues to see if someone has asked your question before.
Make sure that your questions or comments are tagged with azure-ad-adal-deprecation, azure-ad-msal, and dotnet-standard."
If you find a bug in the sample, please raise the issue on GitHub Issues.
If you find a bug in MSAL.NET, please raise the issue on MSAL.NET GitHub Issues.
To provide a recommendation, go to the User Voice page.
Next steps
Learn more about building daemon apps that use the Microsoft identity platform to access protected web APIs:
الملاحظات
قريبًا: خلال عام 2024، سنتخلص تدريجيًا من GitHub Issues بوصفها آلية إرسال ملاحظات للمحتوى ونستبدلها بنظام ملاحظات جديد. لمزيد من المعلومات، راجع https://aka.ms/ContentUserFeedback.
إرسال الملاحظات وعرضها المتعلقة بـ