Deploy F5 BIG-IP Virtual Edition VM in Azure
In this tutorial, learn to deploy BIG-IP Vitural Edition (VE) in Azure infrastructure as a service (IaaS). At the end of the tutorial you'll have:
- A prepared BIG-IP virtual machine (VM) to model a secure hybrid access (SHA) proof-of-concept
- A staging instance to test new BIG-IP system updates and hotfixes
Learn more: SHA: Secure legacy apps with Microsoft Entra ID
Prerequisites
Prior F5 BIG-IP experience or knowledge isn't necessary. However, we recommend you review industry standard terminology in the F5 Glossary.
Deploying a BIG-IP in Azure for SHA requires:
- A paid Azure subscription
- If you don't have one, you can get an Azure free trial
- Any of the following F5 BIG-IP license SKUs:
- F5 BIG-IP® Best bundle
- F5 BIG-IP Access Policy Manager™ (APM) standalone license
- F5 BIG-IP Access Policy Manager™ (APM) add-on license on a BIG-IP F5 BIG-IP® Local Traffic Manager™ (LTM)
- 90-day BIG-IP full feature trial license
- A wildcard or Subject Alternative Name (SAN) certificate, to publish web applications over Secure Socket Layer (SSL)
- Go to letsencrypt.org to see offers. Select Get Started.
- An SSL certificate to secure the BIG-IP management interface. You can use a certificate to publish web apps, if its subject corresponds to the BIG-IP fully qualified domain name (FQDN). For example, you can use a wildcard certificate with a subject
*.contoso.comforhttps://big-ip-vm.contoso.com:8443.
VM deployment and base system configurations take approximately 30 minutes, then BIG-IP is to implement SHA scenarios in Integrate F5 BIG-IP with Microsoft Entra ID.
Testing scenarios
When you test the scenarios, this tutorial assumes:
- The BIG-IP is deployed into an Azure resource group with an Active Directory (AD) environment
- The environment consists of a Domain Controller (DC) and Internet Information Services (IIS) web host VMs
- Servers not in the same locations as the BIG-IP VM is acceptable, if the BIG-IP sees roles required to support a scenario
- BIG-IP VM connected to another environment, over a VPN connection, is supported
If you don't have the previous items for testing, you can deploy an AD domain environment into Azure, using a script on Cloud Identity Lab. You can programmatically deploy sample test applications to an IIS web host using a scripted automation on Demo Suite.
Note
Some steps in this tutorial might differ from the layout in the Microsoft Entra admin center.
Azure deployment
Tip
Steps in this article might vary slightly based on the portal you start from.
You can deploy a BIG-IP in different topologies. This guide focuses on a network interface card (NIC) deployment. However, if your BIG-IP deployment requires multiple network interfaces for high availability, network segregation, or more than 1-GB throughput, consider using F5 pre-compiled Azure Resource Manager (ARM) templates.
To deploy BIG-IP VE from the Azure Marketplace.
Sign in to the Microsoft Entra admin center with an account with permissions to create VMs, such as a Global Administrator.
In the top ribbon search box, type marketplace
Select Enter.
Type F5 into the Marketplace filter.
Select Enter.
From the top ribbon, select + Add.
For the marketplace filter, enter F5.
Select Enter.
Select F5 BIG-IP Virtual Edition (BYOL) > Select a software plan > F5 BIG-IP VE - ALL (BYOL, 2 Boot Locations).
Select Create.

For Basics:
- Subscription: Target subscription for the BIG-IP VM deployment
- Resource group: The Azure RG the BIG-IP VM will be deployed into, or create one. It's your DC and IIS VMs resource group
- For Instance details:
- VM Name Example BIG-IP-VM
- Region: Target Azure geo for BIG-IP-VM
- Availability options Enable if using VM in production
- Image: F5 BIG-IP VE - ALL (BYOL, 2 Boot Locations)
- Azure Spot instance: No, but enable it, if needed
- Size: Minimum specifications are 2 vCPUs and 8-GB memory
- For Administrator account:
- Authentication type: Select a password for now, and switch to a key pair later
- Username: The identity to be created as a BIG-IP local account to access its management interfaces. Username is CASE sensitive.
- Password: Secure admin access with a strong password
- Inbound port rules: Public inbound ports, None.
- Select Next: Disks. Leave the defaults.
- Select Next: Networking.
- For Networking:
- Virtual network: The Azure VNet used by your DC and IIS VMs, or create one
- Subnet: The same Azure internal subnet as your DC and IIS VMs, or create one
- Public IP: None
- NIC Network Security Group: Select None, if the Azure subnet you selected is associated with a network security group (NSG); otherwise select Basic
- Accelerate Networking: Off
- For Load balancing: Load balance VM, No.
- Select Next: Management and complete the settings:
- Detailed monitoring: Off
- Boot diagnostics Enable with custom storage account. This feature allows connection to the BIG-IP secure shell (SSH) interface via the Serial Console option in the Microsoft Entra admin center. Select an available Azure storage account.
- For Identity:
- System assigned managed identity: Off
- Microsoft Entra ID: BIG-IP doesn’t support this option
- For Autoshutdown: Enable, or if testing, you can set the BIG-IP-VM to shut down daily
- Select Next: Advanced; leave the defaults.
- Select Next: Tags.
- To review your BIG-IP-VM configuration, select Next: Review + create.
- Select Create. Time to deploy a BIG-IP VM typically is 5 minutes.
- When complete, expand the Microsoft Entra admin center left-hand menu.
- Select Resource groups and navigate to the BIG-IP-VM.
Note
If the VM creation fails, select Back and Next.
Network configuration
When the BIG-IP VM starts, its NIC is provisioned with a Primary private IP issued by the Dynamic Host Configuration Protocol (DHCP) service of the Azure subnet it’s connected to. BIG-IP Traffic Management Operating System (TMOS) uses the IP to communicate with:
- Hosts and services
- Outbound access to the public internet
- Inbound access to the BIG-IP web config and SSH management interfaces
Exposing the management interfaces to the internet increases BIG-IP attack surface. This risk is why the BIG-IP primary IP wasn't provisioned with a public IP during deployment. Instead, a secondary internal IP, and associated public IP, is provisioned for publishing. This one-to-one mapping between a VM public IP, and private IP, enables external traffic to reach a VM. However, an Azure NSG rule is required to allow the traffic, similar to a firewall.
The following diagram shows a NIC deployment of a BIG-IP VE in Azure, configured with a primary IP for general operations and management. There's a separate virtual server IP for publishing services. An NSG rule allows remote traffic destined for intranet.contoso.com to route to the public IP for the published service, before being forwarded to the BIG-IP virtual server.
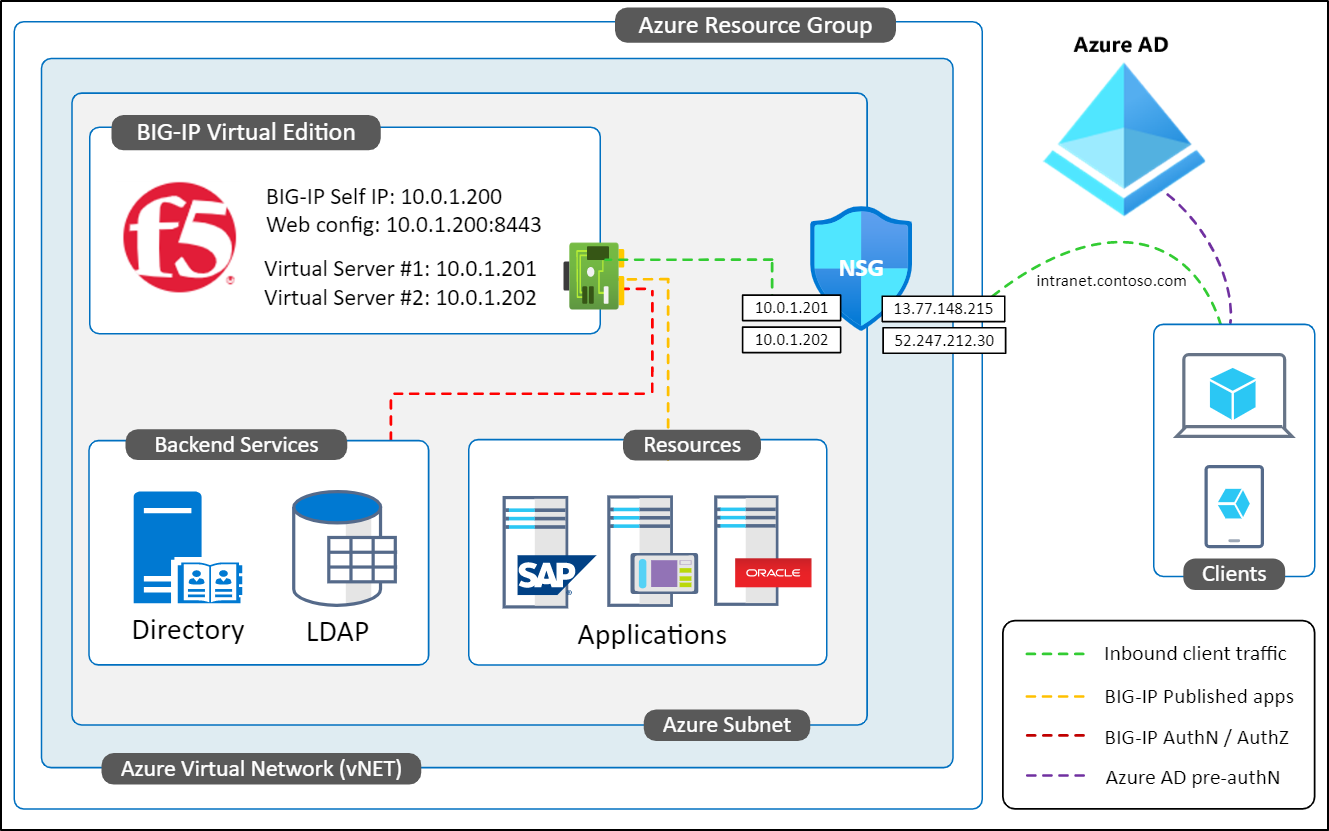
By default, private and public IPs issued to Azure VMs are dynamic, so can change when a VM restarts. Avoid connectivity issues by changing the BIG-IP management IP to static. Do the same action on secondary IPs for publishing services.
From your BIG-IP VM menu, go to Settings > Networking.
In the networking view, select the link to the right of Network Interface.
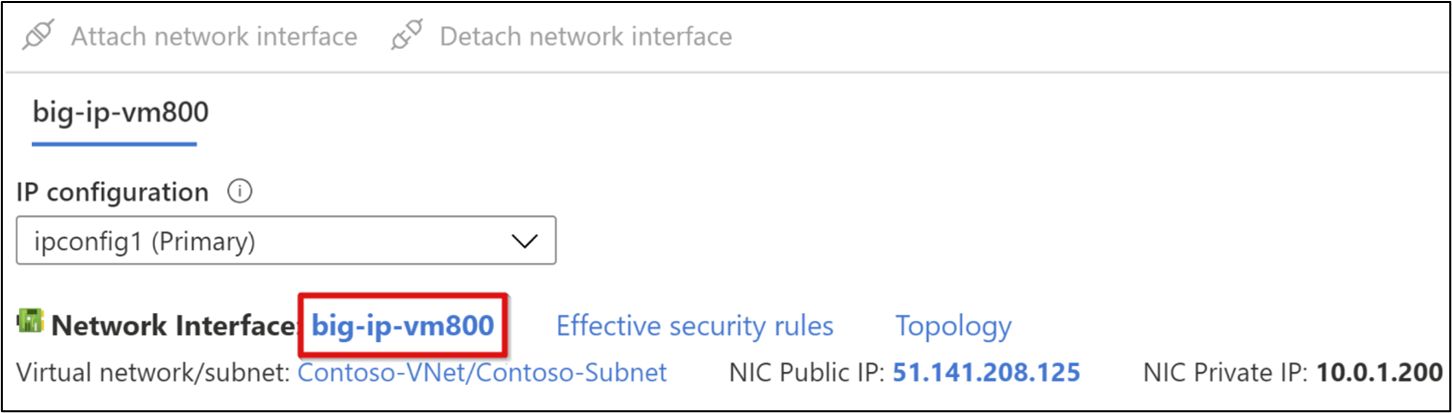
Note
VM names are generated randomly during deployment.
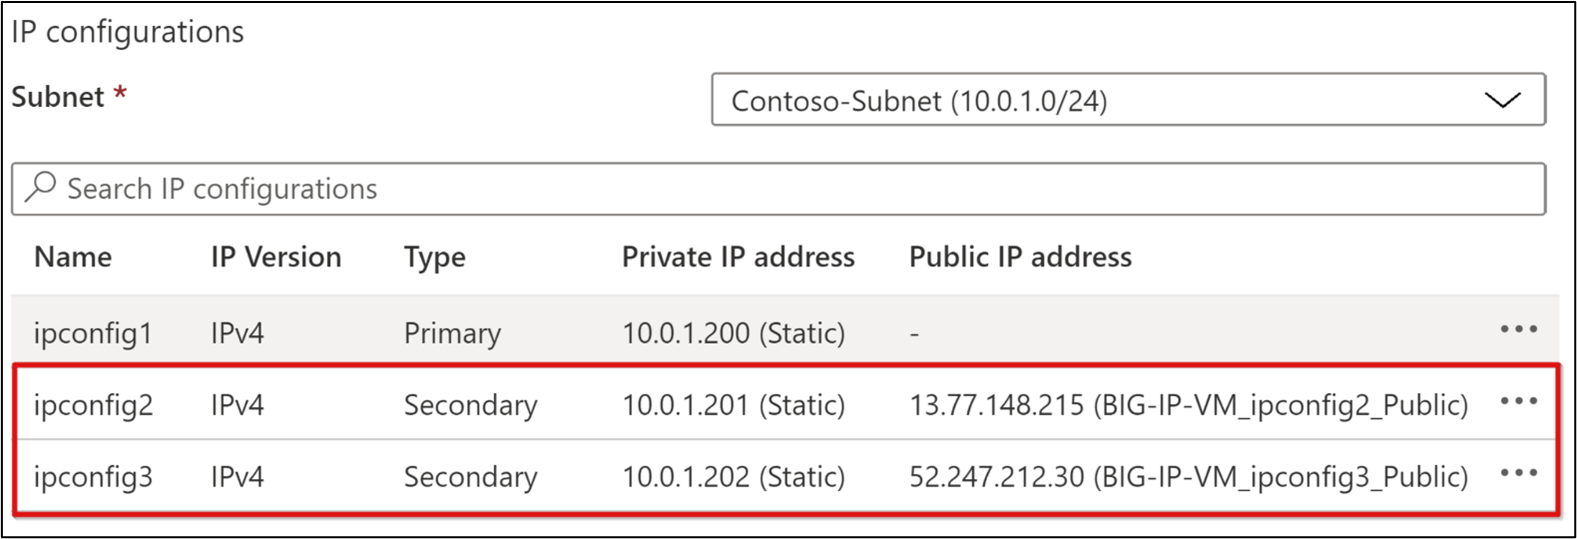
- In the left-hand pane, select IP configurations.
- Select the ipconfig1 row.
- Set the IP Assignment option to Static. If necessary, change the BIG-IP VM primary IP address.
- Select Save.
- Close the ipconfig1 menu.
Note
Use the primary IP to connect and manage the BIG-IP-VM.
- On the top ribbon, select + Add.
- Provide a secondary private IP name, for example, ipconfig2.
- For the private IP address setting, set the Allocation option to Static. Providing the next-higher or -lower IP helps preserve orderliness.
- Set the Public IP address to Associate.
- Select Create.
- For the new public IP address, provide a name, for example, BIG-IP-VM_ipconfig2_Public.
- If prompted, set the SKU to Standard.
- If prompted, set the Tier to Global.
- Set the Assignment option to Static.
- Select OK twice.
Your BIG-IP-VM is ready for:
- Primary private IP: Dedicated to managing the BIG-IP-VM via its Web config utility and SSH. It's used by the BIG-IP system, as its Self-IP, to connect to published back-end services. It connects to external services:
- Network Time Protocol (NTP)
- Active Directory (AD)
- Lightweight Directory Access Protocol (LDAP)
- Secondary private IP: Use to create a BIG-IP APM virtual server to listen for inbound request to a published service(s)
- Public IP: It is associated with the secondary private IP; it enables client traffic from the public internet to reach the BIG-IP virtual server for the published service(s)
The example illustrates the one-to-one relationship between a VM public and private IPs. An Azure VM NIC has one primary IP, and other IPs are secondary.
Note
You need the secondary IP mappings for publishing BIG-IP services.
To implement SHA using the BIG-IP Access Guided Configuration, repeat steps to create more private and public IP pairs for services you publish via the BIG-IP APM. Use the same approach for publishing services using BIG-IP Advanced Configuration. However, avoid public IP overhead by using a Server Name Indicator (SNI) configuration: a BIG-IP virtual server accepts client traffic it receives, and sends it to its destination.
DNS configuration
To resolve your published SHA services to your BIG-IP-VM public IP(s), configure DNS for clients. The following steps assume the public domain DNS zone for your SHA services is managed in Azure. Apply DNS principles of creating a locator, no matter where your DNS zone is managed.
Expand the portal left-hand menu.
With the Resource Groups option, navigate to your BIG-IP-VM.
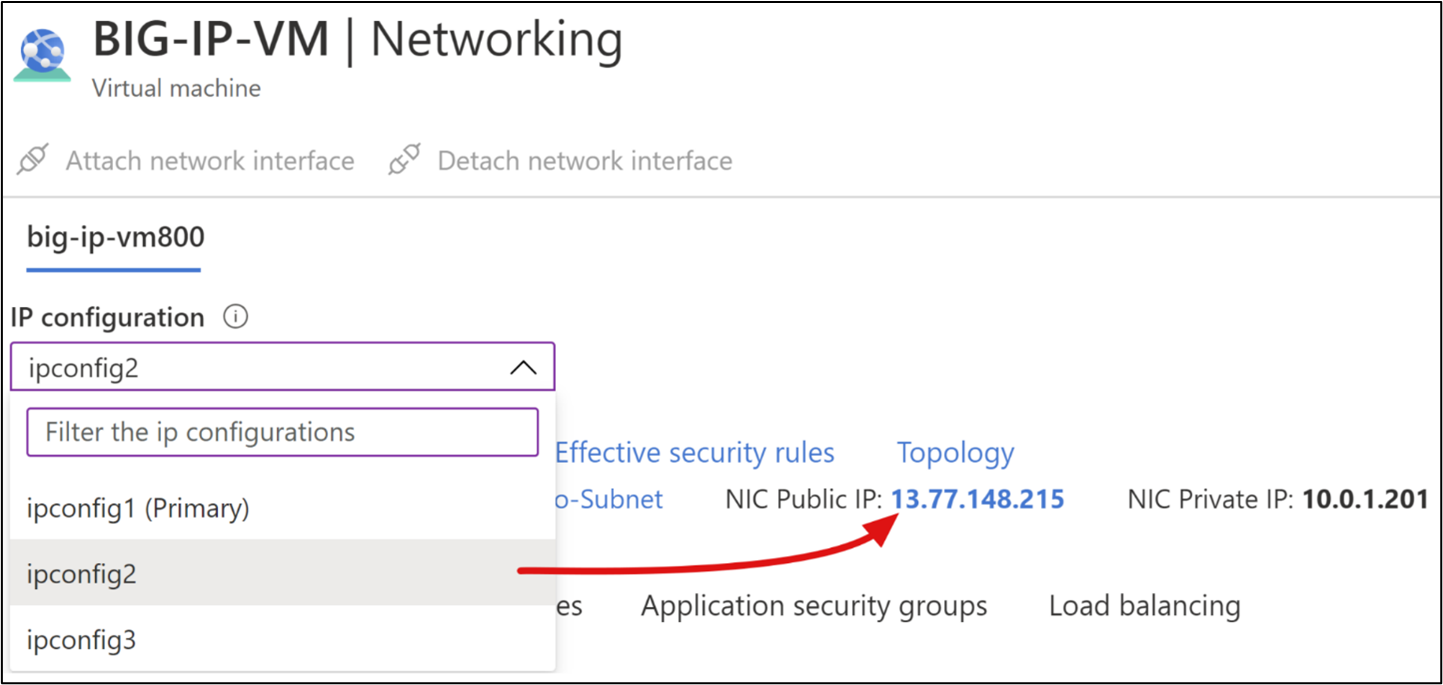
From the BIG-IP VM menu, go to Settings > Networking.
In the BIG-IP-VMs networking view, from the drop-down IP configuration list, select the first secondary IP.
Select the NIC Public IP link.
In the left-hand pane, below the Settings section, select Configuration.
The public IP and DNS properties menu appears.
Select and Create alias record.
From the drop-down menu, select your DNS zone. If there's no DNS zone, then it can be managed outside Azure, or create one for the domain suffix to verify in Microsoft Entra ID.
To create the first DNS alias record:
- Subscription: Same subscription as the BIG-IP-VM
- DNS zone: DNS zone authoritative for the verified domain suffix your published websites use, for example, www.contoso.com
- Name: The hostname you specify resolves to the public IP associated with the selected secondary IP. Define DNS-to IP-mappings. For example, intranet.contoso.com to 13.77.148.215
- TTL: 1
- TTL units: Hours
Select Create.
Leave the DNS name label (optional).
Select Save.
Close the Public IP menu.
Note
To create additional DNS records for the services you wil publish using BIG-IP Guided Configuration, repeat steps 1 through 6.
With DNS records in place, you can use tools such as DNS checker to verify a created record propagated across global public DNS servers. If you manage your DNS domain namespace using an external provider like GoDaddy, create records using their DNS management facility.
Note
If testing and frequently switching DNS records, you can use a PC local hosts file: Select Win + R. In the Run box, enter drivers. A local host record provides DNS resolution for the local PC, not other clients.
Client traffic
By default, Azure virtual networks (VNets) and associated subnets are private networks unable to receive Internet traffic. Attach your BIG-IP-VM NIC to the NSG specified during deployment. For external web traffic to reach the BIG-IP-VM, define an inbound NSG rule to permit ports 443 (HTTPS) and 80 (HTTP) from the public internet.
- From the BIG-IP VM main Overview menu, select Networking.
- Select Add inbound rule.
- Enter NSG rule properties:
- Source: Any
- Source port ranges: *|
- Destination IP addresses: Comma-separated list of BIG-IP-VM secondary private IPs
- Destination ports: 80, 443
- Protocol: TCP
- Action: Allow
- Priority: Lowest available value between 100 and 4096
- Name: A descriptive name, for example:
BIG-IP-VM_Web_Services_80_443
- Select Add.
- Close the Networking menu.
HTTP and HTTPS traffic can reach your BIG-IP-VMs secondary interfaces. Permitting port 80 allows the BIG-IP APM to auto-redirect users from HTTP to HTTPS. Edit this rule to add or remove destination IPs.
Manage BIG-IP
A BIG-IP system is administered with its web config UI. Access the UI from:
- A machine in the BIG-IP internal network
- A VPN client connected to the BIG-IP-VM internal network
- Published via Microsoft Entra application proxy
Note
Select one of the three previous methods before you proceed with the remaining configurations. If necessary, connect directly to the web config from the internet by configuring the BIG-IP primary IP with a public IP. Then add an NSG rule to allow the 8443 traffic to that primary IP. Restrict the source to your own trusted IP, otherwise anyone can connect.
Confirm connection
Confirm you can connect to the BIG-IP VM web config and sign in with the credentials specified during VM deployment:
- If connecting from a VM on its internal network or via VPN, connect to the BIG-IP primary IP and web config port. For example,
https://<BIG-IP-VM_Primary_IP:8443. Your browser prompt might state the connection is insecure. Ignore the prompt until the BIG-IP is configured. If the browser blocks access, clear its cache, and try again. - If you published the web config via Application Proxy, use the URL defined to access the web config externally. Don't append the port, for example,
https://big-ip-vm.contoso.com. Define the internal URL by using the web config port, for example,https://big-ip-vm.contoso.com:8443.
Note
You can manage a BIG-IP system with its SSH environment, typically used for command-line (CLI) tasks and root-level access.
To connect to the CLI:
- Azure Bastion service: Connect to VMs in a VNet, from any location
- SSH client, such as PowerShell with the just-in-time (JIT) approach
- Serial Console: In the portal, in the VM menu, Support and troubleshooting section. It doesn't support file transfers.
- From the internet: Configure the BIG-IP primary IP with a public IP. Add an NSG rule to allow SSH traffic. Restrict your trusted IP source.
BIG-IP license
Before it can be configured for publishing services and SHA, activate and provision a BIG-IP system with the APM module.
- Sign in to the web config.
- On the General properties page, select Activate.
- In the Base Registration key field, enter the case-sensitive key provided by F5.
- Leave the Activation Method set to Automatic.
- Select Next.
- BIG-IP validates the license and shows the end-user license agreement (EULA).
- Select Accept and wait for activation to complete.
- Select Continue.
- At the bottom of the License summary page, sign in.
- Select Next.
- A list of modules, required for SHA, appears.
Note
If the list does not appear, in the main tab, go to System > Resource Provisioning. Check the provisioning column for Access Policy (APM)

- Select Submit.
- Accept the warning.
- Wait for initialization to complete.
- Select Continue.
- On the About tab, select Run the setup utility.
Important
An F5 licenses is for one BIG-IP VE instance. To migrate a license from one instance to another, see the AskF5 article, K41458656: Reusing a BIG-IP VE license on a different BIG-IP VE system. Revoke your trial license on the active instance before you decommission it, otherwise the license will be permanently lost.
Provision BIG-IP
It's important to secure management traffic to and from BIG-IP web config. To help protect the web config channel from compromise, configure a device management certificate.
From the left-navigation bar, go to System > Certificate Management > Traffic Certificate Management > SSL Certificate List > Import.
From the Import Type drop-down list, select PKCS 12(IIS) and Choose File.
Locate an SSL web certificate with a Subject name or SAN that covers the FQDN, which you assign the BIG-IP-VM later.
Provide the certificate password.
Select Import.
From the left-navigation bar, go to System > Platform.
Under General Properties, enter a qualified Host Name and environment Time Zone.
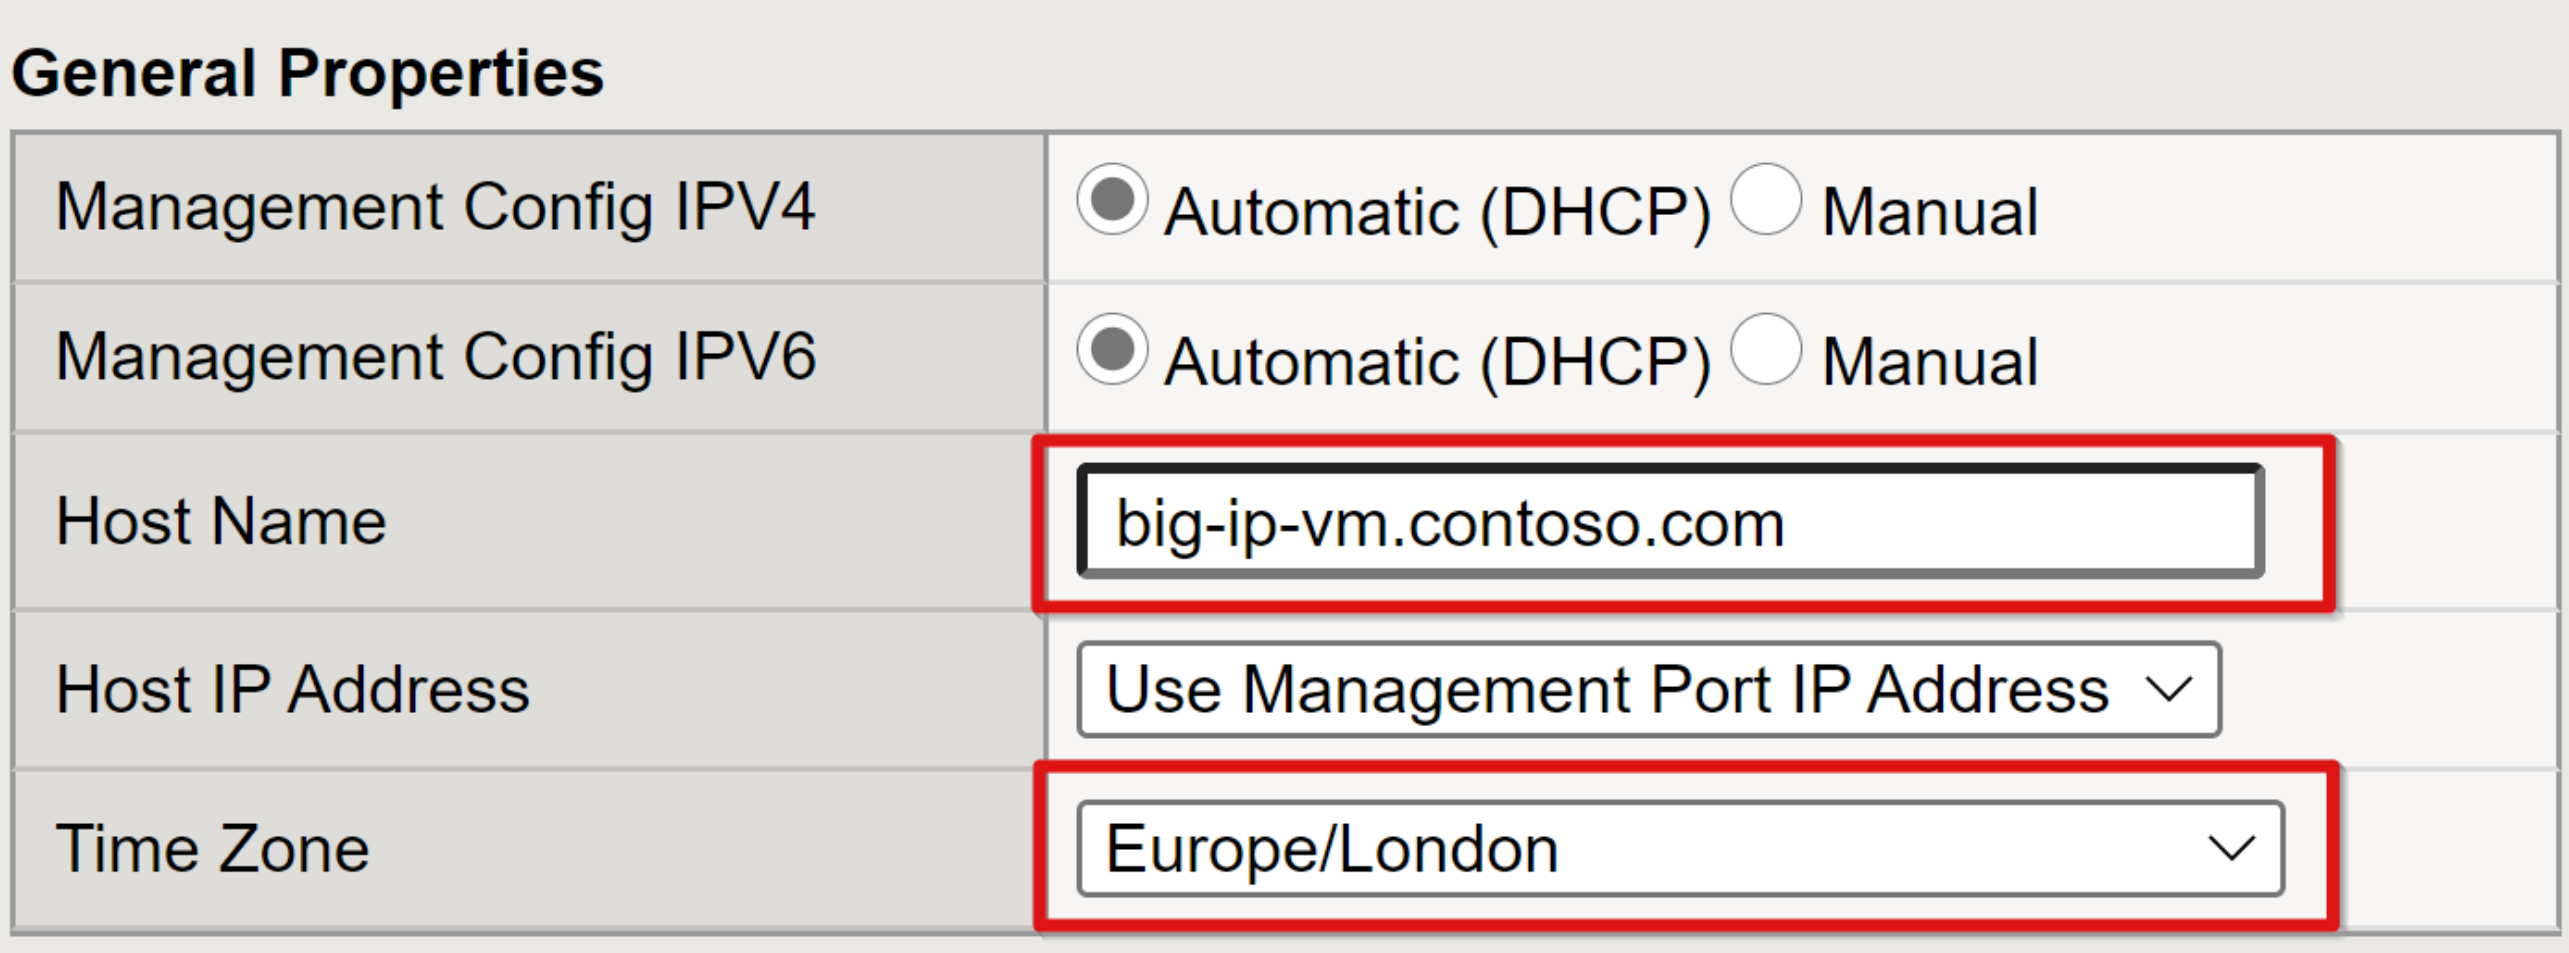
Select Update.
From the left-navigation bar, go to System > Configuration > Device > NTP.
Specify an NTP source.
Select Add.
Select Update. For example,
time.windows.com
You need a DNS record to resolve the BIG-IPs FQDN to its primary private IP, which you specified in previous steps. Add a record to your environment internal DNS, or to a PC localhost file to connect to the BIG-IP web config. When you connect to the web config, the browser warning no longer appears, not with Application Proxy or any other reverse proxy.
SSL profile
As a reverse proxy, a BIG-IP system is a forwarding service, otherwise known as a Transparent proxy, or a Full proxy that participates in exchanges between clients and servers. A full proxy creates two connections: a front-end TCP client connection and a back-end TCP server connection, with a soft gap in the middle. Clients connect to the proxy listener on one end, a virtual server, and the proxy establishes a separate, independent connection to the back-end server. This configuration is bi-directional on both sides. In this full proxy mode, the F5 BIG-IP system can inspect traffic, and interact with requests and responses. Functions such as load balancing and web performance optimization, and advanced traffic management services (application layer security, web acceleration, page routing, and secure remote access) rely on this functionality. When you publish SSL-based services, BIG-IP SSL profiles handing decrypting and encrypting traffic between clients and back-end services.
There are two profile types:
- Client SSL: Creating this profile is the most common way to set up a BIG-IP system to publish internal services with SSL. With a Client SSL profile, a BIG-IP system decrypts inbound client requests, before sending them to a down-stream service. It encrypts outbound back-end responses, then sends them to clients.
- Server SSL: For back-end services configured for HTTPS, you can configure BIG-IP to use a Server SSL profile. With this profile, the BIG-IP re-encrypts the client request, then sends it to the destination back-end service. When the server returns an encrypted response, the BIG-IP system decrypts and re-encrypts the response, then sends it to the client, through the configured Client SSL profile.
For BIG-IP to be pre-configured and ready for SHA scenarios, provision Client and Server SSL profiles.
From the left-navigation, go to System > Certificate Management > Traffic Certificate Management > SSL Certificate List > Import.
From the Import Type drop-down list, select PKCS 12 (IIS).
For the imported certificate, enter a name such as
ContosoWildcardCert.Select Choose File.
Browse to the SSL web certificate with a Subject name that corresponds to the domain suffix for published services.
For the imported certificate, provide the password.
Select Import.
From the left-navigation, go to Local Traffic > Profiles > SSL > Client.
Select Create.
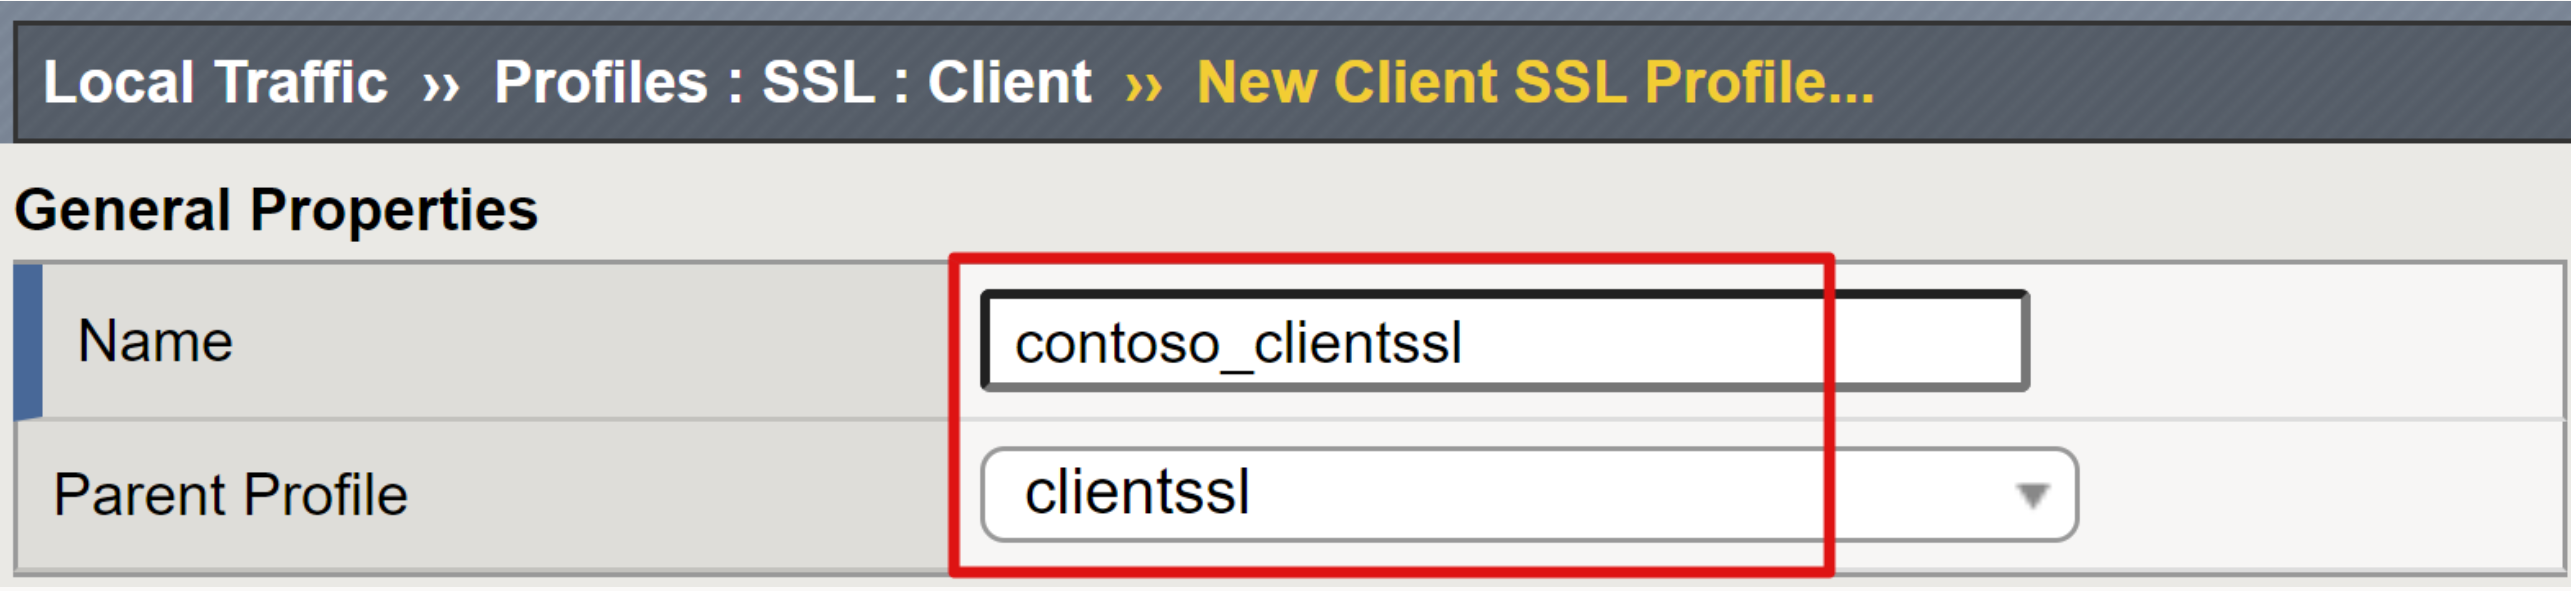
In the New Client SSL Profile page, enter a unique, friendly Name.
Ensure the Parent profile is set to clientssl.
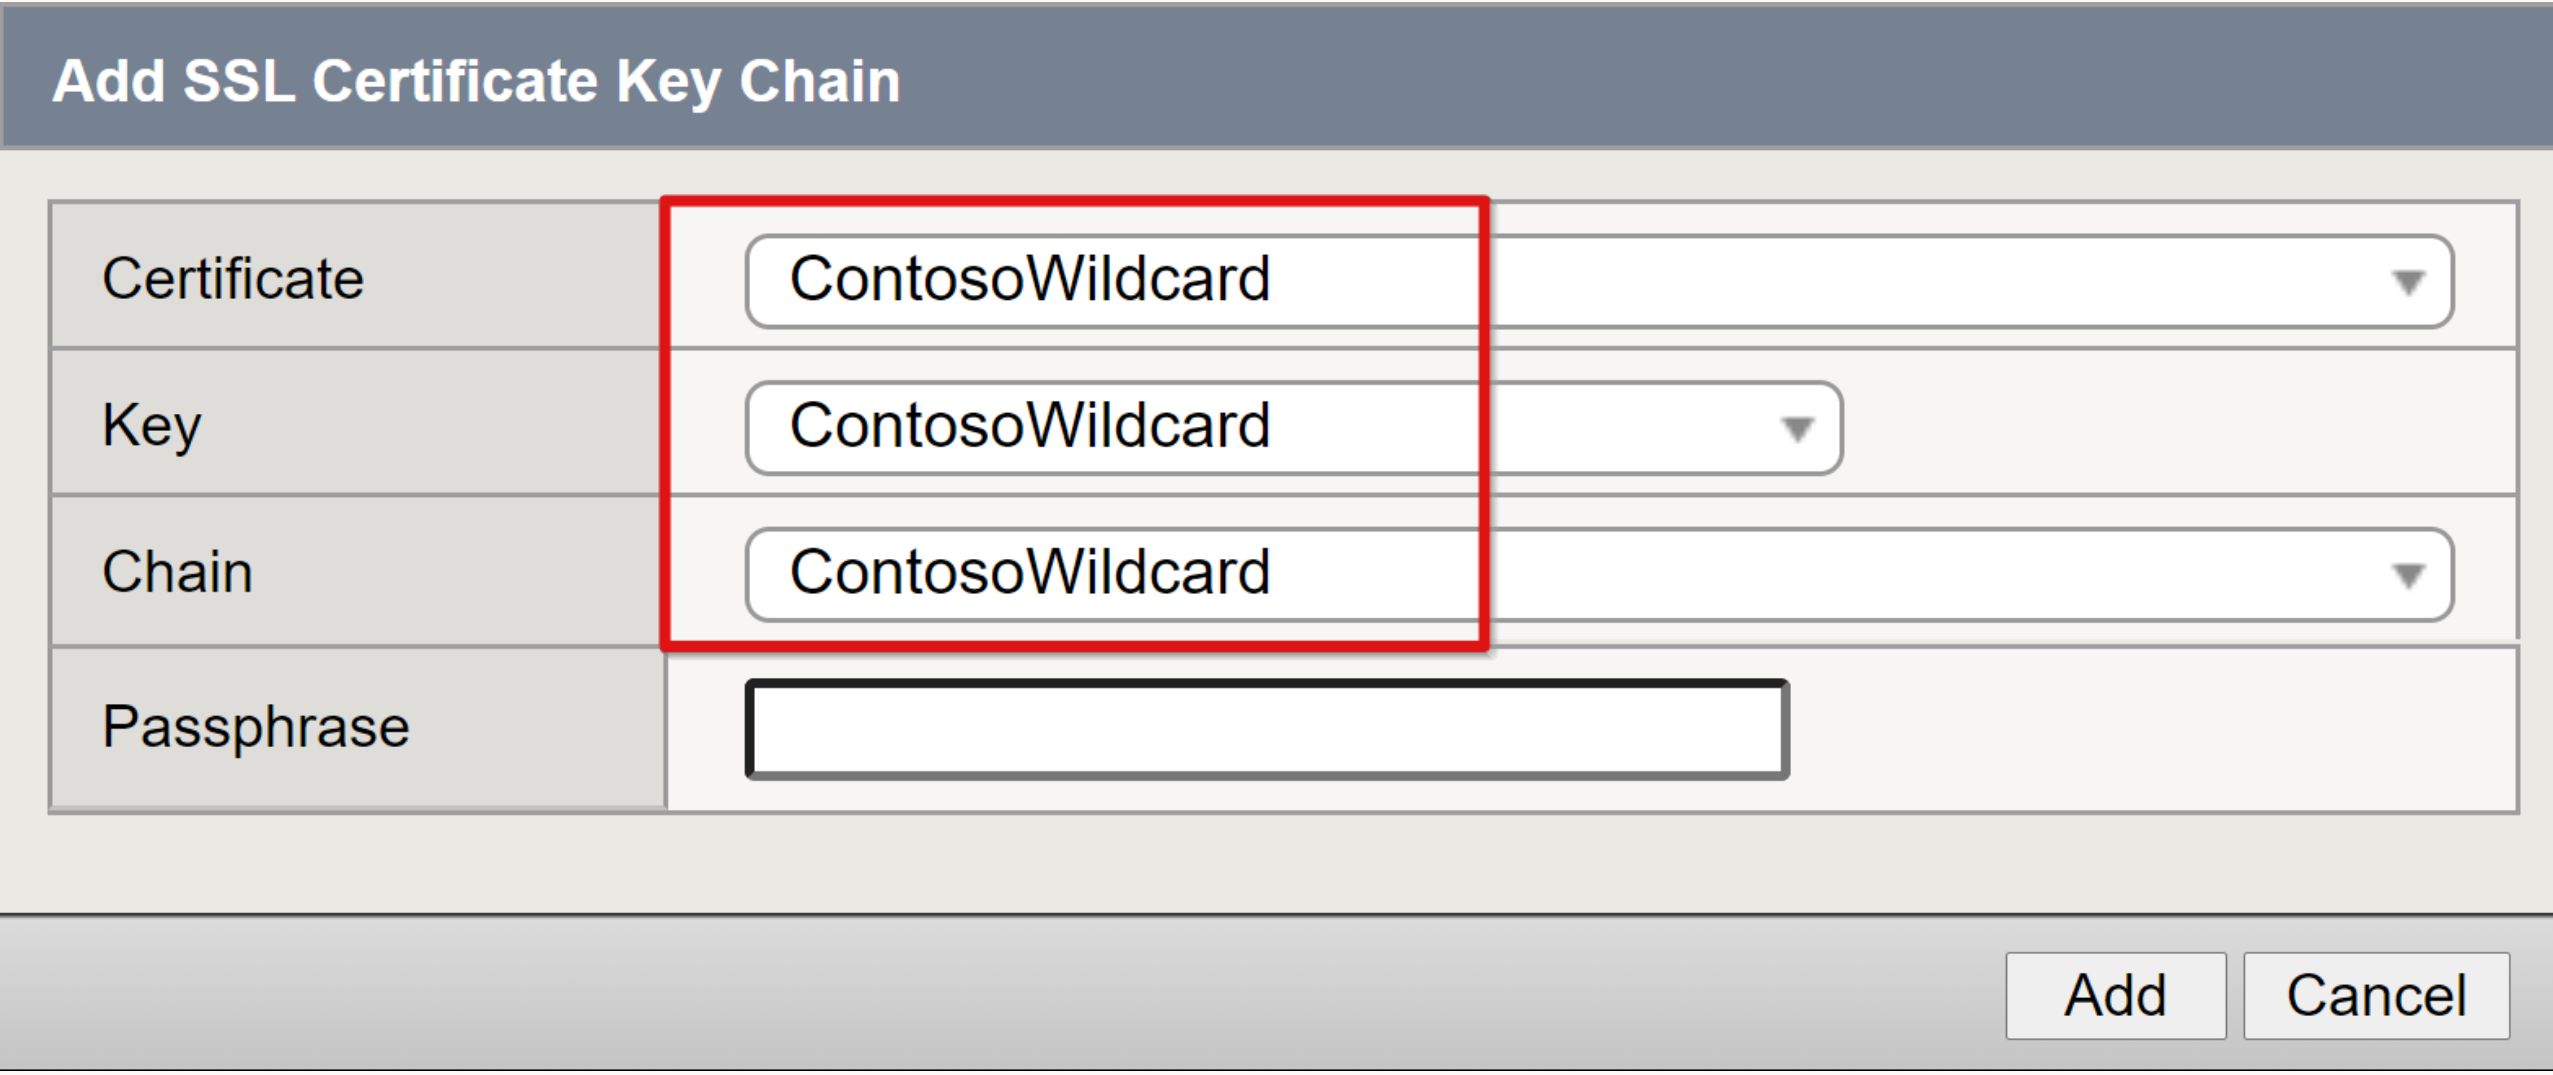
In the Certificate Key Chain row, select the far-right check box.
Select Add.
From the Certificate, Key, and Chain drop-down lists, select the wildcard certificate you imported without a passphrase.
Select Add.
Select Finished.
Repeat steps to create an SSL server certificate profile.
From the top ribbon, select SSL > Server > Create.
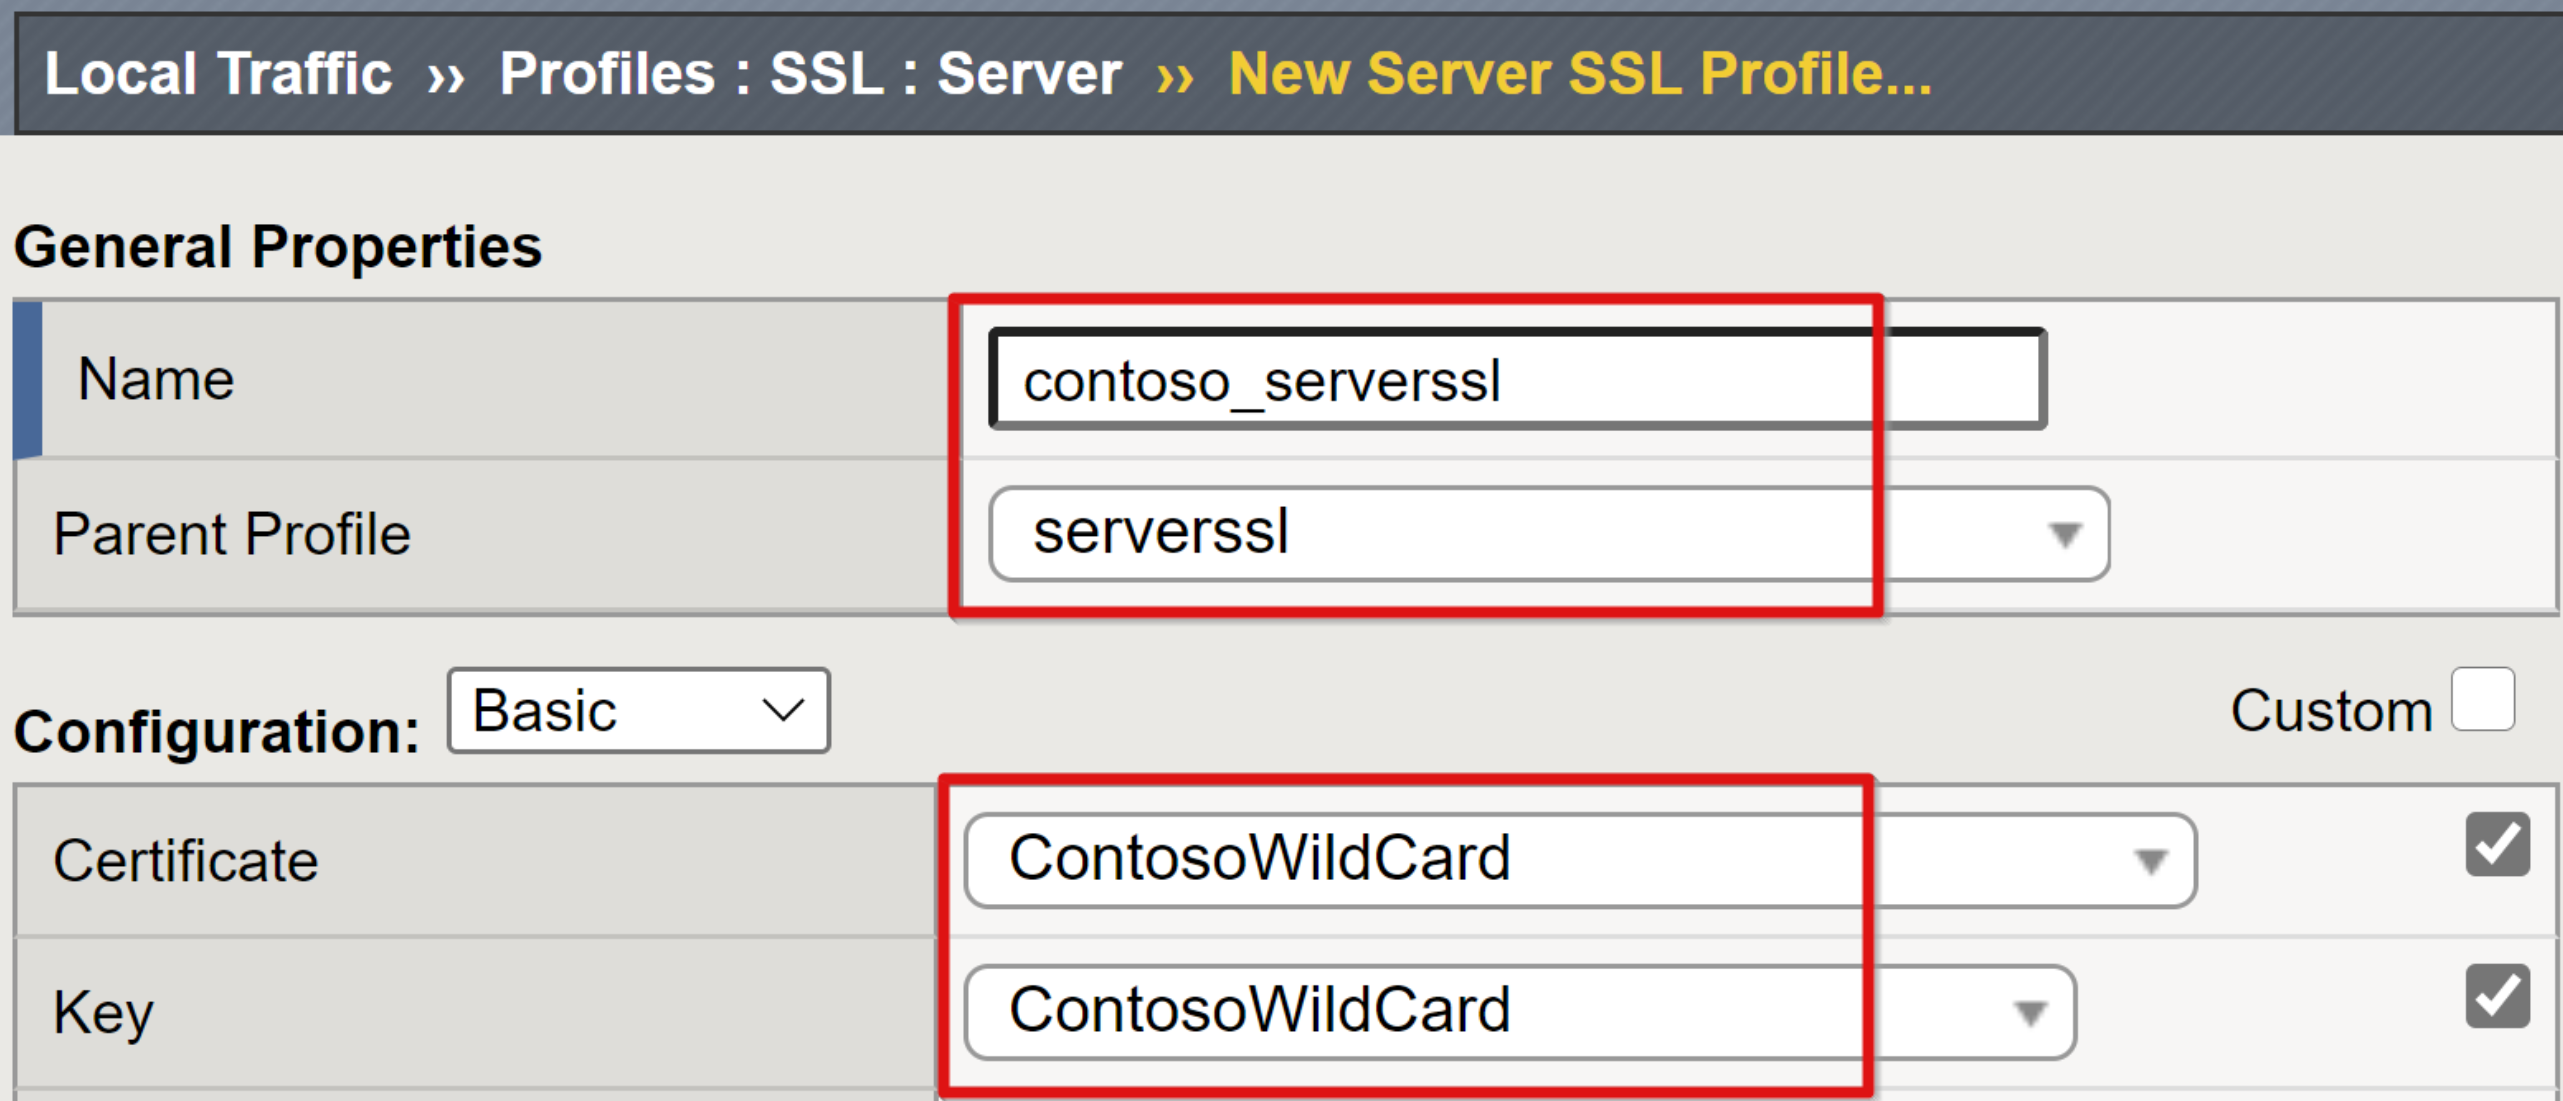
In the New Server SSL Profile page, enter a unique, friendly Name.
Ensure the Parent profile is set to serverssl.
Select the far-right check box for the Certificate and Key rows
From the Certificate and Key drop-down lists, select your imported certificate.
Select Finished.
Note
If you’re unable to procure an SSL certificate, use the integrated self-signed BIG-IP server and client SSL certificates. A certificate error appears in the browser.
Locate the resource
To prepare a BIG-IP for SHA, locate the resources its publishing, and the directory service it relies on for SSO. A BIG-IP has two sources of name resolution, starting with its local/.../hosts file. If a record isn't found, the BIG-IP system uses the DNS service it was configured with. The hosts file method doesn't apply to APM nodes and pools that use an FQDN.
- In the web config, go to System > Configuration > Device > DNS.
- In DNS Lookup Server List, enter the IP address of your environment DNS server.
- Select Add.
- Select Update.
An optional step is an LDAP configuration to authenticate BIG-IP sysadmins against Active Directory, instead of managing local BIG-IP accounts.
Update BIG-IP
See the following list for update-related guidance. Update instructions follow.
- To check the traffic management operating system (TMOS) version:
- On the top-left of the main page, hover your cursor over the BIG-IP hostname
- Run v15.x and above. See, F5 download. Sign-in required.
- To update the main TMOS, see the F5 article, K34745165: Managing software images on the BIG-IP system
- If you can't update the main TMOS, you can upgrade the Guided Configuration. Use the following steps.
- See also, scenario-based guidance
In the BIG-IP web config, on the main tab, go to Access > Guided Configuration.
On the Guided Configuration page, select Upgrade Guided Configuration.
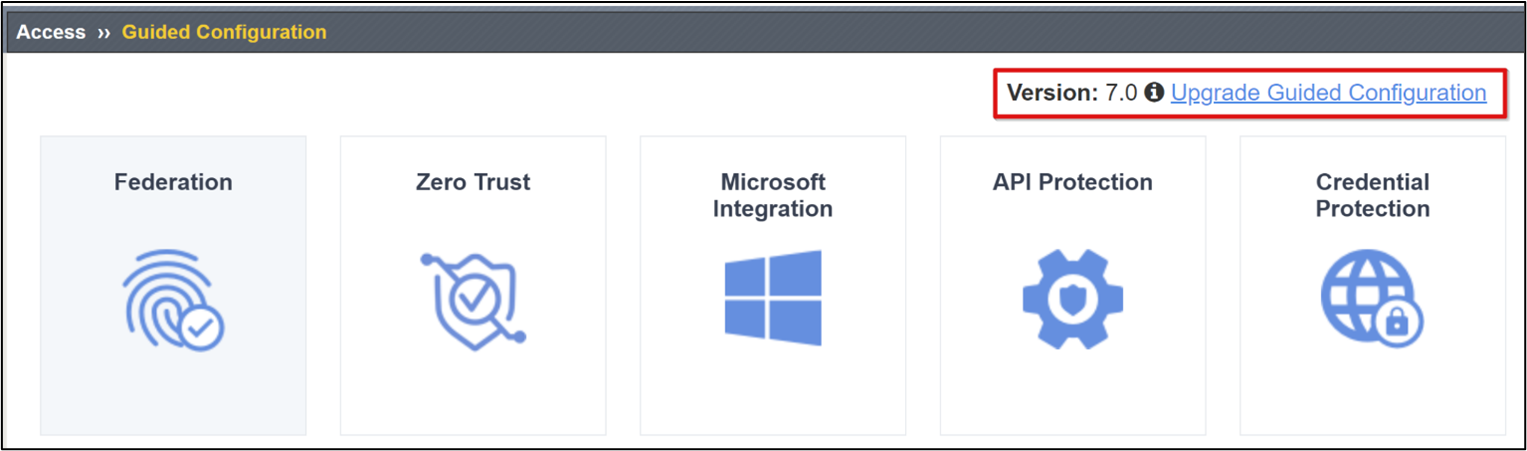
On the Upgrade Guided Configuration dialog, select Choose File.
Select Upload and Install.
Wait for the upgrade to complete.
Select Continue.
Back up BIG-IP
When the BIG-IP system is provisioned, we recommend a full configuration backup.
- Go to System > Archives > Create.
- Provide a unique File Name.
- Enable Encryption with a passphrase.
- Set the Private Keys option to Include to back up device and SSL certificates.
- Select Finished.
- Wait for the process to complete.
- A message appears with results.
- Select OK.
- Select the back-up link.
- Save the user configuration set (UCS) archive locally.
- Select Download.
You can create a backup of the entire system disk using Azure snapshots. This tool provides contingency for testing between TMOS versions, or rolling back to a fresh system.
# Install modules
Install-module Az
Install-module AzureVMSnapshots

# Authenticate to Azure
Connect-azAccount

# Set subscription by Id
Set-AzContext -SubscriptionId ‘<Azure_Subscription_ID>’

#Create Snapshot
New-AzVmSnapshot -ResourceGroupName '<E.g.contoso-RG>' -VmName '<E.g.BIG-IP-VM>'

#List Snapshots
#Get-AzVmSnapshot -ResourceGroupName ‘<E.g.contoso-RG>'

#Get-AzVmSnapshot -ResourceGroupName ‘<E.g.contoso-RG>' -VmName '<E.g.BIG-IP-VM>' | Restore-AzVmSnapshot -RemoveOriginalDisk
Restore BIG-IP
Restoring a BIG-IP is similar to the back-up process and can be used to migrate configs between BIG-IP VMs. Before you import a backup, confirm supported upgrade paths.
- Go to System > Archives.
- Select a backup link, or
- Select Upload and browse to a saved UCS archive not in the list
- Provide the backup passphrase.
- select Restore
# Authenticate to Azure
Connect-azAccount

# Set subscription by Id
Set-AzContext -SubscriptionId ‘<Azure_Subscription_ID>’

#Restore Snapshot
Get-AzVmSnapshot -ResourceGroupName '<E.g.contoso-RG>' -VmName '<E.g.BIG-IP-VM>' | Restore-AzVmSnapshot
Note
Currently, the AzVmSnapshot cmdlet can restore the most recent snapshot, based on date. Snapshots are stored in the VM resource-group root. Restoring snapshots restarts an Azure VM, therefore ensure optimal timing for the task.
Resources
- Reset BIG-IP VE password in Azure
- Reset the password without using the portal
- Change the NIC used for BIG-IP VE management
- About routes in a single NIC configuration
- Microsoft Azure: Waagent
Next steps
Select a deployment scenario and start your implementation.
الملاحظات
قريبًا: خلال عام 2024، سنتخلص تدريجيًا من GitHub Issues بوصفها آلية إرسال ملاحظات للمحتوى ونستبدلها بنظام ملاحظات جديد. لمزيد من المعلومات، راجع https://aka.ms/ContentUserFeedback.
إرسال الملاحظات وعرضها المتعلقة بـ