Security
Safer Authentication with a One-Time Password Solution
Dan Griffin
Code download available at:OTPAuthentication2008_05.exe(496 KB)
This article discusses:
|
This article uses the following technologies: IIS 7.0, SQL Server |
Contents
One-Time Passwords
A Complete OTP Solution
Test OTP Generator Client
The Sample Web Site
The Authentication Web Service
The Complete Architecture
Running the Code Sample
Deployment Considerations
Give It a Try
Passwords can be a big security and manageability headache for enterprise IT administrators. Users often create simple passwords or write their passwords down to make sure that they'll remember them. In addition, there are few secure and efficient procedures for resetting passwords.
Knowing these limitations, how can you mitigate these types of security problems when remote users access your network? Seeing that many users write down their passwords, how would you make your company's password solution more robust? I'll show you how to use standards-based technologies with C# and C to develop a one-time password (OTP) proof of concept. First, though, I want to briefly take a broader look at password-replacement technologies.
There are a few ways that you could go about eliminating standard passwords for your remote users. You could use certificate authorities to issue certificates to your users, but this requires a public key infrastructure (PKI) and is expensive to set up and maintain. It can also be difficult to manage certificates for remote users, especially if you are using a hardware-based token, such as a smart card. This kind of trade-off of high cost for high security is a common theme.
Alternatively, you could use SecureID, which is the one-time password solution from RSA. However, you should note that SecureID is not based on a standard, which can cause incompatibilities and licensing overhead.
A third option is to use a standards-based OTP solution. But what kind of one-time password options are out there, and why is OTP better than traditional passwords anyway? Well, let's see.
One-Time Passwords
A traditional, static password is usually only changed when necessary: either when it has expired or when the user has forgotten it and needs to reset it. Because passwords are cached on computer hard drives and stored on servers, they are susceptible to cracking. This is especially a concern for laptops since they can be easily stolen.
Many businesses give employees laptops and open their networks to remote access. They also hire temporary employees and vendors. In this environment, a simple static password solution can become a liability.
Unlike a static password, a one-time password changes each time the user logs in. The passwords themselves are generated in one of two ways: either as time-synchronized or counter-synchronized. Both approaches typically require the user to carry a small hardware device (often on a key chain) that is synchronized with a server, and both typically use some algorithm to generate the password.
Time-synchronized OTPs are widely deployed but are subject to problems caused by clock skew. That is, if the authentication server and the user token don't keep the same time, then the expected OTP value won't be produced and the user authentication will fail. With time-synchronized OTPs, the user typically must enter the password within a certain period of time before it's considered expired and another one must be generated.
A counter-synchronized OTP solution synchronizes a counter between the client device and the server. The counter is advanced each time an OTP value is requested of the device. Just like with time-synchronized OTPs, when the user wants to log on, he enters the OTP that is currently displayed on the device.
Challenge-based OTPs are a special case and also often use a hardware device. However, the user must provide a known value, such as a personal identification number (PIN), to cause the OTP to be generated. This type of OTP is currently being rolled out in Europe to add authentication to credit and debit cards. The OTP solutions in use today are all built on some sort of cryptographic processing to generate the current password from a synchronization parameter (that is, the time or counter value), a secret key, and possibly a PIN.
For example, hash-based OTPs use cryptographic hashing algorithms to compute the password. As you know, a cryptographic hash is a one-way function that maps an arbitrary length message to a fixed-length digest. Thus, a hash-based OTP starts with the inputs (synchronization parameter, secret key, PIN), runs them through the one-way function, and produces the fixed-length password.
So, which method should you choose? I wanted to know how to do this too, so I created and tested a solution. Next, I'll show you how you can create counter-synchronized OTPs using IIS 7.0 and keyed-hash message authentication, as described in the RFC 2104 and RFC 4426 standards (RFC 2104, "HMAC: Keyed-Hashing for Message Authentication" at www.ietf.org/rfc/rfc2104.txt, and RFC 4226, "HOTP: An HMAC-Based One-Time Password Algorithm" at www.ietf.org/rfc/rfc4226.txt).
Because this is a test deployment, I will use a simple client application to create the OTPs. As mentioned previously, in the real world, you would want to integrate this with a tamper-resistant hardware device. I'll go over the basics of what that would require and point you to some resources to get you started.
A Complete OTP Solution
In order to build my OTP solution, I'll need to create a standards-based OTP authentication Web service that is backed by SQL Server® and integrated into ASP.NET. I'll create an OTP generator that is installed on each client computer, which users will run to generate a new OTP.
The user will type the OTP value when prompted by the Web browser and click Submit to authenticate. The OTP plug-in module is notified by IIS and subsequently calls the Web service to verify authentication attempts. The Web service looks up the user's key and counter value in the SQL Server table, verifies the OTP computation, and responds with authentication success or failure.
Figure 1 shows the architecture of the sample solution. Keep in mind that in a production environment, this architecture should be further hardened against denial of service (DoS) attacks by actions such as configuring a trust relationship between the client and server and throttling invalid logon attempts.
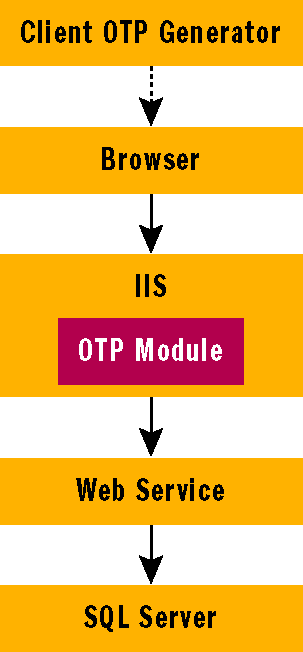
Figure 1** One-Time Password Solution Components **
The sample code that accompanies this article, in the download section of the MSDN® Magazine Web site, consists of a Visual Studio® 2005 solution that includes a C++ DLL to generate the OTP (HmacOtpDll). Because this DLL is used by the OtpClient and the Web service, I put it into the system32 folder. (I use a post-build event to automatically copy it there.) The sample also includes a console application called OtpClient that generates the OTP value. OtpClient uses an XML file to store the secret code and counter. Every time the application is rebuilt, it copies the XML from the project root to the target directory, causing the counter to reset to 0.
An IIS module called IIS7Module provides OTP authentication services, and a Web service (called WebService) is used by the module to verify the OTP value. The Web service contains a SQL Server Express database, which is located in App_Data. Finally, I've included Web pages in the TestWebsite project, which I use for testing the solution.
Test OTP Generator Client
The test OTP generator client application is a self-contained tool that allows users to obtain OTP authentication values. It takes the place of a hardware device plus the challenge (such as a PIN request) that would typically be required in a real deployment. To compute OTPs, this client component uses a DLL that is shared with the authentication Web service. For the purpose of this sample application, the user will run the tool to create the next OTP and then manually type that value into a form in a Web browser. I'll do all of this using C# and some C. (I chose C for the low-level implementation of the OTP cryptography.)
You've seen how OTPs work at a user level, but how does this solution work at a functional level? This hash-based OTP solution takes two values as input: a key and a count. However, an OTP solution also has metadata relevant to the implementer, including the length of the key and the length of the expected OTP value that the user will have to type in when authenticating.
My sample produces OTPs that are six characters in length and can support up to eight characters. For the sake of simplicity, this implementation uses some fixed-length buffers that limit the key length to 64 bytes. However, assuming that the key is a high-quality, cryptographically random number, that's a huge key space. Such a key would not be the weak link in a production deployment. (A typical size for a random key today is 256 bits, or 32 bytes.)
The count value increments each time an authentication attempt is made by a given user (or technically, with a given key). The security of the OTP solution depends upon the count value never being reused; this is enforced by the OTP server. In this implementation, the count is a 64-bit unsigned integer. As I discussed earlier, another way to deploy this would be to use time synchronization with a server.
A keyed hash message authentication code (HMAC) is a key-based cryptographic hash. Or to put it another way, an HMAC takes an arbitrary message and a key and maps the message to a fixed-size digest value (20 bytes, for example), ensuring that only someone with the same key can produce the same digest value from the same message.
The first computational step for HMAC-OTP is to take the count value and encode it as the input message for an HMAC computation. In this implementation, the message is an 8-byte buffer set to the counter value. Figure 2 depicts this and the following two steps.The next computational step is to compute the HMAC of the above message with the user's key. Note that I addressed byte ordering in this implementation in order ensure that it is compliant with the RFCs.
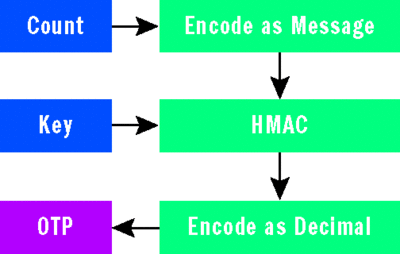
Figure 2** One-Time Password Flow **
The 20-byte HMAC result is then turned into the OTP value, which is accomplished by making a decimal encoding of the HMAC result. There are two practical requirements here: first, I need to preserve as many bits of the HMAC computation as possible, up to the length of the OTP result (six numbers in this case), since losing bits exposes the computation to cryptographic attack. Second, I need to create an OTP that is compatible with as many varieties of input devices as possible. This compatibility requirement is why I implement decimal encoding. (This strong-authentication implementation is even compatible with a rotary phone!)
The Sample Web Site
My goal is to ensure that I have designed the site properly to show whether users have successfully or unsuccessfully logged in using OTPs. In order to facilitate testing, the OTP solution includes a sample Web site. The first page in the site is Default.htm, a landing page for authenticated users that demonstrates how even non-ASP.NET pages are protected by the OTP module. Test.aspx, a file that shows the currently authenticated user name, is also included, as is Test.aspx.cs, the file that shows how the Test.aspx page retrieves the authenticated user name from the System.Web.UI.Page.User property. Also included in the solution are a web.config file that includes a reference to OtpModule and a Visual Studio project solution with a reference to the IISModule.dll file.
The IIS HTTP OTP plug-in module is a component of the Web site. The module interfaces with IIS and redirects users to a Web form where they can enter their user names and OTPs. When a user submits a user name and OTP, the module validates the input and redirects the user to the appropriate success or failure page. The module also pairs the authentication status of the user with the user's session.
For maintainability and supportability, I wanted the module to be managed, so I wrote it in C#. The plug-in module is a client of the authentication Web service, which I discuss next.
The OTP module implements the IHttpModule interface. In fact, the module is remarkably simple and consists of only three public methods. The first is Init, as shown here:
public void Init(HttpApplication application)
{
  application.BeginRequest += new EventHandler(application_BeginRequest);
}
As you can see, the module uses this method to register its BeginRequest handler, application_BeginRequest. The purpose of the OTP BeginRequest handler is to ensure that all HTTP requests are made by an authenticated user. This is accomplished by using a few helper functions: one to determine whether the caller is authenticated and a few others to perform the authentication if the caller is not already authenticated. It is also worth mentioning here that intercepting the request during the BeginRequest event does not follow the standard authentication pattern used by ASP.NET applications. This approach is recommended, however, if you don't want other modules to see the request, even those that, by design, want to intercept requests prior to authentication.
The IsAuthenticated helper function determines if the request indicates an authenticated user. This is done by checking the application context for a properly encrypted authentication cookie using the classes HttpContext, HttpCookie, and Security.FormsAuthenticationTicket within the System.Web namespace. If the cookie is present and decrypts without error, the caller is deemed to be authenticated. Otherwise, there are two possible states: either this is an OTP authentication request that should be processed, or the Web client request is invalid (unauthenticated) and a login form is displayed.
The OTP module includes a built-in login form known as LoginPage.htm. It consists of five HTML elements: an initially empty error message field, a user name field, a password field, a submit button, and a hidden input field named hdLoginForm.
If the caller is already authenticated, the module takes no further action. Accordingly, the request continues to process. In this demonstration, the Default.htm page is loaded.
If the caller isn't authenticated, the IsAuthenticationPost helper function is called. It checks whether the request type is POST and if the request form has the hdLoginForm input field. The method returns true if both conditions are confirmed.
If the request is an authentication request, the TryAuthenticate helper function is called. The user name and OTP values are retrieved from the request context and passed to the authentication Web service's VerifyOtpCode method. If the verification is successful, a new encrypted authentication cookie is attached to the response. The response is then redirected to the default page (Default.htm). One way to extend this demo would be to save the original page requested by the user and redirect the user to that page following a successful authentication.
If the VerifyOtpCode Web service call fails, the request is redirected back to the login form, which now displays an error message, and the helper function ShowLoginForm is called. The helper function loads the login page from the resource section of the module, sets the error message string in the page (if appropriate), and sets the login page as the response to the current request. It then signals the request as complete (this happens regardless of the nature of the request).
The Authentication Web Service
The authentication Web service is responsible for performing the actual OTP authentication by determining whether the provided OTP value demonstrates that the named user has knowledge of the secret key.
The implementation of the OTP authentication Web service is quite simple since it reuses the low-level cryptographic library, which implements the OTP computation discussed in the earlier section on the test OTP generator client. This reuse comes in the form of a P/Invoke call to the GenerateOTP export of the native HmacOtpDll.dll.
The Web service exposes a single Web method, VerifyOtpCode, which returns true for a successful authentication. The first step in that method is to load the SQL Server row corresponding to the user name indicated in the authentication request. If SQL Server cannot find a matching row, the method returns false.
If the user name is found in the SQL Server database, the following data items are passed to the native GenerateOTP: the OTP value that is specified in the request, the secret key for the user (retrieved from SQL Server), and a counter value (also retrieved from SQL Server).
GenerateOTP is retried with sequential counter values until either it returns a matching OTP value or until at most 1,000 sequential counter values have been checked. That allows for the user to have accidentally advanced the client counter offline, although that's admittedly unlikely to have happened a thousand times since the last successful authentication!
Reducing this range would also reduce the already unlikely chance that an attacker might actually guess an OTP value that happens to be in the sequence, but it increases the possibility that the user may accidentally advance the client counter beyond the range attempted by the server. In the latter case, administrator intervention would be required in order for the user to be able to authenticate again.
If a matching OTP value is found within the counter range, the new counter value is written back to the database. While that unfortunately requires the authentication Web service to have write access to the database, it's also critical to the security of the OTP since, as I described previously, a counter value must never be reused. (For a one-time password to be unique, it really must only be used one time.)
A SQL Server database with a simple schema is used to store user names and their corresponding OTP secret key or seed value. You can also extend the schema to include logging information, such as the number and times of successful and unsuccessful logons using an OTP. The database consists of the Username, SecretCode, and Counter columns. For an explanation of each of these elements, see the Authentication Web service section. The copy of the database that accompanies the sample code has only one row for the user name "testuser."
The Complete Architecture
Figure 3 shows what the solution looks like when it's complete. As you can see in the figure, the user launches the client application, generates an OTP, then navigates to the authentication Web application, and pastes the OTP into the Web browser form. The form is generated by the OTP module when it detects that the request isn't authenticated. When the user clicks Submit, the Web browser form sends the request to the server where it's again intercepted by the OTP module. Next, the OTP module calls the OTP Web service to verify the user authentication data. Finally, if successful, the Web server calls the handler for the requested page, which could be of any type (HTML, ASP.NET, PHP, and so on).
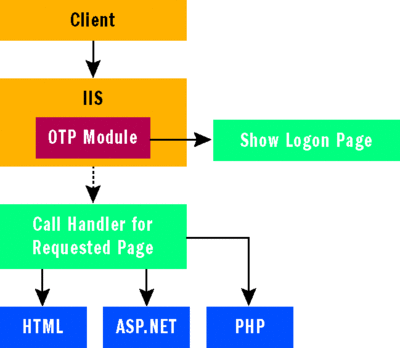
Figure 3** Detailed OTP Solution Architecture **
Running the Code Sample
To run the code sample, you'll need Windows Vista® or Windows Server® 2008 with IIS 7.0 (with the Application Server role enabled for Windows Server 2008), Visual Studio 2005, SQL Server 2005 or SQL Server Express, and the OTP sample code. For experimenting with the demo, I recommend using Windows Server 2008 and SQL Server Express, since that's what I used. In the following description, I will assume that the OTP sample code solution file is located at C:\Test\OTP\Otp.sln.
To prepare your environment, install the IIS module using either the IIS Manager or by editing the web.config file. Enable read and write access to C:\Test\OTP\webservice\app_data for either the IIS_IUSRS account or the account configured as the identity for a custom application pool. Then add a Web site for OtpTest and OtpService.
Registering the IIS module using the web.config file (this step has already been completed in the sample—see TestWebsite\Web.Config) requires the following configuration markup:
<system.webServer>
   modules>
    <add name="OtpModule" type="OtpModule" />
  </modules>
</system.webServer>
You should also add the module DLL to the bin folder or the global assembly cache (GAC). To register the OTP module DLL with the GAC, use a command such as the following:
gacutil.exe /i iis7module.dll
To use IIS Manager, open it and click on the name of your computer in the console tree. In the middle pane, double-click the Modules icon, and then click Add Managed Module in the actions pane. Next, select OtpModule from the dropdown listbox. If you put the DLL into the GAC and you're using IIS Manager to add the module, then you might need to restart IIS in order to refresh the modules list.
In order to properly increment the number-of-attempts value in SQL Server Express, the NETWORK SERVICE account requires read and write access to the C:\Test\Otp\WebService\App_Data directory. The required permissions for this object are read and execute, list folder contents, read, and write, as you see in Figure 4.
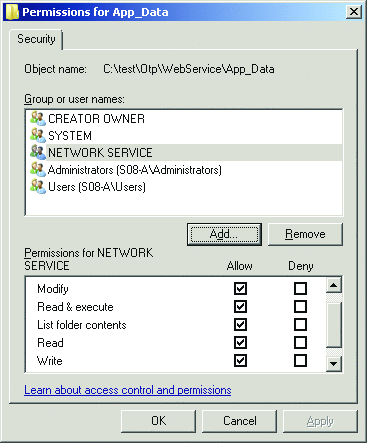
Figure 4** Required Permissions for the App_Data Directory **
You must also set up a site in IIS for the test Web site. To do this, open the IIS Manager console, and in the ISS Manager console tree, expand the node with your computer's name, right-click Sites, and click Add Web Site. Use the following settings for your new site, and then click OK (Figure 5 shows these settings):
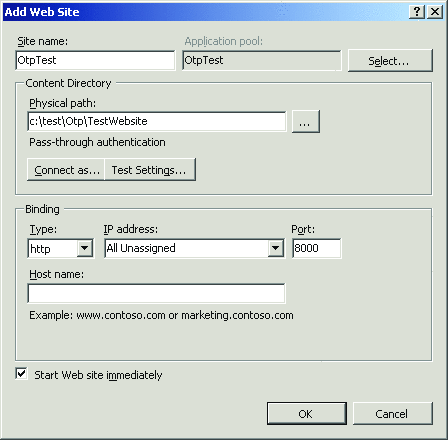
Figure 5** OtpTest Web Site Settings **
- Site name: OtpTest
- Physical path: C:\test\Otp\TestWebsite
- Port: 8000
You must also create a site for the Web service. Use the following settings for this site: site name should be OtpService, physical path should be C:\Test\Otp\WebService, and the port should be 8080.
Next, open the Otp.sln solution in Visual Studio, expand IIS7Module in the solution explorer, expand Web References, right-click OtpService, click Properties, and confirm that the Web Reference URL is set to https://localhost:8080/service.asmx. In the Build menu, click Build Solution and confirm that no build errors have occurred.
Now, you should test to ensure that the OTP module has been properly registered and loads correctly. To do so, navigate to https://localhost:8000 and verify that you see a page that looks like the logon page in Figure 6. To test the implementation, type in the test user name of testuser.
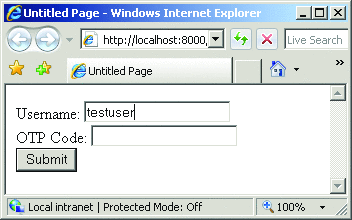
Figure 6** First Page of Test Web Site **
To get the value for the OTP Code textbox, open a Command Prompt Window as an administrator and navigate to the build directory of the OTP client program (C:\Test\Otp\otpclient\bin\debug). Run OtpClient.exe to get the next OTP value. You should get something like Figure 7.
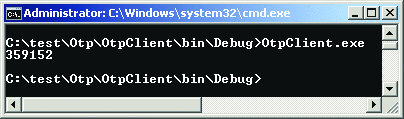
Figure 7** Running OtpClient.exe to Get OTP Value **
Type the OTP value into the OTP Code textbox, and then click Submit. Figure 8 shows the sample OTP code in the page. If the authentication is successful, you should be directed to the Default.htm page.
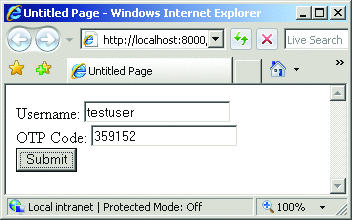
Figure 8** Test Page with Sample OTP Value **
Click the Text.aspx link on the default page to go to a demo page, which displays the name of the currently authenticated user (if any). If the authentication credentials were incorrect, you should see the page shown in Figure 9.
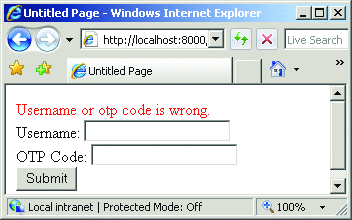
Figure 9** Authentication was Unsuccessful **
Deployment Considerations
If you were to deploy this sample solution in a real-world environment, there are a number of items that you would want to consider. Real deployments store the user key/seed in a tamper-resistant device, such as hardware tokens. I would recommend that you modify the solution to lock the account in response to too many consecutive failed authentication attempts. You can do this by adding SQL Server columns and a feature to the Web service.
If interoperability is a concern, I recommend that you perform interoperability testing on the low-level HMAC code. Also realize that the MD5 hash algorithm is no longer considered secure. I used it in this sample solution in order to run some basic Known-Vector Tests with what's available in the RFC documents. But a deployable solution should use one of the SHA-2 algorithms to create the hashes.
When developing more user-friendly authentication pages, be sure not to distinguish between bad user name and bad password. Otherwise, you're letting attackers learn valid user names. You'll also need some sort of provisioning solution for adding and removing users or perhaps synchronizing the authentication database with another repository such as Active Directory®.
If you are just targeting ASP.NET, the module could have been implemented as a standard ASP.NET HTTP module. However, such a solution would only secure .aspx files. Note that the IHttpModule interface is the same whether you are configuring it with the ASP.NET runtime or IIS 7.0, so if an original solution was an ASP.NET-specific module, then enabling it to support all file types is a simple change in configuration.
I used Visual Studio for editing the database, a cool feature of the IDE of which I had not previously been aware. To edit the database, go to the Solution Explorer tree view, expand WebService, expand App_Data, and select the Open option from the context menu. In the Server Explorer panel that appears, expand Data Connections, expand otp.mdf, expand Tables, right-click Users, and then click Show Table Data. Figure 10 shows the table data in the Visual Studio IDE. Just be sure not to leave the database open in the IDE when testing; the Web service won't be able to open it and, thus, the authentication will fail.
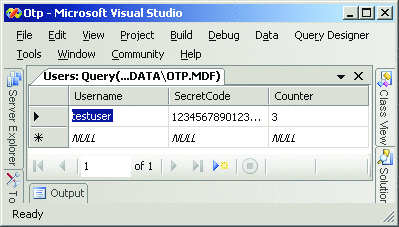
Figure 10** One-Time Password Solution Components **
Give It a Try
One-time passwords are an excellent alternative to standard passwords. Because users do silly things with their passwords, such as writing them down and falling victim to phishing attacks, you must strengthen the authentication process. Using the IIS 7.0 plug-in module model, you can create a standards-based OTP solution and more robust, production-ready OTP solutions using hardware tokens and challenges.
You should follow the sample here and give it a try for yourself. Since many employers, as well as consumer-facing interfaces such as online banking, are adapting OTP, you should familiarize yourself with the technology.
For further reading, see Mike Volodarsky's January 2008 MSDN Magazine article called "IIS 7.0: Enhance Your Apps with the Integrated ASP.NET Pipeline" at msdn.microsoft.com/msdnmag/issues/08/01/PHPandIIS7. This article will provide some helpful background information.
Dan Griffin is a software security consultant in Seattle, Wash. He previously spent seven years at Microsoft on the Windows Security development team. Dan can be contacted at www.jwsecure.com.