Configure Durable Functions with Microsoft Entra ID
Microsoft Entra ID (Microsoft Entra ID) is a cloud-based identity and access management service. Identity-based connections allow Durable Functions to make authorized requests against Microsoft Entra protected resources, like an Azure Storage account, without the need to manage secrets manually. Using the default Azure storage provider, Durable Functions needs to authenticate against an Azure storage account. In this article, we show how to configure a Durable Functions app to utilize two kinds of Identity-based connections: managed identity credentials and client secret credentials.
Configure your app to use managed identity (recommended)
A managed identity allows your app to easily access other Microsoft Entra protected resources such as Azure Key Vault. Managed identity is supported in Durable Functions extension versions 2.7.0 and greater.
Note
Strictly speaking, a managed identity is only available to apps when executing on Azure. When configured to use identity-based connections, a locally executing app will utilize your developer credentials to authenticate with Azure resources. Then, when deployed on Azure, it will utilize your managed identity configuration instead.
Prerequisites
The following steps assume that you're starting with an existing Durable Functions app and are familiar with how to operate it. In particular, this quickstart assumes that you have already:
- Created a Durable Functions project in the Azure portal or deployed a local Durable Functions to Azure.
If this isn't the case, we suggest you start with one of the following articles, which provides detailed instructions on how to achieve all the requirements above:
- Create your first durable function - C#
- Create your first durable function - JavaScript
- Create your first durable function - Python
- Create your first durable function - PowerShell
- Create your first durable function - Java
Enable managed identity
Only one identity is needed for your function, either a system assigned managed identity or a user assigned managed identity. To enable a managed identity for your function and learn more about the differences between the two identities, read the detailed instructions here.
Assign Role-based Access Controls (RBAC) to managed identity
Navigate to your app's storage resource on the Azure portal. Follow these instructions to assign the following roles to your managed identity resource.
- Storage Queue Data Contributor
- Storage Blob Data Contributor
- Storage Table Data Contributor
Add managed identity configuration in the Azure portal
Navigate to your Azure function app’s Configuration page and perform the following changes:
- Remove the default value "AzureWebJobsStorage".

Link your Azure storage account by adding either one of the following value settings:
AzureWebJobsStorage__accountName: For example:
mystorageaccount123AzureWebJobsStorage__blobServiceUri: Example:
https://mystorageaccount123.blob.core.windows.net/AzureWebJobsStorage__queueServiceUri: Example:
https://mystorageaccount123.queue.core.windows.net/AzureWebJobsStorage__tableServiceUri: Example:
https://mystorageaccount123.table.core.windows.net/Note
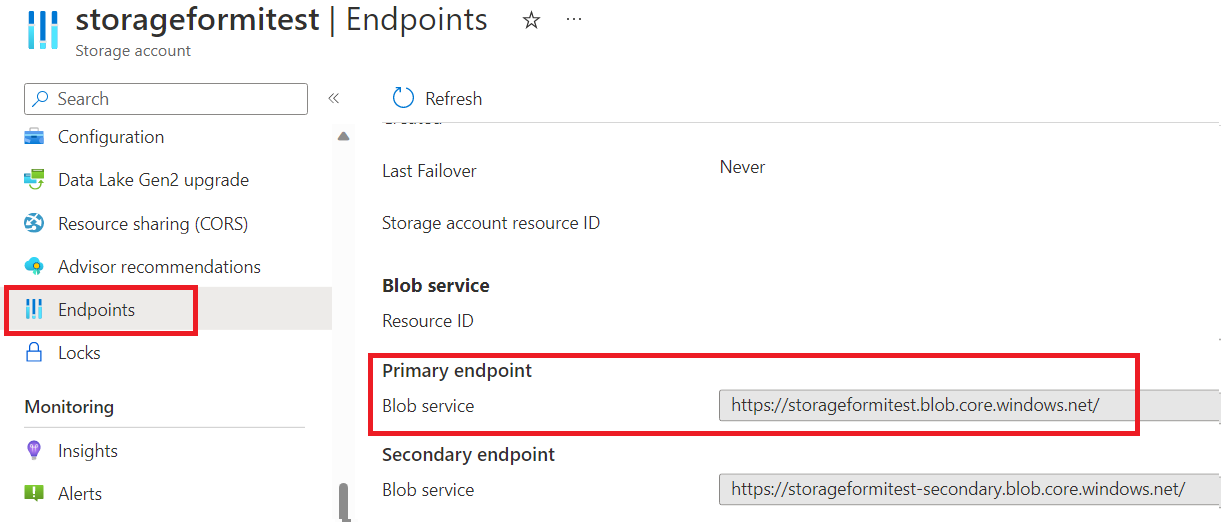
If you are using Azure Government or any other cloud that's separate from global Azure, then you will need to use this second option to provide specific service URLs. The values for these settings can be found in the storage account under the Endpoints tab. For more information on using Azure Storage with Azure Government, see the Develop with Storage API on Azure Government documentation.
Finalize your managed identity configuration:
If system-assigned identity should be used, then specify nothing else.
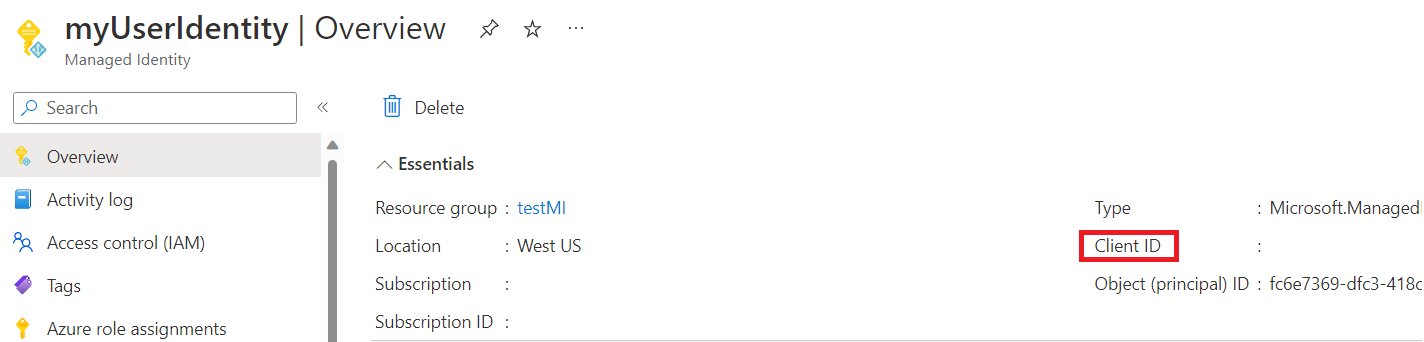
If user-assigned identity should be used, then add the following app settings values in your app configuration:
AzureWebJobsStorage__credential: managedidentity
AzureWebJobsStorage__clientId: (This is a GUID value that you obtain from the Microsoft Entra admin center)
Configure your app to use client secret credentials
Registering a client application in Microsoft Entra ID is another way you can configure access to an Azure service. In the following steps, you will learn how to use client secret credentials for authentication to your Azure Storage account. This method can be used by function apps both locally and on Azure. However, client secret credential is less recommended than managed identity as it's more complicated to configure and manage and it requires sharing a secret credential with the Azure Functions service.
Prerequisites
The following steps assume that you're starting with an existing Durable Functions app and are familiar with how to operate it. In particular, this quickstart assumes that you have already:
- Created a Durable Functions project on your local machine or in the Azure portal.
Register a client application on Microsoft Entra ID
Register a client application under Microsoft Entra ID in the Azure portal according to these instructions.
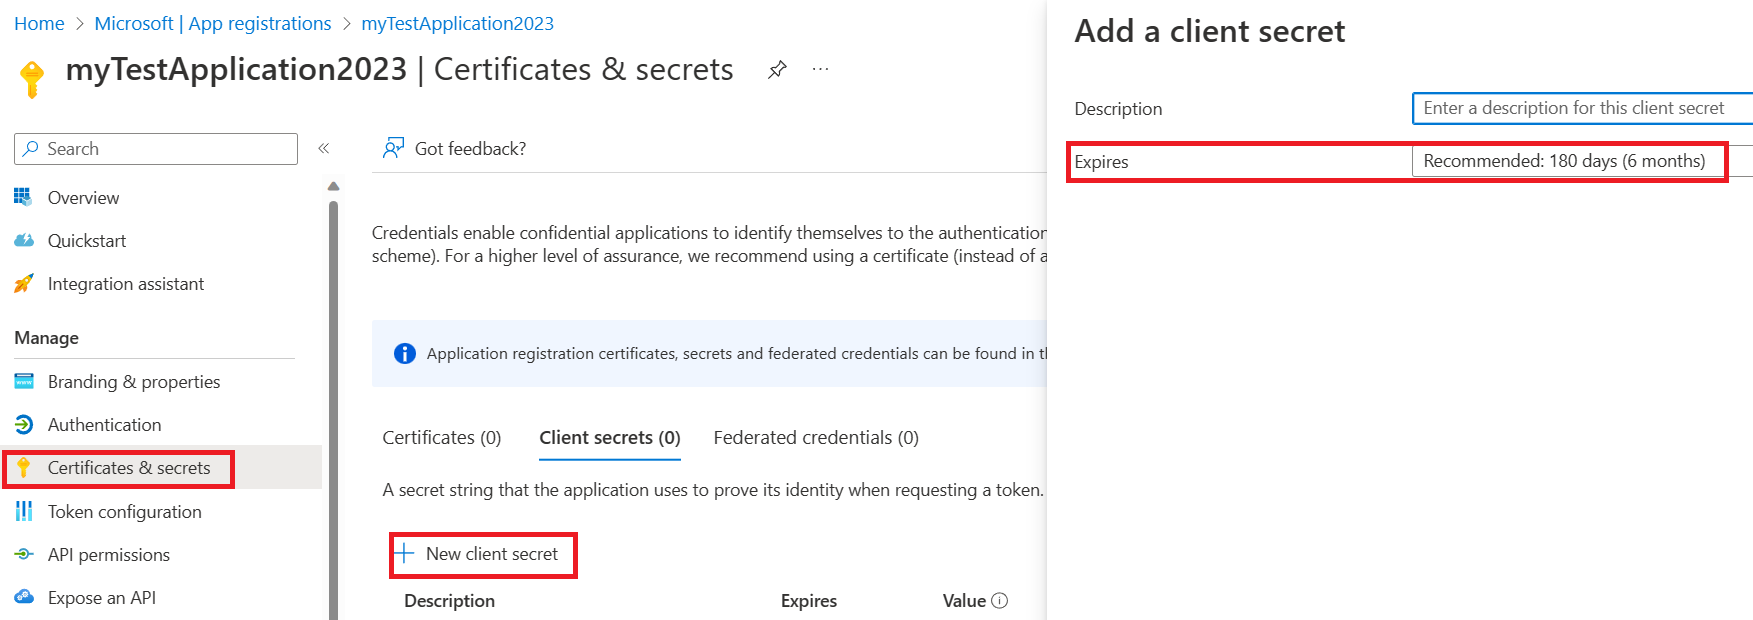
Create a client secret for your client application. In your registered application:
Select Certificates & Secrets and select New client secret.
Fill in a Description and choose secret valid time in the Expires field.
Copy and save the secret value carefully because it will not show up again after you leave the page.
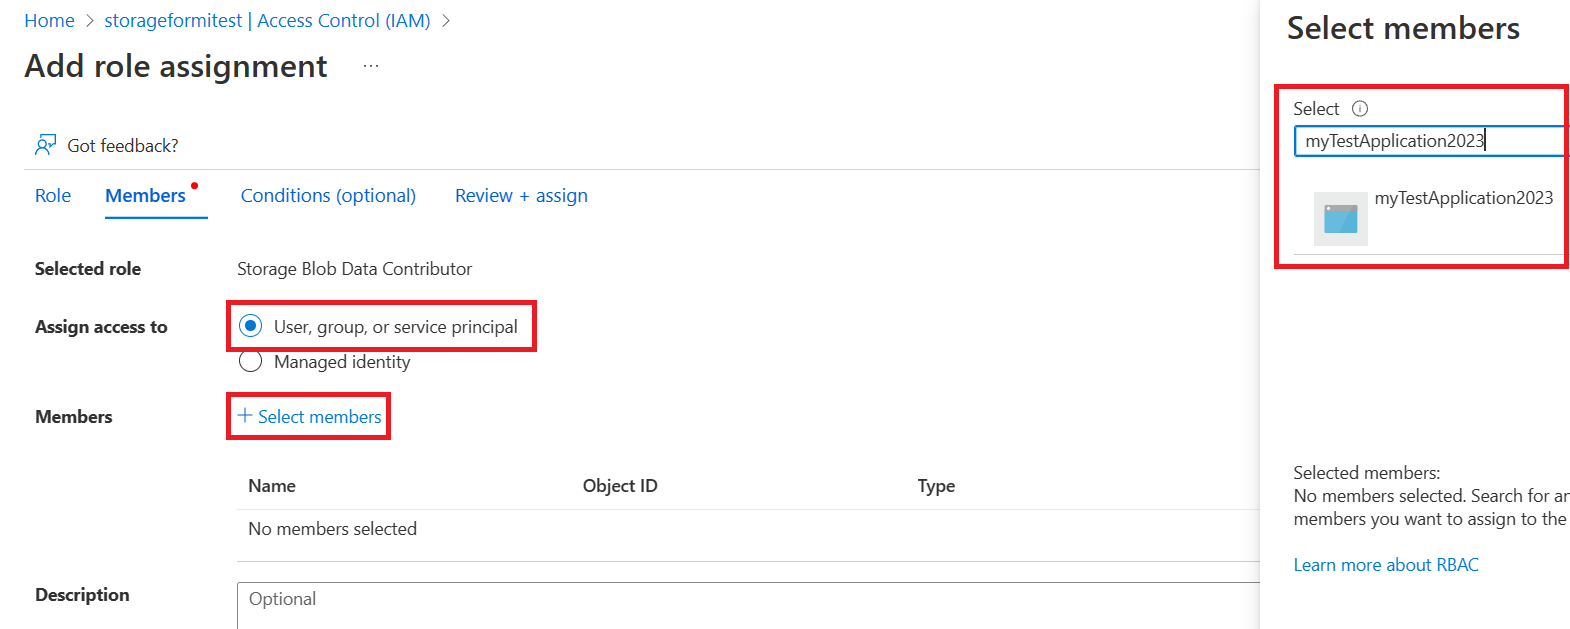
Assign Role-based Access Controls (RBAC) to the client application
Assign these three roles to your client application with the following steps.
- Storage Queue Data Contributor
- Storage Blob Data Contributor
- Storage Table Data Contributor
Navigate to your function’s storage account Access Control (IAM) page and add a new role assignment.
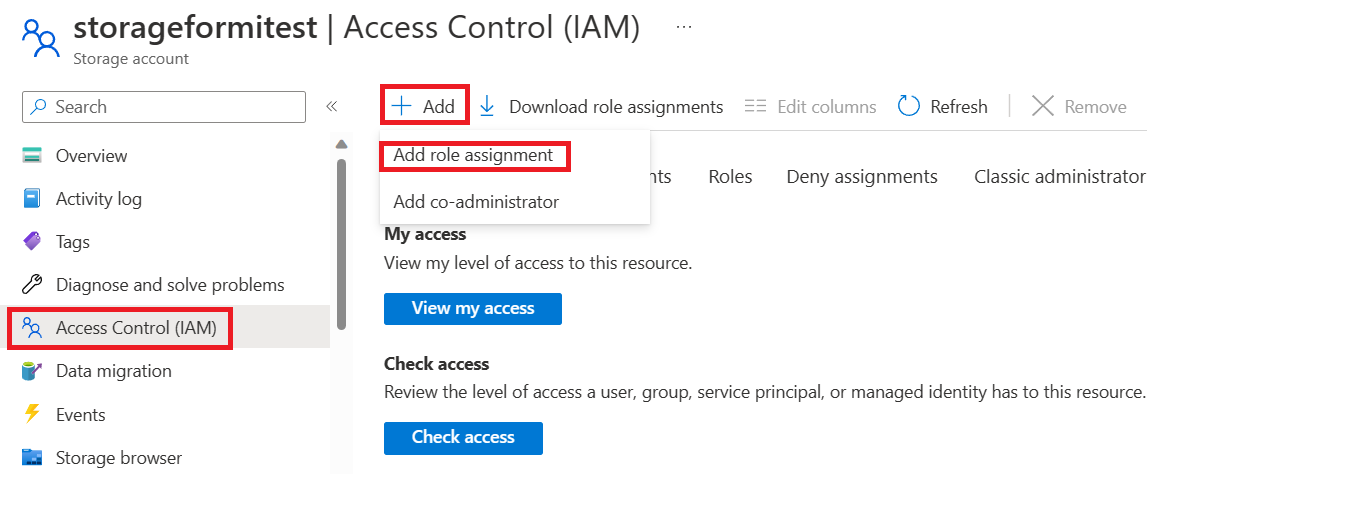
Choose the required role, click next, then search for your application, review and add.
Add client secret configuration
To run and test in Azure, specify the followings in your Azure function app’s Configuration page in the Azure portal. To run and test locally, specify the following in the function’s local.settings.json file.
Remove the default value "AzureWebJobsStorage".
Link Azure storage account by adding either one of the following value settings:
AzureWebJobsStorage__accountName: For example:
mystorageaccount123AzureWebJobsStorage__blobServiceUri: Example:
https://mystorageaccount123.blob.core.windows.net/AzureWebJobsStorage__queueServiceUri: Example:
https://mystorageaccount123.queue.core.windows.net/AzureWebJobsStorage__tableServiceUri: Example:
https://mystorageaccount123.table.core.windows.net/
The values for these Uri variables can be found in the storage account under the Endpoints tab.
Add a client secret credential by specifying the following values:
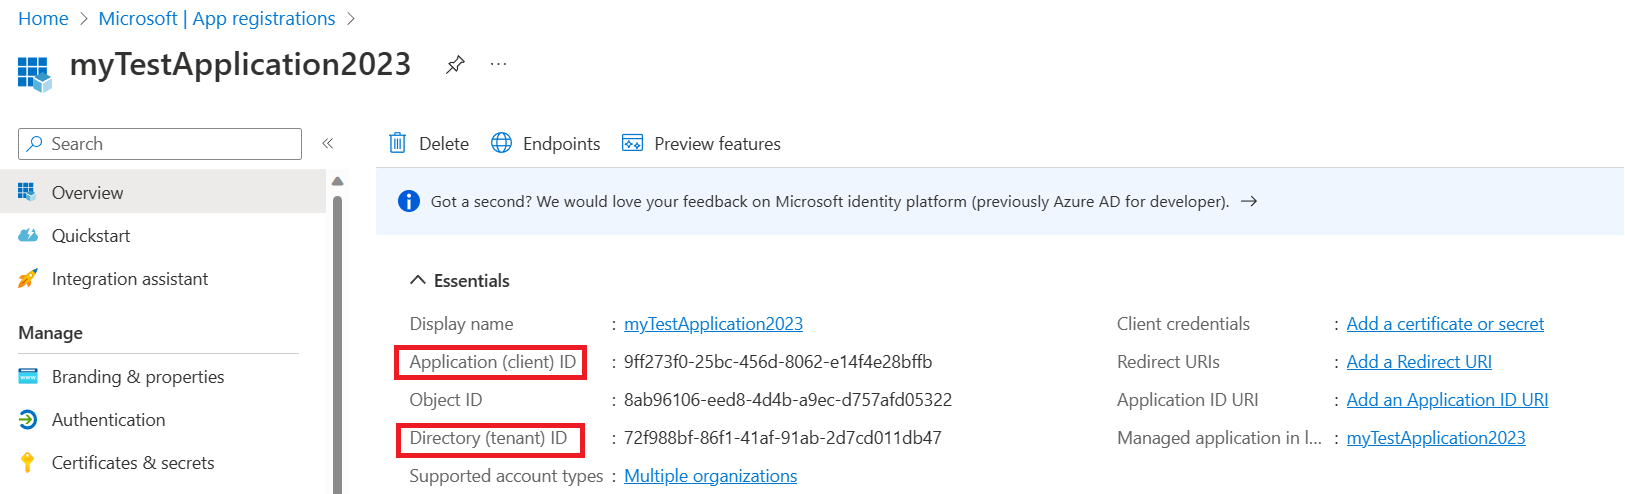
AzureWebJobsStorage__clientId: (this is a GUID value found in the Microsoft Entra application page)
AzureWebJobsStorage__ClientSecret: (this is the secret value generated in the Microsoft Entra admin center in a previous step)
AzureWebJobsStorage__tenantId: (this is the tenant ID that the Microsoft Entra application is registered in)
The client ID and tenant ID values can be found on your client application’s overview page. The client secret value is the one that was carefully saved in the previous step. It will not be available after the page is refreshed.
Feedback
Coming soon: Throughout 2024 we will be phasing out GitHub Issues as the feedback mechanism for content and replacing it with a new feedback system. For more information see: https://aka.ms/ContentUserFeedback.
Submit and view feedback for