In this article, you learn how to create a custom IPv4 address prefix using the Azure portal. You prepare a range to provision, provision the range for IP allocation, and enable the range advertisement by Microsoft.
A custom IPv4 address prefix enables you to bring your own IPv4 ranges to Microsoft and associate it to your Azure subscription. You maintain ownership of the range while Microsoft would be permitted to advertise it to the Internet. A custom IP address prefix functions as a regional resource that represents a contiguous block of customer owned IP addresses.
For this article, choose between the Azure portal, Azure CLI, or PowerShell to create a custom IPv4 address prefix.
Before onboarding your range to Azure, you need to decide on the model that would work best for your architecture. For BYOIPv4, Azure offers two deployment models: "global/regional" and "unified".
To utilize the Azure BYOIP feature, you must perform the following steps before the provisioning of your IPv4 address range.
To authorize Microsoft to associate a prefix with a customer subscription, a public certificate must be compared against a signed message.
The following steps show the steps required to prepare sample customer range (1.2.3.0/24) for provisioning to the Public cloud. You can execute these commands with Windows PowerShell or in a Linux Console. Both require OpenSSL to be installed.
The following steps display the procedure for provisioning and commissioning a custom IPv4 address prefix with a choice of two models: Unified and Global/Regional. The steps can be performed with the Azure portal, Azure CLI, or Azure PowerShell.
The following steps display the procedure for provisioning a sample customer range (1.2.3.0/24) to the US West 2 region.
Note
Clean up or delete steps aren't shown on this page given the nature of the resource. For information on removing a provisioned custom IP prefix, see Manage custom IP prefix.
Sign in to Azure
Sign in to the Azure portal.
Create and provision a unified custom IP address prefix
In the search box at the top of the portal, enter Custom IP.
In the search results, select Custom IP Prefixes.
Select + Create.
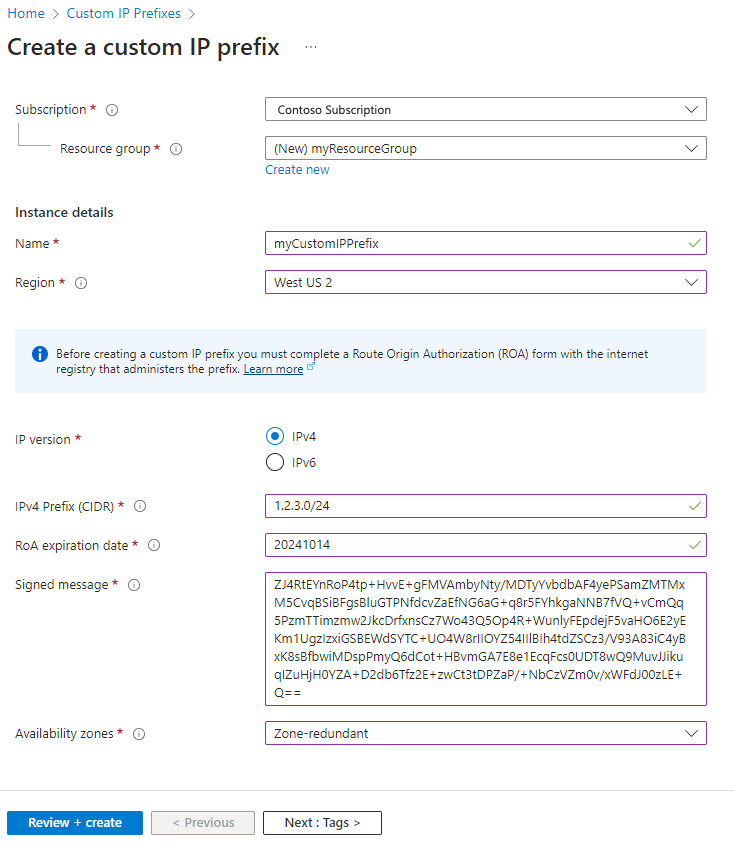
In Create a custom IP prefix, enter or select the following information:
| Setting |
Value |
| Project details |
|
| Subscription |
Select your subscription |
| Resource group |
Select Create new.
Enter myResourceGroup.
Select OK. |
| Instance details |
|
| Name |
Enter myCustomIPPrefix. |
| Region |
Select West US 2. |
| IP Version |
Select IPv4. |
| IPv4 Prefix (CIDR) |
Enter 1.2.3.0/24. |
| ROA expiration date |
Enter your ROA expiration date in the yyyymmdd format. |
| Signed message |
Paste in the output of $byoipauthsigned from the pre-provisioning section. |
| Availability Zones |
Select Zone-redundant. |
Select the Review + create tab or the blue Review + create button at the bottom of the page.
Select Create.
The range is pushed to the Azure IP Deployment Pipeline. The deployment process is asynchronous. You can check the status by reviewing the Commissioned state field for the custom IP prefix.
Note
The estimated time to complete the provisioning process is 30 minutes.
Important
After the custom IP prefix is in a "Provisioned" state, a child public IP prefix can be created. These public IP prefixes and any public IP addresses can be attached to networking resources. For example, virtual machine network interfaces or load balancer front ends. The IPs won't be advertised and therefore won't be reachable. For more information on a migration of an active prefix, see Manage a custom IP prefix.
Create a public IP prefix from unified custom IP prefix
When you create a prefix, you must create static IP addresses from the prefix. In this section, you create a static IP address from the prefix you created earlier.
In the search box at the top of the portal, enter Custom IP.
In the search results, select Custom IP Prefixes.
In Custom IP Prefixes, select myCustomIPPrefix.
In Overview of myCustomIPPrefix, select + Add a public IP prefix.
Enter or select the following information in the Basics tab of Create a public IP prefix.
| Setting |
Value |
| Project details |
|
| Subscription |
Select your subscription. |
| Resource group |
Select myResourceGroup. |
| Instance details |
|
| Name |
Enter myPublicIPPrefix. |
| Region |
Select West US 2. The region of the public IP prefix must match the region of the custom IP prefix. |
| IP version |
Select IPv4. |
| Prefix ownership |
Select Custom prefix. |
| Custom IP prefix |
Select myCustomIPPrefix. |
| Prefix size |
Select a prefix size. The size can be as large as the custom IP prefix. |
Select Review + create, and then Create on the following page.
Repeat steps 1-3 to return to the Overview page for myCustomIPPrefix. You see myPublicIPPrefix listed under the Associated public IP prefixes section. You can now allocate standard SKU public IP addresses from this prefix. For more information, see Create a static public IP address from a prefix.
Commission the unified custom IP address prefix
When the custom IP prefix is in Provisioned state, update the prefix to begin the process of advertising the range from Azure.
In the search box at the top of the portal, enter Custom IP and select Custom IP Prefixes.
Verify, and wait if necessary, for myCustomIPPrefix to be is listed in a Provisioned state.
In Custom IP Prefixes, select myCustomIPPrefix.
In Overview of myCustomIPPrefix, select the Commission dropdown menu and choose Globally.
The operation is asynchronous. You can check the status by reviewing the Commissioned state field for the custom IP prefix. Initially, the status will show the prefix as Commissioning, followed in the future by Commissioned. The advertisement rollout isn't completed all at once. The range is partially advertised while still in the Commissioning status.
Note
The estimated time to fully complete the commissioning process is 3-4 hours.
Important
As the custom IP prefix transitions to a Commissioned state, the range is being advertised with Microsoft from the local Azure region and globally to the Internet by Microsoft's wide area network under Autonomous System Number (ASN) 8075. Advertising this same range to the Internet from a location other than Microsoft at the same time could potentially create BGP routing instability or traffic loss. For example, a customer on-premises building. Plan any migration of an active range during a maintenance period to avoid impact. To prevent these issues during initial deployment, you can choose the regional only commissioning option where your custom IP prefix will only be advertised within the Azure region it is deployed in. For more information, see Manage a custom IP address prefix (BYOIP).
The following steps display the modified steps for provisioning a sample global (parent) IP range (1.2.3.0/4) and regional (child) IP ranges to the US West 2 and US East 2 Regions.
Note
Clean up or delete steps aren't shown on this page given the nature of the resource. For information on removing a provisioned custom IP prefix, see Manage custom IP prefix.
Provision a global custom IP address prefix
Sign in to the Azure portal.
Create and provision a global custom IP address prefix
In the search box at the top of the portal, enter Custom IP.
In the search results, select Custom IP Prefixes.
Select + Create.
In Create a custom IP prefix, enter or select the following information:
| Setting |
Value |
| Project details |
|
| Subscription |
Select your subscription |
| Resource group |
Select Create new.
Enter myResourceGroup.
Select OK. |
| Instance details |
|
| Name |
Enter myCustomIPGlobalPrefix. |
| Region |
Select West US 2. |
| IP Version |
Select IPv4. |
| IP prefix range |
Select Global. |
| Global IPv4 Prefix (CIDR) |
Enter 1.2.3.0/24. |
| ROA expiration date |
Enter your ROA expiration date in the yyyymmdd format. |
| Signed message |
Paste in the output of $byoipauthsigned from the pre-provisioning section. |
Select the Review + create tab or the blue Review + create button at the bottom of the page.
Select Create.
The range is pushed to the Azure IP Deployment Pipeline. The deployment process is asynchronous. You can check the status by reviewing the Commissioned state field for the custom IP prefix.
Note
The estimated time to complete the provisioning process is 30 minutes.
Provision regional custom IP address prefixes
After the global custom IP prefix is in a Provisioned state, regional custom IP prefixes can be created. These ranges must always be of size /64 to be considered valid. The ranges can be created in any region (it doesn't need to be the same as the global custom IP prefix), keeping in mind any geolocation restrictions associated with the original global range. The "children" custom IP prefixes advertise from the region they're created in. Because the validation is only done for global custom IP prefix provision, no Authorization or Signed message is required (but availability zones can be utilized).
In the same Create a custom IP prefix page as before, enter or select the following information:
| Setting |
Value |
| Project details |
|
| Subscription |
Select your subscription |
| Resource group |
Select Create new.
Enter myResourceGroup.
Select OK. |
| Instance details |
|
| Name |
Enter myCustomIPRegionalPrefix1. |
| Region |
Select West US 2. |
| IP Version |
Select IPv4. |
| IP prefix range |
Select Regional. |
| Custom IP prefix parent |
Select myCustomIPGlobalPrefix (1.2.3.0/24) from the drop-down menu. |
| Regional IPv4 Prefix (CIDR) |
Enter 1.2.3.0/25. |
| ROA expiration date |
Enter your ROA expiration date in the yyyymmdd format. |
| Signed message |
Paste in the output of $byoipauthsigned from the pre-provisioning section. |
| Availability Zones |
Select Zone-redundant. |
After creation, go through the flow a second time for another regional prefix in a new region.
| Setting |
Value |
| Project details |
|
| Subscription |
Select your subscription |
| Resource group |
Select Create new.
Enter myResourceGroup.
Select OK. |
| Instance details |
|
| Name |
Enter myCustomIPRegionalPrefix2. |
| Region |
Select East US 2. |
| IP Version |
Select IPv4. |
| IP prefix range |
Select Regional. |
| Custom IP prefix parent |
Select myCustomIPGlobalPrefix (1.2.3.0/24) from the drop-down menu. |
| Regional IPv4 Prefix (CIDR) |
Enter 1.2.3.128/25. |
| ROA expiration date |
Enter your ROA expiration date in the yyyymmdd format. |
| Signed message |
Paste in the output of $byoipauthsigned from the pre-provisioning section. |
| Availability Zones |
Select Zone 3. |
Important
After the regional custom IP prefix is in a "Provisioned" state, a child public IP prefix can be created. These public IP prefixes and any public IP addresses can be attached to networking resources. For example, virtual machine network interfaces or load balancer front ends. The IPs won't be advertised and therefore won't be reachable. For more information on a migration of an active prefix, see Manage a custom IP prefix.
Create a public IP prefix from regional custom IP prefix
When you create a prefix, you must create static IP addresses from the prefix. In this section, you create a static IP address from the prefix you created earlier.
In the search box at the top of the portal, enter Custom IP.
In the search results, select Custom IP Prefixes.
In Custom IP Prefixes, select myCustomIPPrefix.
In Overview of myCustomIPPrefix, select + Add a public IP prefix.
Enter or select the following information in the Basics tab of Create a public IP prefix.
| Setting |
Value |
| Project details |
|
| Subscription |
Select your subscription. |
| Resource group |
Select myResourceGroup. |
| Instance details |
|
| Name |
Enter myPublicIPPrefix. |
| Region |
Select West US 2. The region of the public IP prefix must match the region of the regional custom IP prefix. |
| IP version |
Select IPv4. |
| Prefix ownership |
Select Custom prefix. |
| Custom IP prefix |
Select myCustomIPRegionalPrefix1. |
| Prefix size |
Select a prefix size. The size can be as large as the regional custom IP prefix. |
Select Review + create, and then Create on the following page.
Repeat steps 1-3 to return to the Overview page for myCustomIPPrefix. You see myPublicIPPrefix listed under the Associated public IP prefixes section. You can now allocate standard SKU public IP addresses from this prefix. For more information, see Create a static public IP address from a prefix.
Commission the custom IP address prefixes
When commissioning custom IP prefixes using this model, the global and regional prefixes are treated separately. In other words, commissioning a regional custom IP prefix isn't connected to commissioning the global custom IP prefix.

The safest strategy for range migrations is as follows:
- Provision all required regional custom IP prefixes in their respective regions. Create public IP prefixes and public IP addresses and attach to resources.
- Commission each regional custom IP prefix and test connectivity to the IPs within the region. Repeat for each regional custom IP prefix.
- Commission the global custom IP prefix, which advertises the larger range to the Internet. Complete this step only after verifying all regional custom IP prefixes (and derived prefixes/IPs) work as expected.
To commission a custom IP prefix (regional or global) using the portal:
In the search box at the top of the portal, enter Custom IP and select Custom IP Prefixes.
Verify the custom IP prefix is in a Provisioned state.
In Custom IP Prefixes, select the desired custom IP prefix.
In Overview page of the custom IP prefix, select the Commission button near the top of the screen. If the range is global, it begins advertising from the Microsoft WAN. If the range is regional, it advertises only from the specific region.
Note
The estimated time to fully complete the commissioning process for a custom IP global prefix is 3-4 hours. The estimated time to fully complete the commissioning process for a custom IP regional prefix is 30 minutes.
It's possible to commission the global custom IP prefix before the regional custom IP prefixes. Doing this advertises the global range to the Internet before the regional prefixes are ready so it's not recommended for migrations of active ranges. You can decommission a global custom IP prefix while there are still active (commissioned) regional custom IP prefixes. Also, you can decommission a regional custom IP prefix while the global prefix is still active (commissioned).
Important
As the global custom IP prefix transitions to a Commissioned state, the range is being advertised with Microsoft from the local Azure region and globally to the Internet by Microsoft's wide area network under Autonomous System Number (ASN) 8075. Advertising this same range to the Internet from a location other than Microsoft at the same time could potentially create BGP routing instability or traffic loss. For example, a customer on-premises building. Plan any migration of an active range during a maintenance period to avoid impact.
The following steps display the procedure for provisioning a sample customer range (1.2.3.0/24) to the US West 2 region.
Note
Clean up or delete steps aren't shown on this page given the nature of the resource. For information on removing a provisioned custom IP prefix, see Manage custom IP prefix.
Create a resource group and specify the prefix and authorization messages
Create a resource group in the desired location for provisioning the BYOIP range.
  az group create \
    --name myResourceGroup \
    --location westus2
Provision a unified custom IP address prefix
The following command creates a custom IP prefix in the specified region and resource group. Specify the exact prefix in CIDR notation as a string to ensure there's no syntax error. For the --authorization-message parameter, use the variable $byoipauth that contains your subscription ID, prefix to be provisioned, and expiration date matching the Validity Date on the ROA. Ensure the format is in that order. Use the variable $byoipauthsigned for the --signed-message parameter created in the certificate readiness section.
  byoipauth="xxxxxxxx-xxxx-xxxx-xxxx-xxxxxxxxxxxx|1.2.3.0/24|yyyymmdd"

  az network custom-ip prefix create \
    --name myCustomIpPrefix \
    --resource-group myResourceGroup \
    --location westus2 \
    --cidr ‘1.2.3.0/24’ \
    --zone 1 2 3
    --authorization-message $byoipauth \
    --signed-message $byoipauthsigned
The range is pushed to the Azure IP Deployment Pipeline. The deployment process is asynchronous. To determine the status, execute the following command:
 az network custom-ip prefix show \
   --name myCustomIpPrefix \
   --resource-group myResourceGroup
Sample output is shown below, with some fields removed for clarity:
{
  "cidr": "1.2.3.0/24",
  "commissionedState": "Provisioning",
  "id": "/subscriptions/xxxx/resourceGroups/myResourceGroup/providers/Microsoft.Network/customIPPrefixes/myCustomIpPrefix",
  "location": "westus2",
  "name": myCustomIpPrefix,
  "resourceGroup": "myResourceGroup",
}
The CommissionedState field should show the range as Provisioning initially, followed in the future by Provisioned.
Note
The estimated time to complete the provisioning process is 30 minutes.
Important
After the custom IP prefix is in a Provisioned state, a child public IP prefix can be created. These public IP prefixes and any public IP addresses can be attached to networking resources. For example, virtual machine network interfaces or load balancer front ends. The IPs won't be advertised and therefore won't be reachable. For more information on a migration of an active prefix, see Manage a custom IP prefix.
Commission the unified custom IP address prefix
When the custom IP prefix is in Provisioned state, the following command updates the prefix to begin the process of advertising the range from Azure.
az network custom-ip prefix update \
    --name myCustomIpPrefix \
    --resource-group myResourceGroup \
    --state commission
As before, the operation is asynchronous. Use az network custom-ip prefix show to retrieve the status. The CommissionedState field will initially show the prefix as Commissioning, followed in the future by Commissioned. The advertisement rollout isn't completed all at once. The range is partially advertised while still in the Commissioning status.
Note
The estimated time to fully complete the commissioning process is 3-4 hours.
Important
As the custom IP prefix transitions to a Commissioned state, the range is being advertised with Microsoft from the local Azure region and globally to the Internet by Microsoft's wide area network under Autonomous System Number (ASN) 8075. Advertising this same range to the Internet from a location other than Microsoft at the same time could potentially create BGP routing instability or traffic loss. For example, a customer on-premises building. Plan any migration of an active range during a maintenance period to avoid impact. Additionally, you could take advantage of the regional commissioning feature to put a custom IP prefix into a state where it is only advertised within the Azure region it is deployed in--see Manage a custom IP address prefix (BYOIP) for more information.
The following steps display the modified steps for provisioning a sample global (parent) IP range (1.2.3.0/4) and regional (child) IP ranges to the US West 2 and US East 2 Regions.
Note
Clean up or delete steps aren't shown on this page given the nature of the resource. For information on removing a provisioned custom IP prefix, see Manage custom IP prefix.
Create a resource group and specify the prefix and authorization messages
Create a resource group in the desired location for provisioning the global range resource. Although the global range will be associated with a region, the prefix will be advertised by the Microsoft WAN to the Internet globally.
  az group create \
    --name myResourceGroup \
    --location westus2
Provision a global custom IP address prefix
The following command creates a custom IP prefix in the specified region and resource group. Specify the exact prefix in CIDR notation as a string to ensure there's no syntax error. No zonal properties are provided because the global range isn't associated with any particular region (and therefore no regional availability zones). The global custom IP prefix resource will still sit in a region in your subscription; this has no bearing on how the range will be advertised by Microsoft.
  byoipauth="xxxxxxxx-xxxx-xxxx-xxxx-xxxxxxxxxxxx|1.2.3.0/24|yyyymmdd"

  az network custom-ip prefix create \
    --name myCustomIPGlobalPrefix \
    --resource-group myResourceGroup \
    --location westus2 \
    --cidr ‘1.2.3.0/24’ \
    --authorization-message $byoipauth \
    --signed-message $byoipauthsigned
    --isparent
Provision regional custom IP address prefixes
After the global custom IP prefix is in a Provisioned state, regional custom IP prefixes can be created. These ranges must always be of size /64 to be considered valid. The ranges can be created in any region (it doesn't need to be the same as the global custom IP prefix), keeping in mind any geolocation restrictions associated with the original global range. The "children" custom IP prefixes advertise from the region they're created in. Because the validation is only done for global custom IP prefix provision, no Authorization or Signed message is required (but availability zones can be utilized).
  az network custom-ip prefix create \
    --name myCustomIPRegionalPrefix1 \
    --resource-group myResourceGroup \
    --location westus2 \
    --cidr ‘1.2.3.0/25’ \
    --zone 1 2 3 \
    --cip-prefix-parent myCustomIPGlobalPrefix

  az network custom-ip prefix create \
    --name myCustomIPRegionalPrefix2 \
    --resource-group myResourceGroup \
    --location westus2 \
    --cidr ‘1.2.3.128/25’ \
    --zone 3
    --cip-prefix-parent myCustomIPGlobalPrefix
After the regional custom IP prefix is in a Provisioned state, public IP prefixes can be derived from the regional custom IP prefix. These public IP prefixes and any public IP addresses derived from them can be attached to networking resources, though they aren't yet being advertised.
Commission the custom IP address prefixes
When commissioning custom IP prefixes using this model, the global and regional prefixes are treated separately. In other words, commissioning a regional custom IP prefix isn't connected to commissioning the global custom IP prefix.
The safest strategy for range migrations is as follows:
- Provision all required regional custom IP prefixes in their respective regions. Create public IP prefixes and public IP addresses and attach to resources.
- Commission each regional custom IP prefix and test connectivity to the IPs within the region. Repeat for each regional custom IP prefix.
- Commission the global custom IP prefix, which advertises the larger range to the Internet. Complete this step only after verifying all regional custom IP prefixes (and derived prefixes/IPs) work as expected.
Using the previous example ranges, the command sequence would be:
az network custom-ip prefix update \
    --name myCustomIPRegionalPrefix \
    --resource-group myResourceGroup \
    --state commission

az network custom-ip prefix update \
    --name myCustomIPRegionalPrefix2 \
    --resource-group myResourceGroup \
    --state commission
Followed by:
az network custom-ip prefix update \
    --name myCustomIPGlobalPrefix \
    --resource-group myResourceGroup \
    --state commission
Note
The estimated time to fully complete the commissioning process for a custom IP global prefix is 3-4 hours. The estimated time to fully complete the commissioning process for a custom IP regional prefix is 30 minutes.
It's possible to commission the global custom IP prefix before the regional custom IP prefixes. Doing this advertises the global range to the Internet before the regional prefixes are ready so it's not recommended for migrations of active ranges. You can decommission a global custom IP prefix while there are still active (commissioned) regional custom IP prefixes. Also, you can decommission a regional custom IP prefix while the global prefix is still active (commissioned).
Important
As the global custom IP prefix transitions to a Commissioned state, the range is being advertised with Microsoft from the local Azure region and globally to the Internet by Microsoft's wide area network under Autonomous System Number (ASN) 8075. Advertising this same range to the Internet from a location other than Microsoft at the same time could potentially create BGP routing instability or traffic loss. For example, a customer on-premises building. Plan any migration of an active range during a maintenance period to avoid impact.
The following steps display the procedure for provisioning a sample customer range (1.2.3.0/24) to the US West 2 region.
Note
Clean up or delete steps aren't shown on this page given the nature of the resource. For information on removing a provisioned custom IP prefix, see Manage custom IP prefix.
Create a resource group and specify the prefix and authorization messages
Create a resource group in the desired location for provisioning the BYOIP range.
$rg =@{
    Name = 'myResourceGroup'
    Location = 'WestUS2'
}
New-AzResourceGroup @rg
Provision a unified custom IP address prefix
The following command creates a custom IP prefix in the specified region and resource group. Specify the exact prefix in CIDR notation as a string to ensure there's no syntax error. For the -AuthorizationMessage parameter, substitute your subscription ID, prefix to be provisioned, and expiration date matching the Validity Date on the ROA. Ensure the format is in that order. Use the variable $byoipauthsigned for the -SignedMessage parameter created in the certificate readiness section.
$prefix =@{
    Name = 'myCustomIPPrefix'
    ResourceGroupName = 'myResourceGroup'
    Location = 'WestUS2'
    CIDR = '1.2.3.0/24'
    AuthorizationMessage = 'xxxxxxxx-xxxx-xxxx-xxxx-xxxxxxxxxxxx|1.2.3.0/24|yyyymmdd'
    SignedMessage = $byoipauthsigned
}
$myCustomIpPrefix = New-AzCustomIPPrefix @prefix -Zone 1,2,3
The range is pushed to the Azure IP Deployment Pipeline. The deployment process is asynchronous. To determine the status, execute the following command:
Get-AzCustomIpPrefix -ResourceId $myCustomIpPrefix.Id
Here's a sample output with some fields removed for clarity:
Name              : myCustomIpPrefix
ResourceGroupName : myResourceGroup
Location          : westus2
Id                : /subscriptions/xxxx/resourceGroups/myResourceGroup/providers/Microsoft.Network/customIPPrefixes/MyCustomIPPrefix
Cidr              : 1.2.3.0/24
Zones             : {1, 2, 3}
CommissionedState : Provisioning
The CommissionedState field should show the range as Provisioning initially, followed in the future by Provisioned.
Note
The estimated time to complete the provisioning process is 30 minutes.
Important
After the custom IP prefix is in a Provisioned state, a child public IP prefix can be created. These public IP prefixes and any public IP addresses can be attached to networking resources. For example, virtual machine network interfaces or load balancer front ends. The IPs won't be advertised and therefore won't be reachable. For more information on a migration of an active prefix, see Manage a custom IP prefix.
Commission the unified custom IP address prefix
When the custom IP prefix is in the Provisioned state, the following command updates the prefix to begin the process of advertising the range from Azure.
Update-AzCustomIpPrefix -ResourceId $myCustomIPPrefix.Id -Commission
As before, the operation is asynchronous. Use Get-AzCustomIpPrefix to retrieve the status. The CommissionedState field will initially show the prefix as Commissioning, followed in the future by Commissioned. The advertisement rollout isn't completed all at once. The range is partially advertised while still in the Commissioning status.
Note
The estimated time to fully complete the commissioning process is 3-4 hours.
Important
As the custom IP prefix transitions to a Commissioned state, the range is being advertised with Microsoft from the local Azure region and globally to the Internet by Microsoft's wide area network under Autonomous System Number (ASN) 8075. Advertising this same range to the Internet from a location other than Microsoft at the same time could potentially create BGP routing instability or traffic loss. For example, a customer on-premises building. Plan any migration of an active range during a maintenance period to avoid impact. Additionally, you could take advantage of the regional commissioning feature to put a custom IP prefix into a state where it is only advertised within the Azure region it is deployed in. For more information, see Manage a custom IP address prefix (BYOIP).
The following steps display the modified steps for provisioning a sample global (parent) IP range (1.2.3.0/4) and regional (child) IP ranges to the US West 2 and US East 2 Regions.
Note
Clean up or delete steps aren't shown on this page given the nature of the resource. For information on removing a provisioned custom IP prefix, see Manage custom IP prefix.
Create a resource group and specify the prefix and authorization messages
Create a resource group in the desired location for provisioning the global range resource. Although the global range is associated with a region, the prefix is advertised by the Microsoft WAN to the Internet globally.
$rg =@{
    Name = 'myResourceGroup'
    Location = 'USWest2'
}
New-AzResourceGroup @rg
Provision a global custom IP address prefix
The following command creates a custom IP prefix in the specified region and resource group. Specify the exact prefix in CIDR notation as a string to ensure there's no syntax error. No zonal properties are provided because the global range isn't associated with any particular region (and therefore no regional availability zones). The global custom IP prefix resource will still sit in a region in your subscription; this has no bearing on how the range is advertised by Microsoft.
$prefix =@{
    Name = 'myCustomGlobalPrefix'
    ResourceGroupName = 'myResourceGroup'
    Location = 'WestUS2'
    CIDR = '1.2.3.0/24'
    AuthorizationMessage = 'xxxxxxxx-xxxx-xxxx-xxxx-xxxxxxxxxxxx|1.2.3.0/24|yyyymmdd'
    SignedMessage = $byoipauthsigned
}
$myCustomIPGlobalPrefix = New-AzCustomIPPrefix @prefix -IsParent
Provision regional custom IP address prefixes
After the global custom IP prefix is in a Provisioned state, regional custom IP prefixes can be created. These ranges must always be of size /64 to be considered valid. The ranges can be created in any region (it doesn't need to be the same as the global custom IP prefix), keeping in mind any geolocation restrictions associated with the original global range. The child custom IP prefixes advertise from the region where they're created. Because the validation is only done for global custom IP prefix provision, no Authorization or Signed message is required (but availability zones can be utilized).
$prefix =@{
    Name = 'myCustomIPRegionalPrefix1'
    ResourceGroupName = 'myResourceGroup'
    Location = 'WestUS2'
    CIDR = '1.2.3.0/25'

}
$myCustomIPRegionalPrefix = New-AzCustomIPPrefix @prefix -CustomIpPrefixParent $myCustomIPGlobalPrefix -Zone 1,2,3

$prefix2 =@{
    Name = 'myCustomIPRegionalPrefix2'
    ResourceGroupName = 'myResourceGroup'
    Location = 'EastUS2'
    CIDR = '1.2.3.128/25'
}
$myCustomIPRegionalPrefix2 = New-AzCustomIPPrefix @prefix2 -CustomIpPrefixParent $myCustomIPGlobalPrefix -Zone 3
After the regional custom IP prefix is in a Provisioned state, public IP prefixes can be derived from the regional custom IP prefix. These public IP prefixes and any public IP addresses derived from them can be attached to networking resources, though they aren't yet being advertised.
Commission the custom IP address prefixes
When commissioning custom IP prefixes using this model, the global and regional prefixes are treated separately. In other words, commissioning a regional custom IP prefix isn't connected to commissioning the global custom IP prefix.
The safest strategy for range migrations is as follows:
- Provision all required regional custom IP prefixes in their respective regions. Create public IP prefixes and public IP addresses and attach to resources.
- Commission each regional custom IP prefix and test connectivity to the IPs within the region. Repeat for each regional custom IP prefix.
- Commission the global custom IP prefix, which advertises the larger range to the Internet. Complete this step only after verifying all regional custom IP prefixes (and derived prefixes/IPs) work as expected.
With the previous example ranges, the command sequence would be:
Update-AzCustomIpPrefix -ResourceId $myCustomIPRegionalPrefix.Id -Commission
Update-AzCustomIpPrefix -ResourceId $myCustomIPRegionalPrefix2.Id -Commission
Followed by:
Update-AzCustomIpPrefix -ResourceId $myCustomIPGlobalPrefix.Id -Commission
Note
The estimated time to fully complete the commissioning process for a custom IP global prefix is 3-4 hours. The estimated time to fully complete the commissioning process for a custom IP regional prefix is 30 minutes.
It's possible to commission the global custom IP prefix before the regional custom IP prefixes. Since this process advertises the global range to the Internet before the regional prefixes are ready, it's not recommended for migrations of active ranges. You can decommission a global custom IP prefix while there are still active (commissioned) regional custom IP prefixes. Also, you can decommission a regional custom IP prefix while the global prefix is still active (commissioned).
Important
As the global custom IP prefix transitions to a Commissioned state, the range is being advertised with Microsoft from the local Azure region and globally to the Internet by Microsoft's wide area network under Autonomous System Number (ASN) 8075. Advertising this same range to the Internet from a location other than Microsoft at the same time could potentially create BGP routing instability or traffic loss. For example, a customer on-premises building. Plan any migration of an active range during a maintenance period to avoid impact.

