Create and manage integration accounts for B2B workflows in Azure Logic Apps with the Enterprise Integration Pack
Applies to: Azure Logic Apps (Consumption + Standard)
Before you can build business-to-business (B2B) and enterprise integration workflows using Azure Logic Apps, you need to create an integration account resource. This account is a scalable cloud-based container in Azure that simplifies how you store and manage B2B artifacts that you define and use in your workflows for B2B scenarios, for example:
You also need an integration account to electronically exchange B2B messages with other organizations. When other organizations use protocols and message formats different from your organization, you have to convert these formats so your organization's system can process those messages. With Azure Logic Apps, you can build workflows that support the following industry-standard protocols:
If you're new to creating B2B enterprise integration workflows in Azure Logic Apps, see B2B enterprise integration workflows with Azure Logic Apps and Enterprise Integration Pack.
Prerequisites
An Azure account and subscription. If you don't have an Azure subscription, sign up for a free Azure account. Make sure that you use the same Azure subscription for both your integration account and logic app resource.
Whether you're working on a Consumption or Standard logic app workflow, your logic app resource must already exist if you need to link your integration account.
For Consumption logic app resources, this link is required before you can use the artifacts from your integration account with your workflow. Although you can create your artifacts without this link, the link is required when you're ready to use these artifacts. To create an example Consumption logic app workflow, see Quickstart: Create an example Consumption logic app workflow in multi-tenant Azure Logic Apps.
For Standard logic app resources, this link might be required or optional, based on your scenario:
If you have an integration account with the artifacts that you need or want to use, link the integration account to each Standard logic app resource where you want to use the artifacts.
Some Azure-hosted integration account connectors don't require the link and let you create a connection to your integration account. For example, such as AS2, EDIFACT, and X12 don't require the link, but the AS2 (v2) connector requires the link.
The built-in connectors named Liquid and Flat File let you select maps and schemas that you previously uploaded to your logic app resource or to a linked integration account.
If you don't have or need an integration account, you can use the upload option. Otherwise, you can use the linking option, which also means you don't have to upload maps and schemas to each logic app resource. Either way, you can use these artifacts across all child workflows within the same logic app resource.
To create an example Standard logic app workflow, see Create an example Standard logic app workflow in single-tenant Azure Logic Apps.
A Premium integration account supports using a private endpoint within an Azure virtual network to securely communicate with other Azure resources in the same network. Your integration account, virtual network, and Azure resources must also exist in the same Azure region. For more information, see Create a virtual network and the steps in this guide to set up your Premium integration account.
For example, a Standard logic app can access the private endpoint if they exist in the same virtual network. However, a Consumption logic app doesn't support virtual network integration and can't access the private endpoint.
To create a Standard logic app with virtual network integration, see Create an example Standard logic app workflow in single-tenant Azure Logic Apps.
To set up an existing Standard logic app with virtual network integration, see Set up virtual network integration.
Create integration account
Integration accounts are available in different tiers that vary in pricing. Based on the tier you choose, creating an integration account might incur costs. For more information, see Azure Logic Apps pricing and billing models and Azure Logic Apps pricing.
Based on your requirements and scenarios, determine the appropriate integration account tier to create. The following table describes the available tiers:
Your integration account uses an automatically created and enabled system-assigned managed identity to authenticate access.
| Tier | Description |
|---|---|
| Premium (preview) | Note: This capability is in preview and is subject to the Supplemental Terms of Use for Microsoft Azure Previews. For scenarios with the following criteria: - Store and use unlimited artifacts, such as partners, agreements, schemas, maps, certificates, and so on. - Bring and use your own storage, which contains the relevant runtime states for specific B2B actions and EDI standards. For example, these states include the MIC number for AS2 actions and the control numbers for X12 actions, if configured on your agreements. To access this storage, your integration account uses its system-assigned managed identity, which is automatically created and enabled for your integration account. You can also apply more governance and policies to data, such as customer-managed ("Bring Your Own") keys for data encryption. To store these keys, you'll need a key vault. - Set up and use a key vault to store private certificates or customer-managed keys. To access these keys, your Premium integration account uses its system-assigned managed identity, not an Azure Logic Apps shared service principal. - Set up a private endpoint that creates a secure connection between your Premium integration account and Azure services in an Azure virtual network. Pricing follows Standard integration account pricing. Note: During preview, your Azure bill uses the same meter name and ID as a Standard integration account, but changes when the Premium level becomes generally available. Limitations and known issues: - If you use a key vault to store private certificates, your integration account's managed identity might not work. For now, use the linked logic app's managed identity instead. - Currently doesn't support the Azure CLI for Azure Logic Apps. |
| Standard | For scenarios where you have more complex B2B relationships and increased numbers of entities that you must manage. Supported by the Azure Logic Apps SLA. |
| Basic | For scenarios where you want only message handling or to act as a small business partner that has a trading partner relationship with a larger business entity. Supported by the Azure Logic Apps SLA. |
| Free | For exploratory scenarios, not production scenarios. This tier has limits on region availability, throughput, and usage. For example, the Free tier is available only for public regions in Azure, for example, West US or Southeast Asia, but not for Microsoft Azure operated by 21Vianet or Azure Government. Note: Not supported by the Azure Logic Apps SLA. |
For this task, you can use the Azure portal, Azure CLI, or Azure PowerShell.
Important
For you to successfully link and use your integration account with your logic app, make sure that both resources exist in the same Azure subscription and Azure region.
In the Azure portal search box, enter integration accounts, and select Integration accounts.
Under Integration accounts, select Create.
On the Create an integration account pane, provide the following information about your integration account:
Property Required Value Description Subscription Yes <Azure-subscription-name> The name for your Azure subscription Resource group Yes <Azure-resource-group-name> The name for the Azure resource group to use for organizing related resources. For this example, create a new resource group named FabrikamIntegration-RG. Integration account name Yes <integration-account-name> Your integration account's name, which can contain only letters, numbers, hyphens ( -), underscores (_), parentheses (()), and periods (.). This example uses Fabrikam-Integration.Pricing Tier Yes <pricing-level> The pricing tier for the integration account, which you can change later. For this example, select Free. For more information, see the following documentation:
- Logic Apps pricing model
- Logic Apps limits and configuration
- Logic Apps pricingStorage account Available only for the Premium (preview) integration account None The name for an existing Azure storage account. For the example in this guide, this option doesn't apply. Region Yes <Azure-region> The Azure region where to store your integration account metadata. Either select the same location as your logic app resource, or create your logic apps in the same location as your integration account. For this example, use West US. Enable log analytics No Unselected For this example, don't select this option. When you're done, select Review + create.
After deployment completes, Azure opens your integration account.
If you created a Premium integration account, make sure to set up access to the associated Azure storage account. You can also create a private connection between your Premium integration account and Azure services by setting up a private endpoint for your integration account.

Set up storage access for Premium integration account
To read artifacts and write any state information, your Premium integration account needs access to the selected and associated Azure storage account. Your integration account uses its automatically created and enabled system-assigned managed identity to authenticate access.
In the Azure portal, open your Premium integration account.
On the integration account menu, under Settings, select Identity.
On the System assigned tab, which shows the enabled system-assigned managed identity, under Permissions, select Azure role assignments.
On the Azure role assignments toolbar, select Add role assignment (preview), provide the following information, select Save, and then repeat for each required role:
Parameter Value Description Scope Storage For more information, see Understand scope for Azure RBAC. Subscription <Azure-subscription> The Azure subscription for the resource to access. Resource <Azure-storage-account-name> The name for the Azure storage account to access.
Note If you get an error that you don't have permissions to add role assignments at this scope, you need to get those permissions. For more information, see Microsoft Entra built-in roles.Role - Storage Account Contributor
- Storage Blob Data Contributor
- Storage Table Data ContributorThe roles that your Premium integration account requires to access your storage account. For more information, see Assign Azure role to system-assigned managed identity
Set up private endpoint for Premium integration account (Preview)
Note
This capability is in preview and is subject to the Supplemental Terms of Use for Microsoft Azure Previews.
To create a secure connection between your Premium integration account and Azure services, you can set up a private endpoint for your integration account. This endpoint is a network interface that uses a private IP address from your Azure virtual network. This way, traffic between your virtual network and Azure services stays on the Azure backbone network and never traverses the public internet. Private endpoints ensure a secure, private communication channel between your resources and Azure services by providing the following benefits:
Eliminates exposure to the public internet and reducing the risks from attacks.
Helps your organization meet data privacy and compliance requirements by keeping data within a controlled and secured environment.
Reduces latency and improve workflow performance by keeping traffic within the Azure backbone network.
Removes the need for complex network setups, such as virtual private networks or ExpressRoute.
Saves on costs by reducing extra network infrastructure and avoiding data egress charges through public endpoints.
Best practices for private endpoints
Carefully plan your virtual network and subnet architecture to accommodate private endpoints. Make sure to properly segment and secure your subnets.
Make sure that your domain name system settings are up-to-date and correctly configured to handle name resolution for private endpoints.
Control traffic flow to and from your private endpoints and enforce strict security policies by using network security groups.
Thoroughly test your integration account's connectivity and performance to make sure that everything works as expected with private endpoints before you deploy to production.
Regularly monitor network traffic to and from your private endpoints. Audit and analyze traffic patterns by using tools such as Azure Monitor and Azure Security Center.
Create a private endpoint
Before you start, make sure that you have an Azure virtual network defined with the appropriate subnets and network security groups to manage and secure traffic.
In the Azure portal, in the search box, enter private endpoint,and then select Private endpoints.
On the Private endpoints page, select Create.
On the Basics tab, provide the following information:
Property Value Subscription <Azure-subscription> Resource group <Azure-resource-group> Name <private-endpoint> Network interface name <private-endpoint>-nic Region <Azure-region> On the Resource tab, provide the following information:
Property Value Connection method - Connect to an Azure resource in my directory: Creates a private endpoint that is automatically approved and ready for immediate use. The endpoint's Connection status property is set to Approved after creation.
- Connect to an Azure resource by resource ID or alias: Create a private endpoint that is manually approved and requires data administrator approval before anyone can use. The endpoint's Connection status property is set to Pending after creation.
Note: If the endpoint is manually approved, the DNS tab is unavailable.Subscription <Azure-subscription> Resource type Microsoft.Logic/integrationAccounts Resource <Premium-integration-account> Target sub-resource integrationAccount On the Virtual Network tab, specify the virual network and subnet where to you want to create the endpoint:
Property Value Virtual network <virtual-network> Subnet <subnet-for-endpoint> Your virtual network uses a network interface attached to the private endpoint.
On the DNS tab, provide the following information to make sure your aps can resolve the private IP address for your integration account. You might have to set up a private DNS zone and link to your virtual network.
Property Value Subscription <Azure-subscription> Resource group <Azure-resource-group-for-private-DNS-zone> When you're done, confirm all the provided information, and select Create.
After you confirm that Azure created the private endpoint, check your connectivity and test your setup to make sure that the resources in your virtual network can securely connect to the your integration account through the private endpoint.
View pending endpoint connections
For a private endpoint that requires approval, follow these steps:
In the Azure portal, go to the Private Link page.
On the left menu, select Pending connections.
Approve a pending private endpoint
For a private endpoint that requires approval, follow these steps:
In the Azure portal, go to the Private Link page.
On the left menu, select Pending connections.
Select the pending connection. On the toolbar, select Approve. Wait for the operation to finish.
The endpoint's Connection status property changes to Approved.
Enable Standard logic app calls through private endpoint on Premium integration account
- Choose one of the following options:
To create a Standard logic app with virtual network integration, see Create an example Standard logic app workflow in single-tenant Azure Logic Apps.
To set up an existing Standard logic app with virtual network integration, see Set up virtual network integration.
To make calls through the private endpoint, include an HTTP action in your Standard logic app workflow where you want to call the integration account.
In the Azure portal, go to your Premium integration account. On the integration account menu, under Settings, select Callback URL, and copy the URL.
In your workflow's HTTP action, on the Parameters tab, in the URI property, enter the callback URL using the following format:
https://{domain-name}-{integration-account-ID}.cy.integrationaccounts.microsoftazurelogicapps.net:443/integrationAccounts/{integration-account-ID}?api-version=2015-08-01-preview&sp={sp}&sv={sv}&sig={sig}The following example shows sample values:
https://prod-02-XXXXXXXXXXXXXXXXXXXXXXXXXXXXXXXXXXXXX.cy.integrationaccounts.microsoftazurelogicapps.net:443/integrationAccounts/XXXXXXXXXXXXXXXXXXXXXXXXXXXXXXXXXXXXX?api-version=2015-08-01-preview&sp={sp}&sv={sv}&sig={sig}For the HTTP action's Method property, select GET.
Finish setting up the HTTP action as necessary, and test your workflow.
Link to logic app
For you to successfully link your integration account to your logic app resource, make sure that both resources use the same Azure subscription and Azure region.
This section describes how to complete this task using the Azure portal. If you use Visual Studio and your logic app is in an Azure Resource Group project, you can link your logic app to an integration account by using Visual Studio.
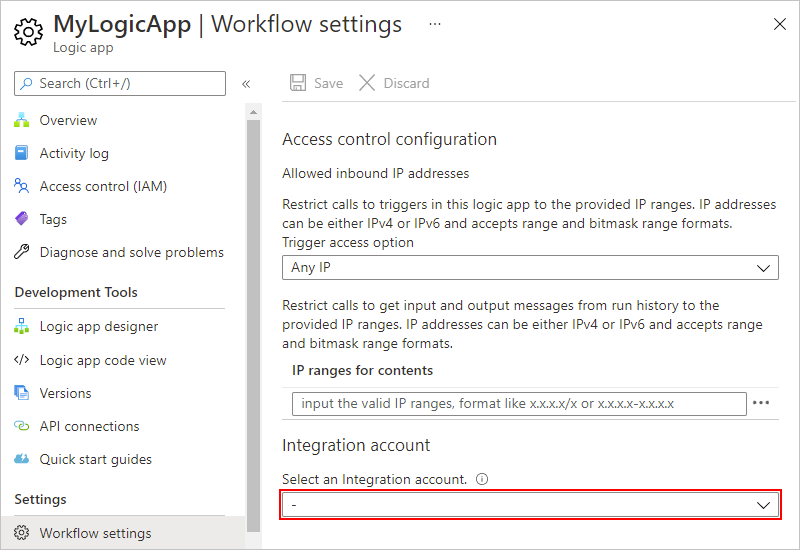
In the Azure portal, open your logic app resource.
On your logic app's navigation menu, under Settings, select Workflow settings. Under Integration account, open the Select an Integration account list, and select the integration account you want.
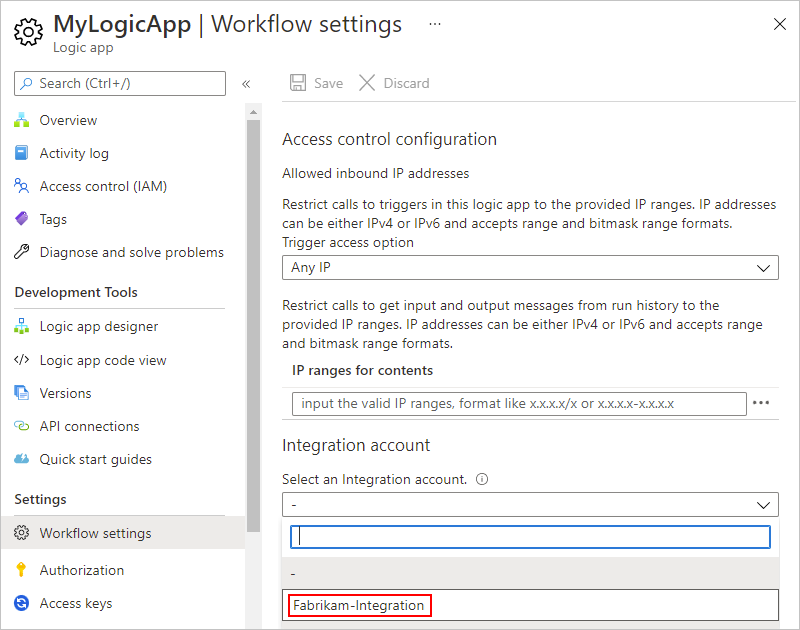
To finish linking, select Save.

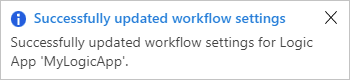
After your integration account is successfully linked, Azure shows a confirmation message.
Now your logic app workflow can use the artifacts in your integration account plus the B2B connectors, such as XML validation and flat file encoding or decoding.
Change pricing tier
To increase the limits for an integration account, you can upgrade to a higher pricing tier, if available. For example, you can upgrade from the Free tier to the Basic tier, Standard tier, or Premium tier. You can also downgrade to a lower tier, if available. For more information pricing information, review the following documentation:
Upgrade pricing tier
To make this change, you can use either the Azure portal or the Azure CLI.
In the Azure portal search box, enter integration accounts, and select Integration accounts.
Azure shows all the integration accounts in your Azure subscriptions.
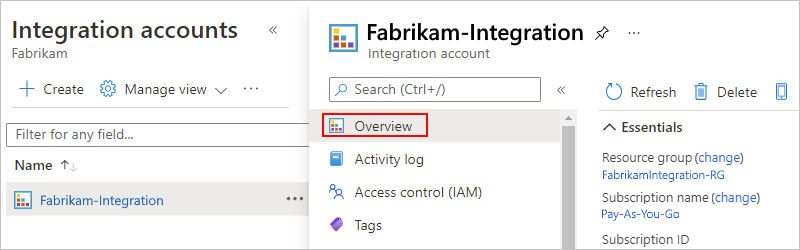
Under Integration accounts, select the integration account that you want to move. On your integration account resource menu, select Overview.
On the Overview page, select Upgrade Pricing Tier, which lists any available higher tiers. When you select a tier, the change immediately takes effect.

Downgrade pricing tier
To make this change, use the Azure CLI.
If you haven't done so already, install the Azure CLI prerequisites.
In the Azure portal, open the Azure Cloud Shell environment.

At the command prompt, enter the az resource command and set
skuNameto the lower tier that you want.az resource update --resource-group <resourceGroupName> --resource-type Microsoft.Logic/integrationAccounts --name <integrationAccountName> --subscription <AzureSubscriptionID> --set sku.name=<skuName>For example, if you have the Standard tier, you can set
skuNametoBasic:az resource update --resource-group FabrikamIntegration-RG --resource-type Microsoft.Logic/integrationAccounts --name Fabrikam-Integration --subscription XXXXXXXXXXXXXXXXX --set sku.name=Basic
Unlink from logic app
If you want to link your logic app to another integration account, or no longer use an integration account with your logic app, delete the link by using Azure Resource Explorer.
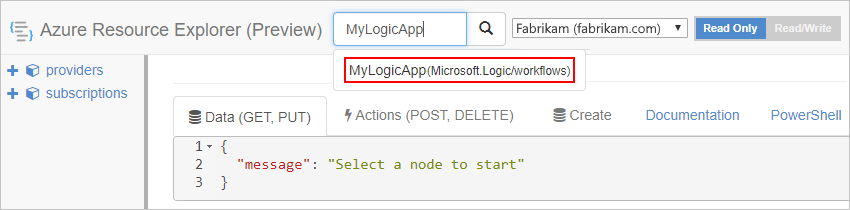
Open your browser window, and go to Azure Resource Explorer (https://resources.azure.com). Sign in with the same Azure account credentials.
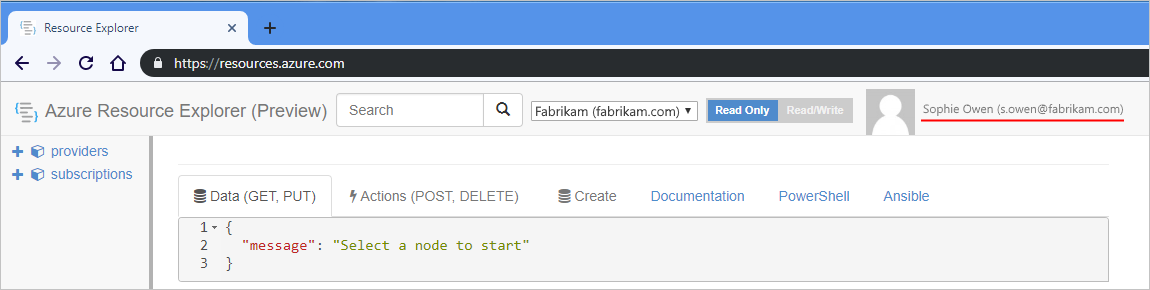
In the search box, enter your logic app's name to find and open your logic app.
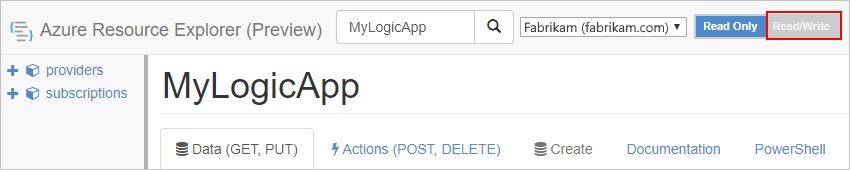
On the explorer title bar, select Read/Write.
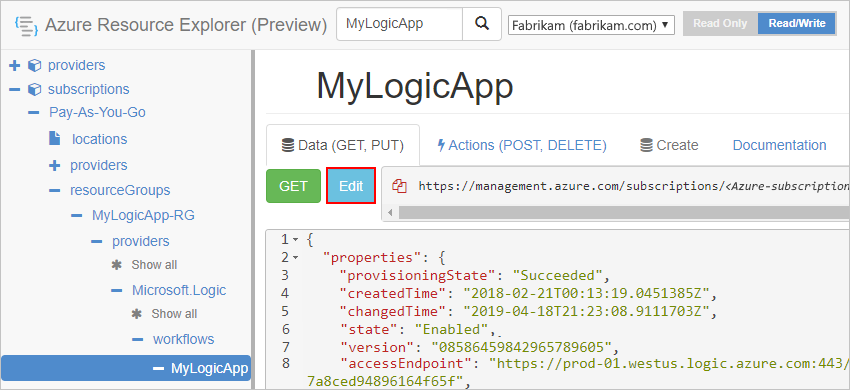
On the Data tab, select Edit.
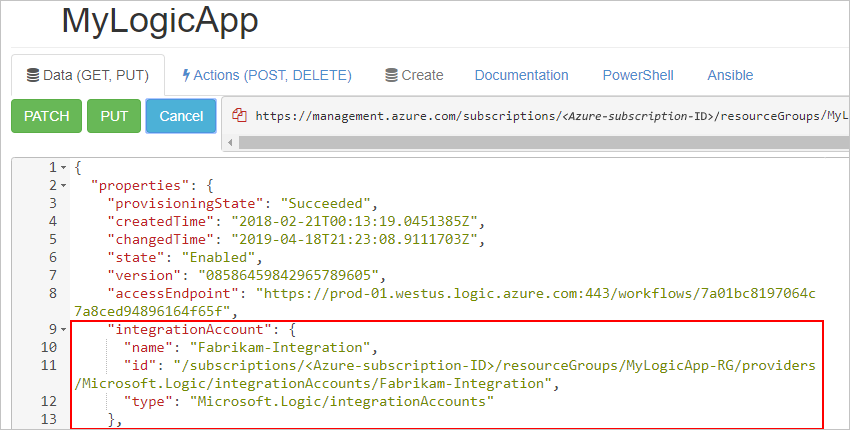
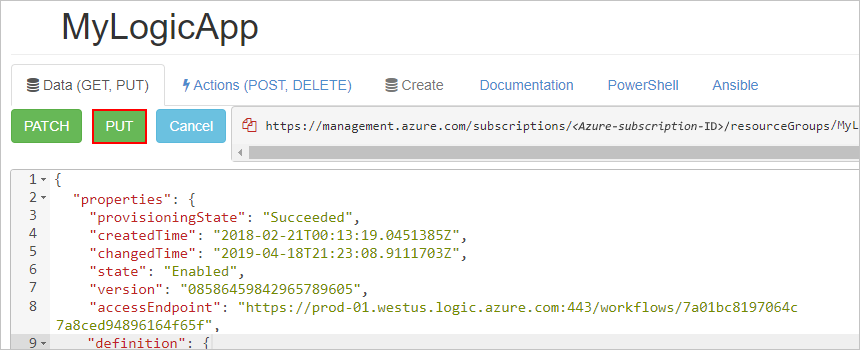
In the editor, find the integrationAccount object, which has the following format, and delete the object:
{
   // <other-attributes>
   "integrationAccount": {
      "name": "<integration-account-name>",
      "id": "<integration-account-resource-ID>",
      "type": "Microsoft.Logic/integrationAccounts"
   },
}
For example:
On the Data tab, select Put to save your changes.
In the Azure portal, open your logic app. On your logic app menu, under Workflow settings, confirm that the Integration account property now appears empty.
Move integration account
You can move your integration account to another Azure resource group or Azure subscription. When you move resources, Azure creates new resource IDs, so make sure that you use the new IDs instead and update any scripts or tools associated with the moved resources. If you want to change the subscription, you must also specify an existing or new resource group.
For this task, you can use either the Azure portal by following the steps in this section or the Azure CLI.
In the Azure portal search box, enter integration accounts, and select Integration accounts.
Azure shows all the integration accounts in your Azure subscriptions.
Under Integration accounts, select the integration account that you want to move. On your integration account menu, select Overview.
On the Overview page, next to either Resource group or Subscription name, select change.
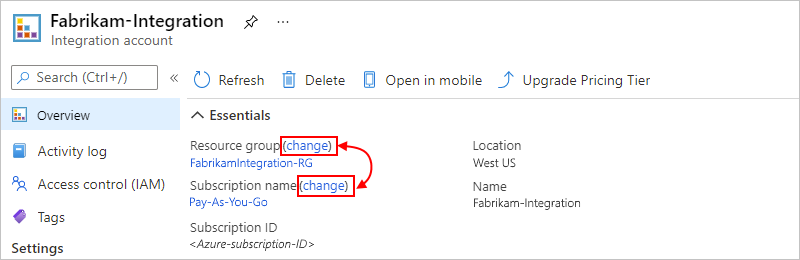
Select any related resources that you also want to move.
Based on your selection, follow these steps to change the resource group or subscription:
Resource group: From the Resource group list, select the destination resource group. Or, to create a different resource group, select Create a new resource group.
Subscription: From the Subscription list, select the destination subscription. From the Resource group list, select the destination resource group. Or, to create a different resource group, select Create a new resource group.
To acknowledge your understanding that any scripts or tools associated with the moved resources won't work until you update them with the new resource IDs, select the confirmation box, and then select OK.
After you finish, make sure that you update all scripts with the new resource IDs for your moved resources.
Delete integration account
For this task, you can use either the Azure portal by following the steps in this section, Azure CLI, or Azure PowerShell.
In to the Azure portal search box, enter integration accounts, and select Integration accounts.
Azure shows all the integration accounts in your Azure subscriptions.
Under Integration accounts, select the integration account that you want to delete. On your integration account menu, select Overview.
On the Overview page, select Delete.

To confirm that you want to delete your integration account, select Yes.
