Azure Synapse Analytics connectivity settings
This article explains connectivity settings in Azure Synapse Analytics and how to configure them where applicable.
Public network access
You can use the public network access feature to allow incoming public network connectivity to your Azure Synapse workspace.
- When public network access is disabled, you can connect to your workspace only using private endpoints.
- When public network access is enabled, you can connect to your workspace also from public networks. You can manage this feature both during and after your workspace creation.
Important
This feature is only available to Azure Synapse workspaces associated with Azure Synapse Analytics Managed Virtual Network. However, you can still open your Synapse workspaces to the public network regardless of its association with managed VNet.
When the public network access is disabled, access to GIT mode in Synapse Studio and commit changes won't be blocked as long as the user has enough permission to access the integrated Git repo or the corresponding Git branch. However, the publish button won't work because the access to Live mode is blocked by the firewall settings.
Selecting the Disable option will not apply any firewall rules that you might configure. Additionally, your firewall rules will appear grayed out in the Network setting in Synapse portal. Your firewall configurations are reapplied when you enable public network access again.
Tip
When you revert to enable, allow some time before editing the firewall rules.
Configure public network access when you create your workspace
Select the Networking tab when you create your workspace in Azure portal.
Under Managed virtual network, select Enable to associate your workspace with managed virtual network and permit public network access.
Under Public network access, select Disable to deny public access to your workspace. Select Enable if you want to allow public access to your workspace.
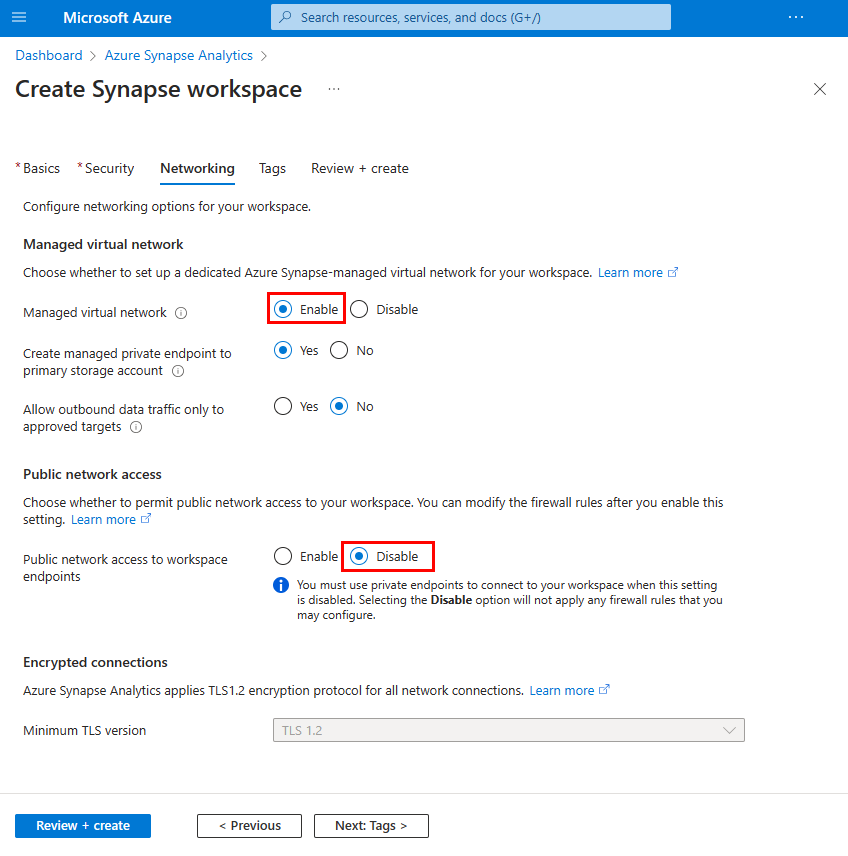
Complete the rest of the workspace creation flow.

Configure public network access after you create your workspace
Select your Synapse workspace in Azure portal.
Select Networking from the left navigation.
Select Disabled to deny public access to your workspace. Select Enabled if you want to allow public access to your workspace.
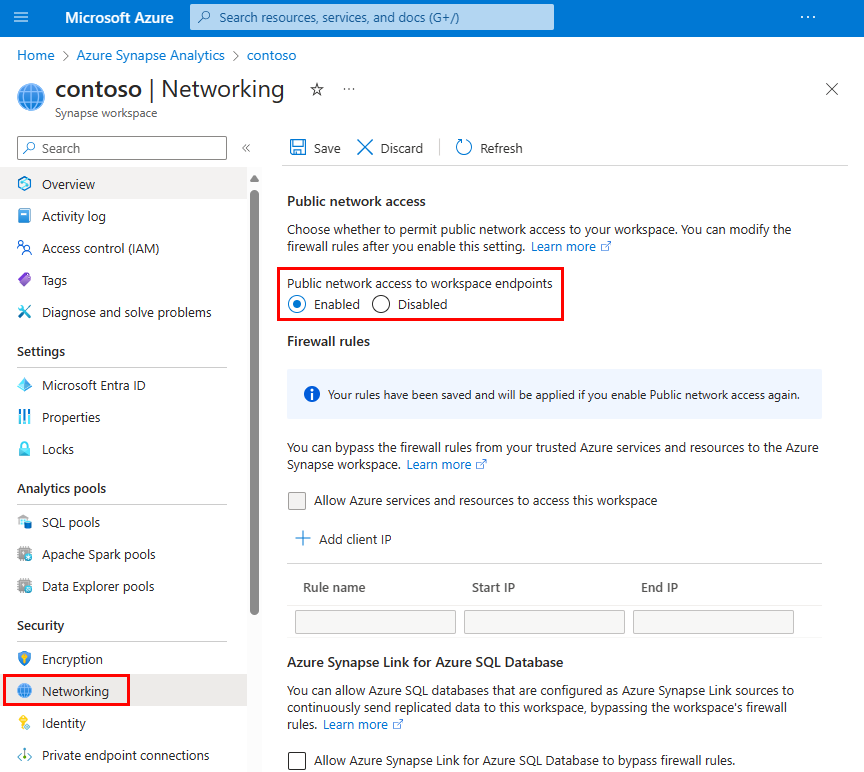
When disabled, the Firewall rules gray out to indicate that firewall rules are not in effect. Firewall rule configurations will be retained.
Select Save to save the change. A notification will confirm that the network setting was successfully saved.

Connection policy
The connection policy for Synapse SQL in Azure Synapse Analytics is set to Default. You cannot change this in Azure Synapse Analytics. For more information, see Connectivity architecture.
Minimal TLS version
The serverless SQL endpoint and development endpoint only accept TLS 1.2 and above.
Since December 2021, a minimum level of TLS 1.2 is required for workspace-managed dedicated SQL pools in new Synapse workspaces. Sign-in attempts from connections using a TLS version lower than 1.2 fail. Customers can raise or lower this requirement using the minimal TLS REST API for both new Synapse workspaces or existing workspaces, so users who cannot use a higher TLS client version in the workspaces can connect. Customers can also raise the minimum TLS version to meet their security needs.
Related content
Povratne informacije
Uskoro: tokom 2024. postepeno ćemo ukidati probleme s uslugom GitHub kao mehanizam povratnih informacija za sadržaj i zamijeniti ga novim sistemom povratnih informacija. Za više informacija, pogledajte https://aka.ms/ContentUserFeedback.
Pošalјite i prikažite povratne informacije za