Set a custom home page for published apps by using Microsoft Entra application proxy
This article discusses how to configure an app to direct a user to a custom home page. When you publish an app with application proxy, you set an internal URL, but sometimes that's not the page a user should see first. Set a custom home page so that a user gets the right page when they access the app. A user sees the custom home page that you set, regardless of whether they access the app from the Microsoft Entra My Apps or the Microsoft 365 app launcher.
When a user launches the app, they're directed by default to the root domain URL for the published app. The landing page is typically set as the home page URL. Use the Azure AD PowerShell module to define a custom home page URL when you want an app user to land on a specific page within the app.
Here's one scenario that explains why your company would set a custom home page:
- Inside your corporate network, a user goes to
https://ExpenseApp/login/login.aspxto sign in and access your app. - Because you have other assets (such as images) that application proxy needs to access at the top level of the folder structure, you publish the app with
https://ExpenseAppas the internal URL. - The default external URL is
https://ExpenseApp-contoso.msappproxy.net, which doesn't take an external user to the sign-in page. - You want to set
https://ExpenseApp-contoso.msappproxy.net/login/login.aspxas the home page URL instead, so an external user sees the sign-in page first.
Note
When you give users access to published apps, the apps are displayed in My Apps and the Office 365 app launcher.
Before you start
Before you set the home page URL, keep in mind the following requirements:
The path that you specify must be a subdomain path of the root domain URL.
For example, if the root-domain URL is
https://apps.contoso.com/app1/, the home page URL that you configure must start withhttps://apps.contoso.com/app1/.If you make a change to the published app, the change might reset the value of the home page URL. When you update the app in the future, you should recheck and, if necessary, update the home page URL.
You can set the home page URL either through the Microsoft Entra admin center or by using PowerShell.
Change the home page in the Microsoft Entra admin center
To change the home page URL of your app through the Microsoft Entra admin center, follow these steps:
Sign in to the Microsoft Entra admin center as at least a Application Administrator.
Select your username in the upper-right corner. Verify you're signed in to a directory that uses application proxy. If you need to change directories, select Switch directory and choose a directory that uses application proxy.
Browse to Identity > Applications > App registrations. The list of registered apps appears.
Choose your app from the list. A page showing the details of the registered app appears.
Under Manage, select Branding.
Update the Home page URL with your new path.
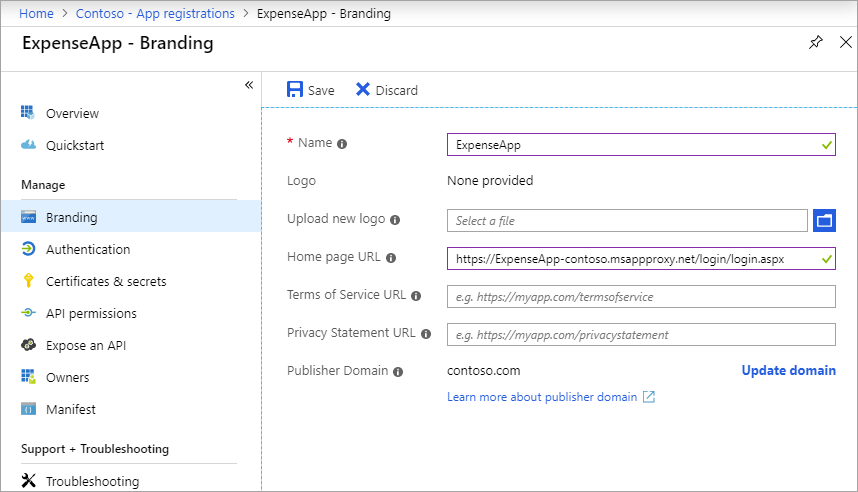
Select Save.
Change the home page with PowerShell
To configure the home page of an app using PowerShell, you need to:
- Install the Azure AD PowerShell module.
- Find the ObjectId value of the app.
- Update the app's home page URL using PowerShell commands.
Install the Azure AD PowerShell module
Before you define a custom home page URL by using PowerShell, install the Azure AD PowerShell module. You can download the package from the PowerShell Gallery, which uses the Graph API endpoint.
To install the package, follow these steps:
Open a standard PowerShell window, and then run the following command:
Install-Module -Name AzureADIf you're running the command without administrative rights, use the
-scope currentuseroption.During the installation, select Y to install two packages from Nuget.org. Both packages are required.
Find the ObjectId of the app
You get the ObjectId of the app by searching for the app by its display name or home page.
In the same PowerShell window, import the Microsoft Entra module.
Import-Module AzureADSign in to the Microsoft Entra module as the tenant administrator.
Connect-AzureADFind the app. This example uses PowerShell to find the ObjectId by searching for the app with a display name of
SharePoint.Get-AzureADApplication | Where-Object { $_.DisplayName -eq "SharePoint" } | Format-List DisplayName, Homepage, ObjectIdYou should get a result that's similar to the one shown here. Copy the ObjectId GUID to use in the next section.
DisplayName : SharePoint
Homepage    : https://sharepoint-iddemo.msappproxy.net/
ObjectId    : 8af89bfa-eac6-40b0-8a13-c2c4e3ee22a4
Alternatively, you could just pull the list of all apps, search the list for the app with a specific display name or home page, and copy the app's ObjectId once the app is found.
Get-AzureADApplication | Format-List DisplayName, Homepage, ObjectId
Update the home page URL
Create the home page URL, and update your app with that value. Continue using the same PowerShell window, or if you're using a new PowerShell window, sign in to the Microsoft Entra module again using Connect-AzureAD. Then follow these steps:
Create a variable to hold the
ObjectIdvalue you copied.$objguid = "<object id>"Confirm that you have the correct app by running the following command. The output should be identical to the output you saw in the previous section (Find the ObjectId of the app).
Get-AzureADApplication -ObjectId $objguid | Format-List DisplayName, Homepage, ObjectIdCreate a blank application object to hold the changes that you want to make.
$appnew = New-Object "Microsoft.Open.AzureAD.Model.Application"Set the home page URL to the value that you want. The value must be a subdomain path of the published app. For example, if you change the home page URL from
https://sharepoint-iddemo.msappproxy.net/tohttps://sharepoint-iddemo.msappproxy.net/hybrid/, app users go directly to the custom home page.$homepage = "https://sharepoint-iddemo.msappproxy.net/hybrid/"Make the update of the home page.
Set-AzureADApplication -ObjectId $objguid -Homepage $homepageTo confirm that the change was successful, run the following command from step 2 again.
Get-AzureADApplication -ObjectId $objguid | Format-List DisplayName, Homepage, ObjectIdFor our example, the output should now appear as follows:
DisplayName : SharePoint
Homepage    : https://sharepoint-iddemo.msappproxy.net/hybrid/
ObjectId    : 8af89bfa-eac6-40b0-8a13-c2c4e3ee22a4
Restart the app to confirm that the home page appears as the first screen, as expected.
Note
Any changes that you make to the app might reset the home page URL. If your home page URL resets, repeat the steps in this section to set it back.
Next steps
Povratne informacije
Uskoro: tokom 2024. postepeno ćemo ukidati probleme s uslugom GitHub kao mehanizam povratnih informacija za sadržaj i zamijeniti ga novim sistemom povratnih informacija. Za više informacija, pogledajte https://aka.ms/ContentUserFeedback.
Pošalјite i prikažite povratne informacije za