Post-migration optimization steps when using Azure Cosmos DB's API for MongoDB
APPLIES TO:
![]() MongoDB
MongoDB
Important
Please read this entire guide before carrying out your post-migration steps.
This MongoDB post-migration guide is part of series on MongoDB migration. The critical MongoDB migration steps are pre-migration, migration, and post-migration, as shown below.

Overview of post-migration
After you migrate the data stored in MongoDB database to Azure Cosmos DB's API for MongoDB, you can connect to Azure Cosmos DB and manage the data. This guide provides the steps you should consider after the migration. See the Migrate MongoDB to Azure Cosmos DB's API for MongoDB tutorial for the migration steps.
Follow these steps to perform a post-migration
- Optimize the indexing policy
- Configure global distribution for Azure Cosmos DB's API for MongoDB
- Set consistency level
- Connect (cutover) your application
- Tune for optimal performance
Note
The only mandatory post-migration step is to change the connection string in your application to point to your new Azure Cosmos DB account. All other post-migration steps are recommended optimizations to improve data-layer performance. However, if you perform application cutover immediately without the other steps, then your application will immediately see the impact of having non-optimal indexing and consistency. Specifically, if you cutover before configuring your indexes, the application may see an immediate price/performance drop. Be aware that this is can be remedied - once the index is optimized, we expect that Azure Cosmos DB will often outperform the status quo solution on price/performance.
Pre-requisites
In this guide, we assume that you are maintaining a record of your migration's progress using some sort of tracking artifact such as a spreadsheet. If you have not already, we recommend that you read the pre-migration guide for guidance on building a data estate migration spreadsheet, discovering your existing MongoDB resources, and planning your migration.
Optimize the indexing policy
In order to optimize price and performance, we recommend that you step through your data estate migration spreadsheet and design an index configuration for each resource.
- We actually recommend planning your indexes during the pre-migration phase. Add a column to your data estate migration spreadsheet for index settings.
The Azure Cosmos DB for MongoDB server versions 3.6 and higher automatically index the _id field only. This field can't be dropped. It automatically enforces the uniqueness of the _id field per shard key. To index additional fields, you apply the MongoDB index-management commands. This default indexing policy differs from the Azure Cosmos DB for NoSQL, which indexes all fields by default.
For the Azure Cosmos DB for MongoDB server version 3.2, all data fields are automatically indexed, by default, during the migration of data to Azure Cosmos DB. In many cases, this default indexing policy is acceptable. In general, removing indexes optimizes write requests and having the default indexing policy (i.e., automatic indexing) optimizes read requests.
The indexing capabilities provided by Azure Cosmos DB include adding compound indices, unique indices and time-to-live (TTL) indices. The index management interface is mapped to the createIndex() command. Learn more at Indexing in Azure Cosmos DB and Indexing in Azure Cosmos DB's API for MongoDB.
- Apply these index settings during post-migration.
- Azure Database Migration Service automatically migrates MongoDB collections with unique indexes. However, the unique indexes must be created before the migration. Azure Cosmos DB does not support the creation of unique indexes, when there is already data in your collections. For more information, see Unique keys in Azure Cosmos DB.
Globally distribute your data
Azure Cosmos DB is available in all Azure regions worldwide.
- Follow the guidance in the article Distribute data globally on Azure Cosmos DB's API for MongoDB in order to globally distribute your data. After selecting the default consistency level for your Azure Cosmos DB account, you can associate one or more Azure regions (depending on your global distribution needs). For high availability and business continuity, we always recommend running in at least 2 regions. You can review the tips for optimizing cost of multi-region deployments in Azure Cosmos DB.
Set consistency level
Azure Cosmos DB offers 5 well-defined consistency levels. To read about the mapping between MongoDB and Azure Cosmos DB consistency levels, read Consistency levels and Azure Cosmos DB APIs. The default consistency level is the session consistency level. Changing the consistency level is optional and you can optimize it for your app. To change consistency level using Azure portal:
- Go to the Default Consistency blade under Settings.
- Select your consistency level
Most users leave their consistency level at the default session consistency setting. However, there are availability and performance tradeoffs for various consistency levels.
Connect or cutover your application
The processing of cutting-over or connecting your application allows you to switch your application to use Azure Cosmos DB once migration is finished. Follow the steps below:
- In a new window, sign in to the Azure portal.
- From the Azure portal, in the left pane open the All resources menu and find the Azure Cosmos DB account to which you have migrated your data.
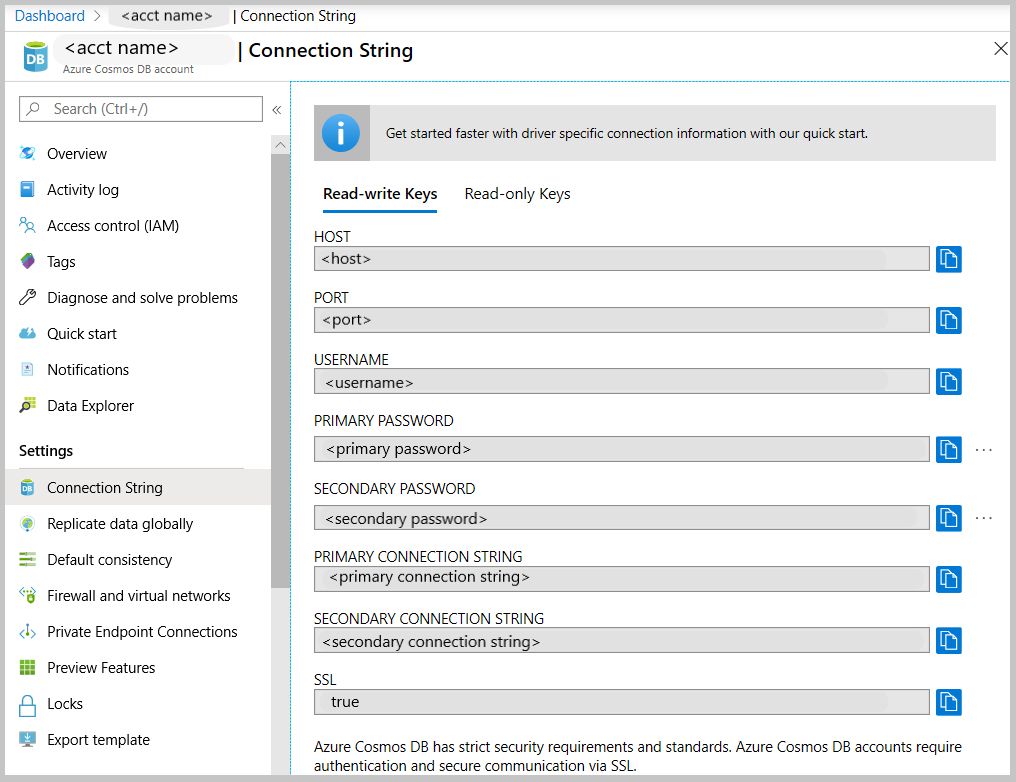
- Open the Connection String blade. The right pane contains all the information that you need to successfully connect to your account.
- Use the connection information in your application's configuration (or other relevant places) to reflect the Azure Cosmos DB's API for MongoDB connection in your app.
For more details, please see the Connect a MongoDB application to Azure Cosmos DB page.
Tune for optimal performance
One convenient fact about indexing, global distribution and consistency - all of these can be easily configured and reconfigured as you see fit. So once you finish application cutover, we advise that you monitor your application's performance and adjust these settings as-needed in order to meet your application's requirements.
Next steps
- Trying to do capacity planning for a migration to Azure Cosmos DB?
- If all you know is the number of vcores and servers in your existing database cluster, read about estimating request units using vCores or vCPUs
- If you know typical request rates for your current database workload, read about estimating request units using Azure Cosmos DB capacity planner
- Connect a MongoDB application to Azure Cosmos DB
- Connect to Azure Cosmos DB account using Studio 3T
- How to globally distribute reads using Azure Cosmos DB's API for MongoDB
- Expire data with Azure Cosmos DB's API for MongoDB
- Consistency Levels in Azure Cosmos DB
- Indexing in Azure Cosmos DB
- Request Units in Azure Cosmos DB
Povratne informacije
Uskoro: tokom 2024. postepeno ćemo ukidati probleme s uslugom GitHub kao mehanizam povratnih informacija za sadržaj i zamijeniti ga novim sistemom povratnih informacija. Za više informacija, pogledajte https://aka.ms/ContentUserFeedback.
Pošalјite i prikažite povratne informacije za