Configure and build with CMake Presets in Visual Studio
CMake supports two files that allow users to specify common configure, build, and test options and share them with others: CMakePresets.json and CMakeUserPresets.json. Use these files to drive CMake in Visual Studio and Visual Studio Code, in a continuous integration (CI) pipeline, and from the command line.
CMakePresets.json is for saving project-wide builds. CMakeUserPresets.json is for developers to save their own local builds. Both files are supported in Visual Studio 2019 version 16.10 or later.
This article contains information about CMakePresets.json integration with Visual Studio. Here are helpful links:
- For more information about the format of
CMakePresets.json, see the official CMake documentation. - For more information about the Microsoft vendor maps and macro expansion, see
CMakePresets.jsonandCMakeUserPresets.jsonMicrosoft vendor maps. - For more information about how to use
CMakePresets.jsonin Visual Studio Code, see Configure and build with CMake Presets.
We recommend CMakePresets.json as an alternative to CMakeSettings.json. Visual Studio never reads from both CMakePresets.json and CMakeSettings.json at the same time. To enable or disable CMakePresets.json integration in Visual Studio, see Enable CMakePresets.json in Visual Studio 2019.
Supported CMake and CMakePresets.json versions
The supported CMakePresets.json and CMakeUserPresets.json schema versions depend on your version of Visual Studio:
- Visual Studio 2019 version 16.10 and later support schema versions 2 and 3.
- Visual Studio 2022 version 17.4 preview 1 adds support for schema version 4.
- Visual Studio 2022 version 17.5 preview 1 adds support for schema version 5.
You can update the version by changing the "version" field in the root object. For an example and more information, see CMakePresets.json format.
CMake version 3.20 or later is required when you're invoking CMake with CMakePresets.json from the command line. However, Visual Studio reads and evaluates CMakePresets.json and CMakeUserPresets.json itself and doesn't invoke CMake directly with the --preset option. So, CMake version 3.20 or later isn't strictly required when you're building with CMakePresets.json inside Visual Studio.
We recommend using at least CMake version 3.14 or later.
Enable CMakePresets.json integration in Visual Studio
CMakePresets.json integration isn't enabled by default in Visual Studio. You can enable it in Tools > Options > CMake > General:
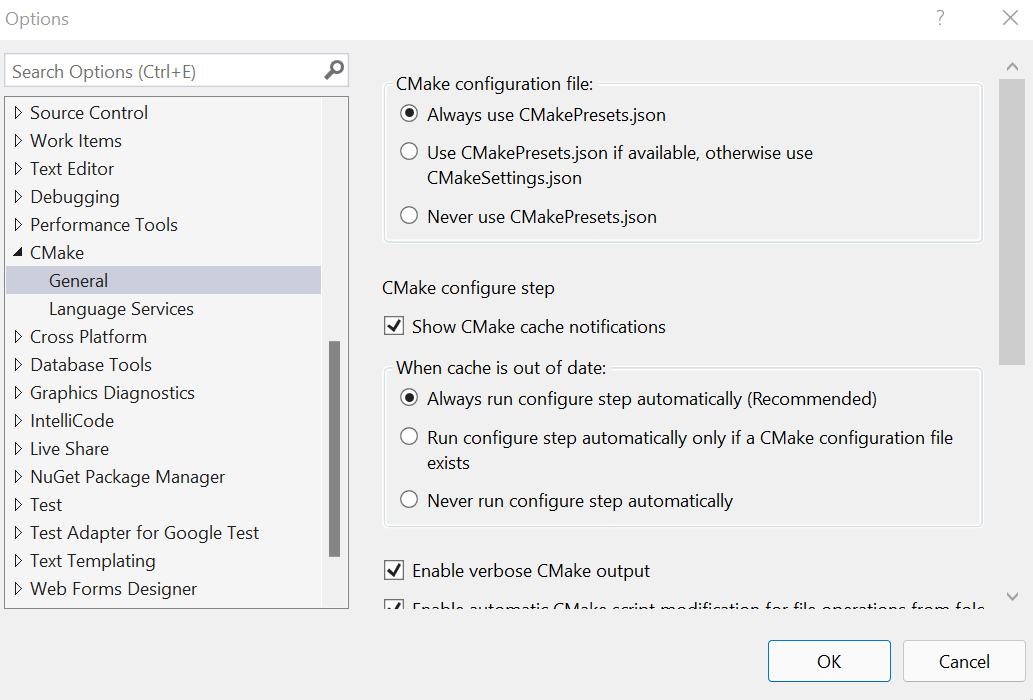
This screen is reached from the Visual Studio 2022 menu: Tools > Options > CMake > General. The option is under the CMake configure file section.
Important
Close and reopen the folder in Visual Studio to activate the integration.
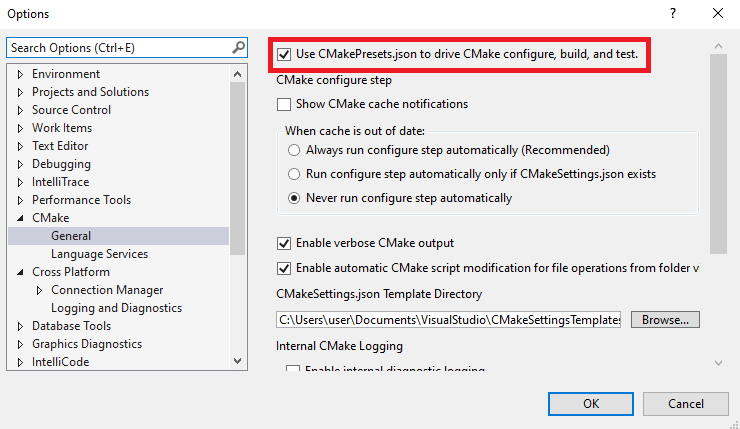
In some older versions of Visual Studio, Tools > Options > CMake > General only has a single option to enable CMakePresets.json integration:
The following table indicates when CMakePresets.json is used instead of CMakeSettings.json to drive CMake configuration and build in Visual Studio 2022 and Visual Studio 2019 version 16.10 and later. If no configuration file is present, default Configure Presets are used.
In the table, "Tools > Options enabled" means Use CMakePresets.json to drive CMake configure, build, and test is selected in Tools > Options > CMake > General.
| Configuration files | Tools > Options disabled | Tools > Options enabled |
|---|---|---|
| No configuration file present | CMakeSettings.json |
CMakePresets.json |
CMakeSettings.json present |
CMakeSettings.json |
CMakePresets.json |
CMakePresets.json present |
CMakePresets.json |
CMakePresets.json |
| Both configuration files present | CMakePresets.json |
CMakePresets.json |
Modify automatic configuration and cache notifications
By default, Visual Studio automatically invokes configure each time the active Target System or Configure Preset changes. You can modify this behavior by selecting Never run configure step automatically in Tools > Options > CMake > General. You can also disable all CMake cache notifications (gold bars) by clearing Show CMake cache notifications.
Default Configure Presets
If no CMakePresets.json or CMakeUserPresets.json file exists, or if CMakePresets.json or CMakeUserPresets.json is invalid, Visual Studio falls back on the following default Configure Presets:
Windows example
{
  "name": "windows-default",
  "displayName": "Windows x64 Debug",
  "description": "Sets Ninja generator, compilers, x64 architecture, build and install directory, debug build type",
  "generator": "Ninja",
  "binaryDir": "${sourceDir}/out/build/${presetName}",
  "architecture": {
    "value": "x64",
    "strategy": "external"
  },
  "cacheVariables": {
    "CMAKE_BUILD_TYPE": "Debug",
    "CMAKE_INSTALL_PREFIX": "${sourceDir}/out/install/${presetName}"
  },
  "vendor": {
    "microsoft.com/VisualStudioSettings/CMake/1.0": {
      "hostOS": [ "Windows" ]
    }
  }
},
Linux example
{
  "name": "linux-default",
  "displayName": "Linux Debug",
  "description": "Sets Ninja generator, compilers, build and install directory, debug build type",
  "generator": "Ninja",
  "binaryDir": "${sourceDir}/out/build/${presetName}",
  "cacheVariables": {
    "CMAKE_BUILD_TYPE": "Debug",
    "CMAKE_INSTALL_PREFIX": "${sourceDir}/out/install/${presetName}"
  },
  "vendor": {
    "microsoft.com/VisualStudioSettings/CMake/1.0": {
      "hostOS": [ "Linux" ]
    },
    "microsoft.com/VisualStudioRemoteSettings/CMake/1.0": {
      "sourceDir": "$env{HOME}/.vs/$ms{projectDirName}"
   }
  }
}
If you try to open or modify a CMakePresets.json file that doesn't exist, Visual Studio automatically creates a CMakePresets.json file with the default Configure Presets at the root of your project.
Configure and build
On the Visual Studio toolbar, there are dropdowns for the Target Systems, Configure Presets, and Build Presets when CMakePresets.json integration is enabled:

Select a Target System
The dropdown list on the left indicates the active Target System. It's the system on which CMake is invoked to configure and build the project. This dropdown list includes your local machine, all SSH connections in Connection Manager by host name, and all Windows Subsystem for Linux (WSL) installations that Visual Studio can find:
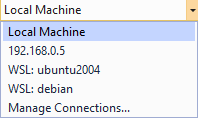
The dropdown list contains several entries including Local Machine, an ip address 192.168.0.5, WSL: ubuntu2004, WSL: debian, and Manage Connections.
In the preceding example:
- 192.168.0.5 is a remote Linux system that was added to Connection Manager.
- ubuntu2004 and debian are WSL installations.
Select Manage Connections to open Connection Manager.
Select a Configure Preset
The dropdown list in the middle indicates the active Configure Preset. It's the configurePreset value that's used when CMake is invoked to generate the project build system. This dropdown list includes the union of non-hidden Configure Presets defined in CMakePresets.json and CMakeUserPresets.json.
Visual Studio uses the value of hostOS in the Microsoft Visual Studio Settings vendor map to hide Configure Presets that don't apply to the active Target System. For more information, see the entry for hostOS in the table under Visual Studio Settings vendor map.
Select Manage Configurations to open the CMakePresets.json file located at the root of the project. CMakePresets.json is created if it doesn't already exist.
Select a Build Preset
The dropdown list on the right indicates the active Build Preset. It's the buildPreset value that's used when CMake is invoked to build the project. This dropdown list includes the union of non-hidden Build Presets defined in CMakePresets.json and CMakeUserPresets.json.
All Build Presets are required to specify an associated configurePreset value. Visual Studio hides Build Presets that don't apply to the active Configure Preset. For more information, see the list of Build Presets.
If there are no Build Presets associated with the active Configure Preset, Visual Studio lists the default Build Preset. The default Build Preset is equivalent to passing cmake --build with no other arguments from the command line.
Configure
Visual Studio automatically tries to configure the project when it detects that the CMake cache is out of date. To manually invoke the configuration, select Project > Configure <project-name> from the main menu. It's the same as running cmake --preset <configurePreset> from the command line, where <configurePreset> is the name of the active Configure Preset.
To disable automatic cache generation, see Automatic configuration and cache notifications.
Build
To build the entire project, select Build > Build All from the main menu. It's the same as running cmake --build --preset <buildPreset> from the command line, where <buildPreset> is the name of the active Build Preset.
To build a single target, switch to CMake Targets View in Solution Explorer. Then right-click any target and select Build from the shortcut menu.
Note
Visual Studio 2019 doesn't support the buildPresets.targets option to build a subset of targets specified in CMakePresets.json.
Run CTest
CMakePresets.json supports two menu options in Visual Studio 2019:
- Test > Run CTests for <project-name> invokes CTest and runs all tests associated with the active Configure Preset and Build Preset, with no other arguments passed to CTest.
- Test > Run Test Preset for <configurePreset> expands to show all Test Presets associated with the active Configure Preset. Selecting a single Test Preset is the same as running
ctest --preset <testPreset>from the command line, where<testPreset>is the name of the selected Test Preset. This option is unavailable if no Test Presets are defined for the active Configure Preset.
In Visual Studio 2019, Test Explorer isn't integrated with CMakePresets.json.
Add new presets
In Visual Studio 2019, all commands and preset templates modify CMakePresets.json. You can add new user-level presets by directly editing CMakeUserPresets.json.
Use a forward slash (/) for paths in CMakePresets.json and CMakeUserPresets.json.
Add new Configure Presets
To add a new Configure Preset to CMakePresets.json, from Solution Explorer, right-click CMakePresets.json from Folder View and select Add Configuration from the shortcut menu. The dialog to select a Configure Preset template appears:

Select the Windows x64 Debug template to configure on Windows systems. Select the Linux Debug template to configure on WSL and remote Linux systems. For more information about editing CMakePresets.json, see Edit presets.
The selected template is added to CMakePresets.json if it exists. Otherwise, the template is copied into a new CMakePresets.json file.
Add new Build Presets and Test Presets
Visual Studio 2019 doesn't offer templates for new Build Presets and Test Presets. You can add Build Presets and Test Presets by directly editing CMakePresets.json. For more information, see the list of Build Presets, the list of Test Presets, or an example CMakePresets.json file.
Edit presets
The official CMake documentation is the best resource for editing Configure Presets, Build Presets, and Test Presets. The following information is a subset of the CMake documentation that's especially relevant to Visual Studio developers.
Select your compilers
You can set C and C++ compilers by using cacheVariables.CMAKE_C_COMPILER and cacheVariables.CMAKE_CXX_COMPILER in a Configure Preset. It's equivalent to passing -D CMAKE_C_COMPILER=<value> and -D CMAKE_CXX_COMPILER=<value> to CMake from the command line. For more information, see CMAKE_<LANG>_COMPILER.
Use the following examples to build with cl.exe and clang-cl.exe from Visual Studio. The C++ Clang tools for Windows components must be installed for you to build with clang-cl.
Build with cl.exe:
"cacheVariables": {
  "CMAKE_BUILD_TYPE": "Debug",
  "CMAKE_INSTALL_PREFIX": "${sourceDir}/out/install/${presetName}",
  "CMAKE_C_COMPILER": "cl",
  "CMAKE_CXX_COMPILER": "cl"
},
Build with clang:
"cacheVariables": {
  "CMAKE_BUILD_TYPE": "Debug",
  "CMAKE_INSTALL_PREFIX": "${sourceDir}/out/install/${presetName}",
  "CMAKE_C_COMPILER": "clang-cl",
  "CMAKE_CXX_COMPILER": "clang-cl"
},

"vendor": {
  "microsoft.com/VisualStudioSettings/CMake/1.0": {
    "intelliSenseMode": "windows-clang-x64"
  }
}
If you use either Visual Studio 16 2019 or Visual Studio 17 2022 as your generator, you can use the toolset Configure Preset to specify the ClangCL toolset:
"cacheVariables": {
  "CMAKE_BUILD_TYPE": "Debug",
  "CMAKE_INSTALL_PREFIX": "${sourceDir}/out/install/${presetName}",
},

"toolset": "ClangCL",

"vendor": {
  "microsoft.com/VisualStudioSettings/CMake/1.0": {
    "intelliSenseMode": "windows-clang-x64"
  }
}
For more information on generators that support the toolset specification, see CMAKE_GENERATOR_TOOLSET in the CMake documentation.
Important
In Visual Studio 2019, you must explicitly specify a Clang IntelliSense mode when you're building with clang or clang-cl.
To reproduce these builds outside Visual Studio, see Run CMake from the command line or a CI pipeline.
To build on Linux or without the Visual C++ toolset, specify the name of a compiler on your PATH instance, or an environment variable that evaluates to the full path of a compiler. Full paths are discouraged so that the file can remain shareable. A preset that builds with GCC version 8 might look like this:
"cacheVariables": {
  "CMAKE_BUILD_TYPE": "Debug",
  "CMAKE_INSTALL_PREFIX": "${sourceDir}/out/install/${presetName}",
  "CMAKE_C_COMPILER": "gcc-8",
  "CMAKE_CXX_COMPILER": "g++-8"
},
You can also set compilers with a CMake toolchain file. Toolchain files can be set with cacheVariables.CMAKE_TOOLCHAIN_FILE, which is equivalent to passing -D CMAKE_TOOLCHAIN_FILE=<value> to CMake from the command line. A CMake toolchain file is most often used for cross-compilation. For more information about authoring CMake toolchain files, see CMake toolchains.
Select your generator
The Windows and Linux Configure Preset templates both specify Ninja as the default generator. Other common generators are the Visual Studio Generators on Windows and Unix Makefiles on Linux and macOS. You can specify a new generator with the generator option in a Configure Preset. It's equivalent to passing -G to CMake from the command line.
Set architecture.strategy and toolset.strategy to set when you're building with a Visual Studio Generator. For more information, see CMake generators.
Select your configuration type
You can set the configuration type (Debug or Release) for single configuration generators by using cacheVariables.CMAKE_BUILD_TYPE. It's equivalent to passing -D CMAKE_BUILD_TYPE=<value> to CMake from the command line. For more information, see CMAKE_BUILD_TYPE.
Select your target and host architecture when building with the Visual C++ toolset
You can set the target architecture (x64, Win32, ARM64, or ARM) by using architecture.value. It's equivalent to passing -A to CMake from the command line. For more information, see Platform Selection.
Note
Currently, Visual Studio Generators expect the Win32 syntax and command-line generators (like Ninja) expect the x86 syntax when you're building for x86.
You can set the host architecture (x64 or x86) and toolset by using toolset.value. It's equivalent to passing -T to CMake from the command line. For more information, see Toolset Selection.
The architecture.strategy and toolset.strategy values tell CMake how to handle the architecture and toolset fields. set means CMake sets the respective value, and external means CMake won't set the respective value.
We recommend using set with IDE generators like the Visual Studio Generator. Use external with command-line generators like Ninja. These values allow vendors like Visual Studio to supply the required environment before CMake is invoked. For more information about the architecture and toolset fields, see the list of Configure Presets.
If you don't want to source an environment, you can set architecture.strategy to external and architecture.value to unspecified. You might find it useful not to source an environment for any one of these reasons:
- You use a toolset other than MSVC.
- You use a custom toolchain, such as in embedded scenarios.
- You don't need a specific environment to build.
For a full list of IDE generators that support the architecture field, see CMAKE_GENERATOR_PLATFORM. For a full list of IDE generators that support the toolset field, see CMAKE_GENERATOR_TOOLSET.
Use the following examples to target ARM64 with the Ninja generator, or to target Win32 (x86) with the Visual Studio 16 2019 generator:
"generator": "Ninja",
"architecture": {
    "strategy": "external",
    "value": "arm64"
},

"generator": "Visual Studio 16 2019",
"architecture": {
    "strategy": "set",
     "value": "Win32"
},
Set and reference environment variables
You can set environment variables by using the environment map. Environment variables are inherited through the inherits field, but you can override them as you like.
A preset's environment is the union of its own environment and the environment from all its parents. If multiple inherits presets provide conflicting values for the same variable, the earlier preset in the inherits list is preferred. You can unset a variable inherited from another preset by setting it to null.
Environment variables set in a Configure Preset also automatically flow through to associated Build Presets and Test Presets, unless inheritConfigureEnvironment is set to false. For more information, see the list of Configure Presets.
You can reference environment variables by using the $env{<variable-name>} and $penv{<variable-name>} syntax. For more information, see Macro Expansion.
Configure IntelliSense for a cross-compiler
By default, Visual Studio uses the IntelliSense mode that matches your specified toolset and target architecture. If you're cross-compiling, you might need to manually specify the correct IntelliSense mode by using the intelliSenseMode option in the Visual Studio Settings vendor map. For more information, see the entry for intelliSenseMode in the table under Visual Studio Settings vendor map.
Configure and build on a remote system or the Windows Subsystem for Linux
With CMakePresets.json support in Visual Studio, you can easily configure and build your project on Windows, WSL, and remote systems. The steps to configure and build your project on Windows, a remote system, or WSL are the same. However, a few behaviors are specific to remote development.
${sourceDir} behavior in remote copy scenarios
In local scenarios (including WSL1), ${sourceDir} evaluates to the path to the project source directory that's open in Visual Studio. In remote copy scenarios, ${sourceDir} evaluates to the path to the project source directory on the Target System and not the project source directory on the local machine.
The value of sourceDir in the Visual Studio Remote Settings vendor map determines the project source directory on the Target System (defaults to $env{HOME}/.vs/$ms{projectDirName}). For more information, see the entry for sourceDir in the table under Visual Studio Settings vendor map.
Local folder for remote output
Remote copy scenarios require a local directory to copy some remote files like CMake File API response files or build files if copyBuildOutput in the Visual Studio Remote Settings vendor map is set to true. These files are automatically copied to <local-source-directory>/out/<remote-connection-ID>/build/${presetName}.
Invoking the same Configure Preset on Windows and WSL1
You'll see an error if you try to use the same Configure Preset on Windows and WSL1. Windows and WSL1 both use the Windows file system, so CMake will try to use the same output directory (binaryDir) for both the Windows and WSL1 build trees.
If you want to use the same Configure Preset with both Windows and the WSL1 toolset, create a second Configure Preset that inherits from the original preset and specifies a new binaryDir value. In the following example, windows-preset can be used on Windows and base-preset can be used on WSL1:
{
  "name": "windows-preset",
  "inherits": "base-preset",
  "binaryDir": "${sourceDir}/out/build/${presetName}",
  "vendor": {
    "microsoft.com/VisualStudioSettings/CMake/1.0": {
      "hostOS": "Windows"
    }
  }
}
Note
In Visual Studio 2019, only the WSL1 toolset is supported. You'll see this behavior any time you invoke configure on both Windows and WSL.
Enable vcpkg integration
Vcpkg helps you manage C and C++ libraries on Windows, Linux, and macOS. A vcpkg toolchain file (vcpkg.cmake) must be passed to CMake to enable vcpkg integration. For more information, see the vcpkg documentation.
Visual Studio no longer passes your vcpkg toolchain file to CMake automatically when CMakePresets.json integration is enabled. This change eliminates Visual Studio-specific behavior and ensures that you can reproduce your build from the command line.
Instead, set the path to vcpkg.cmake by using the VCPKG_ROOT environment variable in CMakePresets.json:
"cacheVariables": {
   "CMAKE_TOOLCHAIN_FILE": {
      "value": "$env{VCPKG_ROOT}/scripts/buildsystems/vcpkg.cmake",
       "type": "FILEPATH"
    }
 },
VCPKG_ROOT should be set to the root of your vcpkg installation. For more information, see vcpkg environment variables.
If you're already using a CMake toolchain file and want to enable vcpkg integration, see Using multiple toolchain files. Follow those instructions to use an external toolchain file with a project by using vcpkg.
Variable substitution in launch.vs.json and tasks.vs.json
CMakePresets.json supports variable substitution in launch.vs.json and tasks.vs.json. Here are some considerations:
Environment variables set in the active Configure Preset automatically flow through to
launch.vs.jsonandtasks.vs.jsonconfigurations. You can unset individual environment variables inlaunch.vs.jsonandtasks.vs.jsonby setting them tonull. The following example sets the variableDEBUG_LOGGING_LEVELtonullinlaunch.vs.json:"env": { "DEBUG_LOGGING_LEVEL": null }.Key values set in the active Configure Preset are available for consumption in
launch.vs.jsonandtasks.vs.jsonwith the syntax${cmake.<KEY-NAME>}. For example, use${cmake.binaryDir}to reference the output directory of the active Configure Preset.Individual environment variables set in the environment map of the active Configure Preset are available for consumption in
launch.vs.jsonandtasks.vs.jsonthrough the syntax${env.<VARIABLE-NAME>}.
Update your launch.vs.json and task.vs.json files to reference CMakePresets.json syntax instead of CMakeSettings.json syntax. Macros that reference the old CMakeSettings.json syntax when CMakePresets.json is the active configuration file are slated for deprecation in a future release. For example, reference the output directory of the active Configure Preset with ${cmake.binaryDir} instead of ${cmake.buildRoot}, because CMakePresets.json uses the binaryDir syntax.
Troubleshoot
If things aren't working as expected, you can try a few troubleshooting steps.
If either CMakePresets.json or CMakeUserPresets.json is invalid, Visual Studio will fall back on its default behavior and show only the default Configure Presets. Visual Studio IntelliSense can help you catch many of these JSON errors, but it won't know if you're referencing a preset with inherits or configurePreset by the wrong name.
To check if your preset files are valid, run cmake --list-presets from the command line at the root of your project directory. (CMake 3.20 or later is required.) If either file is invalid, you'll see the following error:
CMake Error: Could not read presets from
C:/Users/<user>/source/repos/<project-name>: JSON parse error
Other troubleshooting steps include:
- Delete the cache and reconfigure the project (CMake: Delete Cache and Project > Configure <project-name>).
- Close and reopen the folder in Visual Studio (File > Close Folder).
- Delete the
.vsfolder at the root your project.
If you've identified a problem, the best way to report it is by selecting the Send Feedback button in the upper-right corner of Visual Studio.
Enable logging for remote connections
You can enable logging for remote connections if you're having trouble connecting or copying files to a remote system. For more information, see Logging for remote connections.
Enable AddressSanitizer for Windows and Linux
Visual Studio supports AddressSanitizer (ASAN), a C and C++ runtime memory error detector, for both Windows and Linux development. The addressSanitizerEnabled option in CMakeSettings.json enables AddressSanitizer. CMakePresets.json doesn't support this behavior.
Instead, enable and disable AddressSanitizer by setting the required compiler and linker flags yourself. Setting them removes Visual Studio-specific behavior and ensures that the same CMakePresets.json file can reproduce your build from the command line.
You can add the following sample to CMakeLists.txt to enable or disable AddressSanitizer for a target:
option(ASAN_ENABLED "Build this target with AddressSanitizer" ON)

if(ASAN_ENABLED)
  if(MSVC)
    target_compile_options(<target> PUBLIC /fsanitize=address)
  else()
    target_compile_options(<target> PUBLIC -fsanitize=address <additional-options>)
    target_link_options(<target> PUBLIC -fsanitize=address)
  endif()
endif()
The <additional-options> part lists other compilation flags, like "-fno-omit-frame-pointer". For more information about AddressSanitizer for Linux, see Using AddressSanitizer. For more information about using AddressSanitizer with MSVC, see Use AddressSanitizer from a developer command prompt.
Pass runtime flags to AddressSanitizer by using the ASAN_OPTIONS field in launch.vs.json. ASAN_OPTIONS defaults to detect_leaks=0 when no other runtime options are specified because LeakSanitizer isn't supported in Visual Studio.
Run CMake from the command line or a CI pipeline
You can use the same CMakePresets.json and CMakeUserPresets.json files to invoke CMake in Visual Studio and from the command line. The CMake and CTest documentation are the best resources for invoking CMake and CTest with --preset. CMake version 3.20 or later is required.
Sourcing the environment when building with command-line generators on Windows
It's up to the user to configure the environment before CMake is invoked in building with a command-line generator. If you're building with Ninja and the Visual C++ toolset on Windows, set the environment before CMake is called to generate the build system. You can do it by calling vcvarsall.bat with the architecture argument. The architecture argument specifies the host and target architecture to use. For more information, see vcvarsall syntax. If you build on Linux or on Windows with a Visual Studio Generator, you don't need to take this step.
It's the same step that Visual Studio takes for you when the IDE invokes CMake. Visual Studio parses the active Configure Preset for the host and target architecture specified by toolset and architecture. Visual Studio then sources the specified environment from vcvarsall.bat. When you build from the Windows command line with Ninja, you'll need to take this step yourself.
vcvarsall.bat is installed with the Build Tools for Visual Studio. By default, vcvarsall.bat is installed in C:\Program Files (x86)\Microsoft Visual Studio\2019\<edition>\VC\Auxiliary\Build. You can add vcvarsall.bat to PATH if you use the command-line workflow often.
Example command-line workflow
You can use the following commands to configure and build a CMake project that uses Ninja to target ARM64 with x64 build tools. CMake version 3.20 or later is required. Run these commands from the directory where your CMakePresets.json file is located:
/path/to/vcvarsall.bat x64_arm64
cmake --list-presets=all .
cmake --preset <configurePreset-name>
cmake --build --preset <buildPreset-name>
Example CMakePresets.json file
The CMakePresets.json file in box2d-lite contains examples of Configure Presets, Build Presets, and Test Presets. For more information about this example, see the presentation An Introduction to CMakePresets.json. You can see another example in the DirectXTK project, which shows many build targets in its configurePresets section.
Next steps
Learn more about configuring and debugging CMake projects in Visual Studio:
Feedback
Coming soon: Throughout 2024 we will be phasing out GitHub Issues as the feedback mechanism for content and replacing it with a new feedback system. For more information see: https://aka.ms/ContentUserFeedback.
Submit and view feedback for