Quickstart: Create a Game Development Virtual Machine using an ARM template
Important
Azure Game Development Virtual Machine is scheduled for retirement on February 1st, 2024. Learn more.
In addition to the portal deployment method that supports Windows 11 and Server 2022, you can also create an instance of the Game Development Virtual Machine using an Azure Resource manager (ARM) template which supports additional operating systems like Windows 10 and Server 2019 with different game engine versions. Game Development Virtual Machines are cloud-based virtual machines preloaded with a suite of software and tools for game development. When deployed on GPU-powered compute resources, all tools are configured to use the GPU.
An ARM template is a JavaScript Object Notation (JSON) file that defines the infrastructure and configuration for your project. The template uses declarative syntax. In declarative syntax, you describe your intended deployment without writing the sequence of programming commands to create the deployment.
If your environment meets the prerequisites and you're familiar with using ARM templates, select the Deploy to Azure button. The template will open in the Azure portal.


Prerequisites
- An Azure account with an active subscription. If you don't have an Azure subscription, create a free account before you begin. Please note Azure free accounts do not support GPU enabled virtual machine SKUs. To understand what Azure subscriptions support GPU SKUs, please refer to this offer types chart.
- To use the CLI commands in this document from your local environment, you need the Azure CLI.
Review the template
The template used in this Quickstart is from Azure Quickstart Templates.
You can view the details of ARM template JSON from this GitHub repository.
The following resources are defined in the template:
- Microsoft.Network/publicIPAddress
- Microsoft.Network/networkSecurityGroups
- Microsoft.Network/virtualNetworks
- Microsoft.Network/networkInterfaces
- Microsoft.Compute/virtualMachines
Deploy the template with default parameters
To use the template from the Azure CLI, login in and choose your subscription. Then run the scripts below. This is a basic deployment with default Game Dev VM parameters. It deploys a Windows 10 VM with Unreal Engine 5.0.1 installed which has RDP as the remote connection method. The VM size is Standard_Nv12s_v3.
read -p "Enter the name of the resource group to create:" resourceGroupName &&
read -p "Enter the Azure location (e.g., centralus):" location &&
read -p "Enter the local administrator username:" adminName &&
read -s -p "Enter the local administrator password:" adminPass &&
echo "" &&
osType=win10 &&
engine=unreal &&
version=5_0_1 &&
templateUri="https://raw.githubusercontent.com/Azure/azure-quickstart-templates/master/application-workloads/azure-gamedev/gamedev-vm/azuredeploy.json" &&
az vm image terms accept --urn "microsoft-azure-gaming:game-dev-vm:$osType"_"$engine"_"$version:latest" &&
az group create --name $resourceGroupName --location "$location" &&
az deployment group create \
    --resource-group $resourceGroupName \
    --template-uri $templateUri \
    -p adminName=$adminName \
    -p adminPass=$adminPass \
    -p osType=$osType \
    -p gameEngine="ue_"$version &&
echo "Press [ENTER] to continue ..." &&
read
Advanced deployment
For advanced configurations, additional parameters can be set to configure the Virtual Machine Size, Engine Version, or OS type.
read -p "Enter the name of the resource group to create:" resourceGroupName &&
read -p "Enter the Azure location (e.g., centralus):" location &&
read -p "Enter the VM size (e.g., Standard_Nv12s_v3):" vmSize &&
read -p "Enter the local administrator username:" adminName &&
read -s -p "Enter the local administrator password:" adminPass &&
read -p "Enter the OS type (e.g., win10 or ws2019):" osType &&
engine=unreal &&
read -p "Enter the Unreal Engine version (e.g., 4_27_2 or 5_0_1):" version &&
templateUri="https://raw.githubusercontent.com/Azure/azure-quickstart-templates/master/application-workloads/azure-gamedev/gamedev-vm/azuredeploy.json" &&
az vm image terms accept --urn "microsoft-azure-gaming:game-dev-vm:$osType"_"$engine"_"$version:latest" &&
az group create --name $resourceGroupName --location "$location" &&
az deployment group create \
    --resource-group $resourceGroupName \
    --template-uri $templateUri \
    -p adminName=$adminName \
    -p adminPass=$adminPass \
    -p osType=$osType \
    -p gameEngine="ue_"$version &&
echo "Press [ENTER] to continue ..." &&
read
When you run the above command, enter:
- The name of the resource group you would like to create holds the Game Development Virtual Machine and associated resources.
- The Azure region location in which you wish to make the deployment.
- The username for the Administrative User.
- The password for the Administrative User.
- The operating system of the VM.
- The game engine (currently only Unreal Engine is supported, but more may be added in the future).
- The game engine version.
Here is the list of all the available Game Dev VM images:
| Image Description | osType | engine | version | Azure Portal | ARM |
|---|---|---|---|---|---|
| Win11 with UE5 | win11 | unreal | 5_0 | Y | Y |
| Win11 with UE5.1 | win11 | unreal | 5_1 | Y | Y |
| Win11 without UE | win11 | no_engine | 1_0 | Y | Y |
| Svr22 with UE5 | ws2022 | unreal | 5_0 | Y | Y |
| Svr22 with UE5.1 | ws2022 | unreal | 5_1 | Y | Y |
| Svr22 without UE | ws2022 | no_engine | 1_0 | Y | Y |
| Win10 with UE5.0.1 | win10 | unreal | 5_0_1 | N | Y |
| Win10 with UE5 | win10 | unreal | 5_0 | N | Y |
| Win10 with UE4.27.2 | win10 | unreal | 4_27_2 | N | Y |
| Win10 with UE4.27 | win10 | unreal | 4_27 | N | Y |
| Win10 without UE | win10 | no_engine | 1_0 | N | Y |
| Svr19 with UE5.0.1 | ws2019 | unreal | 5_0_1 | N | Y |
| Svr19 with UE5 | ws2019 | unreal | 5_0 | N | Y |
| Svr19 with UE4.27.2 | ws2019 | unreal | 4_27_2 | N | Y |
| Svr19 with UE4.27 | ws2019 | unreal | 4_27 | N | Y |
| Svr19 without UE | ws2019 | no_engine | 1_0 | N | Y |
Review the deployed resources
To see your Game Development Virtual Machine:
- Go to the Azure portal.
- Sign in.
- Choose the resource group you just selected.
You’ll see the resource group’s information:
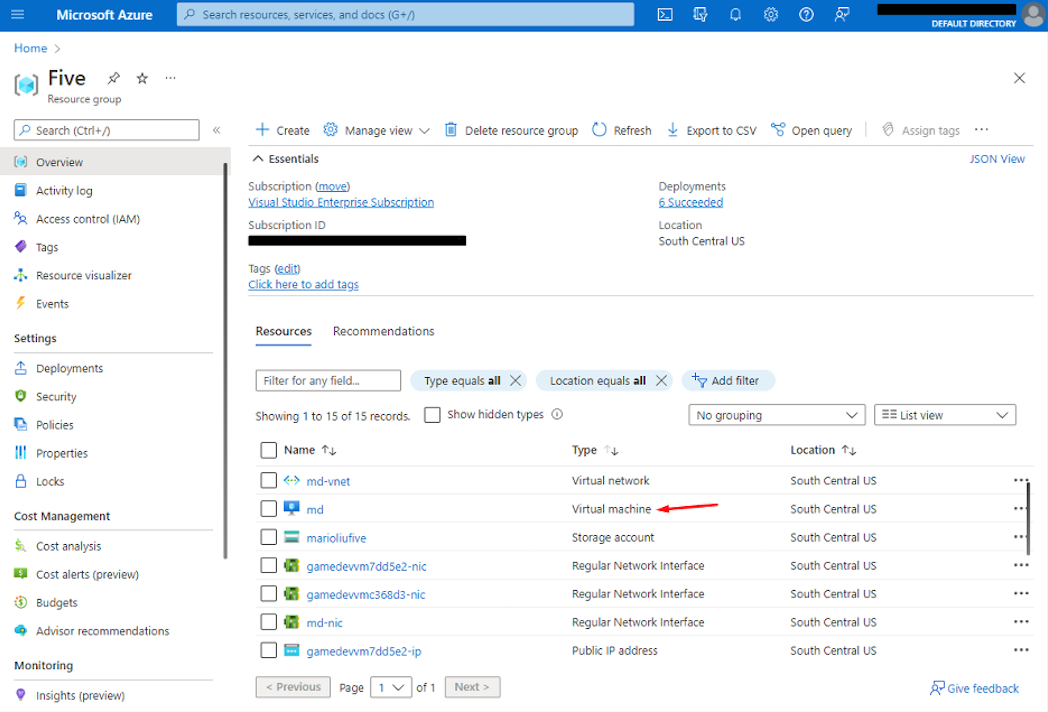
Click on the Virtual Machine resource to go to its information page. Here you can find information on the VM, including connection details.
Clean up resources
If you don’t want to use this virtual machine, delete it. Since the Game Development VM is associated with other resources, such as network interfaces, you will probably want to delete the entire resource group. You can delete the resource group in the portal by clicking on the Delete button and confirming. Or you can delete the resource group from the CLI with:
echo "Enter the Resource Group name:" &&
read resourceGroupName &&
az group delete --name $resourceGroupName &&
echo "Press [ENTER] to continue ..."
Next steps
In this Quickstart, you created a Game Development Virtual Machine from an ARM template. Now you can access this VM, explore the tools, and start your game development journey on Azure. If you need create multiple Game Dev VMs for build servers or test servers purpose, please refer to this template: Azure Game Development Virtual Machine Scale Set
Váš názor
Připravujeme: V průběhu roku 2024 budeme postupně vyřazovat problémy z GitHub coby mechanismus zpětné vazby pro obsah a nahrazovat ho novým systémem zpětné vazby. Další informace naleznete v tématu: https://aka.ms/ContentUserFeedback.
Odeslat a zobrazit názory pro