Setting up your device
Below you'll find four different ways to flash your device with Windows 10 IoT Core. Based on the chart included in the list of suggested boards for prototyping, follow the appropriate directions. Use the right column to navigate between these different methods of flashing.
Important
Do not use maker images for commercialization. If you are commercializing a device, you must use a custom FFU for optimal security. Learn more here.
Important
When the "format this disk" pop up comes up, do not format the disk. We are working on a fix for this issue.
Using the IoT Dashboard (Raspberry Pi, MinnowBoard, NXP)
Important
The latest 64-bit firmware for MinnowBoard Turbot can be found on the MinnowBoard website (skip step 4 on the MinnowBoard site's instructions).
Important
NXP only supports custom images. If you're looking to flash a custom image, select "Custom" from the OS Build dropdown, follow the instructions here to create a basic image, and follow the rest of the instructions below to finish.
Note
Dashboard cannot be used used to setup the Raspberry Pi 3B+. If you have a 3B+ device, you must use the 3B+ technical preview. Please view the known limitations of the technical preview to determine if this is suitable for your development.
Tip
We recommend using a high-performance SD card, such as a SanDisk SD card, for increased stability as well as plugging your device into an external display to see the default application booting up.
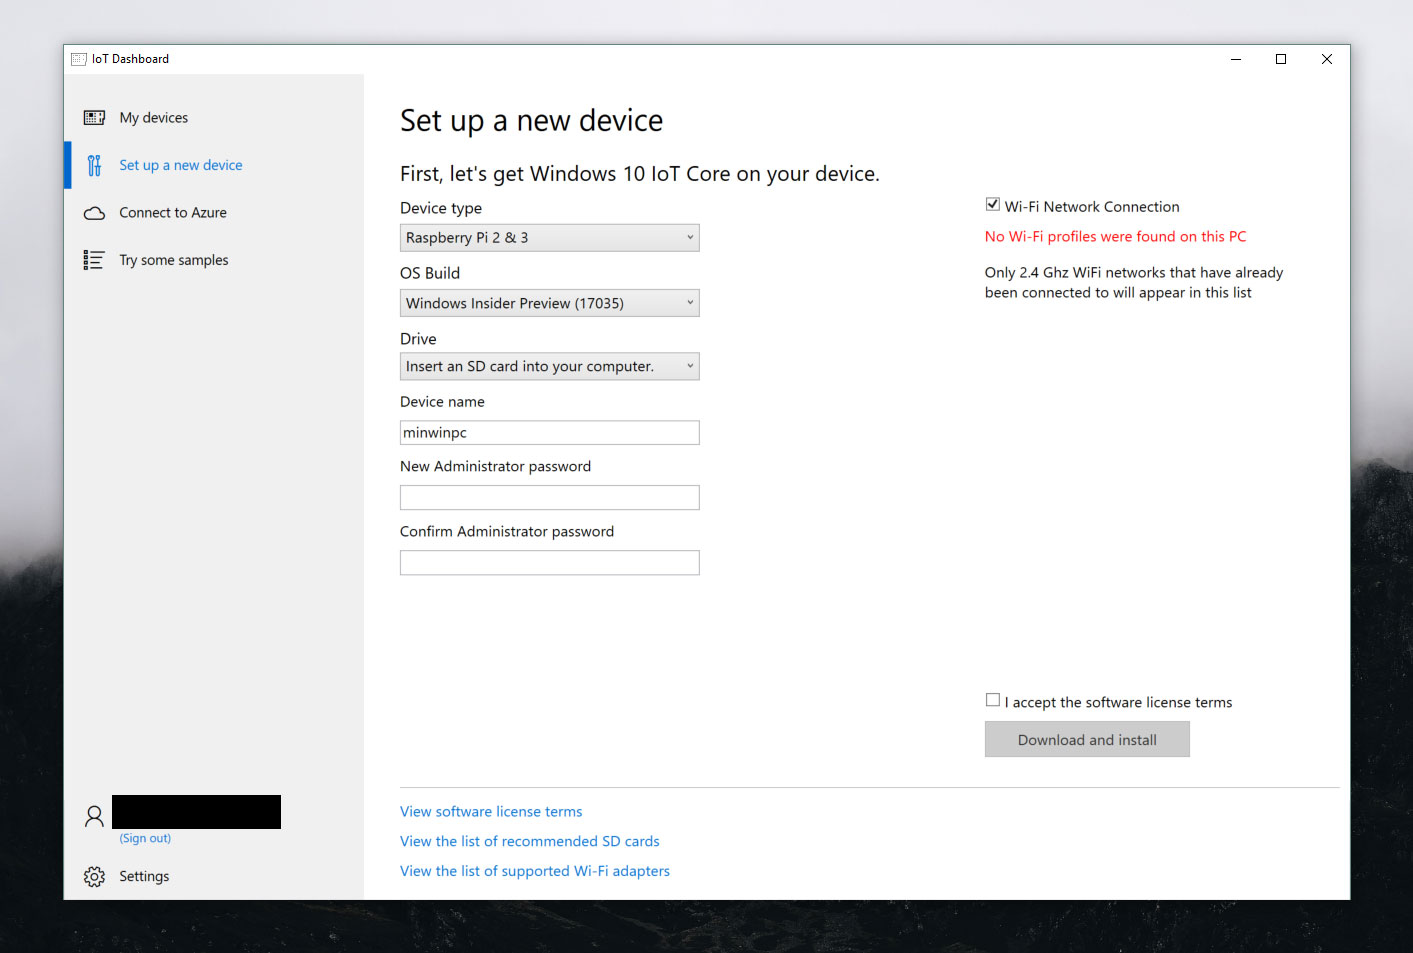
- Download the Windows 10 IoT Core Dashboard here.
- Once downloaded, open the Dashboard and click on set up a new device and insert an SD card into your computer.
- Fill out all of the fields as indicated.
- Accept the software license terms and click Download and install. You'll see that Windows 10 IoT Core is now flashing your SD card.
Using the IoT Dashboard (DragonBoard 410c)
Tip
We recommend plugging your device into an external display to see the default application booting up.
Important
If you're looking to flash a custom image, select "Custom" from the OS Build dropdown, follow the instructions here to create a basic image, and follow the rest of the instructions below to finish.
Important
When you're working with a new Dragonboard, it comes with Android installed. You will need to wipe and load the device using the eMMC flashing method.
Note
If you're running into any audio-related issues with your DragonBoard, we advise that you read through Qualcomm's manual here.
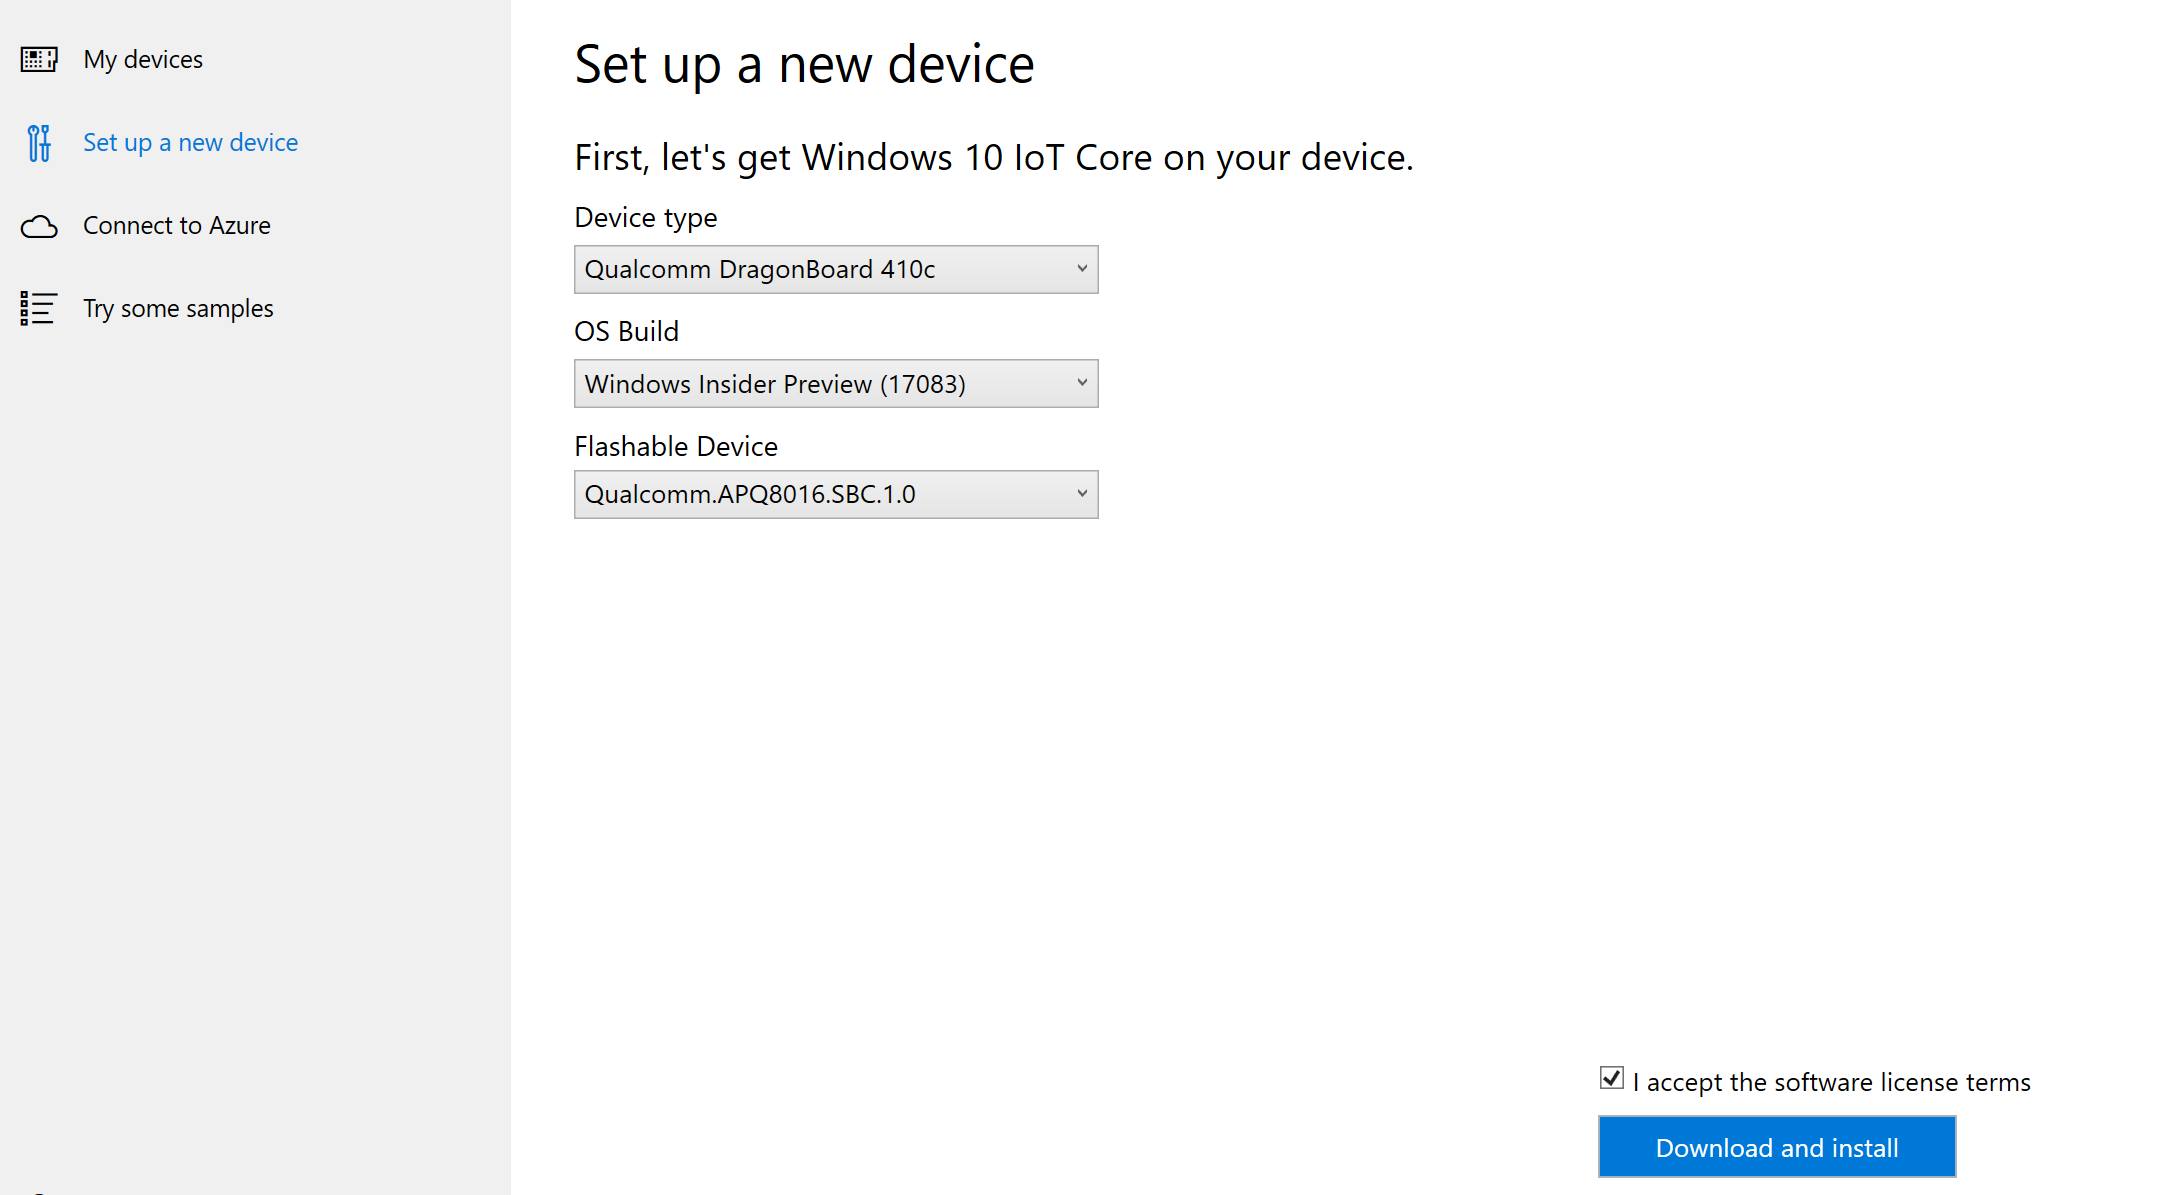
- Download the Windows 10 IoT Core Dashboard here.
- Once downloaded, open the Dashboard and select "Qualcomm DragonBoard 410c". Then sign in as a Windows Insider. You need to be signed in as an insider in order to flash DragonBoard 410c.
- Connect the Qualcomm board to the developer machine using a microUSB cable.
- Power on your Dragonboard using a 12V (>1A) power supply while holding down the volume up (+) button. The device - when connected to a display - should show the image of a hammer, a lightning bolt, and a cog.
- The device should now be visible on the Dashboard as shown below. Select the appropriate device.
- Accept the software license terms and click Download and install. You'll see that Windows 10 IoT Core is now flashing onto your device.
Flashing with eMMC (for DragonBoard 410c, other Qualcomm devices)
- Download and install the DragonBoard Update Tool for your x86 or x64 machine.
- Download the Windows 10 IoT Core DragonBoard FFU.
- Double-click on the downloaded ISO file and locate the mounted Virtual CD-drive. This drive will contain an installer file (.msi); double-click on it. This creates a new directory on your PC under
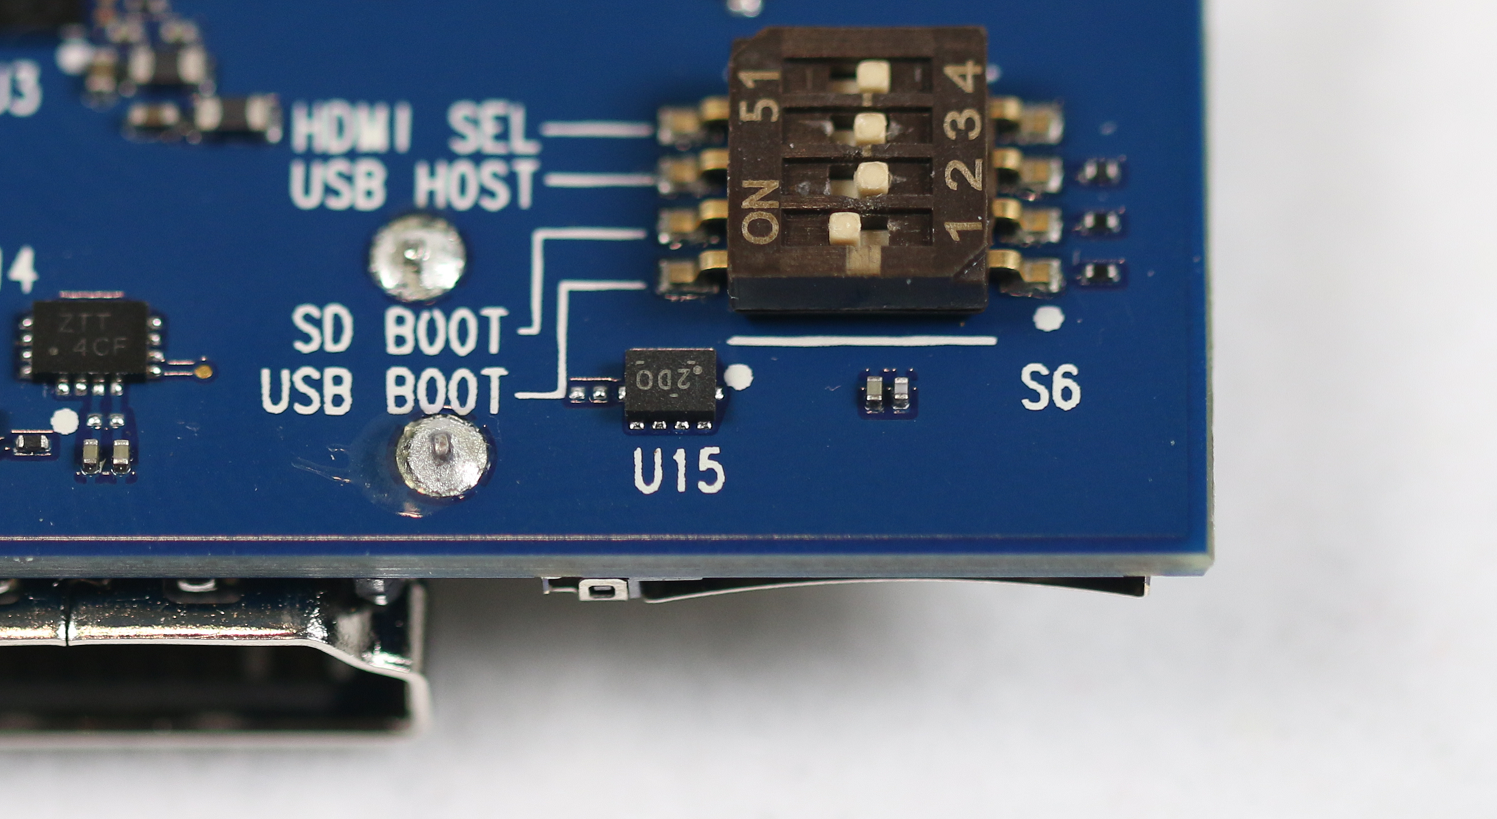
C:\Program Files (x86)\Microsoft IoT\FFU\in which you should see an image file, "flash.ffu". - Ensure your DragonBoard is in download mode by setting the first boot switch on the board to USB Boot, as shown below. Then, connect DragonBoard the host PC via a microUSB cable, then plug in the DragonBoard to a 12V (> 1A) power supply.
- Start the DragonBoard Update Tool, which should detect that the DragonBoard is connected to your PC with a green circle. "Browse" to the DragonBoard's FFU that you downloaded, then click the Program button.
- Click "Browse" again and select "rawprogram0.xml" that was generated in step 5. Then click the "Program" button.
- Once the download is complete, disconnect the power supply and microUSB cable from the board and toggle the USB Boot switch back to OFF. Connect an HDMI display, a mouse, and a keyboard to the DragonBoard and re-connect the power supply. After a few minutes, you should see the Windows 10 IoT Core default application.
Note
Make sure the device is now booting from the eMMC memory by entering the BIOS setup again and switching the Boot Drive order to load from the Hard Drive instead of from the USB Drive.
Flashing with eMMC (for Up Squared, other Intel devices)
Download and Install Tools
- Download and install the Windows Assessment and Deployment Kit (Windows ADK) with the correlating version of Windows 10 you're running on your machine.
- Download and install the Windows PE add-on for the ADK.
Create a USB-bootable Windows PE image
- Insert a USB drive into your machine.
- Start the Deployment and Imaging Tools Environment as an administrator. The default installation path is
C:\Program Files (x86)\Windows Kits\10\Assessment and Deployment Kit\Deployment Tools\DandISetEnv.bat. - Use
Copypeto create a working copy of the Windows PE files. You must specify either x86, amd64 or ARM architectures (e.g.Copype amd64 C:\WINPE_amd64) - Install Windows PE to the USB flash drive using
MakeWinPEMedia. You must specify the destination USB drive (e.g.MakeWinPEMedia /UFD C:\WinPE_amd64 P:). - Download the Windows 10 IoT Core image by double-clicking on the downloaded ISO file and locating the mounted Virtual CD-drive.
- This drive will contain an install file (.msi); double click it. This will create a new directory on your PC under
C:\Program Files (x86)\Microsoft IoT\FFU\in which you should see an image fileflash.ffu. - Download, unzip and copy the eMMC Installer script to the USB device's root directory, along with the device's FFU.
- Connect the USB drive, mouse, and keyboard to the USB hub. Attach the HDMI display to your device, the device to the USB hub, and the power cord to the device.
- If necessary, go to the BIOS setup of the device. Select Windows as the Operating system and set the device to boot from your uSB drive. When the system reboots, you will see the WinPE command prompt. Switch the WinPE prompt to the USB Drive. This is usually C: or D: but you may need to try other driver letters.
- Run the eMMC Installer script, which will install the Windows 10 IoT Core image to the device's eMMC memory. When it completes, press any key and run
wpeutil reboot. The system should boot into Windows 10 IoT Core, start the configuration process, and load the default application.
Note
Make sure the device is now booting from the eMMC memory by entering the BIOS setup again and switching the Boot Drive order to load from the Hard Drive instead of from the USB Drive.
Connecting to a network
Wired connection
If your device comes with an Ethernet port or USB Ethernet adapter support to enable a wired connection, attach an Ethernet cable to connect it to your network.
Wireless connection
If your device supports Wi-Fi connectivity and you've connected a display to it, you'll need to:
- Go into your default application and click the settings button next to the clock.
- On the settings page, select Network and Wi-Fi.
- Your device will begin scanning for wireless networks.
- Once your network appears in this list, select it and click Connect.
If you haven't connected a display and would like to connect via Wi-Fi, you'll need to:
- Go to the IoT Dashboard and click on My Devices.
- Find your unconfigured board from the list. Its name will begin with "AJ_"... (e.g. AJ_58EA6C68). If you don't see your board appear after a few minutes, try rebooting your board.
- Click on Configure Device and enter your network credentials. This will connect your board to the network.
Note
Wifi on your computer will need to be turned on in order to find other networks.
Connecting to Windows Device Portal
Use the Windows Device Portal to connect your device through a web browser. The device portal makes valuable configuration and device management capabilities available.