Send Custom Commands activity to client application
Important
Custom Commands will be retired on April 30th 2026. As of October 30th 2023 you can't create new Custom Commands applications in Speech Studio. Related to this change, LUIS will be retired on October 1st 2025. As of April 1st 2023 you can't create new LUIS resources.
In this article, you learn how to send activity from a Custom Commands application to a client application running the Speech SDK.
You complete the following tasks:
- Define and send a custom JSON payload from your Custom Commands application
- Receive and visualize the custom JSON payload contents from a C# UWP Speech SDK client application
Prerequisites
- Visual Studio 2019 or higher. This guide uses Visual Studio 2019
- An Azure AI Speech resource key and region: Create a Speech resource on the Azure portal. For more information, see Create a multi-service resource.
- A previously created Custom Commands app
- A Speech SDK enabled client app: How-to: Integrate with a client application using Speech SDK
Setup Send activity to client
Open the Custom Commands application you previously created
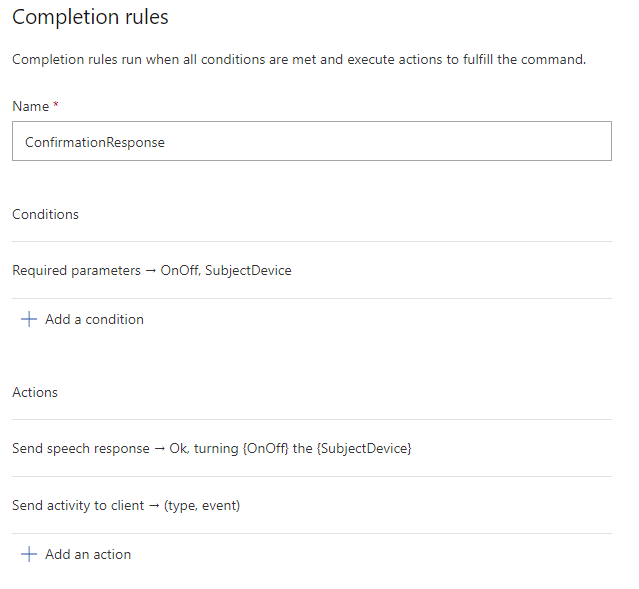
Select TurnOnOff command, select ConfirmationResponse under completion rule, then select Add an action
Under New Action-Type, select Send activity to client
Copy the JSON below to Activity content
{
   "type": "event",
   "name": "UpdateDeviceState",
   "value": {
     "state": "{OnOff}",
     "device": "{SubjectDevice}"
   }
 }
Select Save to create a new rule with a Send Activity action, Train and Publish the change
Integrate with client application
In How-to: Setup client application with Speech SDK (Preview), you created a UWP client application with Speech SDK that handled commands such as turn on the tv, turn off the fan. With some visuals added, you can see the result of those commands.
To Add labeled boxes with text indicating on or off, add the following XML block of StackPanel to MainPage.xaml.
<StackPanel Orientation="Vertical" H......>
......
</StackPanel>
<StackPanel Orientation="Horizontal" HorizontalAlignment="Center" Margin="20">
    <Grid x:Name="Grid_TV" Margin="50, 0" Width="100" Height="100" Background="LightBlue">
        <StackPanel>
            <TextBlock Text="TV" Margin="0, 10" TextAlignment="Center"/>
            <TextBlock x:Name="State_TV" Text="off" TextAlignment="Center"/>
        </StackPanel>
    </Grid>
    <Grid x:Name="Grid_Fan" Margin="50, 0" Width="100" Height="100" Background="LightBlue">
        <StackPanel>
            <TextBlock Text="Fan" Margin="0, 10" TextAlignment="Center"/>
            <TextBlock x:Name="State_Fan" Text="off" TextAlignment="Center"/>
        </StackPanel>
    </Grid>
</StackPanel>
<MediaElement ....../>
Add reference libraries
Since you've created a JSON payload, you need to add a reference to the JSON.NET library to handle deserialization.
Right-client your solution.
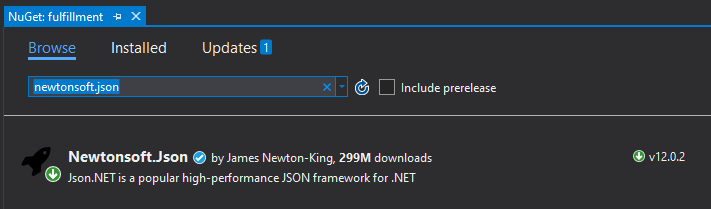
Choose Manage NuGet Packages for Solution, Select Browse
If you already installed Newtonsoft.json, make sure its version is at least 12.0.3. If not, go to Manage NuGet Packages for Solution - Updates, search for Newtonsoft.json to update it. This guide is using version 12.0.3.
Also, make sure NuGet package Microsoft.NETCore.UniversalWindowsPlatform is at least 6.2.10. This guide is using version 6.2.10.
In `MainPage.xaml.cs', add
using Newtonsoft.Json;
using Windows.ApplicationModel.Core;
using Windows.UI.Core;
Handle the received payload
In InitializeDialogServiceConnector, replace the ActivityReceived event handler with following code. The modified ActivityReceived event handler extracts the payload from the activity and change the visual state of the tv or fan respectively.
connector.ActivityReceived += async (sender, activityReceivedEventArgs) =>
{
    NotifyUser($"Activity received, hasAudio={activityReceivedEventArgs.HasAudio} activity={activityReceivedEventArgs.Activity}");

    dynamic activity = JsonConvert.DeserializeObject(activityReceivedEventArgs.Activity);
    var name = activity?.name != null ? activity.name.ToString() : string.Empty;

    if (name.Equals("UpdateDeviceState"))
    {
        Debug.WriteLine("Here");
        var state = activity?.value?.state != null ? activity.value.state.ToString() : string.Empty;
        var device = activity?.value?.device != null ? activity.value.device.ToString() : string.Empty;

        if (state.Equals("on") || state.Equals("off"))
        {
            switch (device)
            {
                case "tv":
                    await CoreApplication.MainView.CoreWindow.Dispatcher.RunAsync(
                        CoreDispatcherPriority.Normal, () => { State_TV.Text = state; });
                    break;
                case "fan":
                    await CoreApplication.MainView.CoreWindow.Dispatcher.RunAsync(
                        CoreDispatcherPriority.Normal, () => { State_Fan.Text = state; });
                    break;
                default:
                    NotifyUser($"Received request to set unsupported device {device} to {state}");
                    break;
            }
        }
        else {
            NotifyUser($"Received request to set unsupported state {state}");
        }
    }

    if (activityReceivedEventArgs.HasAudio)
    {
        SynchronouslyPlayActivityAudio(activityReceivedEventArgs.Audio);
    }
};
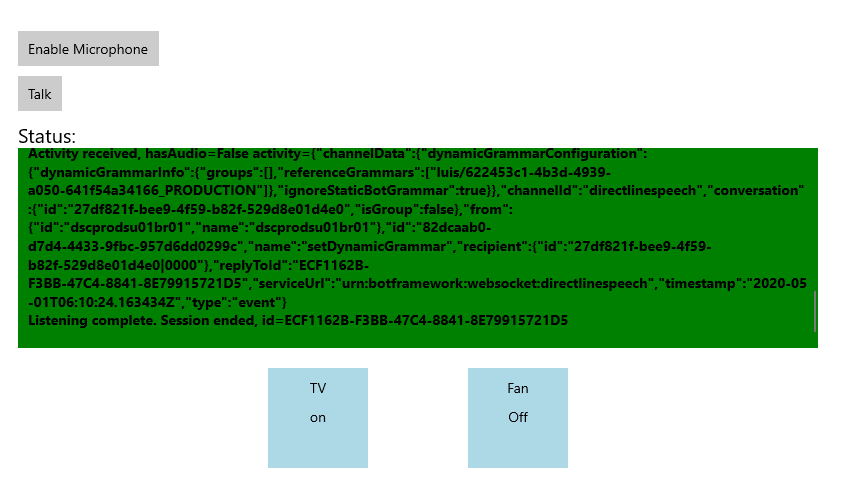
Try it out
- Start the application
- Select Enable microphone
- Select the Talk button
- Say
turn on the tv - The visual state of the tv should change to "on"
Next steps
Feedback
Kommer snart: I hele 2024 udfaser vi GitHub-problemer som feedbackmekanisme for indhold og erstatter det med et nyt feedbacksystem. Du kan få flere oplysninger under: https://aka.ms/ContentUserFeedback.
Indsend og få vist feedback om