Migrate your Azure Database for MySQL - Flexible Server database by using import and export
APPLIES TO:  Azure Database for MySQL - Single Server
Azure Database for MySQL - Flexible Server
Azure Database for MySQL - Single Server
Azure Database for MySQL - Flexible Server
Important
Azure Database for MySQL single server is on the retirement path. We strongly recommend that you upgrade to Azure Database for MySQL flexible server. For more information about migrating to Azure Database for MySQL flexible server, see What's happening to Azure Database for MySQL Single Server?
This article explains two common approaches to importing and exporting data to an Azure Database for MySQL flexible server instance by using MySQL Workbench.
For detailed and comprehensive migration guidance, see the migration guide resources.
For other migration scenarios, see the Database Migration Guide.
Prerequisites
Before you begin migrating your MySQL database, you need to:
- Create an Azure Database for MySQL flexible server instance by using the Azure portal.
- Download and install MySQL Workbench or another third-party MySQL tool for importing and exporting.
Create a database on the Azure Database for MySQL flexible server instance
Create an empty database on the Azure Database for MySQL flexible server instance by using MySQL Workbench, Toad, or Navicat. The database can have the same name as the database that contains the dumped data, or you can create a database with a different name.
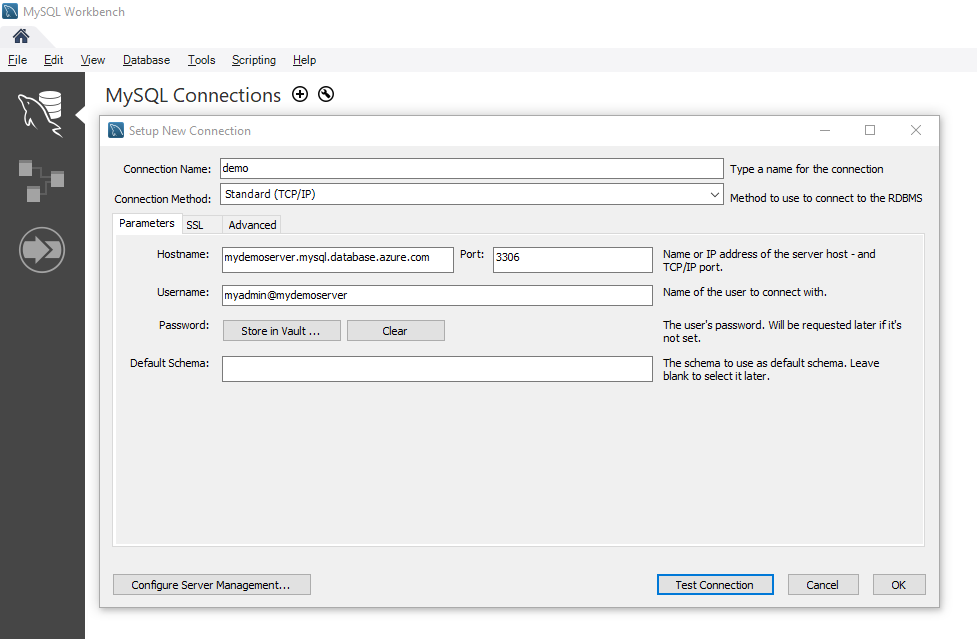
To get connected, do the following:
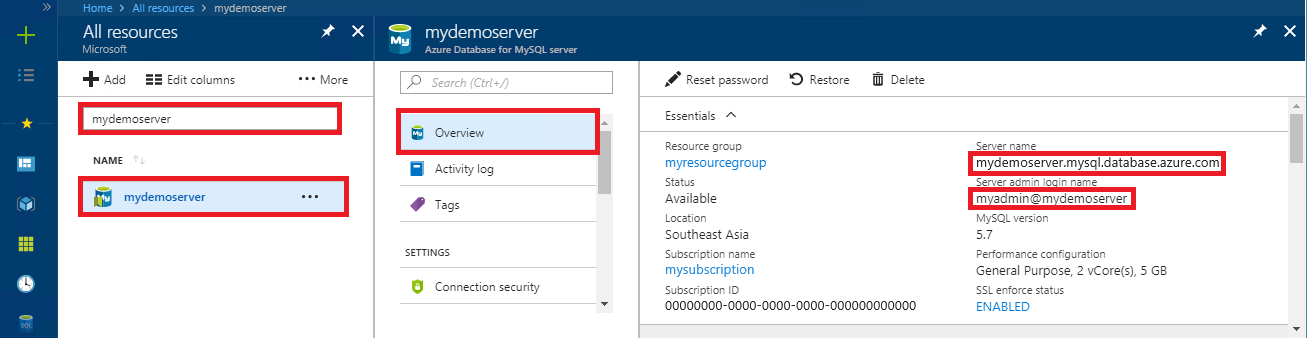
In the Azure portal, look for the connection information on the Overview pane of your Azure Database for MySQL flexible server instance.
Add the connection information to MySQL Workbench.
Determine when to use import and export techniques
Tip
For scenarios where you want to dump and restore the entire database, use the dump and restore approach instead.
In the following scenarios, use MySQL tools to import and export databases into your MySQL database. For other tools, go to the "Migration Methods" section (page 22) of the MySQL to Azure Database migration guide.
- When you need to selectively choose a few tables to import from an existing MySQL database into your Azure Database for MySQL flexible server database, it's best to use the import and export technique. By doing so, you can omit any unneeded tables from the migration to save time and resources. For example, use the
--include-tablesor--exclude-tablesswitch with mysqlpump, and the--tablesswitch with mysqldump. - When you're moving database objects other than tables, explicitly create those objects. Include constraints (primary key, foreign key, and indexes), views, functions, procedures, triggers, and any other database objects that you want to migrate.
- When you're migrating data from external data sources other than a MySQL database, create flat files and import them by using mysqlimport.
Important
Both Azure Database for MySQL single server and Azure Database for MySQL flexible server support only the InnoDB storage engine. Make sure that all tables in the database use the InnoDB storage engine when you're loading data into your Azure Database for MySQL flexible server instance.
If your source database uses another storage engine, convert to the InnoDB engine before you migrate the database. For example, if you have a WordPress or web app that uses the MyISAM engine, first convert the tables by migrating the data into InnoDB tables. Use the clause ENGINE=INNODB to set the engine for creating a table, and then transfer the data into the compatible table before the migration.
INSERT INTO innodb_table SELECT * FROM myisam_table ORDER BY primary_key_columns
Performance recommendations for import and export
For optimal data import and export performance, we recommend that you do the following:
- Create clustered indexes and primary keys before you load data. Load the data in primary key order.
- Delay the creation of secondary indexes until after the data is loaded.
- Disable foreign key constraints before you load the data. Disabling foreign key checks provides significant performance gains. Enable the constraints and verify the data after the load to ensure referential integrity.
- Load data in parallel. Avoid too much parallelism that would cause you to hit a resource limit, and monitor resources by using the metrics available in the Azure portal.
- Use partitioned tables when appropriate.
Import and export data by using MySQL Workbench
There are two ways to export and import data in MySQL Workbench: from the object browser context menu or from the Navigator pane. Each method serves a different purpose.
Note
If you're adding a connection to Azure Database for MySQL single server or Azure Database for MySQL flexible server on MySQL Workbench, do the following:
- For Azure Database for MySQL single server, make sure that the user name is in the format <username@servername>.
- For Azure Database for MySQL flexible server, use <username> only. If you use <username@servername> to connect, the connection will fail.
Run the table data export and import wizards from the object browser context menu
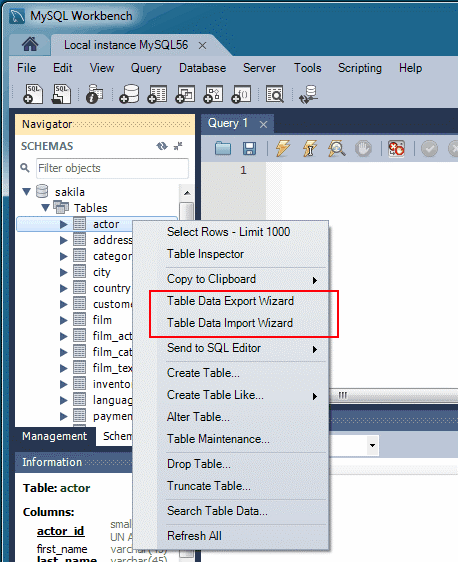
The table data wizards support import and export operations by using CSV and JSON files. The wizards include several configuration options, such as separators, column selection, and encoding selection. You can run each wizard against local or remotely connected MySQL servers. The import action includes table, column, and type mapping.
To access these wizards from the object browser context menu, right-click a table, and then select Table Data Export Wizard or Table Data Import Wizard.
The table data export wizard
To export a table to a CSV file:
- Right-click the table of the database to be exported.
- Select Table Data Export Wizard. Select the columns to be exported, row offset (if any), and count (if any).
- On the Select data for export pane, select Next. Select the file path, CSV, or JSON file type. Also select the line separator, method of enclosing strings, and field separator.
- On the Select output file location pane, select Next.
- On the Export data pane, select Next.
The table data import wizard
To import a table from a CSV file:
- Right-click the table of the database to be imported.
- Look for and select the CSV file to be imported, and then select Next.
- Select the destination table (new or existing), select or clear the Truncate table before import check box, and then select Next.
- Select the encoding and the columns to be imported, and then select Next.
- On the Import data pane, select Next. The wizard imports the data.
Run the SQL data export and import wizards from the Navigator pane
Use a wizard to export or import SQL data that's generated from MySQL Workbench or from the mysqldump command. You can access the wizards from the Navigator pane or you can select Server from the main menu.
Export data
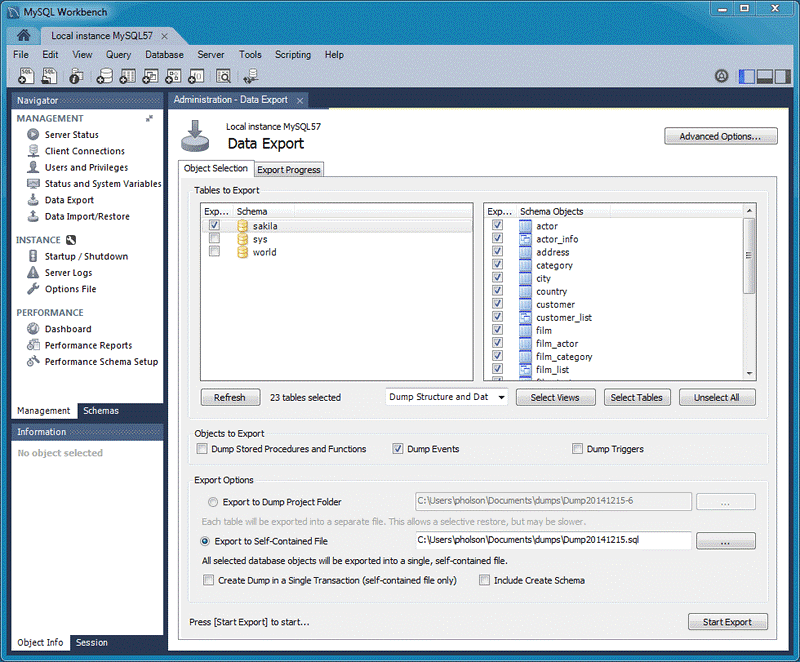
You can use the Data Export pane to export your MySQL data.
In MySQL Workbench, on the Navigator pane, select Data Export.
On the Data Export pane, select each schema that you want to export.
For each schema, you can select specific schema objects or tables to export. Configuration options include export to a project folder or a self-contained SQL file, dump stored routines and events, or skip table data.
Alternatively, use Export a Result Set to export a specific result set in the SQL editor to another format, such as CSV, JSON, HTML, and XML.
Select the database objects to export, and configure the related options.
Select Refresh to load the current objects.
Optionally, select Advanced Options at the upper right to refine the export operation. For example, add table locks, use
replaceinstead ofinsertstatements, and quote identifiers with backtick characters.Select Start Export to begin the export process.
Import data
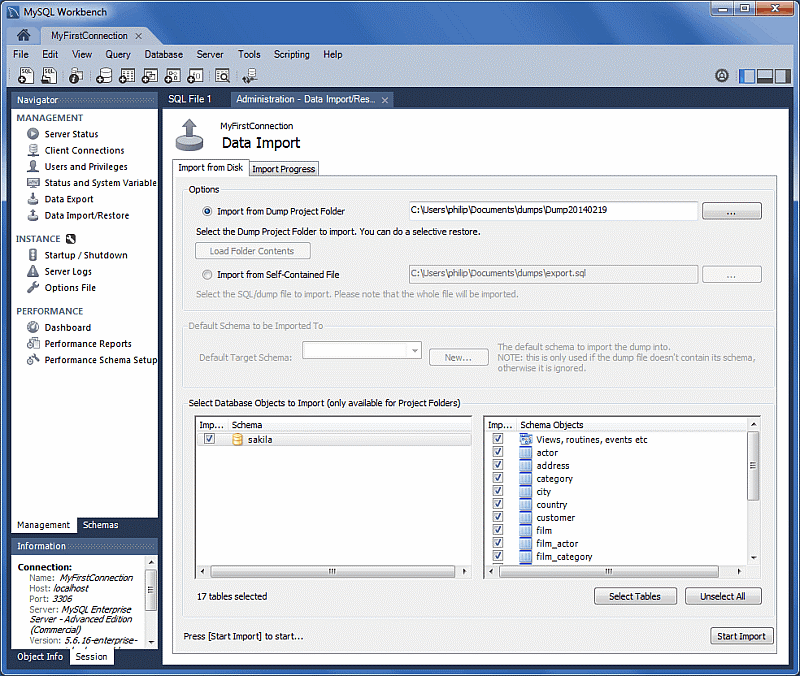
You can use the Data Import pane to import or restore exported data from the data export operation or from the mysqldump command.
- In MySQL Workbench, on the Navigator pane, select Data Import/Restore.
- Select the project folder or self-contained SQL file, select the schema to import into, or select the New button to define a new schema.
- Select Start Import to begin the import process.
Next steps
- For another migration approach, see Migrate your MySQL database to Azure Database for MySQL flexible server by using dump and restore.
- For more information about migrating databases to Azure Database for MySQL flexible server, see the Database Migration Guide.
Feedback
Kommer snart: I hele 2024 udfaser vi GitHub-problemer som feedbackmekanisme for indhold og erstatter det med et nyt feedbacksystem. Du kan få flere oplysninger under: https://aka.ms/ContentUserFeedback.
Indsend og få vist feedback om