Deploy custom content from your repository (Public preview)
When creating custom content, you can manage it from your own Microsoft Sentinel workspaces, or an external source control repository. This article describes how to create and manage connections between Microsoft Sentinel and GitHub or Azure DevOps repositories. Managing your content in an external repository allows you to make updates to that content outside of Microsoft Sentinel, and have it automatically deployed to your workspaces. For more information, see Update custom content with repository connections.
Important
- The Microsoft Sentinel Repositories feature is currently in PREVIEW. See the Supplemental Terms of Use for Microsoft Azure Previews for additional legal terms that apply to Azure features that are in beta, preview, or otherwise not yet released into general availability.
- Microsoft Sentinel is available as part of the public preview for the unified security operations platform in the Microsoft Defender portal. For more information, see Microsoft Sentinel in the Microsoft Defender portal.
Prerequisites and scope
Microsoft Sentinel currently supports connections to GitHub and Azure DevOps repositories. Before connecting your Microsoft Sentinel workspace to your source control repository, make sure that you have:
- An Owner role in the resource group that contains your Microsoft Sentinel workspace or a combination of User Access Administrator and Sentinel Contributor roles to create the connection
- Collaborator access to your GitHub repository or Project Administrator access to your Azure DevOps repository
- Actions enabled for GitHub and Pipelines enabled for Azure DevOps
- Third-party application access via OAuth enabled for Azure DevOps application connection policies.
- Ensure custom content files you want to deploy to your workspaces are in relevant Azure Resource Manager (ARM) templates.
For more information, see Validate your content.
Connect a repository
This procedure describes how to connect a GitHub or Azure DevOps repository to your Microsoft Sentinel workspace.
Each connection can support multiple types of custom content, including analytics rules, automation rules, hunting queries, parsers, playbooks, and workbooks. For more information, see About Microsoft Sentinel content and solutions.
You can't create duplicate connections, with the same repository and branch, in a single Microsoft Sentinel workspace.
Create your connection:
Make sure that you're signed into your source control app with the credentials you want to use for your connection. If you're currently signed in using different credentials, sign out first.
For Microsoft Sentinel in the Azure portal, under Content management, select Repositories.
For Microsoft Sentinel in the Defender portal, select Microsoft Sentinel > Content management > Repositories.Select Add new, and then, on the Create new deployment connection page, enter a meaningful name and description for your connection.
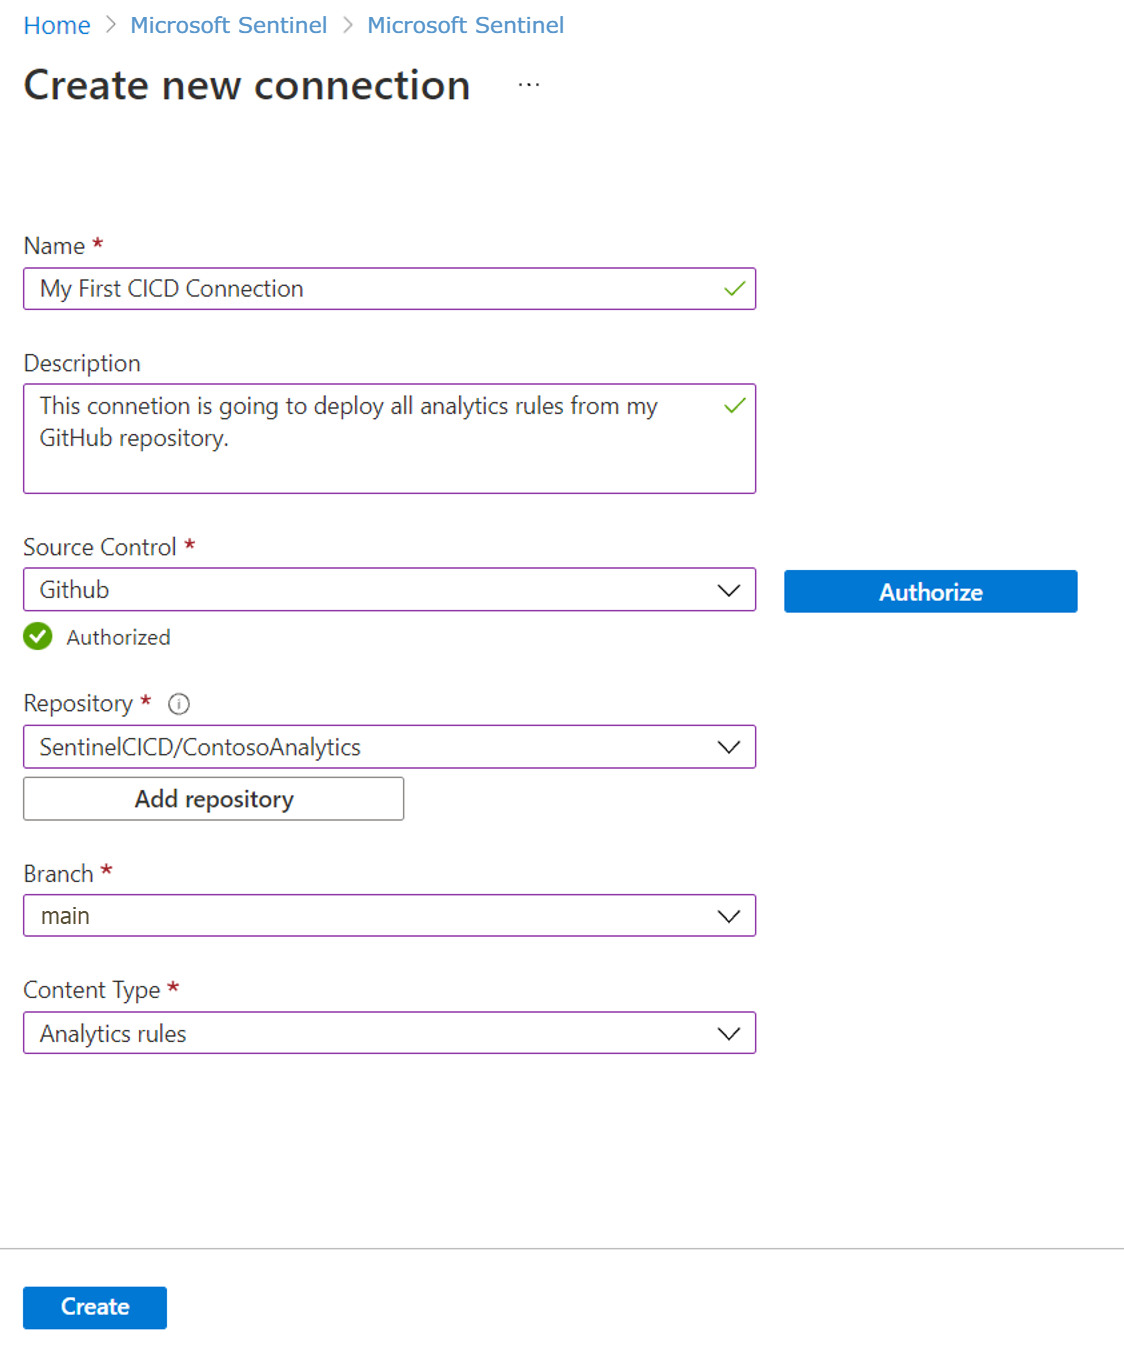
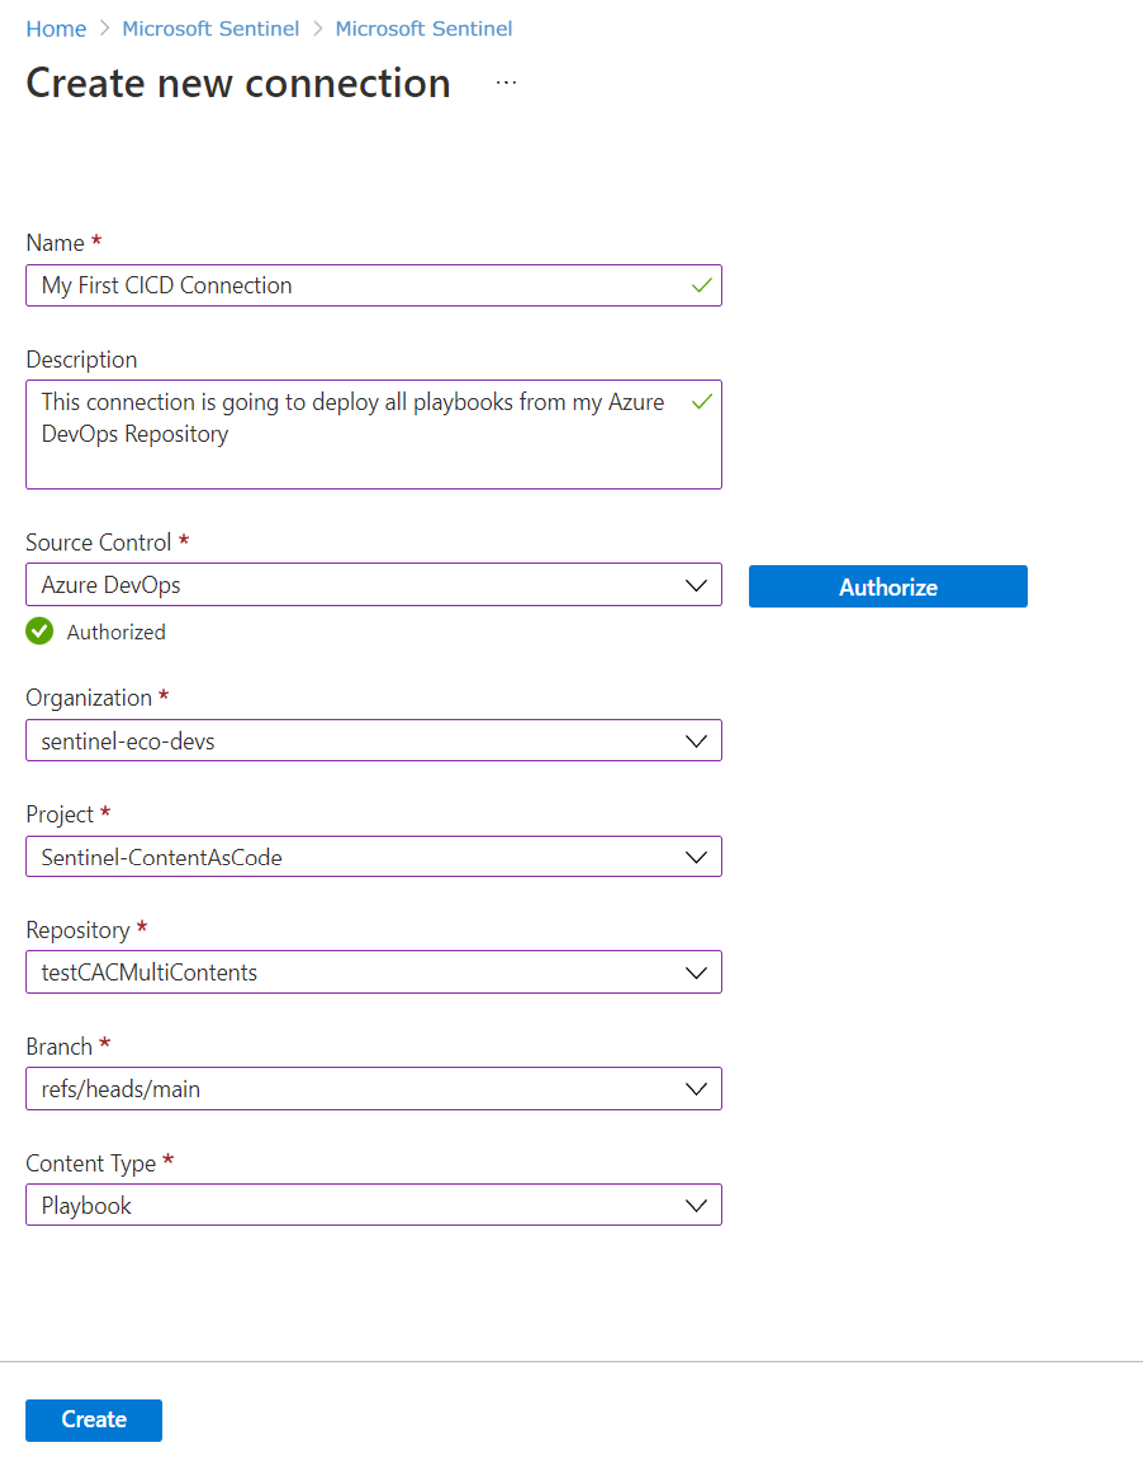
From the Source Control dropdown, select the type of repository you want to connect to, and then select Authorize.
Select one of the following tabs, depending on your connection type:
Enter your GitHub credentials when prompted.
The first time you add a connection, you're prompted to authorize the connection to Microsoft Sentinel. If you're already logged into your GitHub account on the same browser, your GitHub credentials are autopopulated.
A Repository area now shows on the Create new deployment connection page, where you can select an existing repository to connect to. Select your repository from the list, and then select Add repository.
The first time you connect to a specific repository, you'll see a new browser window or tab, prompting you to install the Azure-Sentinel app on your repository. If you have multiple repositories, select the ones where you want to install the Azure-Sentinel app, and install it.
You're directed to GitHub to continue the app installation.
After the Azure-Sentinel app is installed in your repository, the Branch dropdown in the Create new deployment connection page is populated with your branches. Select the branch you want to connect to your Microsoft Sentinel workspace.
From the Content Types dropdown, select the type of content you're deploying.
Both parsers and hunting queries use the Saved Searches API to deploy content to Microsoft Sentinel. If you select one of these content types, and also have content of the other type in your branch, both content types are deployed.
For all other content types, selecting a content type in the Create new deployment connection pane deploys only that content to Microsoft Sentinel. Content of other types isn't deployed.
Select Create to create your connection. For example:
After you create the connection, a new workflow or pipeline is generated in your repository. The content stored in your repository is deployed to your Microsoft Sentinel workspace.
The deployment time might vary depending on the volume of content that you're deploying.
View the deployment status
In GitHub: On the repository's Actions tab, select the workflow .yaml file to access detailed deployment logs and any specific error messages.
In Azure DevOps: View the deployment status from the repository's Pipelines tab.
After the deployment is complete:
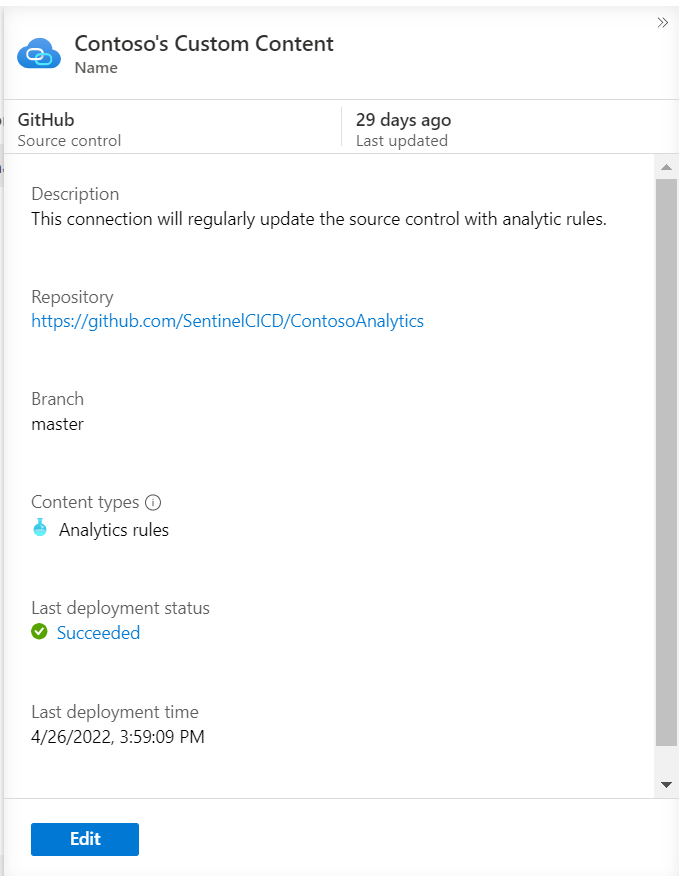
The content stored in your repository is displayed in your Microsoft Sentinel workspace, in the relevant Microsoft Sentinel page.
The connection details on the Repositories page are updated with the link to the connection's deployment logs and the status and time of the last deployment. For example:
The default workflow only deploys content that is modified since the last deployment based on commits to the repository. But you might want to turn off smart deployments or perform other customizations. For example, you can configure different deployment triggers, or deploy content exclusively from a specific root folder. To learn more, see customize repository deployments.
Edit content
When you successfully create a connection to your source control repository, your content is deployed to Sentinel. We recommend that you edit content stored in a connected repository only in the repository, and not in Microsoft Sentinel. For example, to make changes to your analytics rules, do so directly in GitHub or Azure DevOps.
If you edit the content in Microsoft Sentinel instead, make sure to export it to your source control repository to prevent your changes from being overwritten the next time the repository content is deployed to your workspace.
Delete content
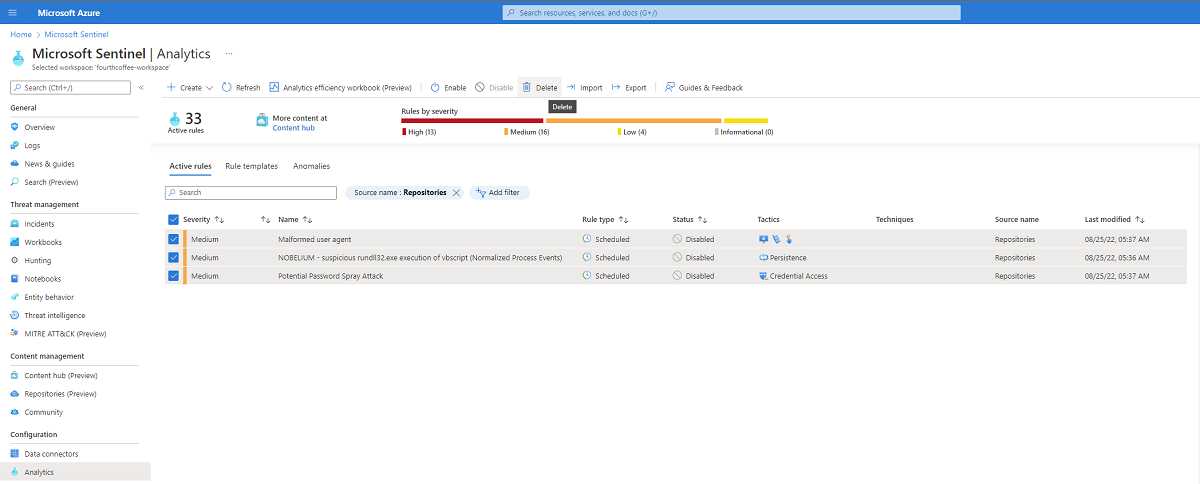
Deleting content from your repository doesn't delete it from your Microsoft Sentinel workspace. If you want to remove content that was deployed through repositories, delete it from both your repository and Microsoft Sentinel. For example, set a filter for the content based on source name to make it easier to identify content from repositories.
Remove a repository connection
This procedure describes how to remove the connection to a source control repository from Microsoft Sentinel.
To remove your connection:
- In Microsoft Sentinel, under Content management, select Repositories.
- In the grid, select the connection you want to remove, and then select Delete.
- Select Yes to confirm the deletion.
After you remove your connection, content that was previously deployed via the connection remains in your Microsoft Sentinel workspace. Content added to the repository after removing the connection isn't deployed.
If you encounter issues or an error message when you delete your connection, we recommend that you check your source control. Confirm that the GitHub workflow or Azure DevOps pipeline associated with the connection is deleted.
Remove the Microsoft Sentinel app from your GitHub repository
If you intend to delete the Microsoft Sentinel app from a GitHub repository, we recommend that you first remove all associated connections from the Microsoft Sentinel Repositories page.
Each Microsoft Sentinel App installation has a unique ID that's used when both adding and removing the connection. If the ID is missing or changed, remove the connection from the Microsoft Sentinel Repositories page and manually remove the workflow from your GitHub repository to prevent any future content deployments.
Next steps
Use your custom content in Microsoft Sentinel in the same way that you'd use out-of-the-box content.
For more information, see:
Feedback
Kommer snart: I hele 2024 udfaser vi GitHub-problemer som feedbackmekanisme for indhold og erstatter det med et nyt feedbacksystem. Du kan få flere oplysninger under: https://aka.ms/ContentUserFeedback.
Indsend og få vist feedback om