Manage blob containers using the Azure portal
Azure Blob Storage allows you to store large amounts of unstructured object data. You can use Blob Storage to gather or expose media, content, or application data to users. Because all blob data is stored within containers, you must create a storage container before you can begin to upload data. To learn more about Blob Storage, read the Introduction to Azure Blob storage.
In this how-to article, you learn how to work with container objects within the Azure portal.
Prerequisites
To access Azure Storage, you'll need an Azure subscription. If you don't already have a subscription, create a free account before you begin.
All access to Azure Storage takes place through a storage account. For this how-to article, create a storage account using the Azure portal, Azure PowerShell, or Azure CLI. For help with creating a storage account, see Create a storage account.
Create a container
A container organizes a set of blobs, similar to a directory in a file system. A storage account can include an unlimited number of containers, and a container can store an unlimited number of blobs.
To create a container in the Azure portal, follow these steps:
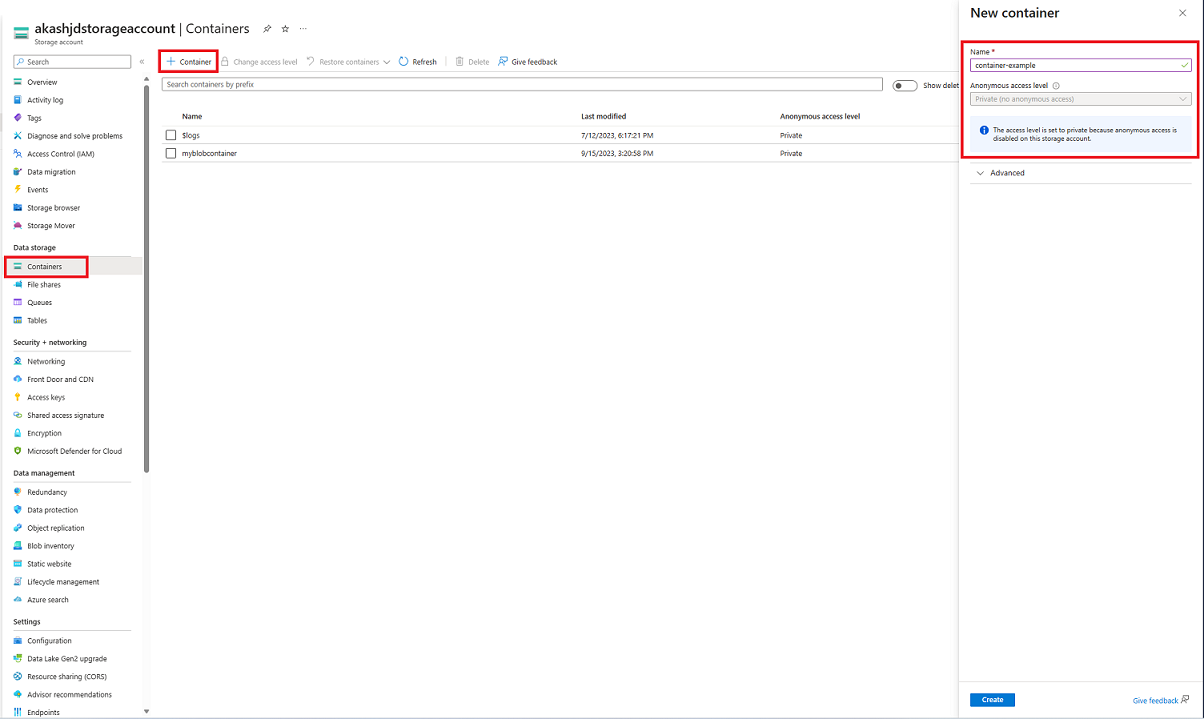
In the portal navigation pane on the left side of the screen, select Storage accounts and choose a storage account. If the navigation pane isn't visible, select the menu button to toggle its visibility.

In the navigation pane for the storage account, scroll to the Data storage section and select Containers.
Within the Containers pane, select the + Container button to open the New container pane.
Within the New Container pane, provide a Name for your new container. The container name must be lowercase, must start with a letter or number, and can include only letters, numbers, and the dash (-) character. The name must also be between 3 and 63 characters long. For more information about container and blob names, see Naming and referencing containers, blobs, and metadata.
Set the Anonymous access level for the container. The recommended level is Private (no anonymous access). For information about preventing anonymous access to blob data, see Overview: Remediating anonymous read access for blob data.
Select Create to create the container.


Read container properties and metadata
A container exposes both system properties and user-defined metadata. System properties exist on each Blob Storage resource. Some properties are read-only, while others can be read or set.
User-defined metadata consists of one or more name-value pairs that you specify for a Blob Storage resource. You can use metadata to store additional values with the resource. Metadata values are for your own purposes only, and don't affect how the resource behaves.
Container properties
To display the properties of a container within the Azure portal, follow these steps:
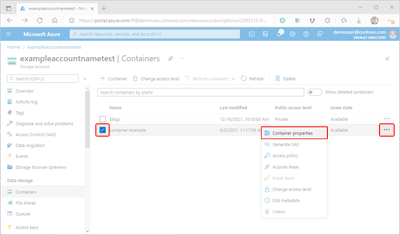
Navigate to the list of containers within your storage account.
Select the checkbox next to the name of the container whose properties you want to view.
Select the container's More button (...), and select Container properties to display the container's Properties pane.

Read and write container metadata
Users that have large numbers of objects within their storage account can organize their data logically within containers using metadata.
To manage a container's metadata within the Azure portal, follow these steps:
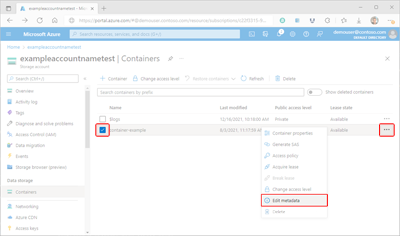
Navigate to the list of containers in your storage account.
Select the checkbox next to the name of the container whose metadata you want to manage.
Select the container's More button (...), and then select Edit metadata to display the Container metadata pane.
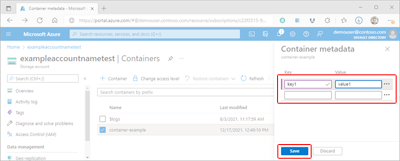
The Container metadata pane will display existing metadata key-value pairs. Existing data can be edited by selecting an existing key or value and overwriting the data. You can add additional metadata by and supplying data in the empty fields provided. Finally, select Save to commit your data.


Manage container and blob access
Properly managing access to containers and their blobs is key to ensuring that your data remains safe. The following sections illustrate ways in which you can meet your access requirements.
Manage Azure RBAC role assignments for the container
Microsoft Entra ID offers optimum security for Blob Storage resources. Azure role-based access control (Azure RBAC) determines what permissions a security principal has to a given resource. To grant access to a container, you'll assign an RBAC role at the container scope or above to a user, group, service principal, or managed identity. You may also choose to add one or more conditions to the role assignment.
You can read about the assignment of roles at Assign Azure roles using the Azure portal.
Generate a shared access signature
A shared access signature (SAS) provides temporary, secure, delegated access to a client who wouldn't normally have permissions. A SAS gives you granular control over how a client can access your data. For example, you can specify which resources are available to the client. You can also limit the types of operations that the client can perform, and specify the duration.
Azure supports three types of SAS. A service SAS provides access to a resource in just one of the storage services: the Blob, Queue, Table, or File service. An account SAS is similar to a service SAS, but can permit access to resources in more than one storage service. A user delegation SAS is a SAS secured with Microsoft Entra credentials and can only be used with Blob Storage service.
When you create a SAS, you may set access limitations based on permission level, IP address or range, or start and expiry date and time. You can read more in Grant limited access to Azure Storage resources using shared access signatures.
Caution
Any client that possesses a valid SAS can access data in your storage account as permitted by that SAS. It's important to protect a SAS from malicious or unintended use. Use discretion in distributing a SAS, and have a plan in place for revoking a compromised SAS.
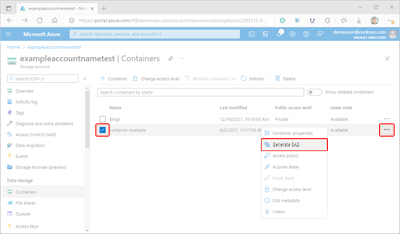
To generate an SAS token using the Azure portal, follow these steps:
In the Azure portal, navigate to the list of containers in your storage account.
Select the checkbox next to the name of the container for which you'll generate an SAS token.
Select the container's More button (...), and select Generate SAS to display the Generate SAS pane.
Within the Generate SAS pane, select the Account key value for the Signing method field.
In the Signing method field, select Account key. Choosing the account key will result in the creation of a service SAS.
In the Signing key field, select the desired key to be used to sign the SAS.
In the Stored access policy field, select None.
Select the Permissions field, then select the check boxes corresponding to the desired permissions.
In the Start and expiry date/time section, specify the desired Start and Expiry date, time, and time zone values.
Optionally, specify an IP address or a range of IP addresses from which to accept requests in the Allowed IP addresses field. If the request IP address doesn't match the IP address or address range specified on the SAS token, it won't be authorized.
Optionally, specify the protocol permitted for requests made with the SAS in the Allowed protocols field. The default value is HTTPS.
Review your settings for accuracy and then select Generate SAS token and URL to display the Blob SAS token and Blob SAS URL query strings.

Copy and paste the blob SAS token and blob SAS url values in a secure location. They'll only be displayed once and can't be retrieved after the window is closed.


Note
The SAS token returned by the portal does not include the delimiter character ('?') for the URL query string. If you are appending the SAS token to a resource URL, remember to append the delimiter character to the resource URL before appending the SAS token.
Create a stored access or immutability policy
A stored access policy gives you additional server-side control over one or more shared access signatures. When you associate an SAS with a stored access policy, the SAS inherits the restrictions defined in the policy. These extra restrictions allow you to change the start time, expiry time, or permissions for a signature. You can also revoke it after it has been issued.
Immutability policies can be used to protect your data from overwrites and deletes. Immutability policies allow objects to be created and read, but prevents their modification or deletion for a specific duration. Blob Storage supports two types of immutability policies. A time-based retention policy prohibits write and delete operations for a defined period of time. A legal hold also prohibits write and delete operations, but must be explicitly cleared before those operations can resume.
Create a stored access policy
Configuring a stored access policy is a two-step process: the policy must first be defined, and then applied to the container afterward. To configure a stored access policy, follow these steps:
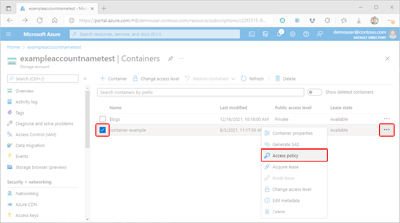
In the Azure portal, navigate to the list of containers in your storage account.
Select the checkbox next to the name of the container for which you'll generate an SAS token.
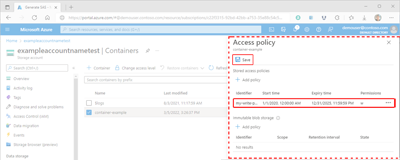
Select the container's More button (...), and select Access policy to display the Access policy pane.
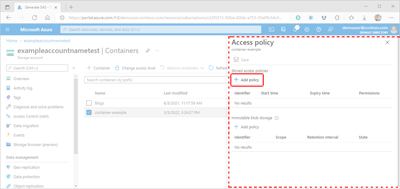
Within the Access policy pane, select + Add policy in the Stored access policies section to display the Add policy pane. Any existing policies will be displayed in either the appropriate section.
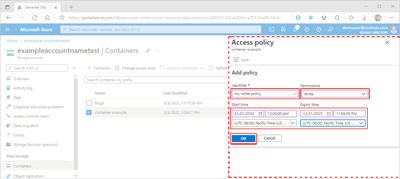
Within the Add policy pane, select the Identifier box and add a name for your new policy.
Select the Permissions field, then select the check boxes corresponding to the permissions desired for your new policy.
Optionally, provide date, time, and time zone values for Start time and Expiry time fields to set the policy's validity period.
Review your settings for accuracy and then select OK to update the Access policy pane.
Caution
Although your policy is now displayed in the Stored access policy table, it is still not applied to the container. If you navigate away from the Access policy pane at this point, the policy will not be saved or applied and you will lose your work.
In the Access policy pane, select + Add policy to define another policy, or select Save to apply your new policy to the container. After creating at least one stored access policy, you'll be able to associate other secure access signatures (SAS) with it.


Create an immutability policy
Read more about how to Configure immutability policies for containers. For help with implementing immutability policies, follow the steps outlined in the Configure a retention policy or Configure or clear a legal hold articles.
Manage leases
A container lease is used to establish or manage a lock for delete operations. When a lease is acquired within the Azure portal, the lock can only be created with an infinite duration. When created programmatically, the lock duration can range from 15 to 60 seconds, or it can be infinite.
There are five different lease operation modes, though only two are available within the Azure portal:
| Use case | ||
|---|---|---|
| Request a new lease. | ✓ | |
| Renew an existing lease. | ||
| Change the ID of an existing lease. | ||
| End the current lease; allows other clients to acquire a new lease | ✓ | |
| End the current lease; prevents other clients from acquiring a new lease during the current lease period |
Acquire a lease
To acquire a lease using the Azure portal, follow these steps:
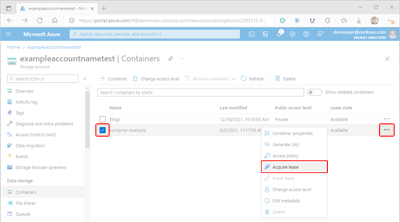
In the Azure portal, navigate to the list of containers in your storage account.
Select the checkbox next to the name of the container for which you'll acquire a lease.
Select the container's More button (...), and select Acquire lease to request a new lease and display the details in the Lease status pane.
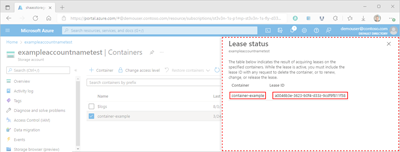
The Container and Lease ID property values of the newly requested lease are displayed within the Lease status pane. Copy and paste these values in a secure location. They'll only be displayed once and can't be retrieved after the pane is closed.


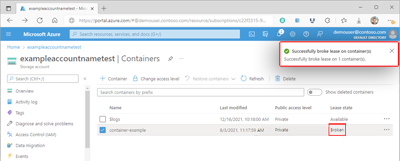
Break a lease
To break a lease using the Azure portal, follow these steps:
In the Azure portal, navigate to the list of containers in your storage account.
Select the checkbox next to the name of the container for which you'll break a lease.
Select the container's More button (...), and select Break lease to break the lease.
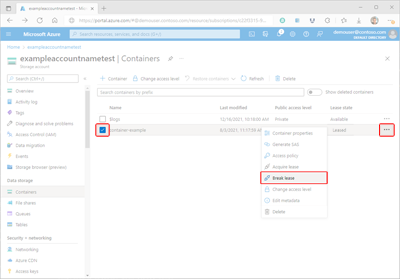
After the lease is broken, the selected container's Lease state value will update, and a status confirmation will appear.


Delete containers
When you delete a container within the Azure portal, all blobs within the container will also be deleted.
Warning
Following the steps below may permanently delete containers and any blobs within them. Microsoft recommends enabling container soft delete to protect containers and blobs from accidental deletion. For more info, see Soft delete for containers.
To delete a container within the Azure portal, follow these steps:
In the Azure portal, navigate to the list of containers in your storage account.
Select the container to delete.
Select the More button (...), and select Delete.
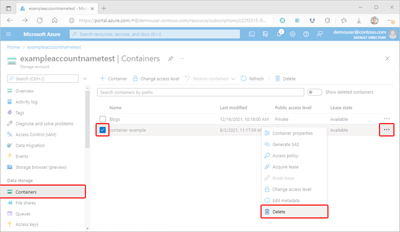
In the Delete container(s) dialog, confirm that you want to delete the container.

In some cases, it's possible to retrieve containers that have been deleted. If soft delete data protection option is enabled on your storage account, you can access containers deleted within the associated retention period. To learn more about soft delete, refer to the Soft delete for containers article.
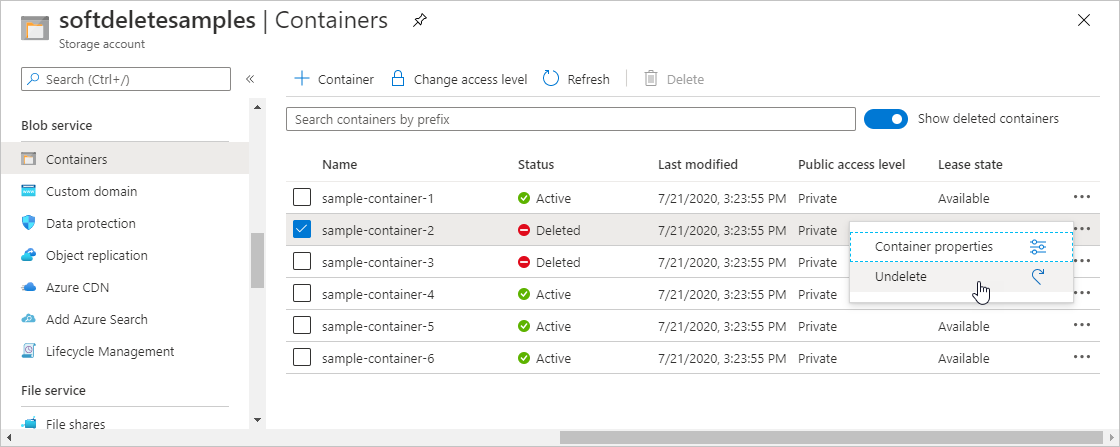
View soft-deleted containers
When soft delete is enabled, you can view soft-deleted containers within the Azure portal. Soft-deleted containers are visible during the specified retention period. After the retention period expires, a soft-deleted container is permanently deleted and is no longer visible.
To view soft-deleted containers within the Azure portal, follow these steps:
Navigate to your storage account within the Azure portal and view the list of your containers.
Toggle the Show deleted containers switch to include deleted containers in the list.

Restore a soft-deleted container
You can restore a soft-deleted container and its contents within the retention period. To restore a soft-deleted container within the Azure portal, follow these steps:
Navigate to your storage account within the Azure portal and view the list of your containers.
Display the context menu for the container you wish to restore, and choose Undelete from the menu.
See also
Feedback
Kommer snart: I hele 2024 udfaser vi GitHub-problemer som feedbackmekanisme for indhold og erstatter det med et nyt feedbacksystem. Du kan få flere oplysninger under: https://aka.ms/ContentUserFeedback.
Indsend og få vist feedback om