Security, access, and operations for Netezza migrations
This article is part three of a seven-part series that provides guidance on how to migrate from Netezza to Azure Synapse Analytics. The focus of this article is best practices for security access operations.
Security considerations
This article discusses connection methods for existing legacy Netezza environments and how they can be migrated to Azure Synapse Analytics with minimal risk and user impact.
This article assumes that there's a requirement to migrate the existing methods of connection and user/role/permission structure as-is. If not, use the Azure portal to create and manage a new security regime.
For more information on the Azure Synapse security options, see Security whitepaper.
Connection and authentication
Tip
Authentication in both Netezza and Azure Synapse can be "in database" or through external methods.
Netezza authorization options
The IBM Netezza system offers several authentication methods for Netezza database users:
Local authentication: Netezza administrators define database users and their passwords by using the
CREATE USERcommand or through Netezza administrative interfaces. In local authentication, use the Netezza system to manage database accounts and passwords, and to add and remove database users from the system. This method is the default authentication method.LDAP authentication: use an LDAP name server to authenticate database users, and manage passwords, database account activations, and deactivations. The Netezza system uses a Pluggable Authentication Module (PAM) to authenticate users on the LDAP name server. Microsoft Active Directory conforms to the LDAP protocol, so it can be treated like an LDAP server for the purposes of LDAP authentication.
Kerberos authentication: use a Kerberos distribution server to authenticate database users, and manage passwords, database account activations, and deactivations.
Authentication is a system-wide setting. Users must be either locally authenticated or authenticated by using the LDAP or Kerberos method. If you choose LDAP or Kerberos authentication, create users with local authentication on a per-user basis. LDAP and Kerberos can't be used at the same time to authenticate users. Netezza host supports LDAP or Kerberos authentication for database user logins only, not for operating system logins on the host.
Azure Synapse authorization options
Azure Synapse supports two basic options for connection and authorization:
SQL authentication: SQL authentication is via a database connection that includes a database identifier, user ID, and password plus other optional parameters. This is functionally equivalent to Netezza local connections.
Microsoft Entra authentication: with Microsoft Entra authentication, you can centrally manage the identities of database users and other Microsoft services in one central location. Central ID management provides a single place to manage Azure Synapse users and simplifies permission management. Microsoft Entra ID can also support connections to LDAP and Kerberos services—for example, Microsoft Entra ID can be used to connect to existing LDAP directories if these are to remain in place after migration of the database.
Users, roles, and permissions
Overview
Tip
High-level planning is essential for a successful migration project.
Both Netezza and Azure Synapse implement database access control via a combination of users, roles (groups in Netezza), and permissions. Both use standard SQL CREATE USER and CREATE ROLE/GROUP statements to define users and roles, and GRANT and REVOKE statements to assign or remove permissions to those users and/or roles.
Tip
Automation of migration processes is recommended to reduce elapsed time and scope for errors.
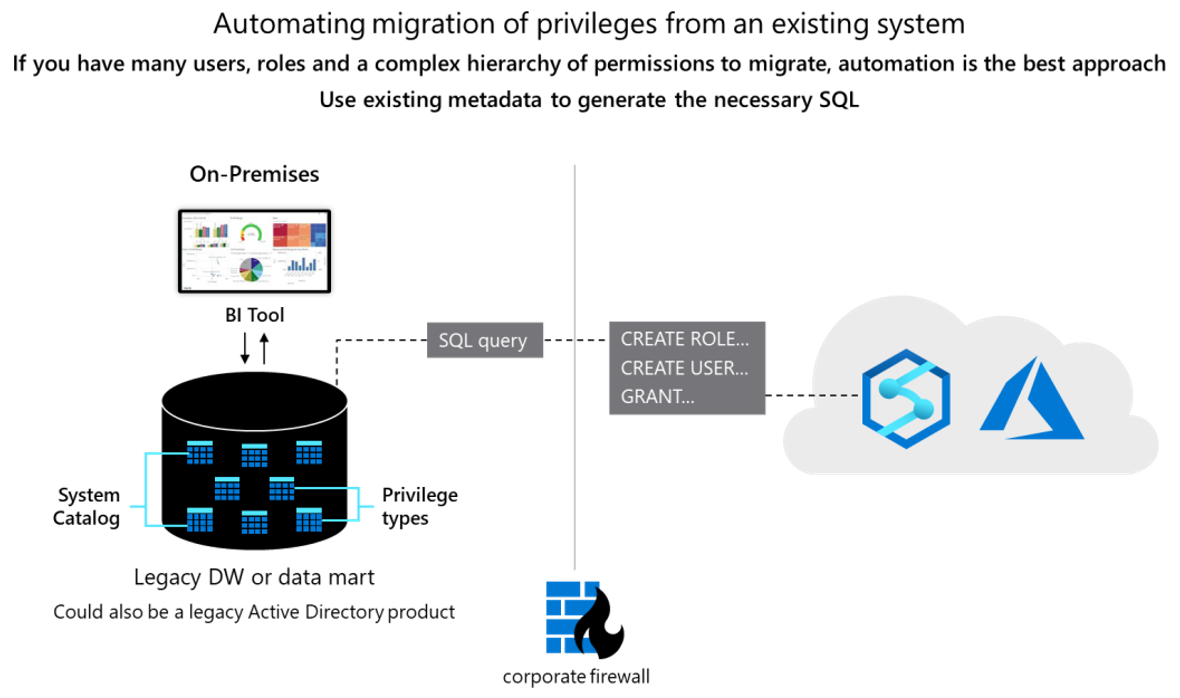
Conceptually the two databases are similar, and it might be possible to automate the migration of existing user IDs, groups, and permissions to some degree. Migrate such data by extracting the existing legacy user and group information from the Netezza system catalog tables and generating matching equivalent CREATE USER and CREATE ROLE statements to be run in Azure Synapse to recreate the same user/role hierarchy.
After data extraction, use Netezza system catalog tables to generate equivalent GRANT statements to assign permissions (where an equivalent one exists). The following diagram shows how to use existing metadata to generate the necessary SQL.
See the following sections for more details.
Users and roles
Tip
Migration of a data warehouse requires more than just tables, views, and SQL statements.
The information about current users and groups in a Netezza system is held in system catalog views _v_users and _v_groupusers. Use the nzsql utility or tools such as the Netezza Performance, NzAdmin, or Netezza Utility scripts to list user privileges. For example, use the dpu and dpgu commands in nzsql to display users or groups with their permissions.
Use or edit the utility scripts nz_get_users and nz_get_user_groups to retrieve the same information in the required format.
Query system catalog views directly (if the user has SELECT access to those views) to obtain current lists of users and roles defined within the system. See examples to list users, groups, or users and their associated groups:
-- List of users
SELECT USERNAME FROM _V_USER;

--List of groups
SELECT DISTINCT(GROUPNAME) FROM _V_USERGROUPS;

--List of users and their associated groups
SELECT USERNAME, GROUPNAME FROM _V_GROUPUSERS;
Modify the example SELECT statement to produce a result set that is a series of CREATE USER and CREATE GROUP statements by including the appropriate text as a literal within the SELECT statement.
There's no way to retrieve existing passwords, so you need to implement a scheme for allocating new initial passwords on Azure Synapse.
Permissions
Tip
There are equivalent Azure Synapse permissions for basic database operations such as DML and DDL.
In a Netezza system, the system table _t_usrobj_priv holds the access rights for users and roles. Query these tables (if the user has SELECT access to those tables) to obtain current lists of access rights defined within the system.
In Netezza, the individual permissions are represented as individual bits within field privileges or g_privileges. See example SQL statement at user group permissions
The simplest way to obtain a DDL script that contains the GRANT commands to replicate the current privileges for users and groups is to use the appropriate Netezza utility scripts:
--List of group privileges
nz_ddl_grant_group -usrobj dbname > output_file_dbname;

--List of user privileges
nz_ddl_grant_user -usrobj dbname > output_file_dbname;
The output file can be modified to produce a script that is a series of GRANT statements for Azure Synapse.
Netezza supports two classes of access rights, Admin and Object. See the following tables for a list of Netezza access rights and their equivalent in Azure Synapse.
| Admin Privilege | Description | Azure Synapse Equivalent |
|---|---|---|
| Backup | Allows user to create backups. The user can run backups. The user can run the command nzbackup. |
1 |
| [Create] Aggregate | Allows the user to create user-defined aggregates (UDAs). Permission to operate on existing UDAs is controlled by object privileges. | CREATE FUNCTION 3 |
| [Create] Database | Allows the user to create databases. Permission to operate on existing databases is controlled by object privileges. | CREATE DATABASE |
| [Create] External Table | Allows the user to create external tables. Permission to operate on existing tables is controlled by object privileges. | CREATE TABLE |
| [Create] Function | Allows the user to create user-defined functions (UDFs). Permission to operate on existing UDFs is controlled by object privileges. | CREATE FUNCTION |
| [Create] Group | Allows the user to create groups. Permission to operate on existing groups is controlled by object privileges. | CREATE ROLE |
| [Create] Index | For system use only. Users can't create indexes. | CREATE INDEX |
| [Create] Library | Allows the user to create shared libraries. Permission to operate on existing shared libraries is controlled by object privileges. | 1 |
| [Create] Materialized View | Allows the user to create materialized views. | CREATE VIEW |
| [Create] Procedure | Allows the user to create stored procedures. Permission to operate on existing stored procedures is controlled by object privileges. | CREATE PROCEDURE |
| [Create] Schema | Allows the user to create schemas. Permission to operate on existing schemas is controlled by object privileges. | CREATE SCHEMA |
| [Create] Sequence | Allows the user to create database sequences. | 1 |
| [Create] Synonym | Allows the user to create synonyms. | CREATE SYNONYM |
| [Create] Table | Allows the user to create tables. Permission to operate on existing tables is controlled by object privileges. | CREATE TABLE |
| [Create] Temp Table | Allows the user to create temporary tables. Permission to operate on existing tables is controlled by object privileges. | CREATE TABLE |
| [Create] User | Allows the user to create users. Permission to operate on existing users is controlled by object privileges. | CREATE USER |
| [Create] View | Allows the user to create views. Permission to operate on existing views is controlled by object privileges. | CREATE VIEW |
| [Manage Hardware | Allows the user to do the following hardware-related operations: view hardware status, manage SPUs, manage topology and mirroring, and run diagnostic tests. The user can run these commands: nzhw and nzds. | 4 |
| [Manage Security | Allows the user to run commands and operations that relate to the following advanced security options such as: managing and configuring history databases, managing multi-level security objects, and specifying security for users and groups, managing database key stores and keys and key stores for the digital signing of audit data. | 4 |
| [Manage System | Allows the user to do the following management operations: start/stop/pause/resume the system, abort sessions, view the distribution map, system statistics, and logs. The user can use these commands: nzsystem, nzstate, nzstats, and nzsession. | 4 |
| Restore | Allows the user to restore the system. The user can run the nzrestore command. | 2 |
| Unfence | Allows the user to create or alter a user-defined function or aggregate to run in unfenced mode. | 1 |
| Object Privilege Abort | Description | Azure Synapse Equivalent |
|---|---|---|
| Abort | Allows the user to abort sessions. Applies to groups and users. | KILL DATABASE CONNECTION |
| Alter | Allows the user to modify object attributes. Applies to all objects. | ALTER |
| Delete | Allows the user to delete table rows. Applies only to tables. | DELETE |
| Drop | Allows the user to drop objects. Applies to all object types. | DROP |
| Execute | Allows the user to run user-defined functions, user-defined aggregates, or stored procedures. | EXECUTE |
| GenStats | Allows the user to generate statistics on tables or databases. The user can run GENERATE STATISTICS command. | 2 |
| Groom | Allows the user to reclaim disk space for deleted or outdated rows, and reorganize a table by the organizing keys, or to migrate data for tables that have multiple stored versions. | 2 |
| Insert | Allows the user to insert rows into a table. Applies only to tables. | INSERT |
| List | Allows the user to display an object name, either in a list or in another manner. Applies to all objects. | LIST |
| Select | Allows the user to select (or query) rows within a table. Applies to tables and views. | SELECT |
| Truncate | Allows the user to delete all rows from a table. Applies only to tables. | TRUNCATE |
| Update | Allows the user to modify table rows. Applies to tables only. | UPDATE |
Table notes:
There's no direct equivalent to this function in Azure Synapse.
These Netezza functions are handled automatically in Azure Synapse.
The Azure Synapse
CREATE FUNCTIONfeature incorporates Netezza aggregate functionality.These features are managed automatically by the system or via the Azure portal in Azure Synapse. See the next section on Operational considerations.
Refer to Azure Synapse Analytics security permissions.
Operational considerations
Tip
Operational tasks are necessary to keep any data warehouse operating efficiently.
This section discusses how to implement typical Netezza operational tasks in Azure Synapse with minimal risk and impact to users.
As with all data warehouse products, once in production there are ongoing management tasks that are necessary to keep the system running efficiently and to provide data for monitoring and auditing. Resource utilization and capacity planning for future growth also falls into this category, as does backup/restore of data.
Netezza administration tasks typically fall into two categories:
System administration, which is managing the hardware, configuration settings, system status, access, disk space, usage, upgrades, and other tasks.
Database administration, which is managing user databases and their content, loading data, backing up data, restoring data, and controlling access to data and permissions.
IBM Netezza offers several ways or interfaces that you can use to perform the various system and database management tasks:
Netezza commands (
nz*commands) are installed in the/nz/kit/bindirectory on the Netezza host. For many of thenz*commands, you must be able to sign into the Netezza system to access and run those commands. In most cases, users sign in as the defaultnzuser account, but you can create other Linux user accounts on your system. Some commands require you to specify a database user account, password, and database to ensure that you have permission to do the task.The Netezza CLI client kits package a subset of the
nz*commands that can be run from Windows and UNIX client systems. The client commands might also require you to specify a database user account, password, and database to ensure that you have database administrative and object permissions to perform the task.The SQL commands support administration tasks and queries within a SQL database session. You can run the SQL commands from the Netezza nzsql command interpreter or through SQL APIs such as ODBC, JDBC, and the OLE DB Provider. You must have a database user account to run the SQL commands with appropriate permissions for the queries and tasks that you perform.
The NzAdmin tool is a Netezza interface that runs on Windows client workstations to manage Netezza systems.
While conceptually the management and operations tasks for different data warehouses are similar, the individual implementations may differ. In general, modern cloud-based products such as Azure Synapse tend to incorporate a more automated and "system managed" approach (as opposed to a more "manual" approach in legacy data warehouses such as Netezza).
The following sections compare Netezza and Azure Synapse options for various operational tasks.
Housekeeping tasks
Tip
Housekeeping tasks keep a production warehouse operating efficiently and optimize use of resources such as storage.
In most legacy data warehouse environments, regular "housekeeping" tasks are time-consuming. Reclaim disk storage space by removing old versions of updated or deleted rows or reorganizing data, log files, or index blocks for efficiency (GROOM and VACUUM in Netezza). Collecting statistics is also a potentially time-consuming task, required after a bulk data ingest to provide the query optimizer with up-to-date data on which to base query execution plans.
Netezza recommends collecting statistics as follows:
Collect statistics on unpopulated tables to set up the interval histogram used in internal processing. This initial collection makes subsequent statistics collections faster. Make sure to recollect statistics after data is added.
Collect prototype phase statistics for newly populated tables.
Collect production phase statistics after a significant percentage of change to the table or partition (~10% of rows). For high volumes of nonunique values, such as dates or timestamps, it may be advantageous to recollect at 7%.
Collect production phase statistics after you've created users and applied real world query loads to the database (up to about three months of querying).
Collect statistics in the first few weeks after an upgrade or migration during periods of low CPU utilization.
Netezza database contains many log tables in the data dictionary that accumulate data, either automatically or after certain features are enabled. Because log data grows over time, purge older information to avoid using up permanent space. There are options to automate the maintenance of these logs available.
Tip
Automate and monitor housekeeping tasks in Azure.
Azure Synapse has an option to automatically create statistics so that they can be used as needed. Perform defragmentation of indexes and data blocks manually, on a scheduled basis, or automatically. Leveraging native built-in Azure capabilities can reduce the effort required in a migration exercise.
Monitoring and auditing
Tip
Netezza Performance Portal is the recommended method of monitoring and logging for Netezza systems.
Netezza provides the Netezza Performance Portal to monitor various aspects of one or more Netezza systems including activity, performance, queuing, and resource utilization. Netezza Performance Portal is an interactive GUI that allows users to drill down into low-level details for any chart.
Tip
The Azure portal provides a UI to manage monitoring and auditing tasks for all Azure data and processes.
Similarly, Azure Synapse provides a rich monitoring experience within the Azure portal to provide insights into your data warehouse workload. The Azure portal is the recommended tool when monitoring your data warehouse as it provides configurable retention periods, alerts, recommendations, and customizable charts and dashboards for metrics and logs.
The portal also enables integration with other Azure monitoring services such as Operations Management Suite (OMS) and Azure Monitor (logs) to provide a holistic monitoring experience for not only the data warehouse but also the entire Azure analytics platform for an integrated monitoring experience.
Tip
Low-level and system-wide metrics are automatically logged in Azure Synapse.
Resource utilization statistics for Azure Synapse are automatically logged within the system. The metrics for each query include usage statistics for CPU, memory, cache, I/O, and temporary workspace, as well as connectivity information like failed connection attempts.
Azure Synapse provides a set of Dynamic Management Views (DMVs). These views are useful when actively troubleshooting and identifying performance bottlenecks with your workload.
For more information, see Azure Synapse operations and management options.
High Availability (HA) and Disaster Recovery (DR)
Netezza appliances are redundant, fault-tolerant systems, and there are diverse options in a Netezza system to enable high availability and disaster recovery.
Adding IBM Netezza Replication Services for disaster recovery improves fault tolerance by extending redundancy across local and wide area networks.
IBM Netezza Replication Services protects against data loss by synchronizing data on a primary system (the primary node) with data on one or more target nodes (subordinates). These nodes make up a replication set.
High-Availability Linux (also called Linux-HA) provides the failover capabilities from a primary or active Netezza host to a secondary or standby Netezza host. The main cluster management daemon in the Linux-HA solution is called Heartbeat. Heartbeat watches the hosts and manages the communication and status checks of services.
Each service is a resource.
Netezza groups the Netezza-specific services into the nps resource group. When Heartbeat detects problems that imply a host failure condition or loss of service to the Netezza users, Heartbeat can initiate a failover to the standby host.
Distributed Replicated Block Device (DRBD) is a block device driver that mirrors the content of block devices (hard disks, partitions, and logical volumes) between the hosts. Netezza uses the DRBD replication only on the /nz and /export/home partitions. As new data is written to the /nz partition and the /export/home partition on the primary host, the DRBD software automatically makes the same changes to the /nz and /export/home partition of the standby host.
Tip
Azure Synapse creates snapshots automatically to ensure fast recovery times.
Azure Synapse uses database snapshots to provide high availability of the warehouse. A data warehouse snapshot creates a restore point that can be used to recover or copy a data warehouse to a previous state. Since Azure Synapse is a distributed system, a data warehouse snapshot consists of many files that are in Azure Storage. Snapshots capture incremental changes from the data stored in your data warehouse.
Tip
Use user-defined snapshots to define a recovery point before key updates.
Tip
Microsoft Azure provides automatic backups to a separate geographical location to enable DR.
Azure Synapse automatically takes snapshots throughout the day, creating restore points that are available for seven days. You can't change this retention period. Azure Synapse supports an eight-hour recovery point objective (RPO). A data warehouse can be restored in the primary region from any one of the snapshots taken in the past seven days.
User-defined restore points are also supported, allowing manual triggering of snapshots to create restore points of a data warehouse before and after large modifications. This capability ensures that restore points are logically consistent, which provides additional data protection in case of any workload interruptions or user errors for a desired RPO less than 8 hours.
As well as the snapshots described previously, Azure Synapse also performs as standard a geo-backup once per day to a paired data center. The RPO for a geo-restore is 24 hours. You can restore the geo-backup to a server in any other region where Azure Synapse is supported. A geo-backup ensures that a data warehouse can be restored in case the restore points in the primary region aren't available.
Workload management
Tip
In a production data warehouse, there are typically mixed workloads with different resource usage characteristics running concurrently.
Netezza incorporates various features for managing workloads:
| Technique | Description |
|---|---|
| Scheduler rules | Scheduler rules influence the scheduling of plans. Each scheduler rule specifies a condition or set of conditions. Each time the scheduler receives a plan, it evaluates all modifying scheduler rules and carries out the appropriate actions. Each time the scheduler selects a plan for execution, it evaluates all limiting scheduler rules. The plan is executed only if doing so wouldn't exceed a limit imposed by a limiting scheduler rule. Otherwise, the plan waits. This provides you with a way to classify and manipulate plans in a way that influences the other WLM techniques (SQB, GRA, and PQE). |
| Guaranteed resource allocation (GRA) | You can assign a minimum share and a maximum percentage of total system resources to entities called resource groups. The scheduler ensures that each resource group receives system resources in proportion to its minimum share. A resource group receives a larger share of resources when other resource groups are idle, but never receives more than its configured maximum percentage. Each plan is associated with a resource group, and the settings of that resource group settings determine what fraction of available system resources are to be made available to process the plan. |
| Short query bias (SQB) | Resources (that is, scheduling slots, memory, and preferential queuing) are reserved for short queries. A short query is a query for which the cost estimate is less than a specified maximum value (the default is two seconds). With SQB, short queries can run even when the system is busy processing other, longer queries. |
| Prioritized query execution (PQE) | Based on settings that you configure, the system assigns a priority—critical, high, normal, or low—to each query. The priority depends on factors such as the user, group, or session associated with the query. The system can then use the priority as a basis for allocating resources. |
Azure Synapse automatically logs resource utilization statistics. Metrics include usage statistics for CPU, memory, cache, I/O, and temporary workspace for each query. Azure Synapse also logs connectivity information, such as failed connection attempts.
Tip
Low-level and system-wide metrics are automatically logged within Azure.
In Azure Synapse, resource classes are pre-determined resource limits that govern compute resources and concurrency for query execution. Resource classes can help you manage your workload by setting limits on the number of queries that run concurrently and on the compute resources assigned to each query. There's a trade-off between memory and concurrency.
Azure Synapse supports these basic workload management concepts:
Workload classification: you can assign a request to a workload group to set importance levels.
Workload importance: you can influence the order in which a request gets access to resources. By default, queries are released from the queue on a first-in, first-out basis as resources become available. Workload importance allows higher priority queries to receive resources immediately regardless of the queue.
Workload isolation: you can reserve resources for a workload group, assign maximum and minimum usage for varying resources, limit the resources a group of requests can consume can, and set a timeout value to automatically kill runaway queries.
Running mixed workloads can pose resource challenges on busy systems. A successful workload management scheme effectively manages resources, ensures highly efficient resource utilization, and maximizes return on investment (ROI). The workload classification, workload importance, and workload isolation gives more control over how workload utilizes system resources.
The workload management guide describes the techniques to analyze the workload, manage and monitor workload importance](../../sql-data-warehouse/sql-data-warehouse-how-to-manage-and-monitor-workload-importance.md), and the steps to convert a resource class to a workload group. Use the Azure portal and T-SQL queries on DMVs to monitor the workload to ensure that the applicable resources are efficiently utilized. Azure Synapse provides a set of Dynamic Management Views (DMVs) for monitoring all aspects of workload management. These views are useful when actively troubleshooting and identifying performance bottlenecks in your workload.
This information can also be used for capacity planning, determining the resources required for additional users or application workload. This also applies to planning scale up/scale downs of compute resources for cost-effective support of "spiky" workloads, such as workloads with temporary, intense bursts of activity surrounded by periods of infrequent activity.
For more information on workload management in Azure Synapse, see Workload management with resource classes.
Scale compute resources
Tip
A major benefit of Azure is the ability to independently scale up and down compute resources on demand to handle peaky workloads cost-effectively.
The architecture of Azure Synapse separates storage and compute, allowing each to scale independently. As a result, compute resources can be scaled to meet performance demands independent of data storage. You can also pause and resume compute resources. A natural benefit of this architecture is that billing for compute and storage is separate. If a data warehouse isn't in use, you can save on compute costs by pausing compute.
Compute resources can be scaled up or scaled back by adjusting the data warehouse units setting for the data warehouse. Loading and query performance will increase linearly as you add more data warehouse units.
Adding more compute nodes adds more compute power and ability to leverage more parallel processing. As the number of compute nodes increases, the number of distributions per compute node decreases, providing more compute power and parallel processing for queries. Similarly, decreasing data warehouse units reduces the number of compute nodes, which reduces the compute resources for queries.
Next steps
To learn more about visualization and reporting, see the next article in this series: Visualization and reporting for Netezza migrations.
Feedback
Kommer snart: I hele 2024 udfaser vi GitHub-problemer som feedbackmekanisme for indhold og erstatter det med et nyt feedbacksystem. Du kan få flere oplysninger under: https://aka.ms/ContentUserFeedback.
Indsend og få vist feedback om