Azure Notification Hubs – Umfassende Pushbenachrichtigungen
Übersicht
Um Benutzer augenblicklich mit umfassenden Inhalten zu versorgen, kann eine Anwendung Pushbenachrichtigungen senden. Diese Benachrichtigungen fördern Benutzerinteraktionen und bieten Inhalte wie URLs, Audioinhalte, Bilder/Coupons und mehr. Dieses Tutorial baut auf dem Tutorial Benachrichtigen von Benutzern auf und veranschaulicht das Senden von Pushbenachrichtigungen mit Nutzlasten (z. B. Bilder).
Dieses Tutorial ist mit iOS 7 und 8 kompatibel.
Allgemeines:
- Das App-Back-End:
- Speichert die umfassende Nutzlast (in diesem Fall das Bild) in der Back-End-Datenbank/im lokalen Speicher
- Sendet die ID dieser umfassenden Benachrichtigung an das Gerät
- App auf dem Gerät:
- Fordert beim Back-End die umfassende Nutzlast mit der empfangenen ID an
- Sendet Benutzerbenachrichtigungen auf dem Gerät, wenn der Datenabruf abgeschlossen ist, und zeigt sofort die Nutzlast an, wenn der Benutzer tippt, um mehr zu erfahren
WebAPI-Projekt
Öffnen Sie in Visual Studio das Projekt AppBackend , das Sie im Lernprogramm Benachrichtigen von Benutzern erstellt haben.
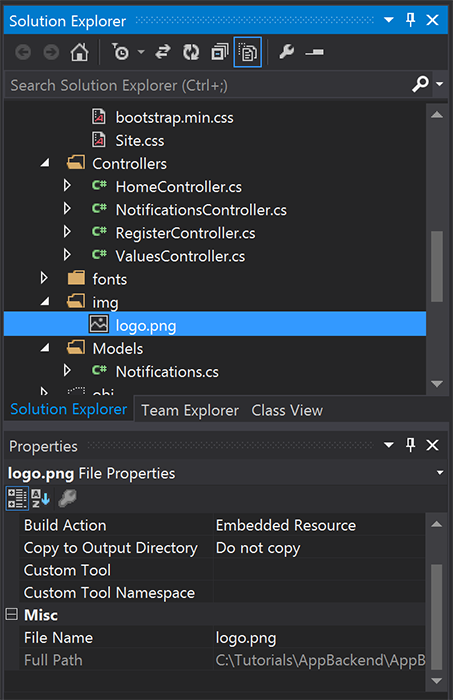
Rufen Sie ein Bild ab, mit dem Sie Benutzer informieren möchten, und platzieren Sie es in einem img -Ordner in Ihrem Projektverzeichnis.
Klicken Sie im Projektmappen-Explorer auf Alle Dateien anzeigen, klicken Sie mit der rechten Maustaste auf den Ordner, und wählen Sie Zu Projekt hinzufügen aus.
Wählen Sie das Bild aus, und ändern Sie dessen Buildaktion im Fenster Eigenschaften in Eingebettete Ressource.
Fügen Sie in
Notifications.csdie folgendeusing-Anweisung hinzu:using System.Reflection;Ersetzen Sie die
Notifications-Klasse durch den folgenden Code. Ersetzen Sie die Platzhalter durch Ihre Benachrichtigungshub-Anmeldedaten und den Namen der Bilddatei:public class Notification { public int Id { get; set; } // Initial notification message to display to users public string Message { get; set; } // Type of rich payload (developer-defined) public string RichType { get; set; } public string Payload { get; set; } public bool Read { get; set; } } public class Notifications { public static Notifications Instance = new Notifications(); private List<Notification> notifications = new List<Notification>(); public NotificationHubClient Hub { get; set; } private Notifications() { // Placeholders: replace with the connection string (with full access) for your notification hub and the hub name from the Azure Classics Portal Hub = NotificationHubClient.CreateClientFromConnectionString("{conn string with full access}", "{hub name}"); } public Notification CreateNotification(string message, string richType, string payload) { var notification = new Notification() { Id = notifications.Count, Message = message, RichType = richType, Payload = payload, Read = false }; notifications.Add(notification); return notification; } public Stream ReadImage(int id) { var assembly = Assembly.GetExecutingAssembly(); // Placeholder: image file name (for example, logo.png). return assembly.GetManifestResourceStream("AppBackend.img.{logo.png}"); } }Definieren Sie
NotificationsControllerinNotificationsController.csmit dem folgendem Code neu. Dadurch wird eine erste stille (silent) umfassende Benachrichtigungs-ID an das Gerät gesendet und der clientseitige Abruf des Bilds ermöglicht:// Return http response with image binary public HttpResponseMessage Get(int id) { var stream = Notifications.Instance.ReadImage(id); var result = new HttpResponseMessage(HttpStatusCode.OK); result.Content = new StreamContent(stream); // Switch in your image extension for "png" result.Content.Headers.ContentType = new System.Net.Http.Headers.MediaTypeHeaderValue("image/{png}"); return result; } // Create rich notification and send initial silent notification (containing id) to client public async Task<HttpResponseMessage> Post() { // Replace the placeholder with image file name var richNotificationInTheBackend = Notifications.Instance.CreateNotification("Check this image out!", "img", "{logo.png}"); var usernameTag = "username:" + HttpContext.Current.User.Identity.Name; // Silent notification with content available var aboutUser = "{\"aps\": {\"content-available\": 1, \"sound\":\"\"}, \"richId\": \"" + richNotificationInTheBackend.Id.ToString() + "\", \"richMessage\": \"" + richNotificationInTheBackend.Message + "\", \"richType\": \"" + richNotificationInTheBackend.RichType + "\"}"; // Send notification to apns await Notifications.Instance.Hub.SendAppleNativeNotificationAsync(aboutUser, usernameTag); return Request.CreateResponse(HttpStatusCode.OK); }Nun stellen wir diese App erneut auf einer Azure-Website bereit, damit von allen Geräten darauf zugegriffen werden kann. Klicken Sie mit der rechten Maustaste auf das Projekt AppBackend, und wählen Sie Veröffentlichen.
Wählen Sie die Azure-Website als Ihr Veröffentlichungsziel aus. Melden Sie sich mit Ihrem Azure-Konto an, wählen Sie eine vorhandene oder neue Website, und notieren Sie sich die Ziel-URL-Eigenschaft auf der Registerkarte Verbindung. Diese URL wird später in diesem Tutorial als Back-End-Endpunkt bezeichnet. Wählen Sie Veröffentlichen.
Ändern des iOS-Projekts
Nachdem Sie das Back-End nun so geändert haben, dass nur die ID einer Benachrichtigung gesendet wird, ändern Sie die iOS-App so, dass sie mit dieser ID umgehen und die umfassende Nachricht von Ihrem Back-End abrufen kann:
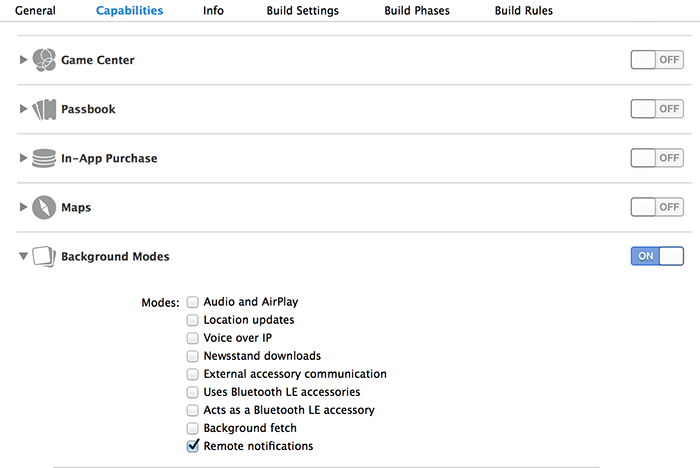
Öffnen Sie das iOS-Projekt, und aktivieren Sie Remotebenachrichtigungen, indem Sie zu dem Haupt-App-Ziel im Abschnitt Targets navigieren.
Wählen Sie Capabilities aus, aktivieren Sie Background Modes, und aktivieren Sie das Kontrollkästchen Remote notifications.
Öffnen Sie
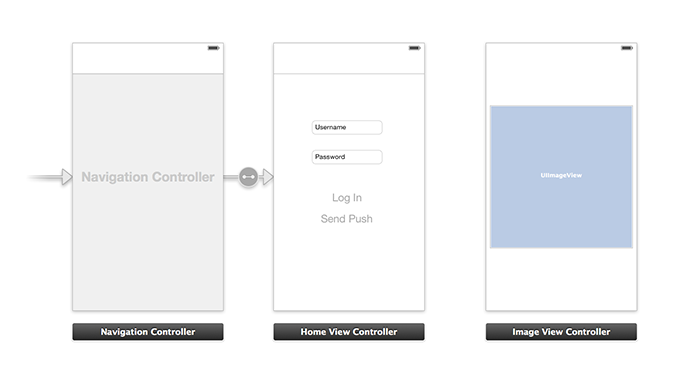
Main.storyboard, und vergewissern Sie sich, dass Sie einen Ansichtscontroller (in diesem Tutorial als „Home View Controller“ bezeichnet) aus dem Tutorial Benachrichtigen von Benutzern haben.Fügen Sie Ihrem Storyboard einen Navigation Controller hinzu, und ziehen Sie den Home View Controller bei gedrückter STRG-TASTE, um ihn zur Stammansicht der Navigation zu machen. Achten Sie darauf, dass die Option Is Initial View Controller in „Attributes inspector“ nur für den Navigation Controller ausgewählt ist.
Fügen Sie dem Storyboard einen View Controller hinzu, und fügen Sie eine Image View hinzu. Dies ist die Seite, die Benutzern angezeigt wird, nachdem sie auf die Benachrichtigung geklickt haben, um weitere Informationen zu erhalten. Ihr Storyboard sollte nun folgendermaßen aussehen:
Klicken Sie im Storyboard auf den Home View Controller, und stellen Sie sicher, dass für den Controller die Klasse homeViewController als dessen Custom Class sowie Storyboard ID unter dem „Identity Inspector“ angegeben ist.
Gehen Sie für Image View Controller als imageViewController gleichermaßen vor.
Erstellen Sie dann eine neue View Controller-Klasse mit dem Namen imageViewController, um die soeben erstellte Benutzeroberfläche zu verarbeiten.
Fügen Sie in imageViewController.h den Schnittstellendeklarationen des Controllers folgenden Code hinzu. Halten Sie STRG gedrückt, und ziehen Sie von der Storyboard-Bildansicht zu diesen Eigenschaften, um beide zu verbinden:
@property (weak, nonatomic) IBOutlet UIImageView *myImage;
@property (strong) UIImage* imagePayload;
Fügen Sie in
imageViewController.mFolgendes am Ende vonviewDidloadhinzu:// Display the UI Image in UI Image View [self.myImage setImage:self.imagePayload];Importieren Sie in
AppDelegate.mden erstellten Image Controller:#import "imageViewController.h"Fügen Sie einen Schnittstellenabschnitt mit der folgenden Deklaration hinzu:
@interface AppDelegate ()

@property UIImage* imagePayload;
@property NSDictionary* userInfo;
@property BOOL iOS8;

// Obtain content from backend with notification id
- (void)retrieveRichImageWithId:(int)richId completion: (void(^)(NSError*)) completion;

// Redirect to Image View Controller after notification interaction
- (void)redirectToImageViewWithImage: (UIImage *)img;

@end
Stellen Sie in
AppDelegatesicher, dass Ihre App sich inapplication: didFinishLaunchingWithOptionsfür automatische Benachrichtigungen registriert:// Software version self.iOS8 = [[UIApplication sharedApplication] respondsToSelector:@selector(registerUserNotificationSettings:)] && [[UIApplication sharedApplication] respondsToSelector:@selector(registerForRemoteNotifications)]; // Register for remote notifications for iOS8 and previous versions if (self.iOS8) { NSLog(@"This device is running with iOS8."); // Action UIMutableUserNotificationAction *richPushAction = [[UIMutableUserNotificationAction alloc] init]; richPushAction.identifier = @"richPushMore"; richPushAction.activationMode = UIUserNotificationActivationModeForeground; richPushAction.authenticationRequired = NO; richPushAction.title = @"More"; // Notification category UIMutableUserNotificationCategory* richPushCategory = [[UIMutableUserNotificationCategory alloc] init]; richPushCategory.identifier = @"richPush"; [richPushCategory setActions:@[richPushAction] forContext:UIUserNotificationActionContextDefault]; // Notification categories NSSet* richPushCategories = [NSSet setWithObjects:richPushCategory, nil]; UIUserNotificationSettings *settings = [UIUserNotificationSettings settingsForTypes:UIUserNotificationTypeSound | UIUserNotificationTypeAlert | UIUserNotificationTypeBadge categories:richPushCategories]; [[UIApplication sharedApplication] registerUserNotificationSettings:settings]; [[UIApplication sharedApplication] registerForRemoteNotifications]; } else { // Previous iOS versions NSLog(@"This device is running with iOS7 or earlier versions."); [[UIApplication sharedApplication] registerForRemoteNotificationTypes: UIRemoteNotificationTypeAlert | UIRemoteNotificationTypeBadge | UIRemoteNotificationTypeSound | UIRemoteNotificationTypeNewsstandContentAvailability]; } return YES;Ersetzen Sie in der folgenden Implementierung
application:didRegisterForRemoteNotificationsWithDeviceToken, sodass die Änderungen an der Storyboard-Benutzeroberfläche berücksichtigt werden:// Access navigation controller which is at the root of window UINavigationController *nc = (UINavigationController *)self.window.rootViewController; // Get home view controller from stack on navigation controller homeViewController *hvc = (homeViewController *)[nc.viewControllers objectAtIndex:0]; hvc.deviceToken = deviceToken;Fügen Sie dann
AppDelegate.mdie folgenden Methoden hinzu, um das Bild von Ihrem Endpunkt abzurufen und bei Abschluss des Abrufs eine lokale Benachrichtigung zu senden. Ersetzen Sie den Platzhalter{backend endpoint}durch Ihren Back-End-Endpunkt:NSString *const GetNotificationEndpoint = @"{backend endpoint}/api/notifications"; // Helper: retrieve notification content from backend with rich notification id - (void)retrieveRichImageWithId:(int)richId completion: (void(^)(NSError*)) completion { UINavigationController *nc = (UINavigationController *)self.window.rootViewController; homeViewController *hvc = (homeViewController *)[nc.viewControllers objectAtIndex:0]; NSString* authenticationHeader = hvc.registerClient.authenticationHeader; // Check if authenticated if (!authenticationHeader) return; NSURLSession* session = [NSURLSession sessionWithConfiguration:[NSURLSessionConfiguration defaultSessionConfiguration] delegate:nil delegateQueue:nil]; NSURL* requestURL = [NSURL URLWithString:[NSString stringWithFormat:@"%@/%d", GetNotificationEndpoint, richId]]; NSMutableURLRequest* request = [NSMutableURLRequest requestWithURL:requestURL]; [request setHTTPMethod:@"GET"]; NSString* authorizationHeaderValue = [NSString stringWithFormat:@"Basic %@", authenticationHeader]; [request setValue:authorizationHeaderValue forHTTPHeaderField:@"Authorization"]; NSURLSessionDataTask* dataTask = [session dataTaskWithRequest:request completionHandler:^(NSData *data, NSURLResponse *response, NSError *error) { NSHTTPURLResponse* httpResponse = (NSHTTPURLResponse*) response; if (!error && httpResponse.statusCode == 200) { // From NSData to UIImage self.imagePayload = [UIImage imageWithData:data]; completion(nil); } else { NSLog(@"Error status: %ld, request: %@", (long)httpResponse.statusCode, error); if (error) completion(error); else { completion([NSError errorWithDomain:@"APICall" code:httpResponse.statusCode userInfo:nil]); } } }]; [dataTask resume]; } // Handle silent push notifications when id is sent from backend - (void)application:(UIApplication *)application didReceiveRemoteNotification:(NSDictionary *)userInfo fetchCompletionHandler:(void (^)(UIBackgroundFetchResult result))handler { self.userInfo = userInfo; int richId = [[self.userInfo objectForKey:@"richId"] intValue]; NSString* richType = [self.userInfo objectForKey:@"richType"]; // Retrieve image data if ([richType isEqualToString:@"img"]) { [self retrieveRichImageWithId:richId completion:^(NSError* error) { if (!error){ // Send local notification UILocalNotification* localNotification = [[UILocalNotification alloc] init]; // "5" is arbitrary here to give you enough time to quit out of the app and receive push notifications localNotification.fireDate = [NSDate dateWithTimeIntervalSinceNow:5]; localNotification.userInfo = self.userInfo; localNotification.alertBody = [self.userInfo objectForKey:@"richMessage"]; localNotification.timeZone = [NSTimeZone defaultTimeZone]; // iOS8 categories if (self.iOS8) { localNotification.category = @"richPush"; } [[UIApplication sharedApplication] scheduleLocalNotification:localNotification]; handler(UIBackgroundFetchResultNewData); } else{ handler(UIBackgroundFetchResultFailed); } }]; } // Add "else if" here to handle more types of rich content such as url, sound files, etc. }Verarbeiten Sie die vorstehende lokale Benachrichtigung, indem Sie den Image View Controller in
AppDelegate.mmit den folgenden Methoden öffnen:// Helper: redirect users to image view controller - (void)redirectToImageViewWithImage: (UIImage *)img { UINavigationController *navigationController = (UINavigationController*) self.window.rootViewController; UIStoryboard *mainStoryboard = [UIStoryboard storyboardWithName:@"Main" bundle: nil]; imageViewController *imgViewController = [mainStoryboard instantiateViewControllerWithIdentifier: @"imageViewController"]; // Pass data/image to image view controller imgViewController.imagePayload = img; // Redirect [navigationController pushViewController:imgViewController animated:YES]; } // Handle local notification sent above in didReceiveRemoteNotification - (void)application:(UIApplication *)application didReceiveLocalNotification:(UILocalNotification *)notification { if (application.applicationState == UIApplicationStateActive) { // Show in-app alert with an extra "more" button UIAlertView *alert = [[UIAlertView alloc] initWithTitle:@"Notification" message:notification.alertBody delegate:self cancelButtonTitle:@"OK" otherButtonTitles:@"More", nil]; [alert show]; } // App becomes active from user's tap on notification else { [self redirectToImageViewWithImage:self.imagePayload]; } } // Handle buttons in in-app alerts and redirect with data/image - (void)alertView:(UIAlertView *)alertView clickedButtonAtIndex:(NSInteger)buttonIndex { // Handle "more" button if (buttonIndex == 1) { [self redirectToImageViewWithImage:self.imagePayload]; } // Add "else if" here to handle more buttons } // Handle notification setting actions in iOS8 - (void)application:(UIApplication *)application handleActionWithIdentifier:(NSString *)identifier forLocalNotification:(UILocalNotification *)notification completionHandler:(void (^)())completionHandler { // Handle richPush related buttons if ([identifier isEqualToString:@"richPushMore"]) { [self redirectToImageViewWithImage:self.imagePayload]; } completionHandler(); }
Ausführen der Anwendung
- Unter XCode führen Sie die App auf einem physischen iOS-Gerät aus (im Simulator funktionieren Pushbenachrichtigungen nicht).
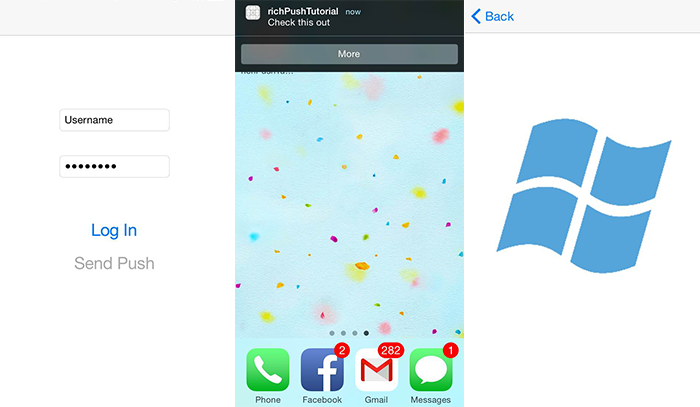
- Geben Sie in der Benutzeroberfläche der iOS-App einen Benutzernamen und ein Kennwort mit dem gleichen Wert für die Authentifizierung ein, und klicken Sie auf Log In.
- Klicken Sie auf Send push. Daraufhin sollte eine interne App-Warnung angezeigt werden. Wenn Sie auf More klicken, gelangen Sie zu dem Bild, das Sie Ihrem App-Back-End hinzufügen möchten.
- Sie können auch auf Send push klicken und sofort die Starttaste Ihres Geräts drücken. Nach kurzer Zeit erhalten Sie eine Pushbenachrichtigung. Wenn Sie darauf tippen oder auf "More" klicken, gelangen Sie zu Ihrer App und dem Inhalt des umfassenden Bildes.