Vendor electronic invoice import in Denmark
This article explains how to configure and use vendor electronic invoice import for Denmark from the country-specific OIOUBL format in Microsoft Dynamics 365 Finance.
Prerequisites
Before you complete the tasks in this article, the following prerequisites must be met:
- The primary address of the legal entity must be in Denmark.
- The latest version of the Electronic reporting (ER) format configuration, named Vendor Invoice Import (DK), must be imported. For more information, see Import Electronic reporting (ER) configurations from Dataverse.
Note
The ER format is based on the Invoice model configuration and uses the Vendor Invoice Mapping to Destination configuration. All required additional configurations are automatically imported.
Configure parameters
Reference the imported ER format configurations
- Go to Accounts payable > Setup > Accounts payable parameters.
- On the Electronic documents tab, on the Electronic reporting FastTab, in the Vendor invoice field, select the imported Vendor Invoice Import (DK) format.
Configure the sources to import files in a batch mode
You can configure a SharePoint folder as a source location for incoming vendor invoice files.
Go to Organization administration > Document management > Document types.
Create a new document type, or configure an existing one.
On the General FastTab, in the Location field, select SharePoint.
In the SharePoint Address field, select the folder where import files will be located.
Go to Organization administration > Electronic reporting > Electronic reporting source.
Create a new ER source.
In the Format field, select the Vendor Invoice Import (DK) format configuration.
On the File source FastTab, in the Name field, assign a source name. Then select Settings.
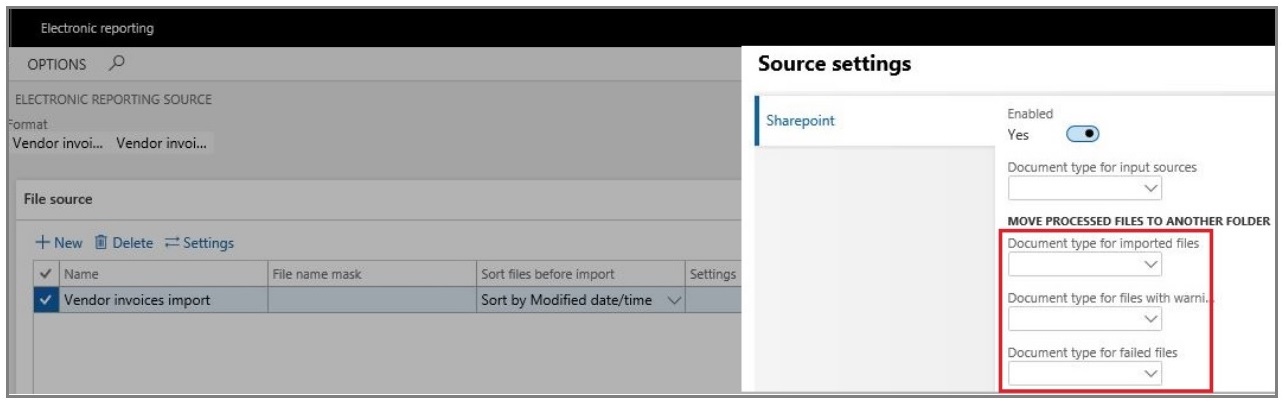
On the Source settings page, enable the Sharepoint option.
In the Document type for input sources field, select the document type that you created in step 2.
Optional: Set up three more document types, and use them to define different post-process locations:
- Document type for imported files – Move the files that were successfully imported.
- Document type for files with warnings – Move the files that were imported with warnings.
- Document type for failed files – Move the files that failed with errors.
Note
If no source is defined for import in batch mode, the system requests to define an individual import file before the start of the import process.
Configure vendor data
During the import process, vendors are identified by their tax exempt number. To enable correct vendor identification, follow these steps.
- Go to Accounts payable > Vendors > All vendors, and select a vendor.
- On the Invoice and delivery FastTab, in the Tax exempt number field, enter a valid tax registration number for the vendor. This number is used to identify the vendor during import, by matching it to the value of the Invoice\cac:AccountingSupplierParty\cac:Party\cac:PartyLegalEntity\cbc:CompanyID element in the import XML file.
Configure products
During the import process, products are identified by their external descriptions. These descriptions are usually vendor-specific. To enable correct product identification, follow these steps.
- Go to Product information management > Products > Released products.
- Select a product, and then, on the Purchase menu, in the Related information section, select External item description.
- Create a new external description for the selected product.
- In the Account code column, select Table to define an external product description for a specific vendor.
- In the Vendor relation column, select a vendor.
- In the External item number column, enter an external product code. This code is used to identify the product during import, by matching the code to the value of the Invoice\cac:InvoiceLine\cac:Item\cbc:Name element in the import XML file.
Configure units of measure (optional)
You can optionally configure external codes for units of measure, if specific units are explicitly defined in the incoming import files.
- Go to Organization administration > Setup > Units > Units.
- Select a unit ID, and then select External codes.
- On the External codes page, in the Overview section, in the Code field, enter a code that corresponds to the selected unit ID.
- In the Value section, in the Value field, enter the external unit code that's expected in import files.
Import vendor electronic invoices
To run the import vendor electronic invoices, follow these steps.
- Go to Accounts payable > Periodic tasks > Import vendor invoices.
- On the Electronic report parameters page, on the File source FastTab, in the Source settings field, select the source location for batch mode import. If no source for batch import is defined, the system prompts you to select a single file for import.
- Select OK to immediately start the import process or to schedule the import to run in the background.
Import process description
Here's an overview of the steps in the import process and the order that they occur in.
- Vendors are identified by using the tax exempt number that's defined in the vendor record. If no vendor matches the data that's being searched, the import process fails, and a related error message is shown.
- Products that are used on invoice lines are identified by using an external item number, which might be vendor-specific. If no product matches the external description, the import process fails, and a related error message is shown.
- If units of measure are used on invoices lines, they're identified by using external codes values. If no unit that has a matching external code value is found in the system, the import process fails, and a related error message is shown.
- If an incoming import file contains the information about purchase orders and its lines in the Invoice\cac:OrderReference\cbc:ID and Invoice\cac:InvoiceLine\cac:OrderLineReference\cbc:LineID elements, the numbers are used for invoice matching with purchase orders and lines that are entered in the system.
- If no order or line references are defined in an incoming file, the system tries to automatically match incoming vendor invoices with existing purchase orders.
- If no purchase order is found, the system raises a warning but continues the import. It now considers products on invoice lines Non-stock items. The system expects that these products belong to an item model group where the Stocked product checkbox is cleared on the Inventory policy page.
- If no related Non-stock products exist, the system tries to import invoice lines by referring to a default item. The default item must be configured in the system as a released product where the code is defined exactly as DEFAULT_ITEM, and the product must belong to an item model group where the Stocked product checkbox is cleared on the Inventory policy page. If no default item is configured in the system, the import process fails, and a related error message is shown.
- Taxes are calculated in the system, based on the imported data and tax settings. Taxes aren't imported as fixed amounts from the incoming XML file. The results of the calculation can be manually adjusted as required.
Successfully imported vendor electronic invoices are shown in the system as pending invoices. To review imported invoices, go to Accounts payable > Invoices > Pending vendor invoices.
Note
There are some limitations to this import process:
- The import of miscellaneous charges isn't supported.
- Only the import of line-level discounts is supported.