Set up the Microsoft Defender for Endpoint on macOS policies in Jamf Pro
Applies to:
- Defender for Endpoint on Mac
- Microsoft Defender for Endpoint Plan 1
- Microsoft Defender for Endpoint Plan 2
This page will guide you through the steps you need to take to set up macOS policies in Jamf Pro.
You'll need to take the following steps:
- Get the Microsoft Defender for Endpoint onboarding package
- Create a configuration profile in Jamf Pro using the onboarding package
- Configure Microsoft Defender for Endpoint settings
- Configure Microsoft Defender for Endpoint notification settings
- Configure Microsoft AutoUpdate (MAU)
- Grant full disk access to Microsoft Defender for Endpoint
- Approve System extensions for Microsoft Defender for Endpoint
- Configure Network Extension
- Configure Background Services
- Grant Bluetooth Permissions
- Schedule scans with Microsoft Defender for Endpoint on macOS
- Deploy Microsoft Defender for Endpoint on macOS
Step 1: Get the Microsoft Defender for Endpoint onboarding package
In Microsoft Defender XDR, navigate to Settings > Endpoints > Onboarding.
Select macOS as the operating system and Mobile Device Management / Microsoft Intune as the deployment method.

Select Download onboarding package (WindowsDefenderATPOnboardingPackage.zip).
Extract
WindowsDefenderATPOnboardingPackage.zip.Copy the file to your preferred location. For example,
C:\Users\JaneDoe_or_JohnDoe.contoso\Downloads\WindowsDefenderATPOnboardingPackage_macOS_MDM_contoso\jamf\WindowsDefenderATPOnboarding.plist.

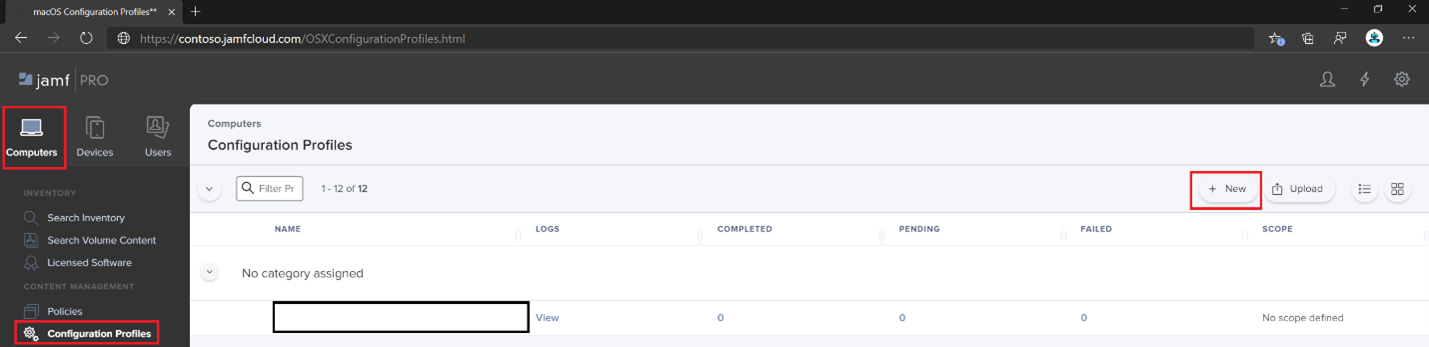
Step 2: Create a configuration profile in Jamf Pro using the onboarding package
Locate the file
WindowsDefenderATPOnboarding.plistfrom the previous section.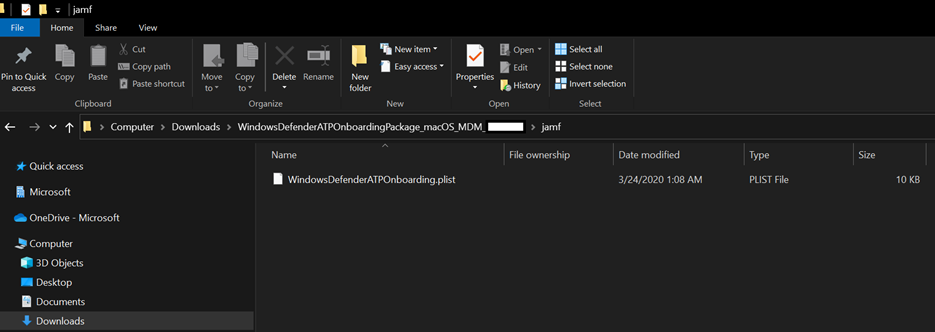
Sign in to Jamf Pro, navigate to Computers > Configuration Profiles, and select New.
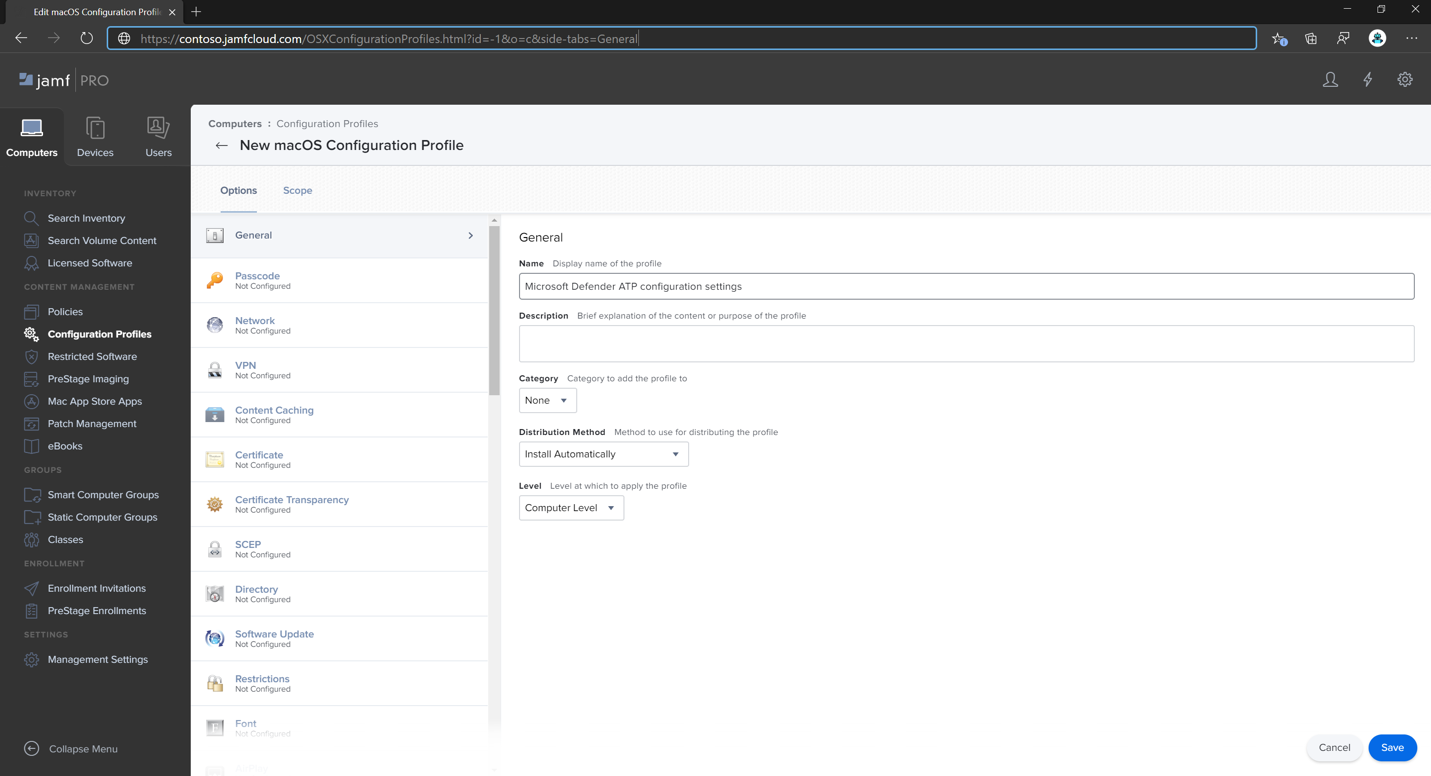
Enter the following details in the General tab:
- Name: MDE onboarding for macOS
- Description: MDE EDR onboarding for macOS
- Category: None
- Distribution Method: Install Automatically
- Level: Computer Level
Navigate to the Application & Custom Settings page and select Upload > Add.

Select Upload File (PLIST file) then in Preference Domain enter:
com.microsoft.wdav.atp.
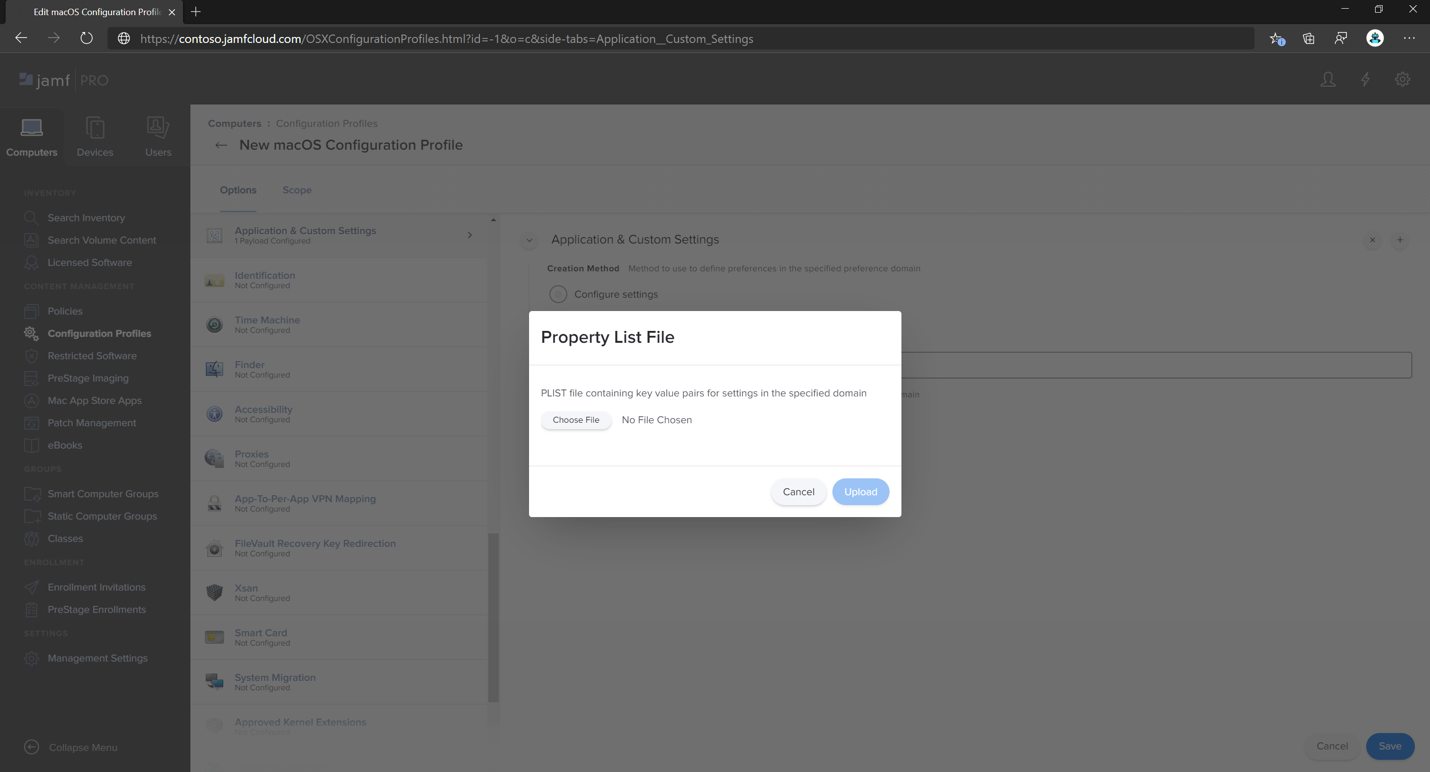
Select Open and select the onboarding file.
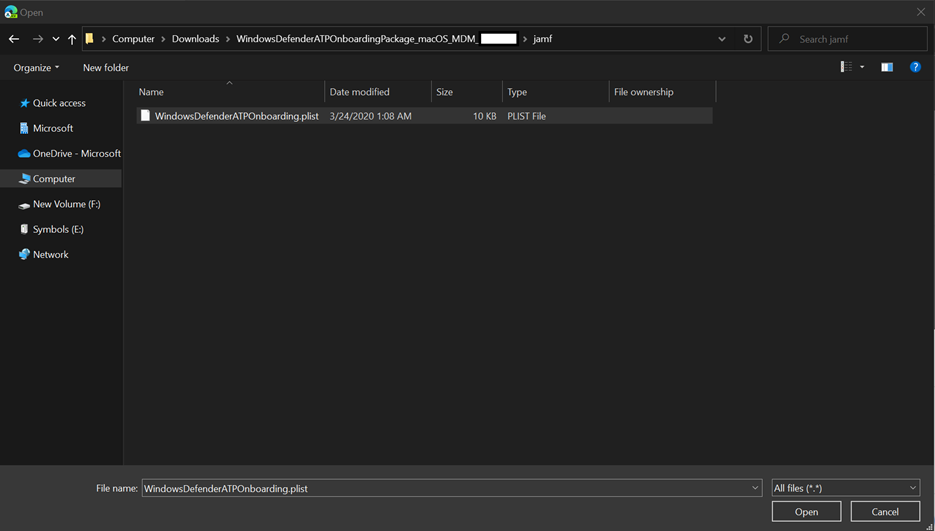
Select Upload.

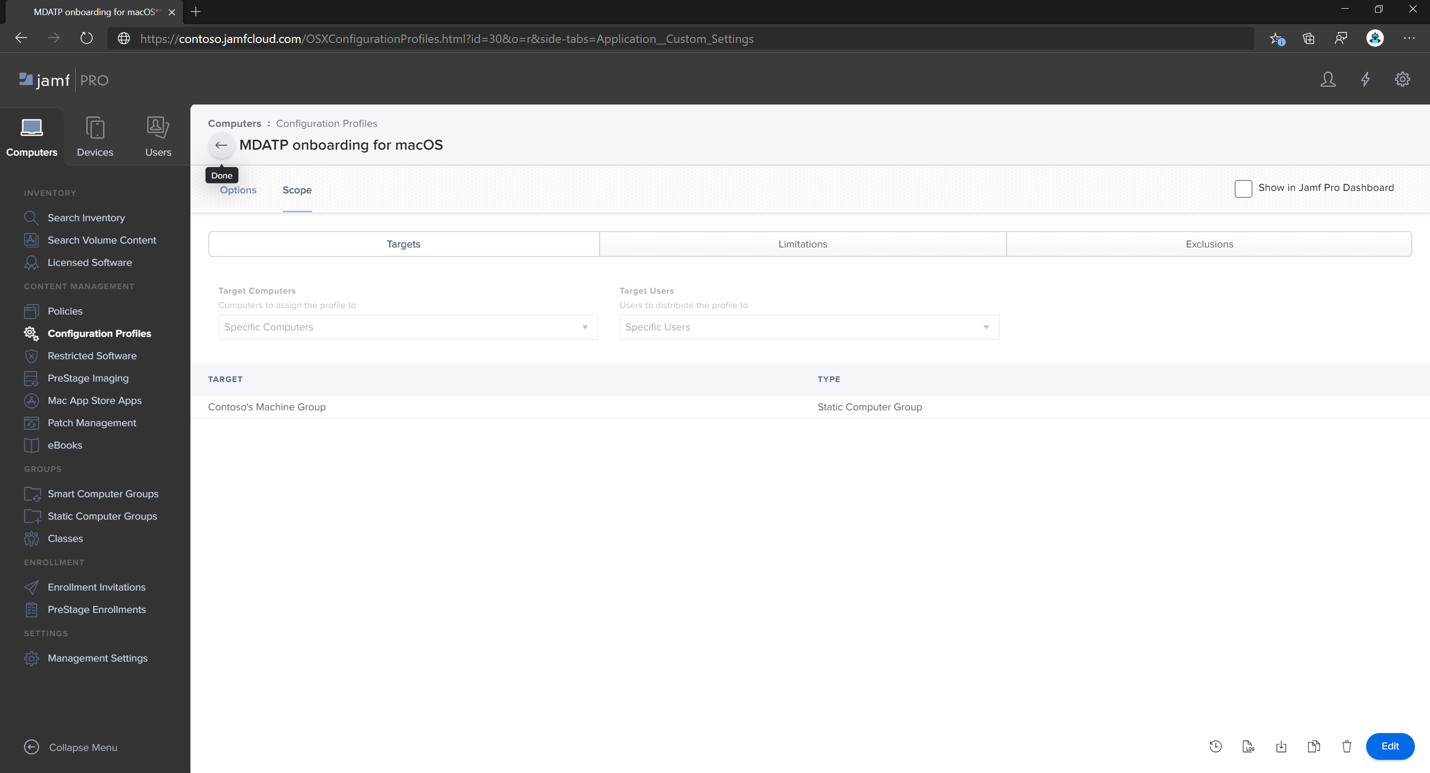
Select the Scope tab.

Select the target computers.
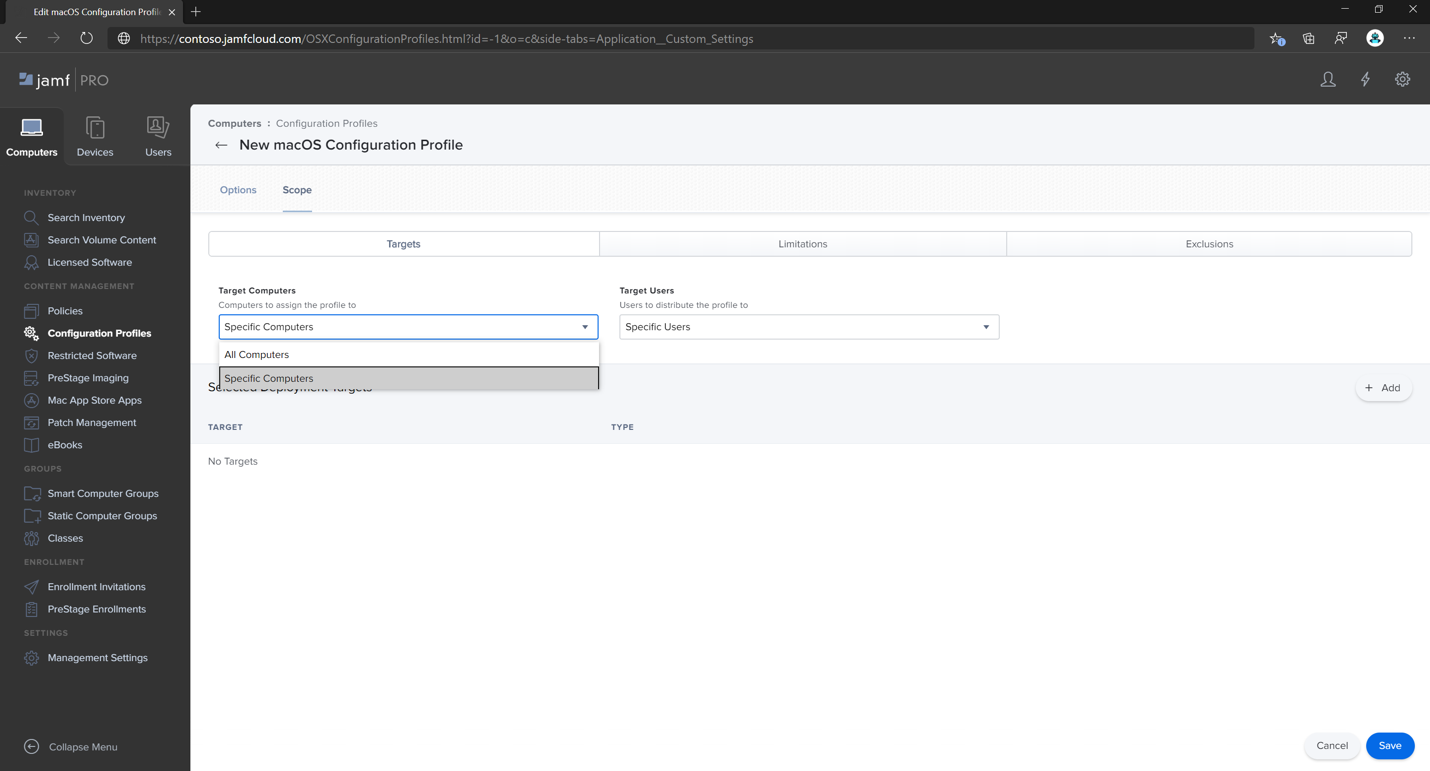
Select Save.


Select Done.


Step 3: Configure Microsoft Defender for Endpoint settings
You can either use JAMF Pro GUI to edit individual settings of the Microsoft Defender for Endpoint configuration, or use the legacy method by creating a configuration Plist in a text editor, and uploading it to JAMF Pro.
Note that you must use exact com.microsoft.wdav as the Preference Domain, Microsoft Defender for Endpoint uses only this name and com.microsoft.wdav.ext to load its managed settings!
(The com.microsoft.wdav.ext version may be used in rare cases when you prefer to use GUI method, but also need to configure a setting that has not been added to the schema yet.)
GUI method
Download schema.json file from Defender's GitHub repository and save it to a local file:
curl -o ~/Documents/schema.json https://raw.githubusercontent.com/microsoft/mdatp-xplat/master/macos/schema/schema.jsonCreate a new Configuration Profile under Computers -> Configuration Profiles, enter the following details on the General tab:
- Name: MDATP MDAV configuration settings
- Description:<blank>
- Category: None (default)
- Level: Computer Level (default)
- Distribution Method: Install Automatically (default)
Scroll down to the Application & Custom Settings tab, select External Applications, click Add and use Custom Schema as Source to use for the preference domain.

Enter
com.microsoft.wdavas the Preference Domain, select Add Schema and Upload the schema.json file downloaded on Step 1. Click Save.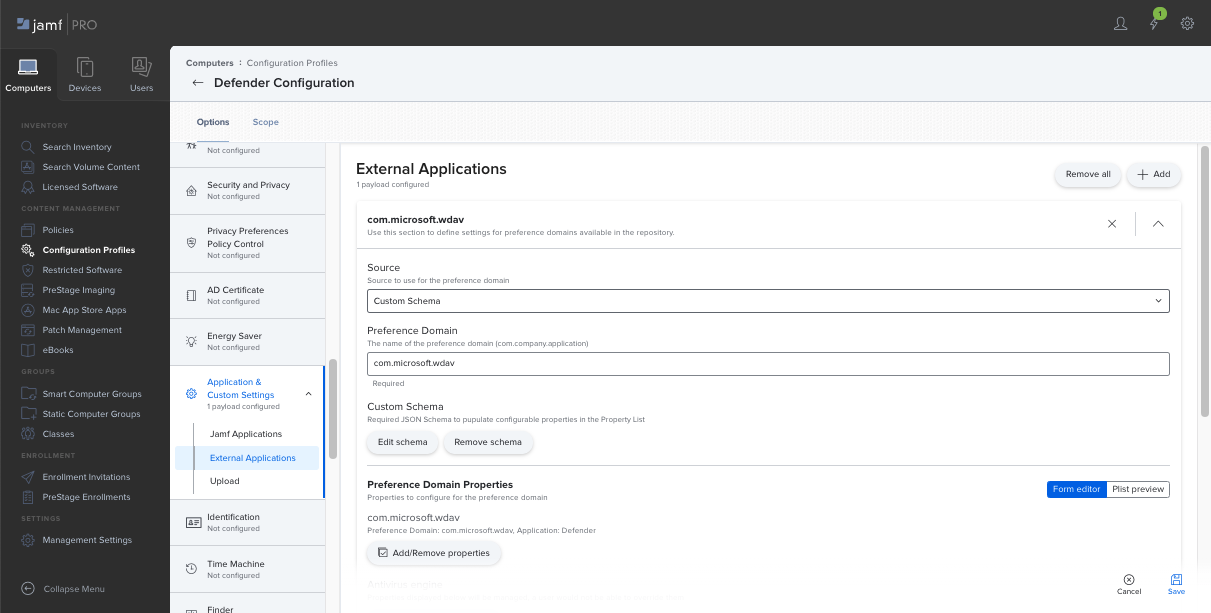
You can see all supported Microsoft Defender for Endpoint configuration settings below, under Preference Domain Properties. Click Add/Remove properties to select the settings that you want to be managed, and click Ok to save your changes. (Settings left unselected will not be included into the managed configuration, an end user will be able to configure those settings on their machines.)
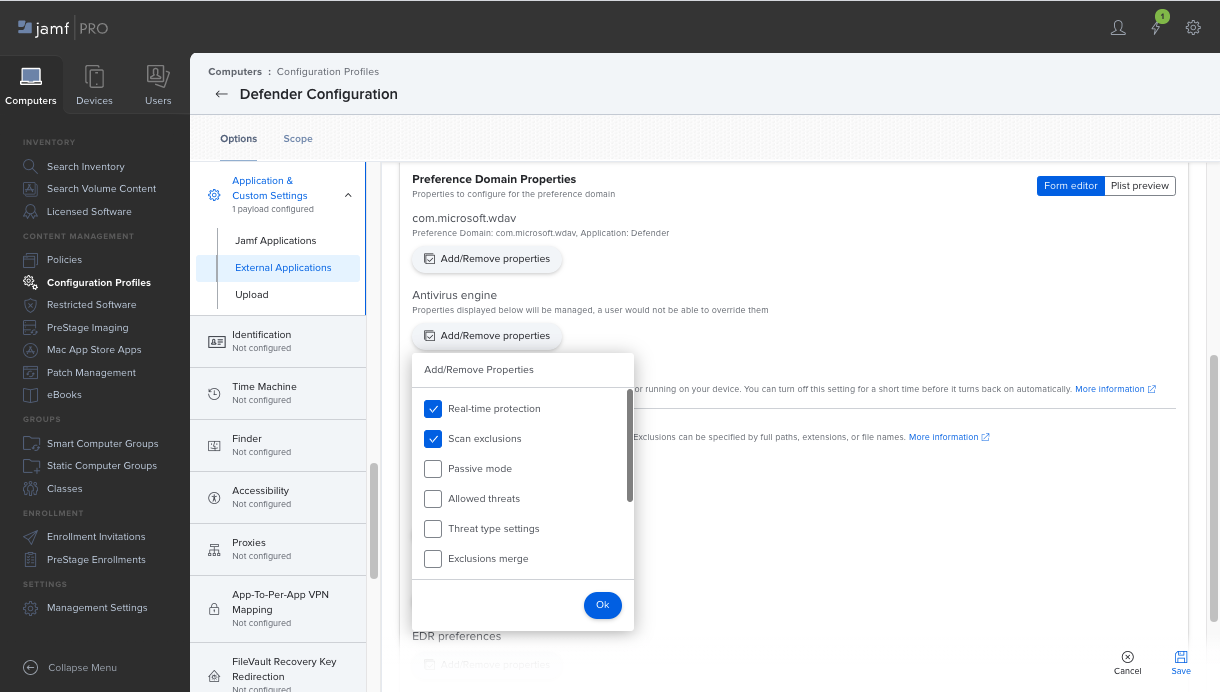
Change values of the settings to desired values. You can click More information to get documentation for a particular setting. (You may click Plist preview to inspect what the configuration plist will look like. Click Form editor to return to the visual editor.)

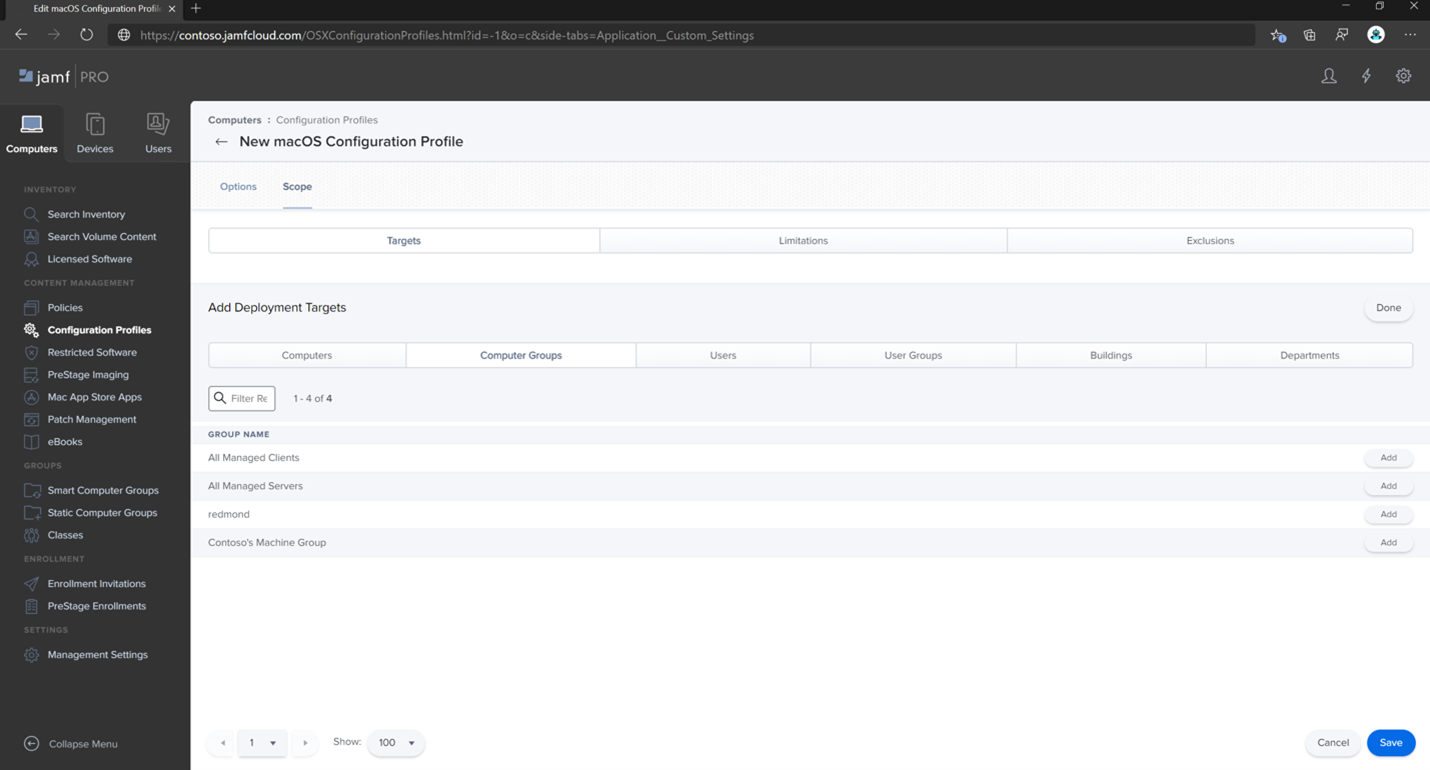
Select the Scope tab.
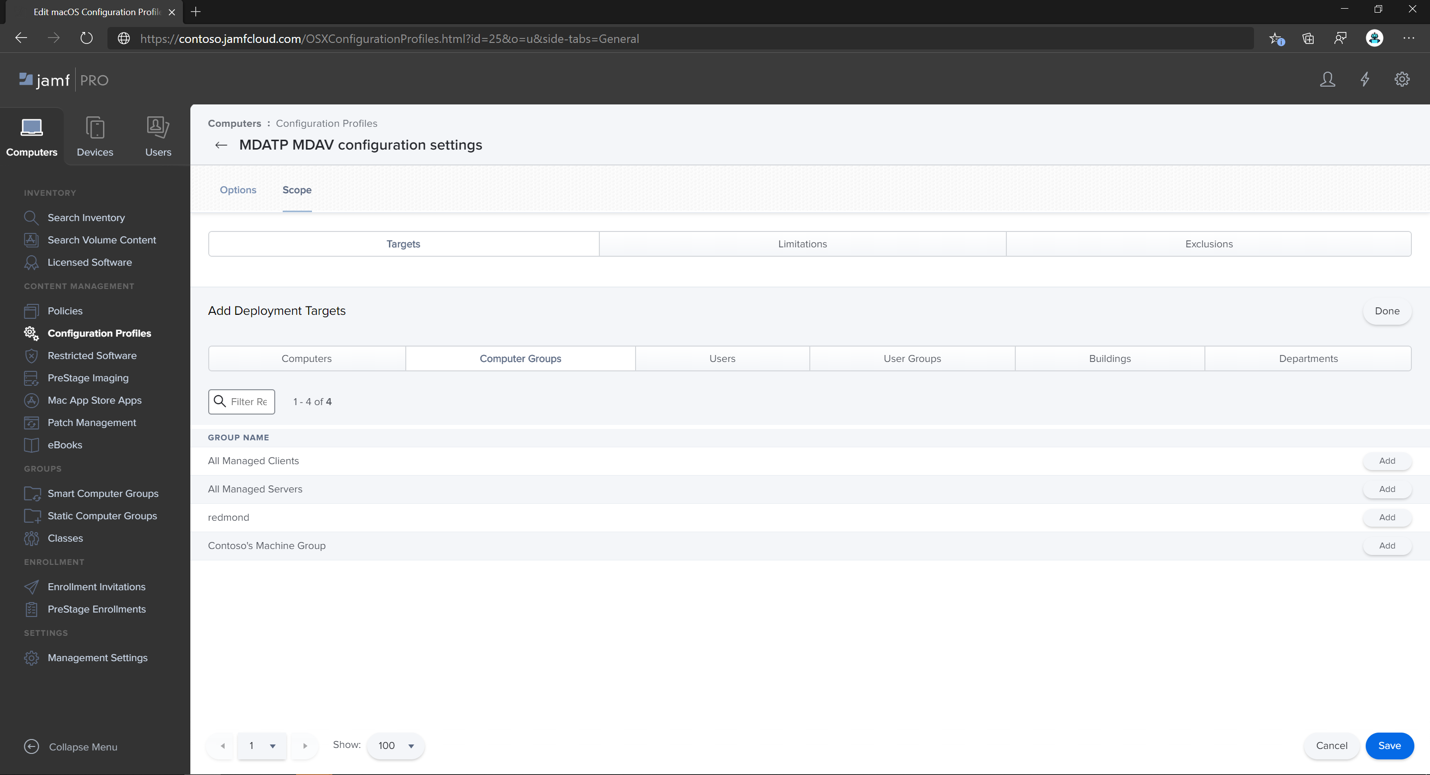
Select Contoso's Machine Group.
Select Add, then select Save.


Select Done. You'll see the new Configuration profile.


Microsoft Defender for Endpoint adds new settings over time. These new settings will be added to the schema, and a new version will be published to GitHub. All you need to do to have updates is to download an updated schema, edit existing configuration profile, and Edit schema at the Application & Custom Settings tab.
Legacy method
Use the following Microsoft Defender for Endpoint configuration settings:
- enableRealTimeProtection
- passiveMode
Note
Not turned on by default, if you are planning to run a third-party AV for macOS, set it to
true.- exclusions
- excludedPath
- excludedFileExtension
- excludedFileName
- exclusionsMergePolicy
- allowedThreats
Note
EICAR is on the sample, if you are going through a proof-of-concept, remove it especially if you are testing EICAR.
- disallowedThreatActions
- potentially_unwanted_application
- archive_bomb
- cloudService
- automaticSampleSubmission
- tags
- hideStatusMenuIcon
For information, see Property list for JAMF full configuration profile.
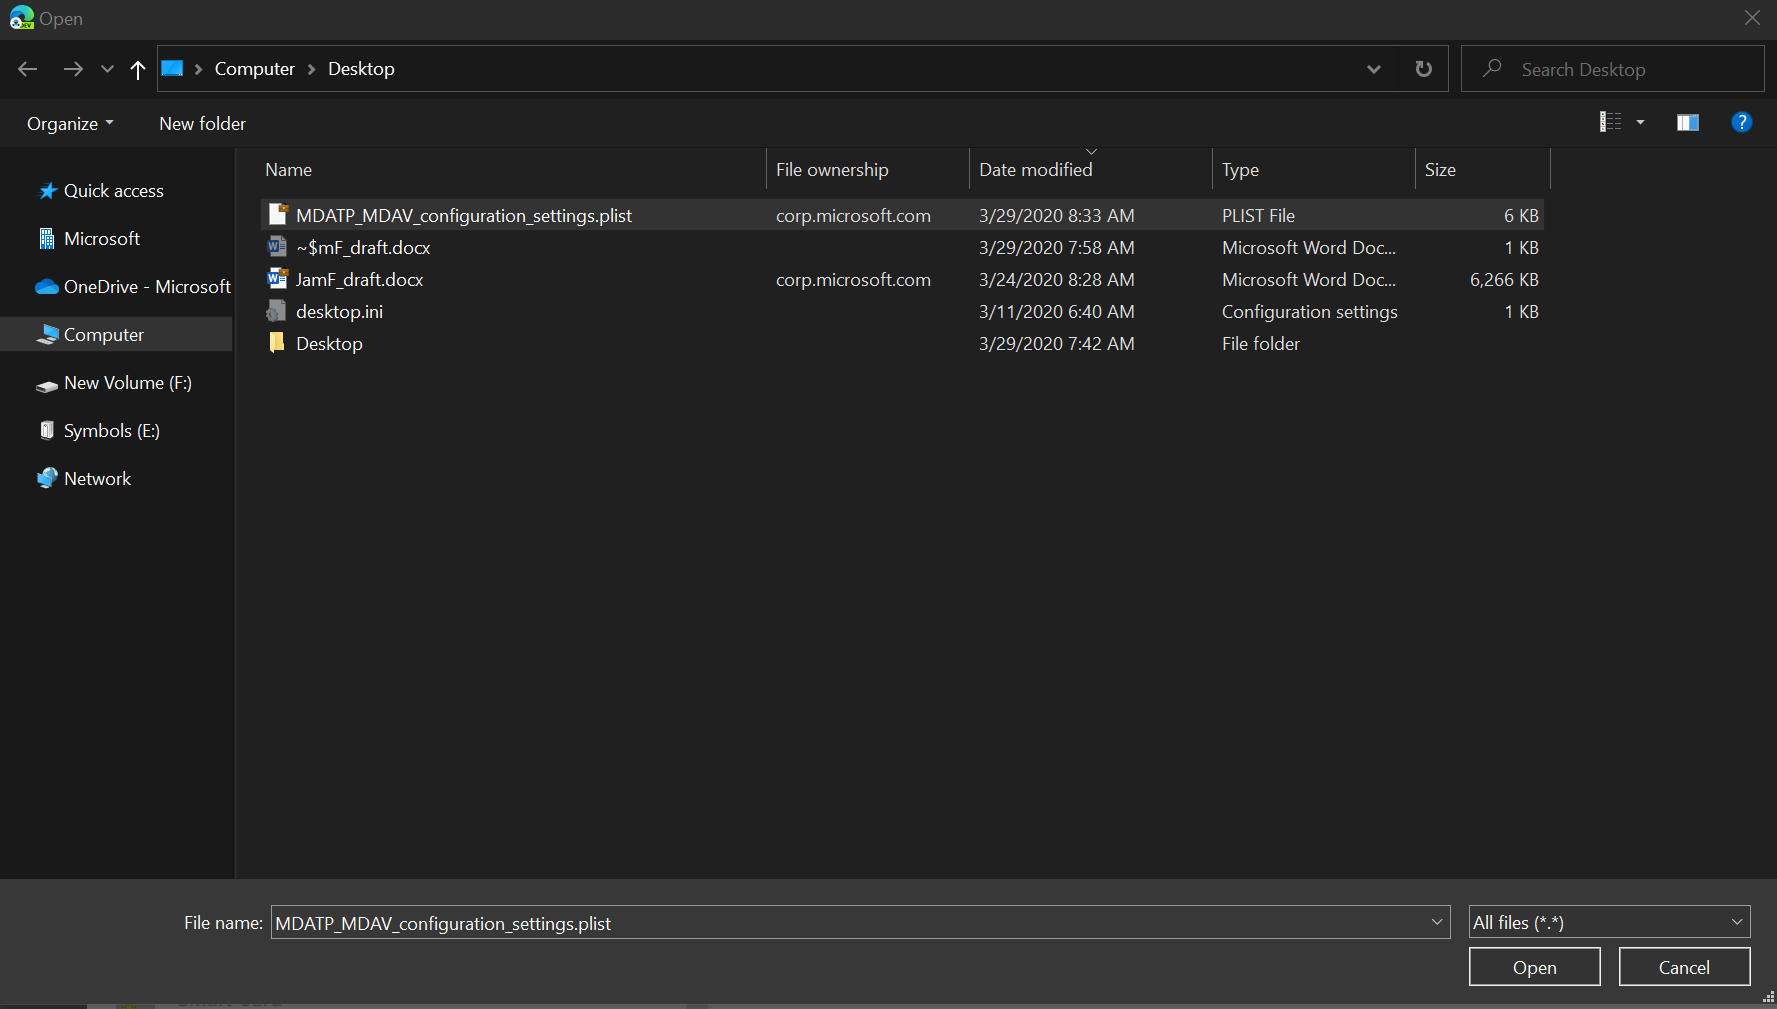
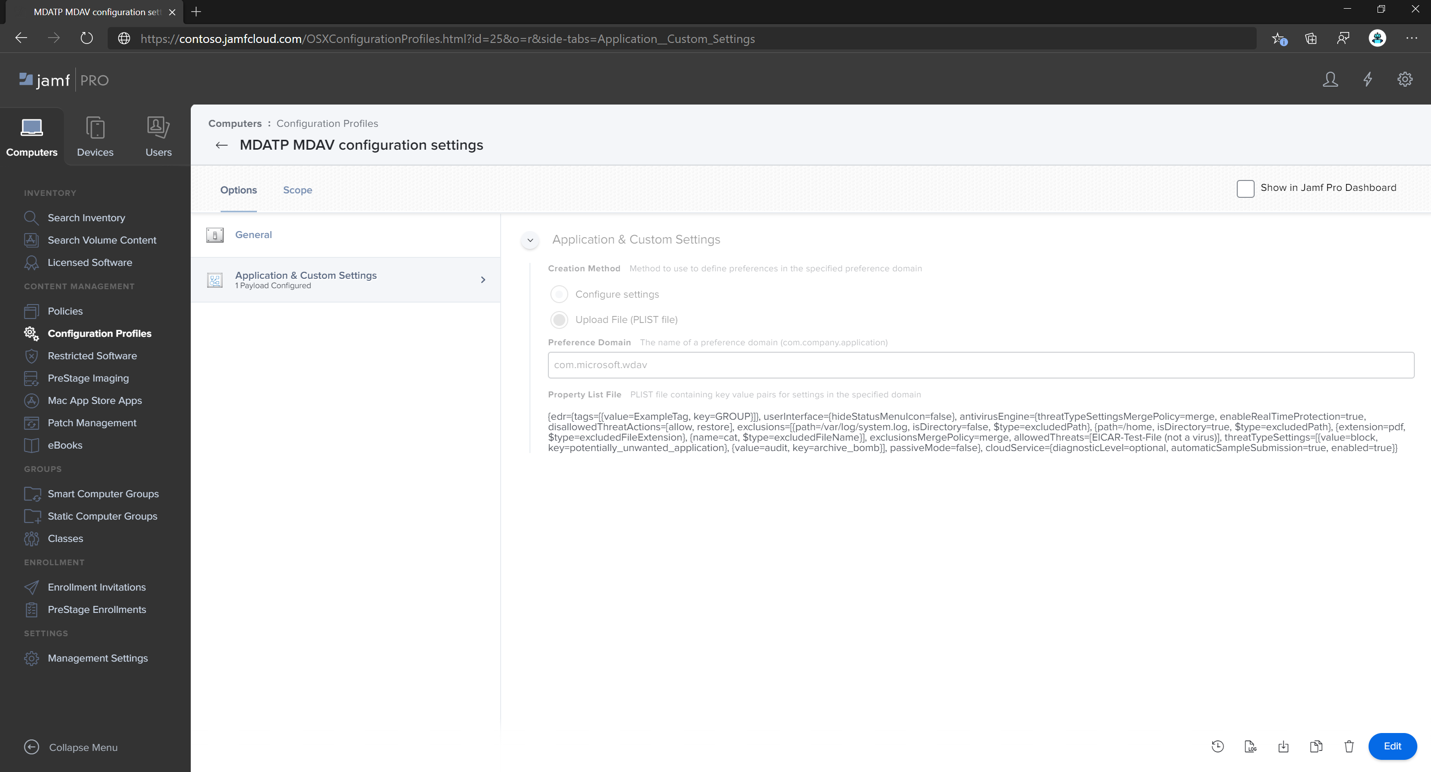
<?xml version="1.0" encoding="UTF-8"?>
<!DOCTYPE plist PUBLIC "-//Apple//DTD PLIST 1.0//EN" "http://www.apple.com/DTDs/PropertyList-1.0.dtd">
<plist version="1.0">
<dict>
    <key>antivirusEngine</key>
    <dict>
        <key>enableRealTimeProtection</key>
        <true/>
        <key>passiveMode</key>
        <false/>
        <key>exclusions</key>
        <array>
            <dict>
                <key>$type</key>
                <string>excludedPath</string>
                <key>isDirectory</key>
                <false/>
                <key>path</key>
                <string>/var/log/system.log</string>
            </dict>
            <dict>
                <key>$type</key>
                <string>excludedPath</string>
                <key>isDirectory</key>
                <true/>
                <key>path</key>
                <string>/home</string>
            </dict>
            <dict>
                <key>$type</key>
                <string>excludedFileExtension</string>
                <key>extension</key>
                <string>pdf</string>
            </dict>
            <dict>
                <key>$type</key>
                <string>excludedFileName</string>
                <key>name</key>
                <string>cat</string>
            </dict>
        </array>
        <key>exclusionsMergePolicy</key>
        <string>merge</string>
        <key>allowedThreats</key>
        <array>
            <string>EICAR-Test-File (not a virus)</string>
        </array>
        <key>disallowedThreatActions</key>
        <array>
            <string>allow</string>
            <string>restore</string>
        </array>
        <key>threatTypeSettings</key>
        <array>
            <dict>
                <key>key</key>
                <string>potentially_unwanted_application</string>
                <key>value</key>
                <string>block</string>
            </dict>
            <dict>
                <key>key</key>
                <string>archive_bomb</string>
                <key>value</key>
                <string>audit</string>
            </dict>
        </array>
        <key>threatTypeSettingsMergePolicy</key>
        <string>merge</string>
    </dict>
    <key>cloudService</key>
    <dict>
        <key>enabled</key>
        <true/>
        <key>diagnosticLevel</key>
        <string>optional</string>
        <key>automaticSampleSubmission</key>
        <true/>
    </dict>
    <key>edr</key>
    <dict>
        <key>tags</key>
        <array>
            <dict>
                <key>key</key>
                <string>GROUP</string>
                <key>value</key>
                <string>ExampleTag</string>
            </dict>
        </array>
    </dict>
    <key>userInterface</key>
    <dict>
        <key>hideStatusMenuIcon</key>
        <false/>
    </dict>
</dict>
</plist>
Save the file as
MDATP_MDAV_configuration_settings.plist.In the Jamf Pro dashboard, open Computers, and their Configuration Profiles. Click New and switch to the General tab.
Enter the following details on the General tab:
- Name: MDATP MDAV configuration settings
- Description:<blank>
- Category: None (default)
- Distribution Method: Install Automatically (default)
- Level: Computer Level (default)
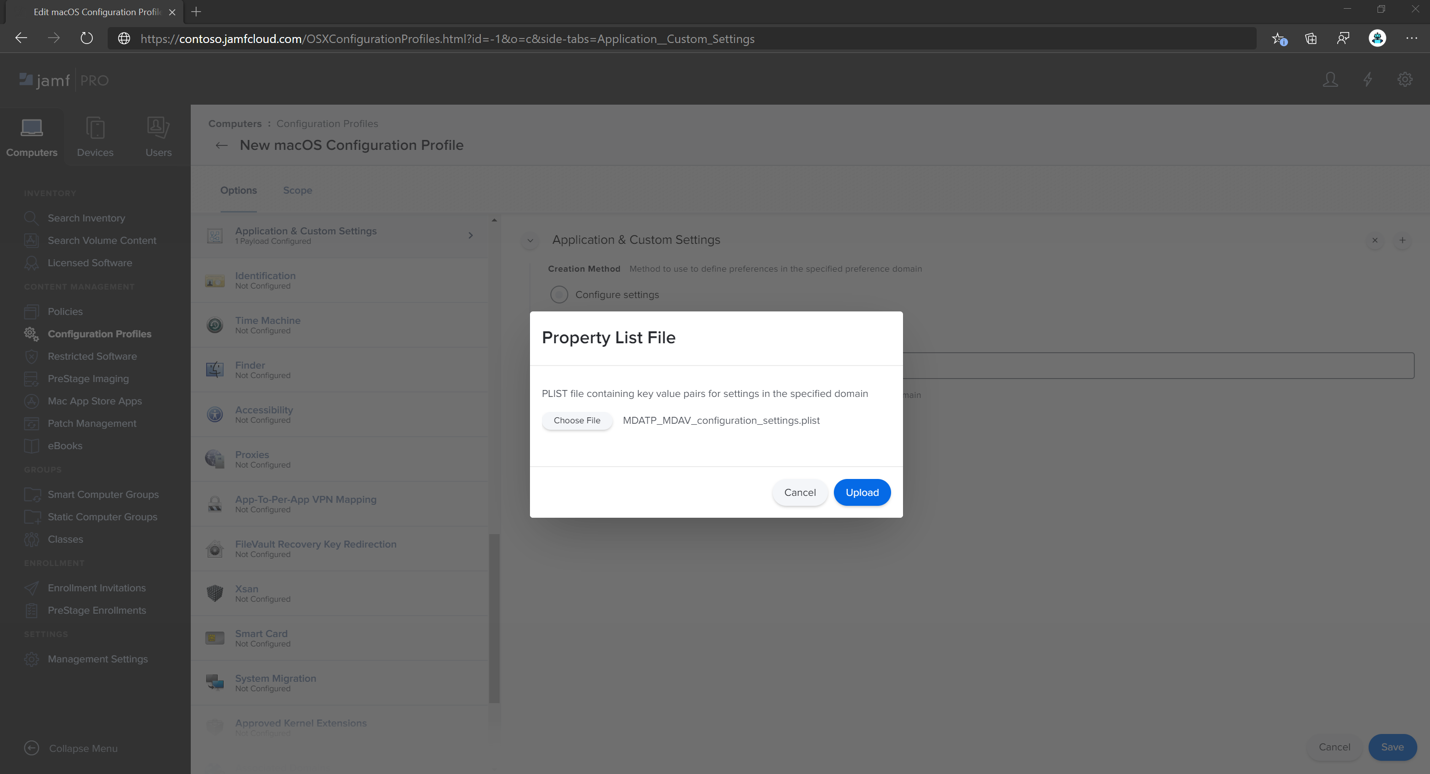
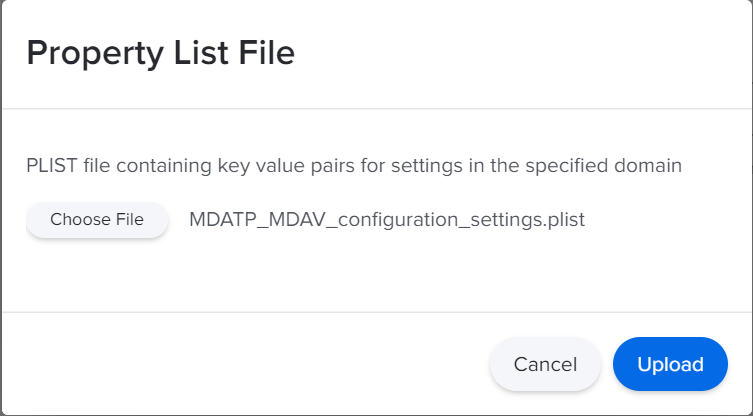
In Application & Custom Settings, select Configure.


Select Upload File (PLIST file).

In Preferences Domain, enter
com.microsoft.wdav, then select Upload PLIST File.
Select Choose File.

Select the MDATP_MDAV_configuration_settings.plist, then select Open.
Select Upload.
Note
If you happen to upload the Intune file, you'll get the following error:

Select Save.

The file is uploaded.

Select the Scope tab.
Select Contoso's Machine Group.
Select Add, then select Save.
Select Done. You'll see the new Configuration profile.


Step 4: Configure notifications settings
These steps are applicable on macOS 11 (Big Sur) or later.
In the Jamf Pro dashboard, select Computers, then Configuration Profiles.
Click New, and enter the following details in the General tab for Options:
- Name: MDATP MDAV Notification settings
- Description: macOS 11 (Big Sur) or later
- Category: None (default)
- Distribution Method: Install Automatically (default)
- Level: Computer Level (default)

Tab Notifications, click Add, and enter the following values:
- Bundle ID:
com.microsoft.wdav.tray - Critical Alerts: Click Disable
- Notifications: Click Enable
- Banner alert type: Select Include and Temporary (default)
- Notifications on lock screen: Click Hide
- Notifications in Notification Center: Click Display
- Badge app icon: Click Display

- Bundle ID:
Tab Notifications, click Add one more time, scroll down to New Notifications Settings
- Bundle ID:
com.microsoft.autoupdate.fba - Configure the rest of the settings to the same values as above

Note that now you have two 'tables' with notification configurations, one for Bundle ID: com.microsoft.wdav.tray, and another for Bundle ID: com.microsoft.autoupdate.fba. While you can configure alert settings per your requirements, Bundle IDs must be exactly the same as described before, and Include switch must be On for Notifications.
- Bundle ID:
Select the Scope tab, then select Add.

Select Contoso's Machine Group.
Select Add, then select Save.

Select Done. You'll see the new Configuration profile.


Step 5: Configure Microsoft AutoUpdate (MAU)
Use the following Microsoft Defender for Endpoint configuration settings:
<?xml version="1.0" encoding="UTF-8"?>
<!DOCTYPE plist PUBLIC "-//Apple//DTD PLIST 1.0//EN" "http://www.apple.com/DTDs/PropertyList-1.0.dtd">
<plist version="1.0">
<dict>
<key>ChannelName</key>
<string>Current</string>
<key>HowToCheck</key>
<string>AutomaticDownload</string>
<key>EnableCheckForUpdatesButton</key>
<true/>
<key>DisableInsiderCheckbox</key>
<false/>
<key>SendAllTelemetryEnabled</key>
<true/>
</dict>
</plist>
Save it as
MDATP_MDAV_MAU_settings.plist.In the Jamf Pro dashboard, select General.

Enter the following details on the General tab:
- Name: MDATP MDAV MAU settings
- Description: Microsoft AutoUpdate settings for MDATP for macOS
- Category: None (default)
- Distribution Method: Install Automatically(default)
- Level: Computer Level(default)
In Application & Custom Settings select Configure.

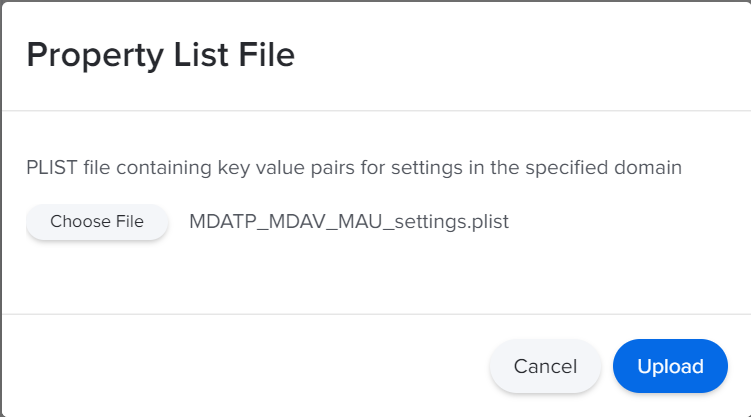
Select Upload File (PLIST file).
In Preference Domain enter:
com.microsoft.autoupdate2, then select Upload PLIST File.
Select Choose File.

Select MDATP_MDAV_MAU_settings.plist.

Select Upload.

Select Save.

Select the Scope tab.

Select Add.


Select Done.


Step 6: Grant full disk access to Microsoft Defender for Endpoint
In the Jamf Pro dashboard, select Configuration Profiles.
Select + New.
Enter the following details on the General tab:
- Name: MDATP MDAV - grant Full Disk Access to EDR and AV
- Description: On macOS 11 (Big Sur) or later, the new Privacy Preferences Policy Control
- Category: None
- Distribution method: Install Automatically
- Level: Computer level

In Configure Privacy Preferences Policy Control select Configure.
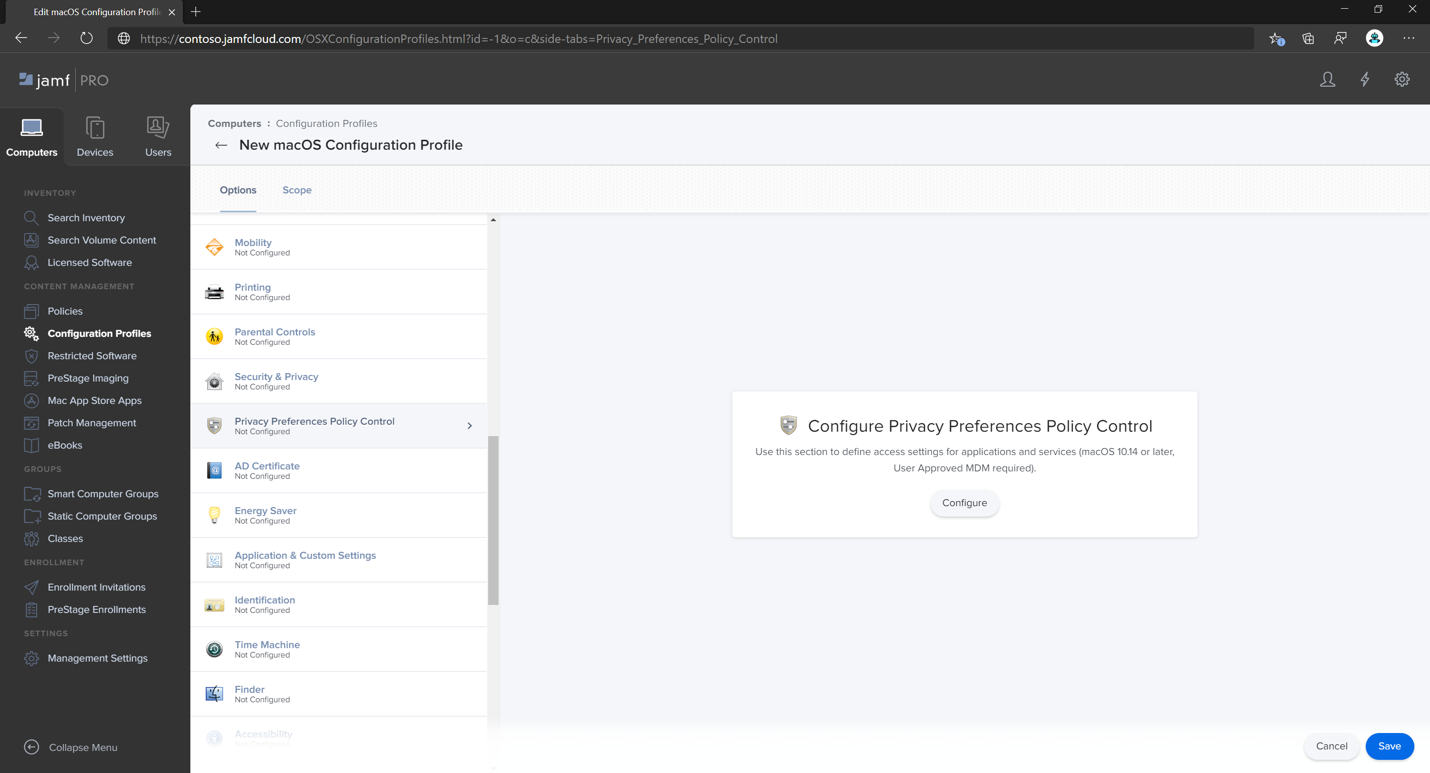
In Privacy Preferences Policy Control, enter the following details:
- Identifier:
com.microsoft.wdav - Identifier Type: Bundle ID
- Code Requirement:
identifier "com.microsoft.wdav" and anchor apple generic and certificate 1[field.1.2.840.113635.100.6.2.6] /* exists */ and certificate leaf[field.1.2.840.113635.100.6.1.13] /* exists */ and certificate leaf[subject.OU] = UBF8T346G9

- Identifier:
Select + Add.

Under App or service: Set to SystemPolicyAllFiles
Under "access": Set to Allow
Select Save (not the one at the bottom right).

Click the
+sign next to App Access to add a new entry.
Enter the following details:
- Identifier:
com.microsoft.wdav.epsext - Identifier Type: Bundle ID
- Code Requirement:
identifier "com.microsoft.wdav.epsext" and anchor apple generic and certificate 1[field.1.2.840.113635.100.6.2.6] /* exists */ and certificate leaf[field.1.2.840.113635.100.6.1.13] /* exists */ and certificate leaf[subject.OU] = UBF8T346G9
- Identifier:
Select + Add.
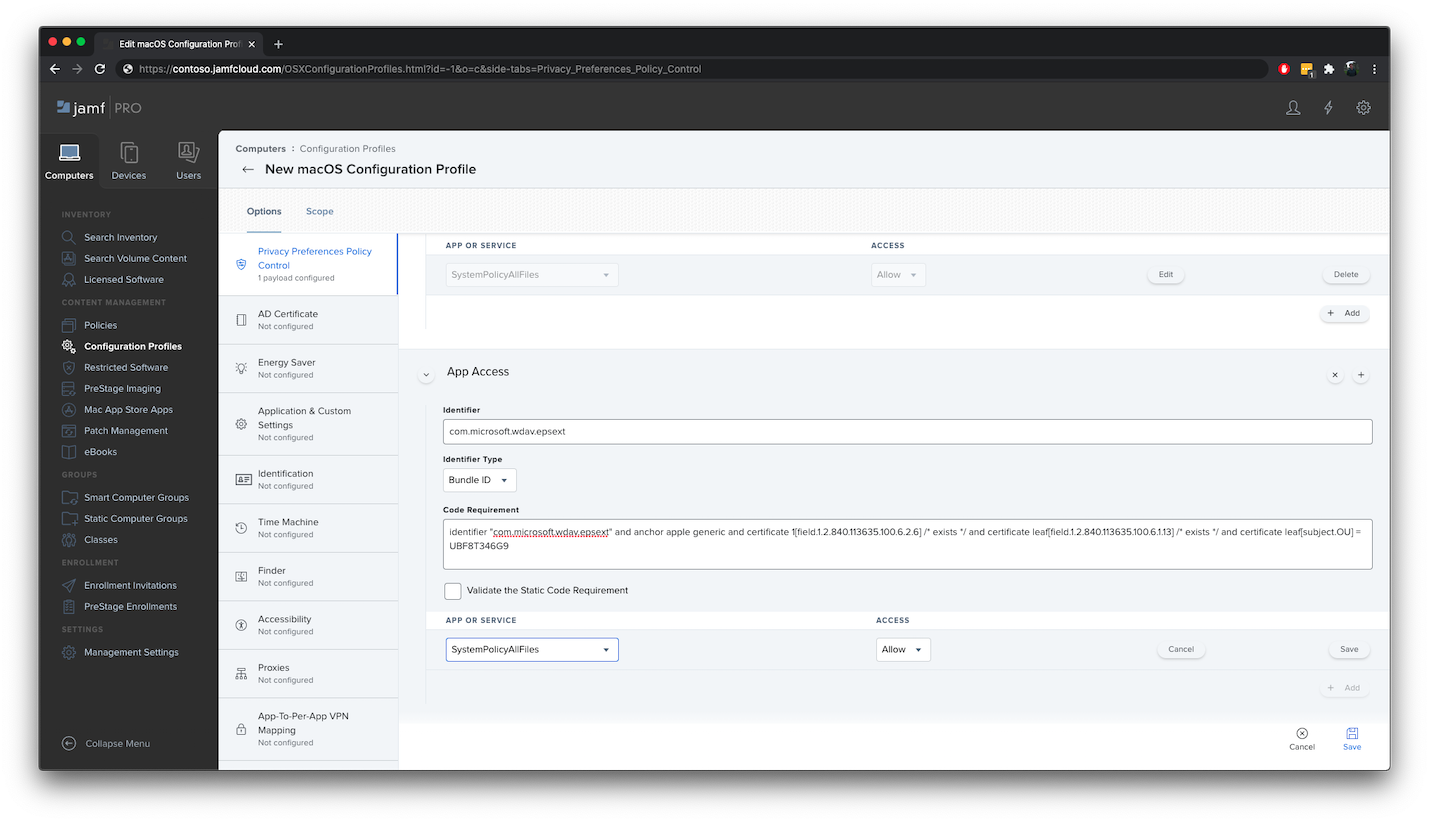
Under App or service: Set to SystemPolicyAllFiles
Under "access": Set to Allow
Select Save (not the one at the bottom right).

Select the Scope tab.

Select + Add.

Select Computer Groups > under Group Name > select Contoso's MachineGroup.

Select Add.
Select Save.
Select Done.


Alternatively, you can download fulldisk.mobileconfig and upload it to JAMF Configuration Profiles as described in Deploying Custom Configuration Profiles using Jamf Pro|Method 2: Upload a Configuration Profile to Jamf Pro.
Note
Full Disk Access granted through Apple MDM Configuration Profile is not reflected in System Settings => Privacy & Security => Full Disk Access.
Step 7: Approve System extensions for Microsoft Defender for Endpoint
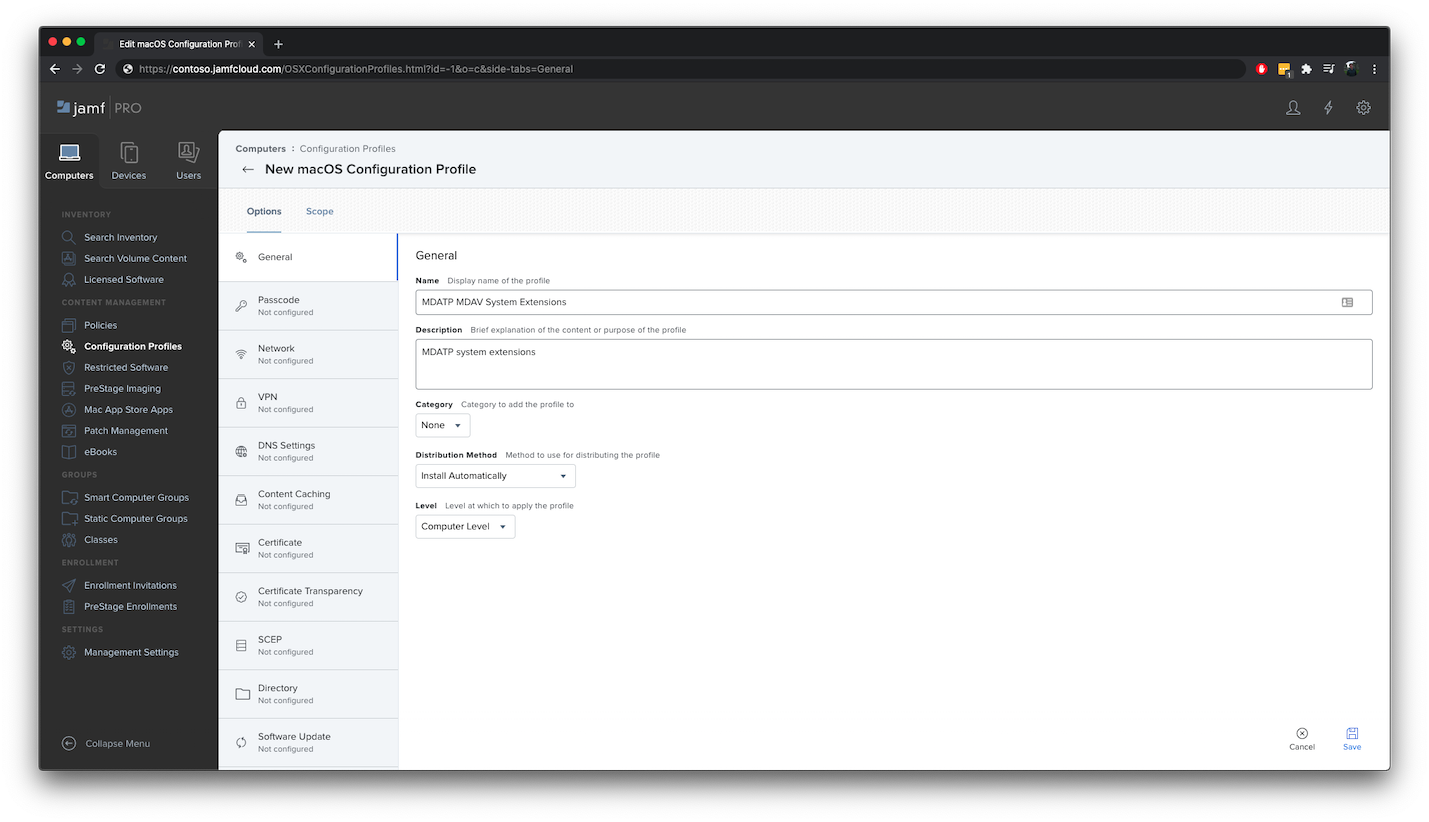
In the Configuration Profiles, select + New.
Enter the following details on the General tab:
- Name: MDATP MDAV System Extensions
- Description: MDATP system extensions
- Category: None
- Distribution Method: Install Automatically
- Level: Computer Level
In System Extensions select Configure.
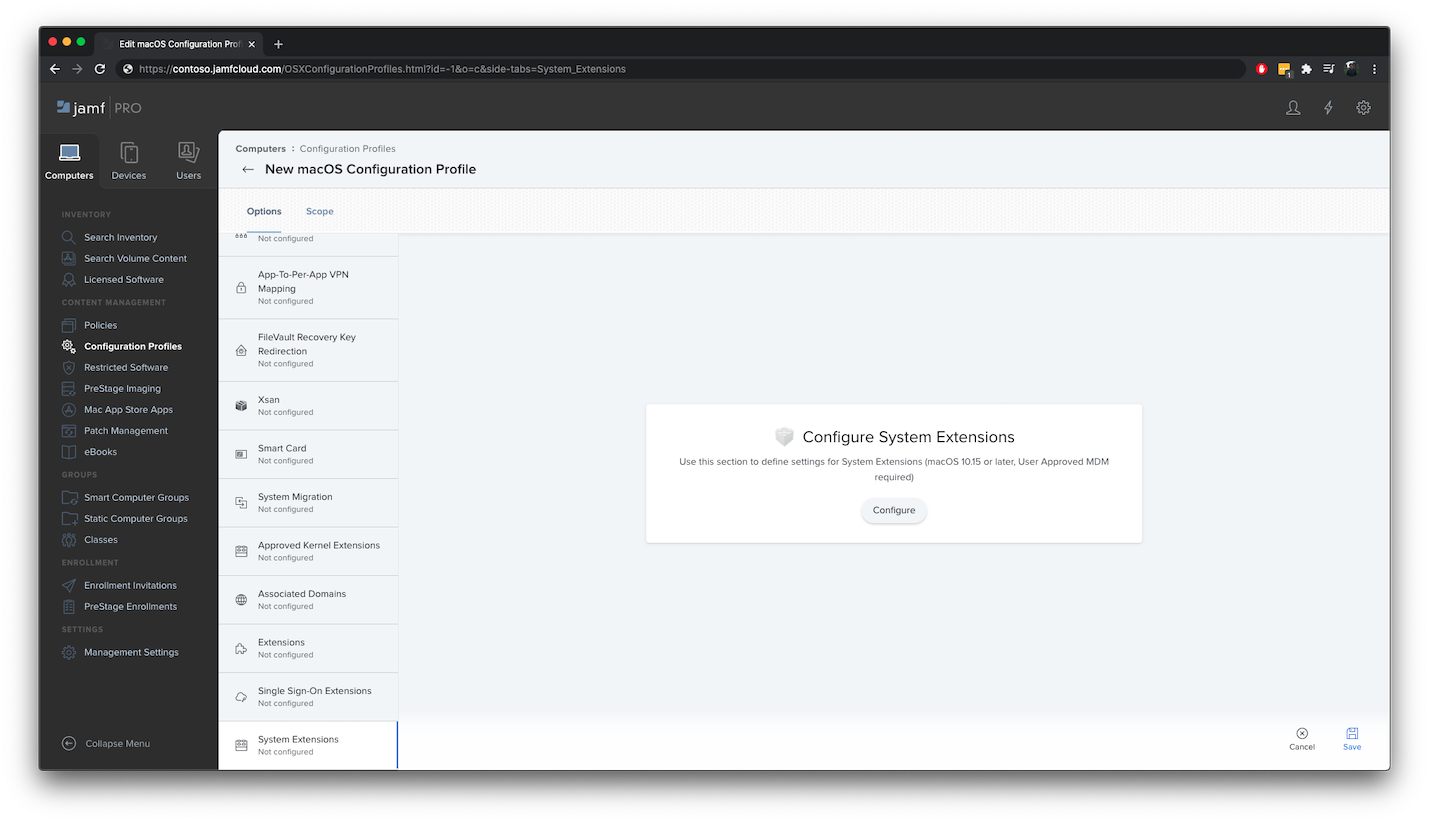
In System Extensions, enter the following details:
- Display Name: Microsoft Corp. System Extensions
- System Extension Types: Allowed System Extensions
- Team Identifier: UBF8T346G9
- Allowed System Extensions:
- com.microsoft.wdav.epsext
- com.microsoft.wdav.netext
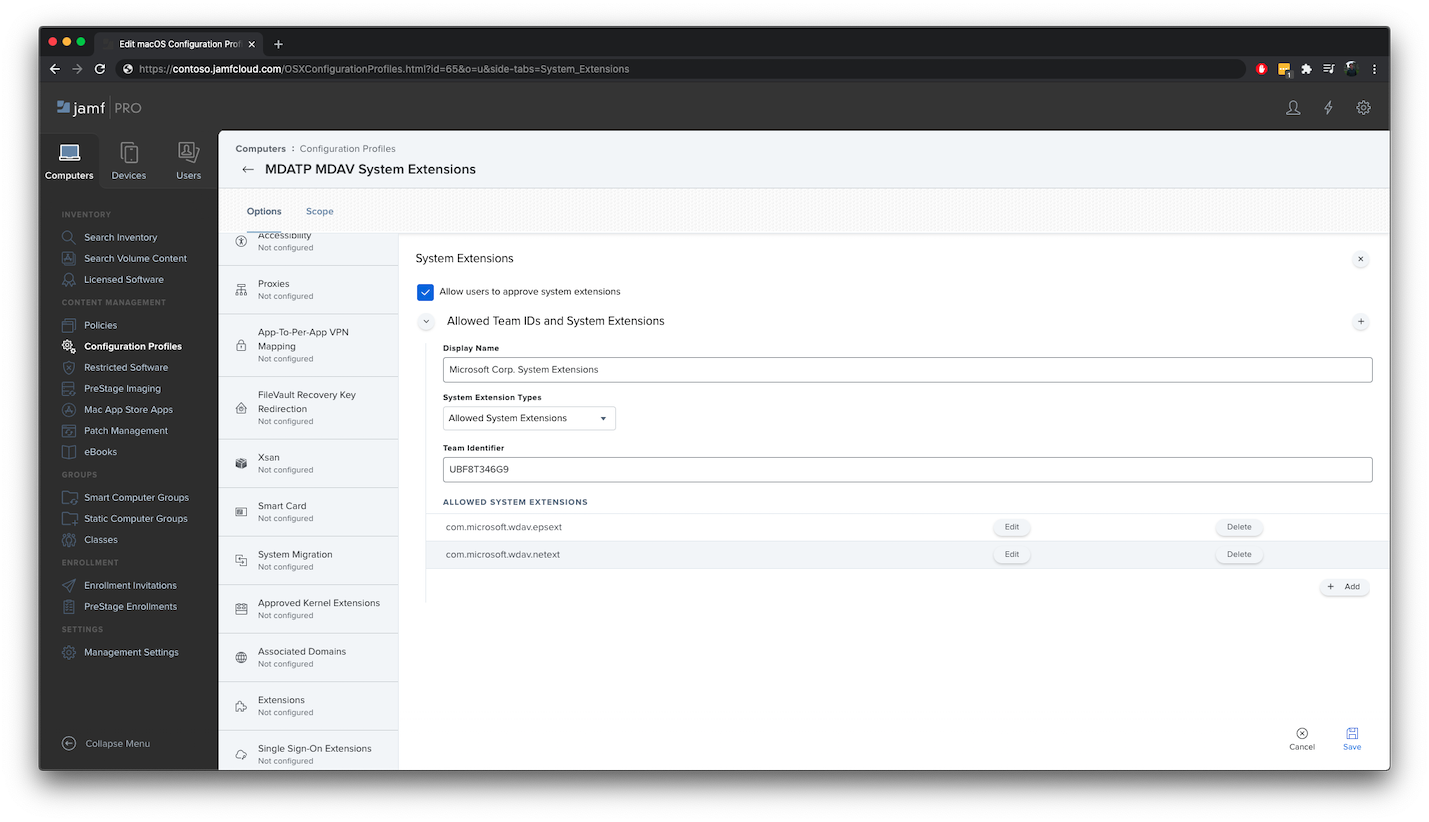
Select the Scope tab.

Select + Add.
Select Computer Groups > under Group Name > select Contoso's Machine Group.
Select + Add.

Select Save.

Select Done.


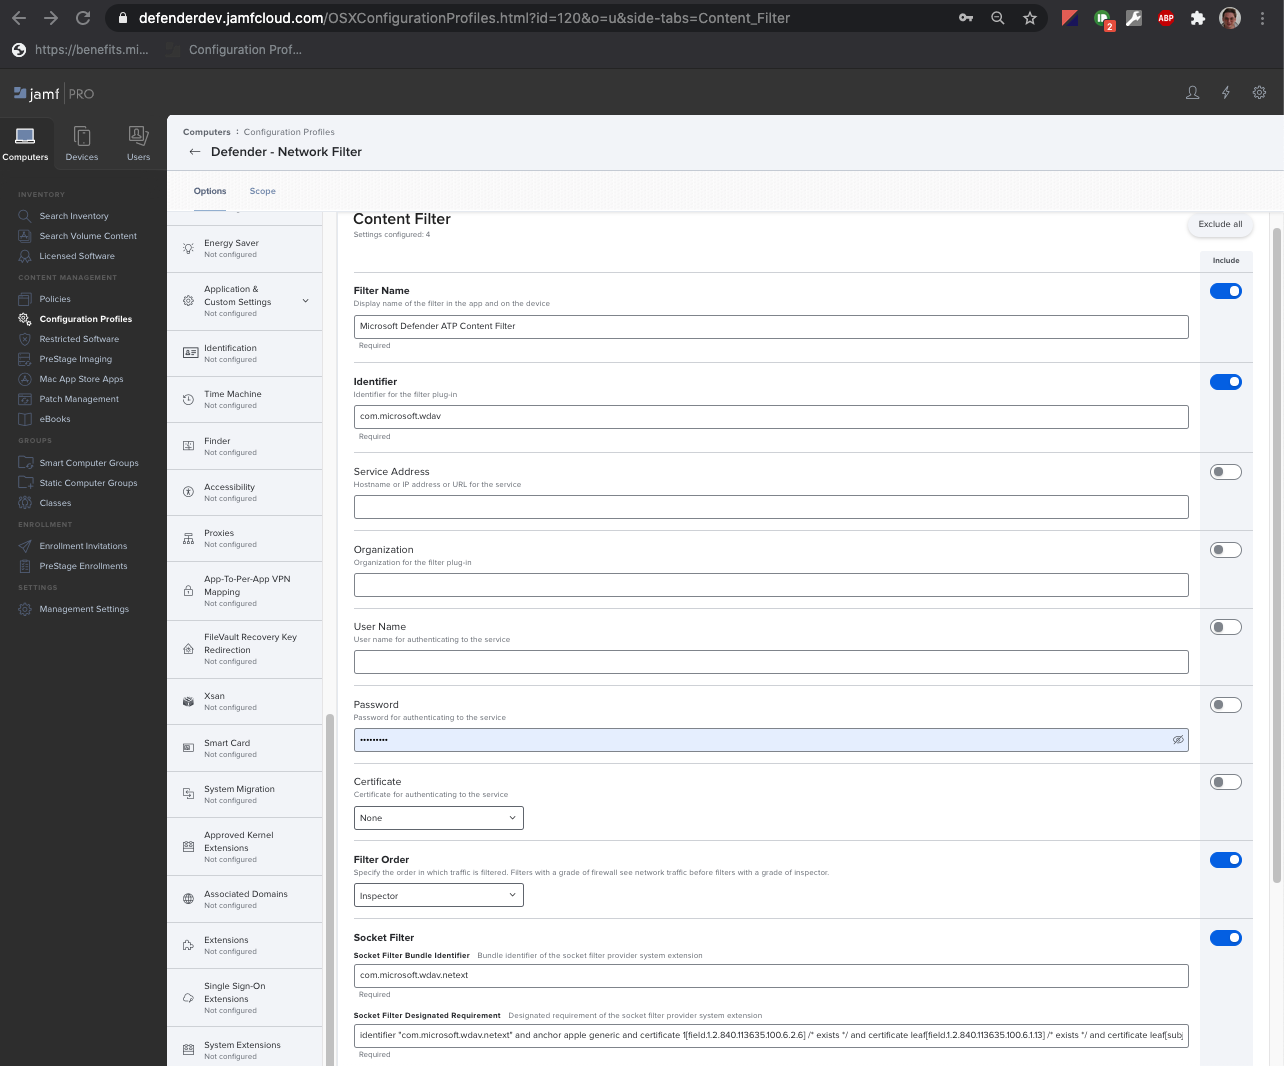
Step 8: Configure Network Extension
As part of the Endpoint Detection and Response capabilities, Microsoft Defender for Endpoint on macOS inspects socket traffic and reports this information to the Microsoft Defender portal. The following policy allows the network extension to perform this functionality.
These steps are applicable on macOS 11 (Big Sur) or later.
In the Jamf Pro dashboard, select Computers, then Configuration Profiles.
Click New, and enter the following details for Options:
Tab General:
- Name: Microsoft Defender Network Extension
- Description: macOS 11 (Big Sur) or later
- Category: None (default)
- Distribution Method: Install Automatically (default)
- Level: Computer Level (default)
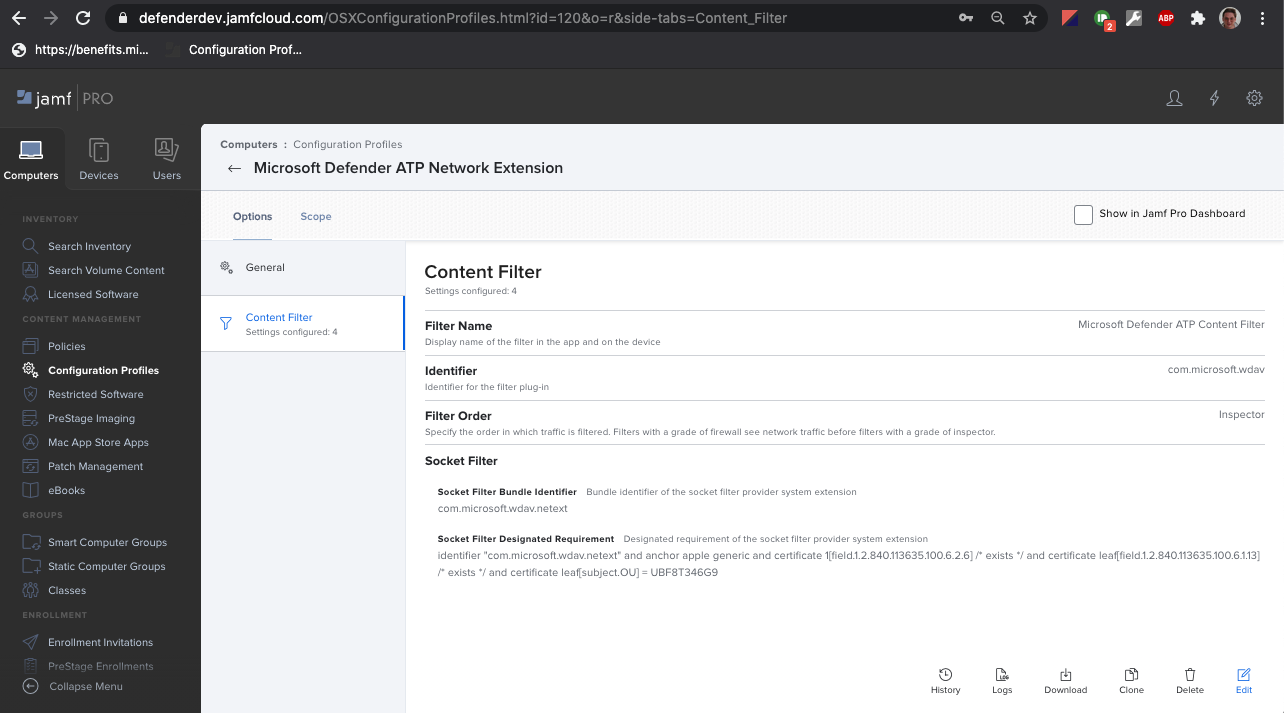
Tab Content Filter:
- Filter Name: Microsoft Defender Content Filter
- Identifier:
com.microsoft.wdav - Leave Service Address, Organization, User Name, Password, Certificate blank (Include is not selected)
- Filter Order: Inspector
- Socket Filter:
com.microsoft.wdav.netext - Socket Filter Designated Requirement:
identifier "com.microsoft.wdav.netext" and anchor apple generic and certificate 1[field.1.2.840.113635.100.6.2.6] /* exists */ and certificate leaf[field.1.2.840.113635.100.6.1.13] /* exists */ and certificate leaf[subject.OU] = UBF8T346G9 - Leave Network Filter fields blank (Include is not selected)
Note that Identifier, Socket Filter and Socket Filter Designated Requirement exact values as specified above.
Select the Scope tab.
Select + Add.
Select Computer Groups > under Group Name > select Contoso's Machine Group.
Select + Add.
Select Save.
Select Done.


Alternatively, you can download netfilter.mobileconfig and upload it to JAMF Configuration Profiles as described in Deploying Custom Configuration Profiles using Jamf Pro|Method 2: Upload a Configuration Profile to Jamf Pro.
Step 9: Configure Background Services
Caution
macOS 13 (Ventura) contains new privacy enhancements. Beginning with this version, by default, applications cannot run in background without explicit consent. Microsoft Defender for Endpoint must run its daemon process in background.
This configuration profile grants Background Service permissions to Microsoft Defender for Endpoint. If you previously configured Microsoft Defender for Endpoint through JAMF, we recommend you update the deployment with this configuration profile.
Download background_services.mobileconfig from our GitHub repository.
Upload downloaded mobileconfig to JAMF Configuration Profiles as described in Deploying Custom Configuration Profiles using Jamf Pro|Method 2: Upload a Configuration Profile to Jamf Pro.
Step 10: Grant Bluetooth Permissions
Caution
macOS 14 (Sonoma) contains new privacy enhancements. Beginning with this version, by default, applications cannot access Bluetooth without explicit consent. Microsoft Defender for Endpoint uses it if you configure Bluetooth policies for Device Control.
Download bluetooth.mobileconfig from GitHub repository.
Warning
Current version of JAMF Pro does not support this kind of payload yet. If you upload this mobileconfig as-is, JAMF Pro will remove unsupported payload, and it will fail to apply to client machines. You need to sign downloaded mobileconfig first, after that JAMF Pro will consider it "sealed" and will not tamper with it. See instructions below:
- You need to have at least one signing certificate installed into your KeyChain, even a self-signed certificate will work. You can inspect what you have with:
> /usr/bin/security find-identity -p codesigning -v

  1) 70E46A47F552EA8D58521DAC1E7F5144BA3012BC "DevCert"
  2) 67FC43F3FAB77662BB7688C114585BAA37CA8175 "Mac Developer: John Doe (1234XX234)"
  3) E142DFD879E5EB60FA249FB5B24CEAE3B370394A "Apple Development: Jane Doe 7XX7778888)"
  4) 21DE31645BBF1D9F5C46E82E87A6968111E41C75 "Apple Development: me@example.com (8745XX123)"
     4 valid identities found
- Choose any of them, and provide the quoted text as the -N parameter:
/usr/bin/security cms -S -N "DevCert" -i bluetooth.mobileconfig -o bluetooth-signed.mobileconfig
- Now you can upload the generated bluetooth-signed.mobileconfig to JAMF Pro as described in Deploying Custom Configuration Profiles using Jamf Pro|Method 2: Upload a Configuration Profile to Jamf Pro.
Note
Bluetooth granted through Apple MDM Configuration Profile is not reflected in System Settings => Privacy & Security => Bluetooth.
Step 11: Schedule scans with Microsoft Defender for Endpoint on macOS
Follow the instructions on Schedule scans with Microsoft Defender for Endpoint on macOS.
Step 12: Deploy Microsoft Defender for Endpoint on macOS
Note
In the steps that follow, the name of the .pkg file and the Display Name values are examples. In these examples, 200329 represents the date on which the
package and policy were created (in yymmdd format), and v100.86.92 represents the version of the Microsoft Defender application that is being deployed.
These values should be updated to conform with the naming convention you use in your environment for Packages and Policies.
Navigate to where you saved
wdav.pkg.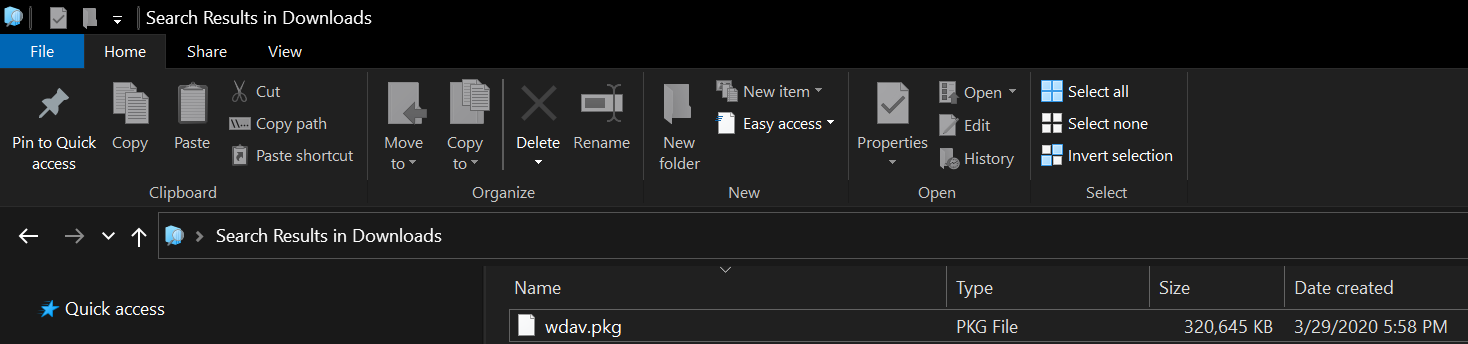
Rename it to
wdav_MDM_Contoso_200329.pkg.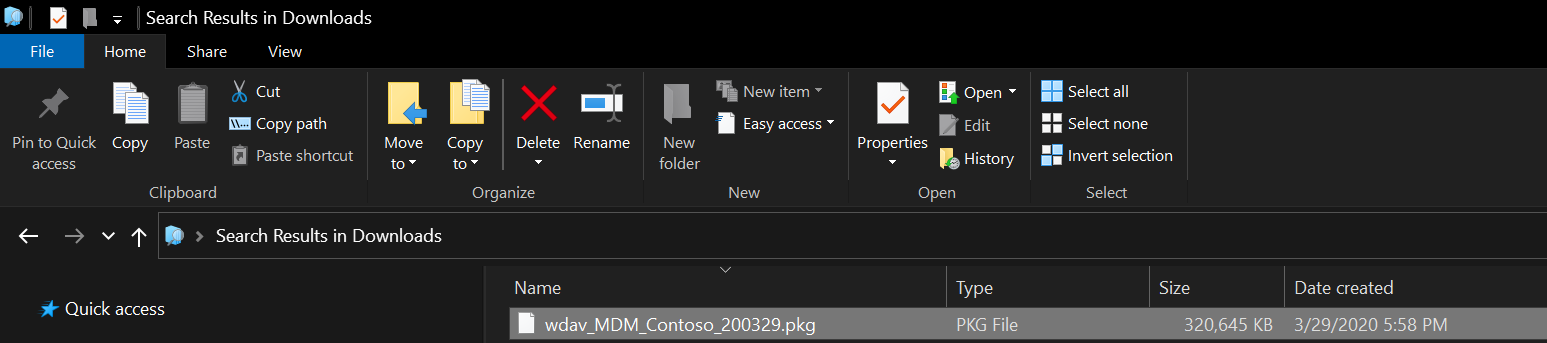
Open the Jamf Pro dashboard.

Select your computer and click the gear icon at the top, then select Computer Management.

In Packages, select + New.

In the General tab, enter the following details in New Package:
- Display Name: Leave it blank for now. Because it will be reset when you choose your pkg.
- Category: None (default)
- Filename: Choose File

Open the file and point it to
wdav.pkgorwdav_MDM_Contoso_200329.pkg.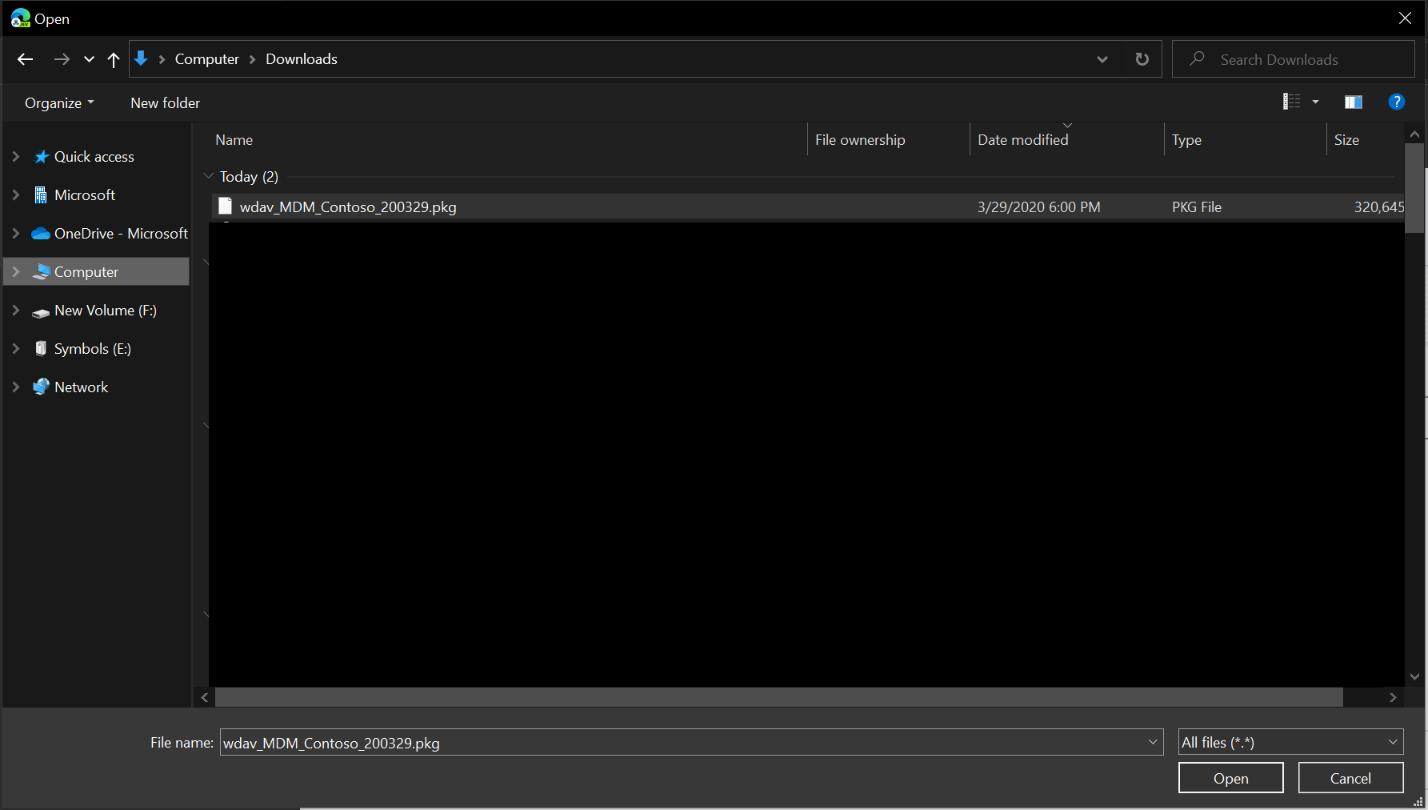
Select Open. Set the Display Name to Microsoft Defender Advanced Threat Protection and Microsoft Defender Antivirus.
Manifest File is not required. Microsoft Defender for Endpoint works without Manifest File.
Options tab: Keep default values.
Limitations tab: Keep default values.
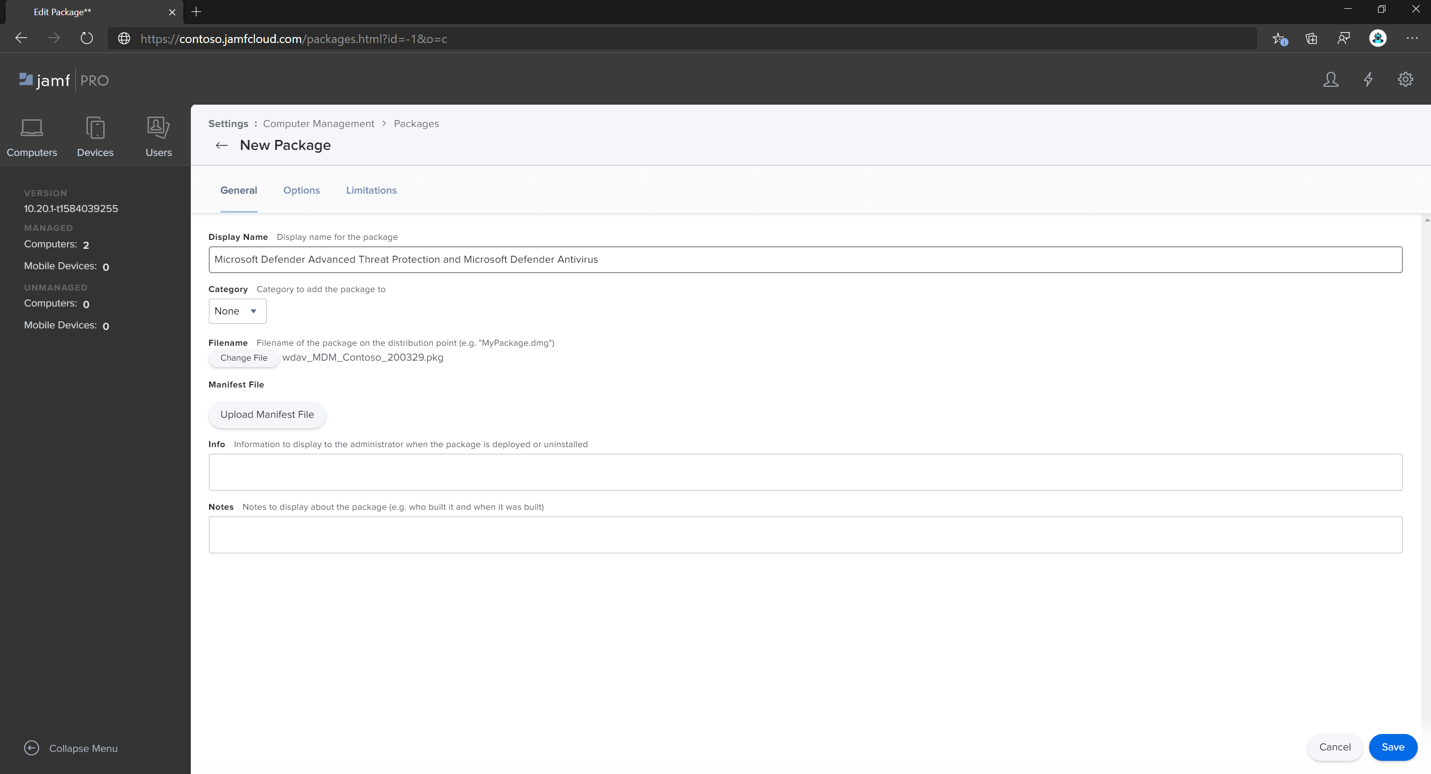
Select Save. The package is uploaded to Jamf Pro.
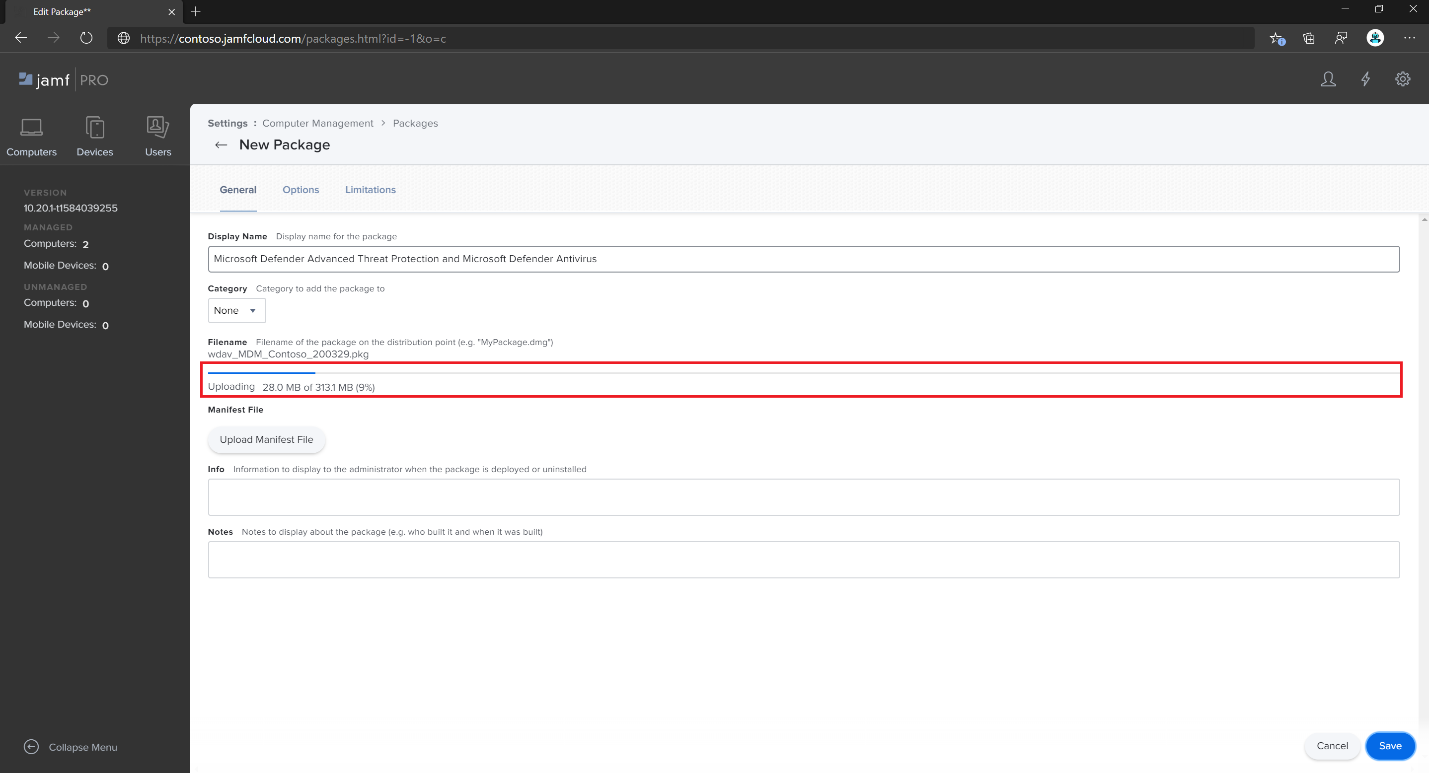
It can take a few minutes for the package to be available for deployment.

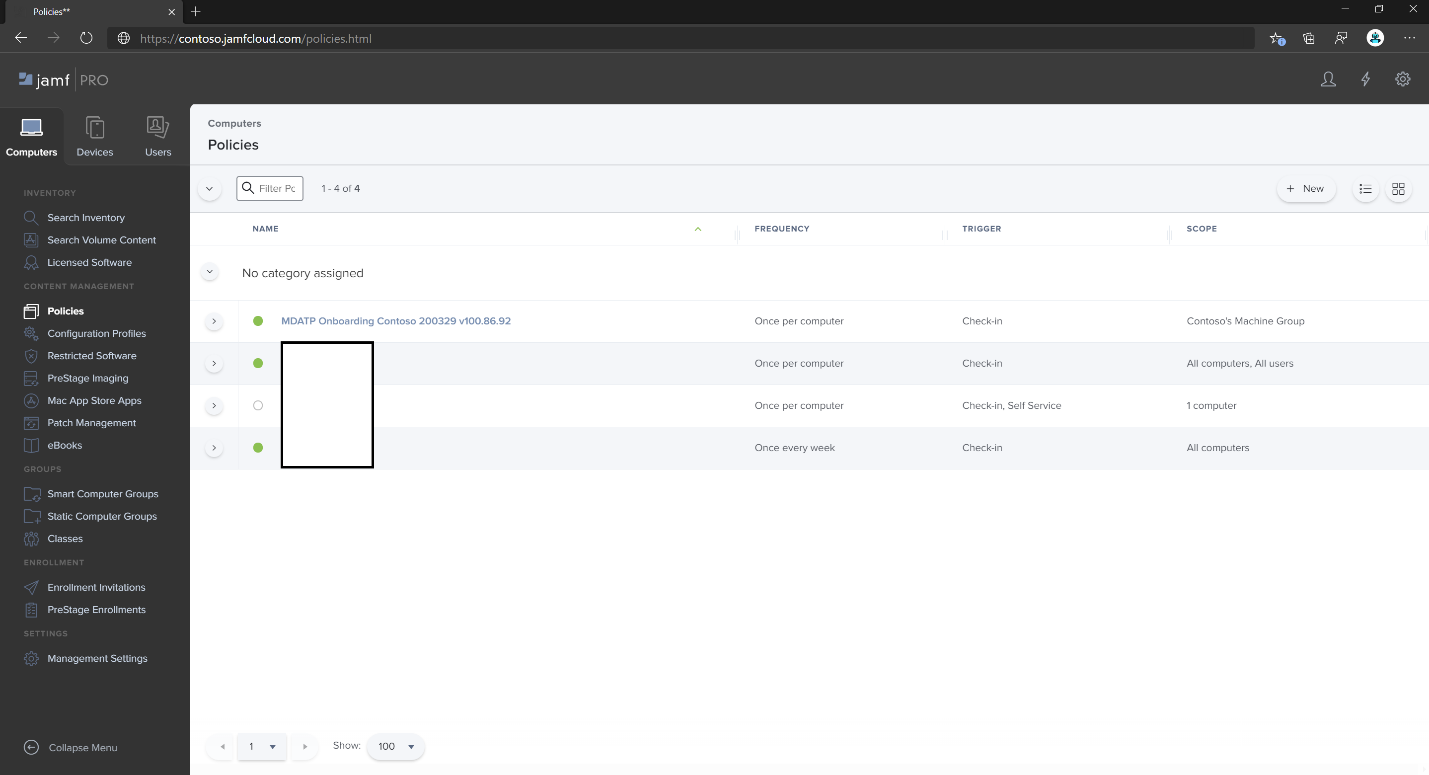
Navigate to the Policies page.
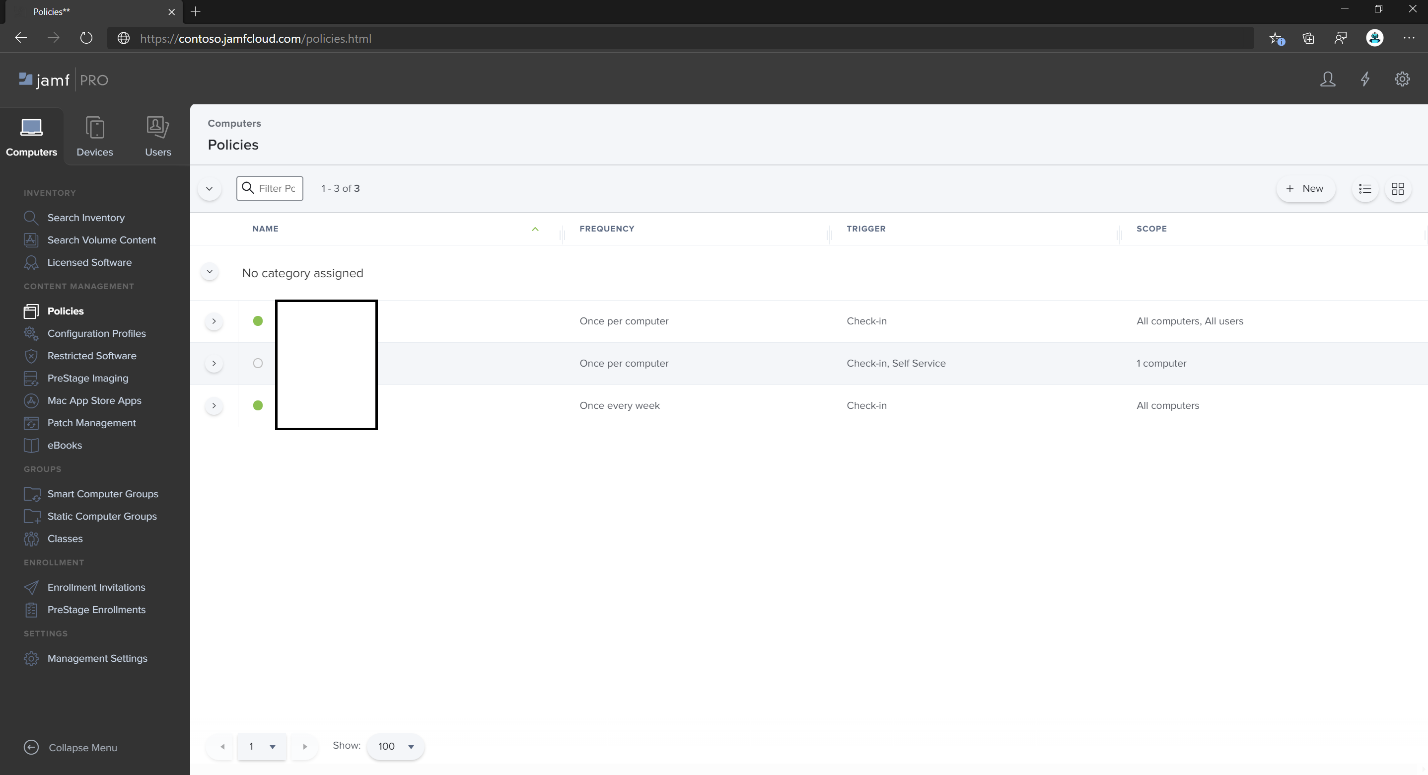
Select + New to create a new policy.

In General, enter the Display name MDATP Onboarding Contoso 200329 v100.86.92 or later.

Select Recurring Check-in.

Select Save.
Select Packages > Configure.

Select the Add button next to Microsoft Defender Advanced Threat Protection and Microsoft Defender Antivirus.

Select Save.

Create a smart group for machines with Microsoft Defender profiles.
For better user experience, configuration profiles to enrolled machines must be installed before Microsoft Defender's package. In most cases JAMF Prof pushes configuration profiles immediately, which policies are executed after some time (i.e. during check-in).
However, in some cases, configuration profiles deployment can be deployed with a significant delay (i.e. if a user's machine is locked).
JAMF Pro provides a way to ensure the correct order. You can create a smart group for machines that already received Microsoft Defender's configuration profile, and install Microsoft Defender's package only to those machines (and as soon as they receive this profile!)
To do it, create a smart group first. In the new browser window open Smart Computers Groups from the left menu, click New. Assign some name, switch to the Criteria tab, click Add and Show Advanced Criteria.
Select Profile Name as a criterion, and use the name of a previously created configuration profile as Value:
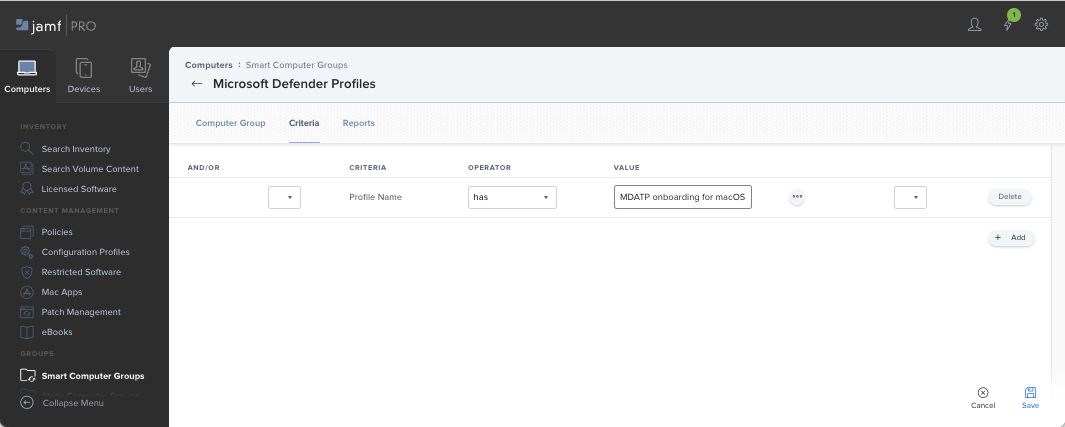
Click Save. Return back to the window where you configure a package policy.
Select the Scope tab.

Select the target computers.
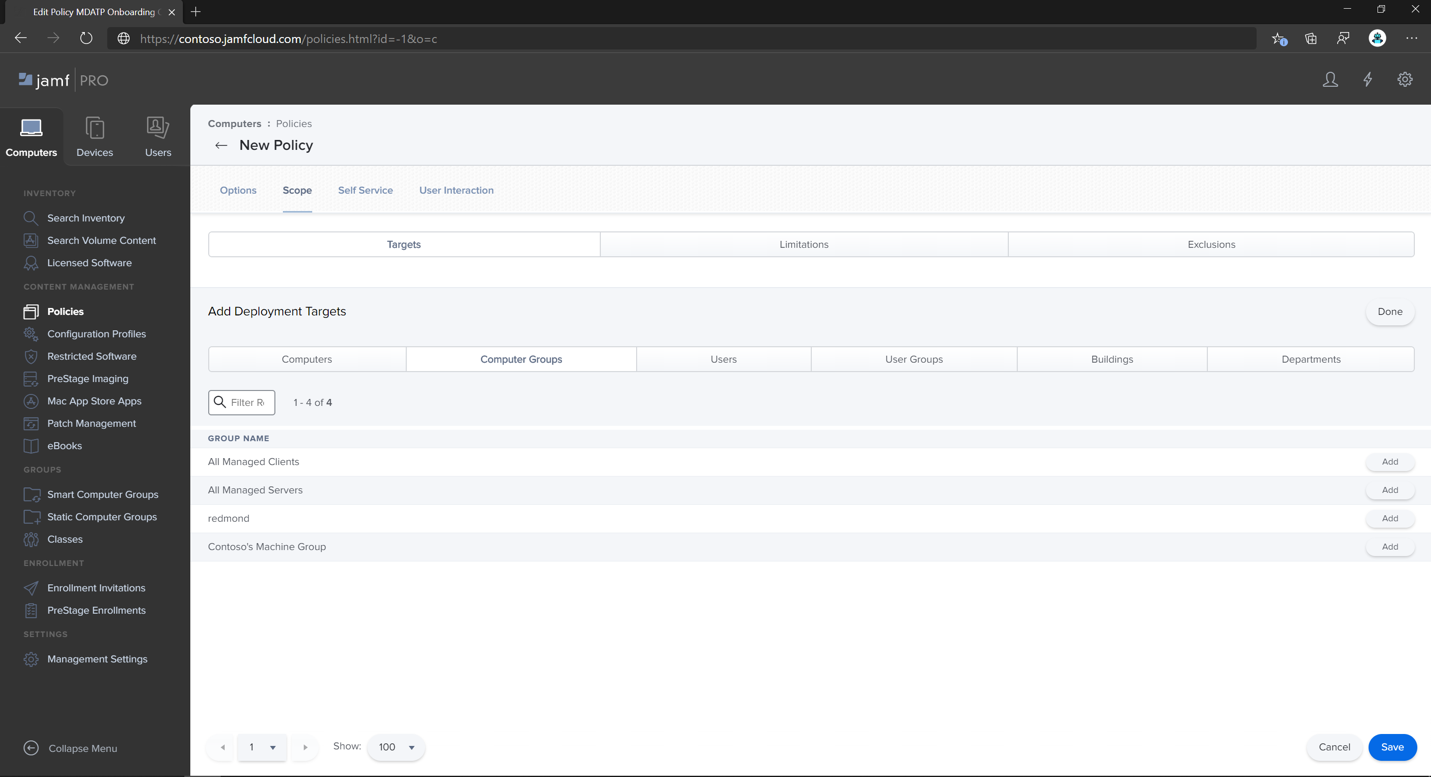
Under Scope, select Add.

Switch to the Computer Groups tab. Find the smart group you created, and Add it.
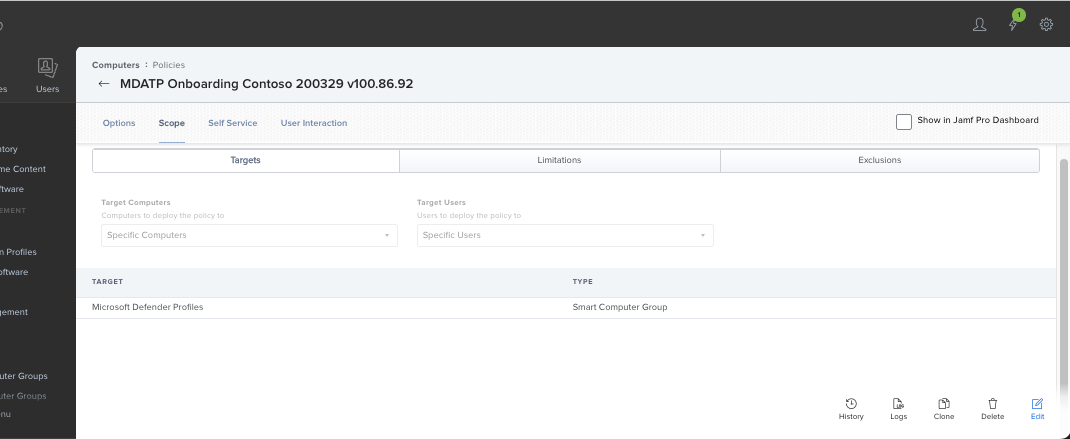
Select Self-Service, if you want users to install Microsoft Defender voluntarily, on demand.

Select Done.


Configuration profile scope
JAMF requires you to define a set of machines for a configuration profile. You need to make sure that all machines receiving Defender's package, also receive all configuration profiles listed above.
Warning
JAMF supports Smart Computer Groups that allow deploying, such as configuration profiles or policies to all machines matching certain criteria evaluated dynamically. It is a powerful concept that is widely used for configuration profiles distribution.
However, keep in mind that these criteria should not include presence of Defender on a machine. While using this criterion may sound logical, it creates problems that are difficult to diagnose.
Defender relies on all these profiles at the moment of its installation. Making configuration profiles depending on Defender's presence effectively delays deployment of configuration profiles, and results in an initially unhealthy product and/or prompts for manual approval of certain application permissions, that are otherwise auto approved by profiles.
Deploying a policy with Microsoft Defender's package after deploying configuration profiles ensures the end user's best experience, because all required configurations will be applied before the package installs.
Tip
Do you want to learn more? Engage with the Microsoft Security community in our Tech Community: Microsoft Defender for Endpoint Tech Community.
Feedback
Bald verfügbar: Im Laufe des Jahres 2024 werden wir GitHub-Issues stufenweise als Feedbackmechanismus für Inhalte abbauen und durch ein neues Feedbacksystem ersetzen. Weitere Informationen finden Sie unter https://aka.ms/ContentUserFeedback.
Feedback senden und anzeigen für