Tutorial: Manage certificates for federated single sign-on
In this article, we cover common questions and information related to certificates that Microsoft Entra ID creates to establish federated single sign-on (SSO) to your software as a service (SaaS) applications. Add applications from the Microsoft Entra application gallery or by using a non-gallery application template. Configure the application by using the federated SSO option.
This tutorial is relevant only to apps that are configured to use Microsoft Entra SSO through Security Assertion Markup Language (SAML) federation.
In this tutorial, an administrator of the application learns how to:
- Generate certificates for gallery and non-gallery applications
- Customize the expiration dates for certificates
- Add email notification address for certificate expiration dates
- Renew certificates
Prerequisites
- An Azure account with an active subscription. If you don't already have one, Create an account for free.
- One of the following roles: Global Administrator, Privileged Role Administrator, Cloud Application Administrator, or Application Administrator.
- An enterprise application configured in your Microsoft Entra tenant.
Autogenerated certificate for gallery and non-gallery applications
When you add a new application from the gallery and configure a SAML-based sign-on (by selecting Single sign-on > SAML from the application overview page), Microsoft Entra ID generates a self-signed certificate for the application that is valid for three years. To download the active certificate as a security certificate (.cer) file, return to that page (SAML-based sign-on) and select a download link in the SAML Signing Certificate heading. You can choose between the raw (binary) certificate or the Base 64 (base 64-encoded text) certificate. For gallery applications, this section might also show a link to download the certificate as federation metadata XML (an .xml file), depending on the requirement of the application.
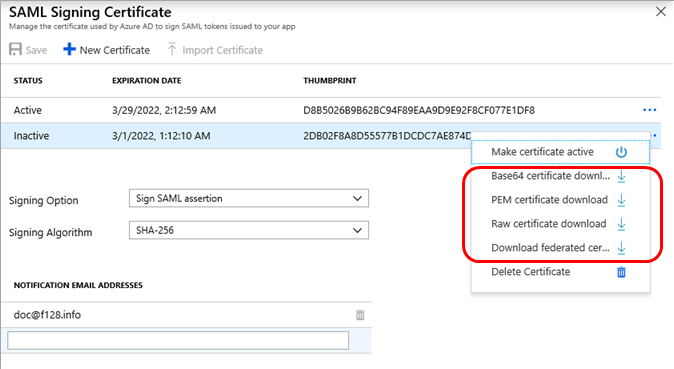
You can also download an active or inactive certificate by selecting the SAML Signing Certificate heading's Edit icon (a pencil), which displays the SAML Signing Certificate page. Select the ellipsis (...) next to the certificate you want to download, and then choose which certificate format you want. You have the other option to download the certificate in privacy-enhanced mail (PEM) format. This format is identical to Base64 but with a .pem file name extension, which isn't recognized in Windows as a certificate format.
Customize the expiration date for your federation certificate and roll it over to a new certificate
By default, Azure configures a certificate to expire after three years when you create it automatically during SAML single sign-on configuration. Because you can't change the date of a certificate after you save it, you have to:
- Create a new certificate with the desired date.
- Save the new certificate.
- Download the new certificate in the correct format.
- Upload the new certificate to the application.
- Make the new certificate active in the Microsoft Entra admin center.
The following two sections help you perform these steps.
Create a new certificate
Tip
Steps in this article might vary slightly based on the portal you start from.
First create and save the new certificate with a different expiration date:
- Sign in to the Microsoft Entra admin center as at least a Cloud Application Administrator.
- Browse to Identity > Applications > Enterprise applications > All applications.
- Enter the name of the existing application in the search box, and then select the application from the search results.
- Under the Manage section, select Single sign-on.
- If the Select a single sign-on method page appears, select SAML.
- In the Set up Single Sign-On with SAML page, find the SAML Signing Certificate heading, and select the Edit icon (a pencil). The SAML Signing Certificate page appears, which displays the status (Active or Inactive), expiration date, and thumbprint (a hash string) of each certificate.
- Select New Certificate. A new row appears below the certificate list, where the expiration date defaults to exactly three years after the current date. (Your changes aren't saved yet, so you can still modify the expiration date.)
- In the new certificate row, hover over the expiration date column and select the Select Date icon (a calendar). A calendar control appears, displaying the days of a month of the new row's current expiration date.
- Use the calendar control to set a new date. You can set any date between the current date and three years after the current date.
- Select Save. The new certificate now appears with a status of Inactive, the expiration date that you chose, and a thumbprint.
Note
When you have an existing certificate that is already expired and you generate a new certificate, the new certificate will be considered for signing tokens, even though you haven't activated it yet.
- Select the X to return to the Set up Single Sign-On with SAML page.
Upload and activate a certificate
Next, download the new certificate in the correct format, upload it to the application, and make it active in Microsoft Entra ID:
View more SAML sign-on configuration instructions for the application with either of following options.
- Select the configuration guide link to view in a separate browser window or tab.
- Browse to the set up heading and select View step-by-step instructions to view in a sidebar.
In the instructions, note the encoding format required for the certificate upload.
Follow the instructions in the Autogenerated certificate for gallery and non-gallery applications section earlier. This step downloads the certificate in the encoding format required for upload by the application.
When you want to roll over to the new certificate, go back to the SAML Signing Certificate page, and in the newly saved certificate row, select the ellipsis (...) and select Make certificate active. The status of the new certificate changes to Active, and the previously active certificate changes to a status of Inactive.
Continue following the application's SAML sign-on configuration instructions that you displayed earlier, so that you can upload the SAML signing certificate in the correct encoding format.
If your app lacks certificate expiration validation and the certificate matches both Microsoft Entra ID and your app, it remains accessible despite it being expired. Ensure your application can validate the certificate's expiration date.
If you intend to keep certificate expiry validation disabled, then the new certificate shouldn't be created until your scheduled maintenance window for the certificate rollover. If both an expired and an inactive valid certificate exist on the application, Microsoft Entra ID automatically utilizes the valid certificate. In this case, users might experience application outage.
Add email notification addresses for certificate expiration
Microsoft Entra ID sends an email notification 60, 30, and 7 days before the SAML certificate expires. You can add more than one email address to receive notifications. To specify one or more email addresses, you want the notifications to be sent to:
- In the SAML Signing Certificate page, go to the notification email addresses heading. By default, this heading uses only the email address of the admin who added the application.
- Below the final email address, type the email address that should receive the certificate's expiration notice, and then press Enter.
- Repeat the previous step for each email address you want to add.
- For each email address you want to delete, select the Delete icon (garbage can) next to the email address.
- Select Save.
You can add up to five email addresses to the Notification list (including the email address of the admin who added the application). If you need more people to be notified, use the distribution list emails.
You receive the notification email from azure-noreply@microsoft.com. To avoid the email going to your spam location, add this email to your contacts.
Renew a certificate that is set to expire soon
If a certificate is about to expire, you can renew it using a procedure that results in no significant downtime for your users. To renew an expiring certificate:
Follow the instructions in the Create a new certificate section earlier, using a date that overlaps with the existing certificate. That date limits the amount of downtime caused by the certificate expiration.
If the application can automatically roll over a certificate, set the new certificate to active by following these steps.
- Go back to the SAML Signing Certificate page.
- In the newly saved certificate row, select the ellipsis (...) and then select Make certificate active.
- Skip the next two steps.
If the application can only handle one certificate at a time, pick a downtime interval to perform the next step. (Otherwise, if the application doesn’t automatically pick up the new certificate but can handle more than one signing certificate, you can perform the next step anytime).
Before the old certificate expires, follow the instructions in the Upload and activate a certificate section earlier. If your application certificate isn't updated after a new certificate is updated in Microsoft Entra ID, authentication on your application might fail.
Sign in to the application to make sure that the certificate works correctly.
If your app lacks certificate expiration validation and the certificate matches both Microsoft Entra ID and your app, it remains accessible despite it being expired. Ensure your application can validate certificate expiration.
Related articles
Σχόλια
Σύντομα διαθέσιμα: Καθ' όλη τη διάρκεια του 2024 θα καταργήσουμε σταδιακά τα ζητήματα GitHub ως μηχανισμό ανάδρασης για το περιεχόμενο και θα το αντικαταστήσουμε με ένα νέο σύστημα ανάδρασης. Για περισσότερες πληροφορίες, ανατρέξτε στο θέμα: https://aka.ms/ContentUserFeedback.
Υποβολή και προβολή σχολίων για