Configure tokens in Azure Active Directory B2C
Before you begin, use the Choose a policy type selector at the top of this page to choose the type of policy you’re setting up. Azure Active Directory B2C offers two methods to define how users interact with your applications: through predefined user flows or through fully configurable custom policies. The steps required in this article are different for each method.
In this article, you learn how to configure the lifetime and compatibility of a token in Azure Active Directory B2C (Azure AD B2C).
Prerequisites
- Create a user flow so users can sign up and sign in to your application.
- Register a web application.
- Complete the steps in Get started with custom policies in Active Directory B2C. This tutorial guides you how to update custom policy files to use your Azure AD B2C tenant configuration.
- Register a web application.
Token lifetime behavior
You can configure the token lifetime, including:
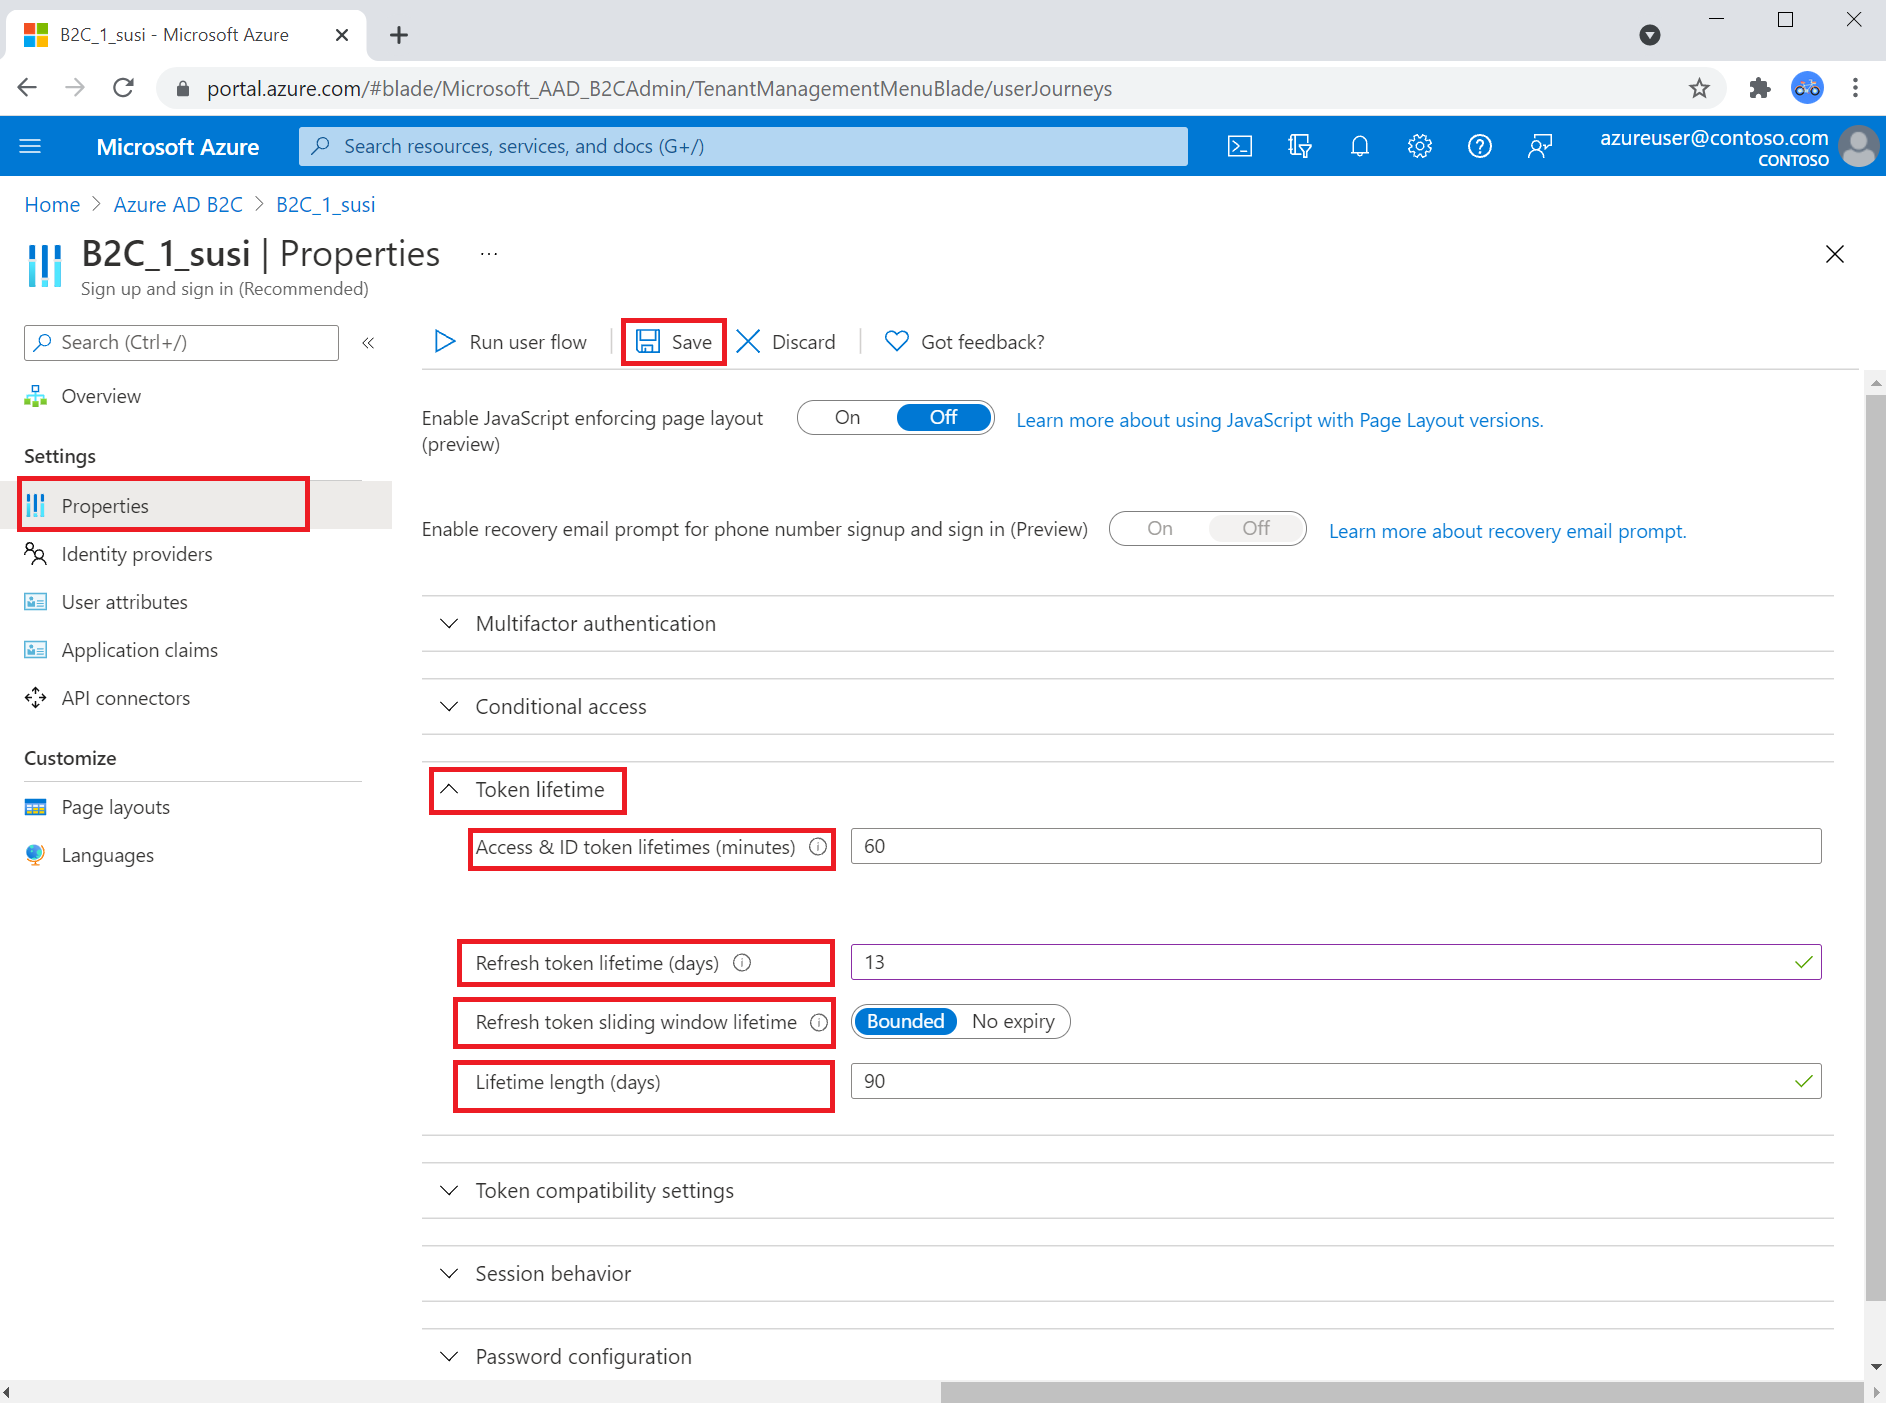
- Access and ID token lifetimes (minutes) - The lifetime of the OAuth 2.0 bearer token and ID tokens. The default is 60 minutes (1 hour). The minimum (inclusive) is 5 minutes. The maximum (inclusive) is 1,440 minutes (24 hours).
- Refresh token lifetime (days) - The maximum time period before which a refresh token can be used to acquire a new access token, if your application had been granted the
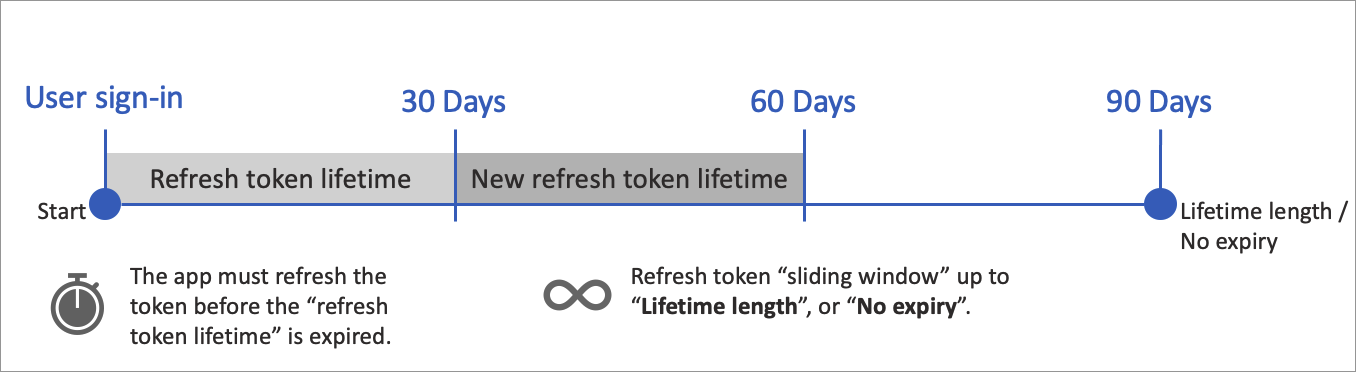
offline_accessscope. The default is 14 days. The minimum (inclusive) is one day. The maximum (inclusive) 90 days. - Refresh token sliding window lifetime - The refresh token sliding window type.
Boundedindicates that the refresh token can be extended as specified in the Lifetime length (days).No expiryindicates that the refresh token sliding window lifetime never expires. - Lifetime length (days) - After this time period elapses the user is forced to reauthenticate, irrespective of the validity period of the most recent refresh token acquired by the application. The value must be greater than or equal to the Refresh token lifetime value.
The following diagram shows the refresh token sliding window lifetime behavior.
Note
Single-page applications using the authorization code flow with PKCE always have a refresh token lifetime of 24 hours while mobile apps, desktop apps, and web apps do not experience this limitation. Learn more about the security implications of refresh tokens in the browser.
Configure token lifetime
To configure your user flow token lifetime:
- Sign in to the Azure portal.
- If you have access to multiple tenants, select the Settings icon in the top menu to switch to your Azure AD B2C tenant from the Directories + subscriptions menu.
- Choose All services in the top-left corner of the Azure portal, and then search for and select Azure AD B2C.
- Select User flows (policies).
- Open the user flow that you previously created.
- Select Properties.
- Under Token lifetime, adjust the properties to fit the needs of your application.
- Select Save.
To change the settings on your token compatibility, you set the Token Issuer technical profile metadata in the extension, or the relying party file of the policy you want to impact. The token issuer technical profile looks like following example:
<ClaimsProviders>
  <ClaimsProvider>
    <DisplayName>Token Issuer</DisplayName>
    <TechnicalProfiles>
      <TechnicalProfile Id="JwtIssuer">
        <Metadata>
          <Item Key="token_lifetime_secs">3600</Item>
          <Item Key="id_token_lifetime_secs">3600</Item>
          <Item Key="refresh_token_lifetime_secs">1209600</Item>
          <Item Key="rolling_refresh_token_lifetime_secs">7776000</Item>
          <!--<Item Key="allow_infinite_rolling_refresh_token">true</Item>-->
          <Item Key="IssuanceClaimPattern">AuthorityAndTenantGuid</Item>
          <Item Key="AuthenticationContextReferenceClaimPattern">None</Item>
        </Metadata>
      </TechnicalProfile>
    </TechnicalProfiles>
  </ClaimsProvider>
</ClaimsProviders>
The following values are set in the previous example:
- token_lifetime_secs - Access token lifetimes (seconds). The default is 3,600 (1 hour). The minimum is 300 (5 minutes). The maximum is 86,400 (24 hours).
- id_token_lifetime_secs - ID token lifetimes (seconds). The default is 3,600 (1 hour). The minimum is 300 (5 minutes). The maximum is 86,400 (24 hours).
- refresh_token_lifetime_secs Refresh token lifetimes (seconds). The default is 1,209,600 (14 days). The minimum is 86,400 (24 hours). The maximum is 7,776,000 (90 days).
- rolling_refresh_token_lifetime_secs - Refresh token sliding window lifetime (seconds). The default is 7,776,000 (90 days). The minimum is 86,400 (24 hours). The maximum is 31,536,000 (365 days). If you don't want to enforce a sliding window lifetime, set the value of
allow_infinite_rolling_refresh_tokentotrue. - allow_infinite_rolling_refresh_token - Refresh token sliding window lifetime never expires.
Token compatibility settings
You can configure the token compatibility, including:
- Issuer (iss) claim - The access and ID token issuer format.
- Subject (sub) claim - The principal about which the token asserts information, such as the user of an application. This value is immutable and can't be reassigned or reused. It can be used to perform authorization checks safely, such as when the token is used to access a resource. By default, the subject claim is populated with the object ID of the user in the directory.
- Claim representing user flow - This claim identifies the user flow that was executed. Possible values:
tfp(default), oracr.
To configure your user flow compatibility settings:
- Select User flows (policies).
- Open the user flow that you previously created.
- Select Properties.
- Under Token compatibility settings, adjust the properties to fit the needs of your application.
- Select Save.
To change the settings on your token compatibility, you set the Token Issuer technical profile metadata in the extension, or the relying party file of the policy you want to update. The token issuer technical profile looks like following example:
<ClaimsProviders>
  <ClaimsProvider>
    <DisplayName>Token Issuer</DisplayName>
    <TechnicalProfiles>
      <TechnicalProfile Id="JwtIssuer">
        <Metadata>
          ...
          <Item Key="IssuanceClaimPattern">AuthorityAndTenantGuid</Item>
          <Item Key="AuthenticationContextReferenceClaimPattern">None</Item>
        </Metadata>
      </TechnicalProfile>
    </TechnicalProfiles>
  </ClaimsProvider>
</ClaimsProviders>
Issuer (iss) claim - The Issuer (iss) claim is set with the IssuanceClaimPattern metadata item. The applicable values are
AuthorityAndTenantGuidandAuthorityWithTfp.Setting claim representing policy ID - The options for setting this value are
TFP(trust framework policy) andACR(authentication context reference).TFPis the recommended value. Set AuthenticationContextReferenceClaimPattern with the value ofNone.In the ClaimsSchema element, add this element:
<ClaimType Id="trustFrameworkPolicy">
  <DisplayName>Trust framework policy name</DisplayName>
  <DataType>string</DataType>
</ClaimType>
In your relying party policy, under the OutputClaims element, add the following output claim:
<OutputClaim ClaimTypeReferenceId="trustFrameworkPolicy" Required="true" DefaultValue="{policy}" PartnerClaimType="tfp" />For ACR, remove the AuthenticationContextReferenceClaimPattern item.
Subject (sub) claim - This option defaults to ObjectID, if you would like to switch this setting to
Not Supported, replace this line:<OutputClaim ClaimTypeReferenceId="objectId" PartnerClaimType="sub" />with this line:
<OutputClaim ClaimTypeReferenceId="sub" />
Provide optional claims to your app
The application claims are values that are returned to the application. Update your user flow to contain the desired claims.
- Select User flows (policies).
- Open the user flow that you previously created.
- Select Application claims.
- Choose the claims and attributes that you want send back to your application.
- Select Save.
The Relying party policy technical profile output claims are values that are returned to an application. Adding output claims will issue the claims into the token after a successful user journey, and will be sent to the application. Modify the technical profile element within the relying party section to add the desired claims as an output claim.
- Open your custom policy file. For example, SignUpOrSignin.xml.
- Find the OutputClaims element. Add the OutputClaim you want to be included in the token.
- Set the output claim attributes.
The following example adds the accountBalance claim. The accountBalance claim is sent to the application as a balance.
<RelyingParty>
  <DefaultUserJourney ReferenceId="SignUpOrSignIn" />
  <TechnicalProfile Id="PolicyProfile">
    <DisplayName>PolicyProfile</DisplayName>
    <Protocol Name="OpenIdConnect" />
    <OutputClaims>
      <OutputClaim ClaimTypeReferenceId="displayName" />
      <OutputClaim ClaimTypeReferenceId="givenName" />
      <OutputClaim ClaimTypeReferenceId="surname" />
      <OutputClaim ClaimTypeReferenceId="email" />
      <OutputClaim ClaimTypeReferenceId="objectId" PartnerClaimType="sub"/>
      <OutputClaim ClaimTypeReferenceId="identityProvider" />
      <OutputClaim ClaimTypeReferenceId="tenantId" AlwaysUseDefaultValue="true" DefaultValue="{Policy:TenantObjectId}" />
      <!--Add the optional claims here-->
      <OutputClaim ClaimTypeReferenceId="accountBalance" DefaultValue="" PartnerClaimType="balance" />
    </OutputClaims>
    <SubjectNamingInfo ClaimType="sub" />
  </TechnicalProfile>
</RelyingParty>
The OutputClaim element contains the following attributes:
- ClaimTypeReferenceId - The identifier of a claim type already defined in the ClaimsSchema section in the policy file or parent policy file.
- PartnerClaimType - Allows you to change the name of the claim in the token.
- DefaultValue - A default value. You can also set the default value to a claim resolver, such as tenant ID.
- AlwaysUseDefaultValue - Force the use of the default value.
Authorization code lifetime
When using the OAuth 2.0 authorization code flow, the app can use the authorization code to request an access token for a target resource. Authorization codes are short-lived that expire after about 10 minutes. The authorization code lifetime can't be configured. Make sure your application redeems the authorization codes within 10 minutes.
Next steps
- Learn more about how to request access tokens.
- Learn how to build Resilience through developer best practices.
Σχόλια
Σύντομα διαθέσιμα: Καθ' όλη τη διάρκεια του 2024 θα καταργήσουμε σταδιακά τα ζητήματα GitHub ως μηχανισμό ανάδρασης για το περιεχόμενο και θα το αντικαταστήσουμε με ένα νέο σύστημα ανάδρασης. Για περισσότερες πληροφορίες, ανατρέξτε στο θέμα: https://aka.ms/ContentUserFeedback.
Υποβολή και προβολή σχολίων για