Resolve private domain names in Azure SQL Managed Instance
Applies to: ![]() Azure SQL Managed Instance
Azure SQL Managed Instance
In this article, learn how Azure SQL Managed Instance resolves private domain names.
Overview
In certain situations, it's necessary for the SQL Server database engine to resolve domain names that don't exist in public DNS records. For example, the following scenarios are likely to involve private domain names:
- Sending emails by using database mail
- Accessing remote data sources by using linked servers
- Replicating data to the cloud by using the Managed Instance Link.
Azure SQL Managed Instance is deployed in an Azure virtual network and uses Azure-provided name resolution by default to resolve Internet addresses.
To change the default name resolution behavior and enable the resolution of private domain names, you can:
- Use Azure private DNS zones: What is Azure Private DNS?
- Use a custom DNS server: Name resolution for resources in Azure virtual networks
Important
When you change a virtual network's DNS server from Azure to custom or vice versa, SQL Managed Instances in that virtual network must also be notified of the change. This is described in the section Update SQL Managed Instances.
You don't need to do this when you only attach or update Azure private DNS zones to the managed instances' virtual network. Those changes automatically propagate to the managed instances.
Considerations
- Be careful not to override or disable the resolution of domain names that Azure SQL Managed Instance uses internally, as listed in Networking constraints. Always configure your custom DNS server so that it can resolve public domain names.
- Always use a fully qualified domain name (FQDN) for the services that you want Azure SQL Managed Instance to resolve, such as your mail server or an on-premises SQL Server instance. Use FQDNs even if those services are within your private DNS zone. For example, use
smtp.contoso.com. Creating a linked server or configuring replication that reference SQL Server VMs inside the same virtual network also require an FQDN and a default DNS suffix; for example,SQLVM.internal.cloudapp.net.
Update SQL Managed Instances
If the DNS server setting is changed in a virtual network with existing SQL managed instances, then the virtual cluster that hosts those instances, and the underlying machine groups, need to synchronize with the changes in the DNS configuration. Updating a virtual cluster affects all SQL Managed Instances hosted in it.
When you update a virtual cluster's DNS server settings, the custom DNS server IP addresses set on the virtual network become the preferred DNS servers for the instances in that cluster. The instances still retain Azure's DNS resolver address as a backup, but now resolve addresses using the custom DNS servers first.
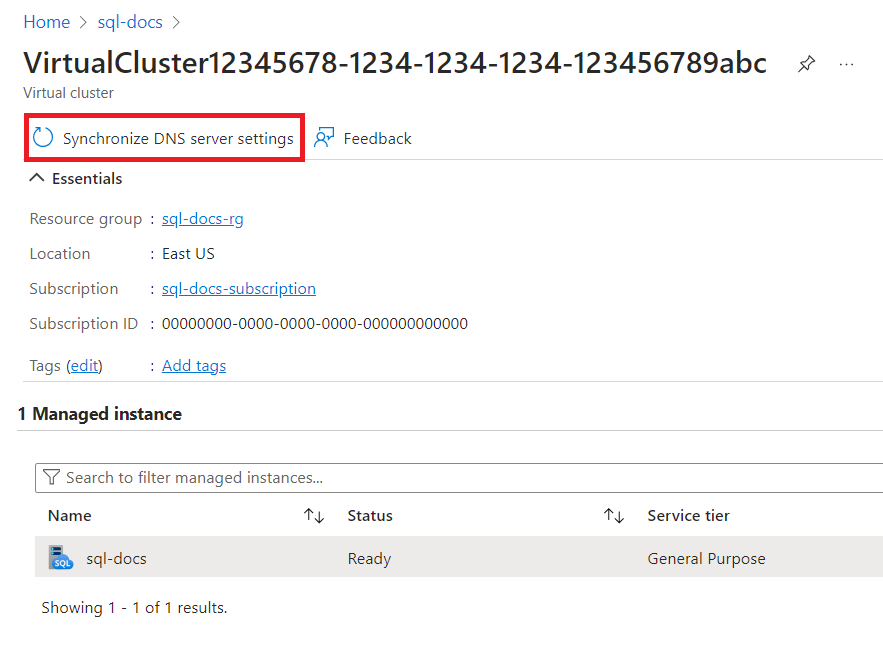
Use the Azure portal to update the DNS server settings for an existing virtual cluster.
- Open the Azure portal.
- Open the resource group with a managed instance in the subnet you're configuring, and select the SQL managed instance that you want to update the DNS server settings for.
- In Overview, select the Virtual cluster the instance belongs to.
- Select Synchronize DNS server settings to update the cluster.
Verify the configuration
After you update the DNS server settings on the virtual cluster, you can verify that it's now in effect for the managed instances in that cluster. One way to do so is to create and run a SQL Server Agent job that outputs a list of DNS servers currently configured on the network interface.
To view the list of DNS servers configured on the managed instance's network interface:
- Start SQL Server Management Studio.
- Connect to a managed instance in the cluster you updated the DNS settings for.
- In Object Explorer, expand SQL Server Agent.
- Right-click Jobs and select New Job....
- In General, write the name of the job; for example "Verify DNS settings".
- In Steps, select New....
- Write the name of the step; for example, "run".
- Set Type to PowerShell.
- In Command, paste the following command:
Get-DnsClientServerAddress - Select OK, then OK to close both dialog windows.
- In Object Explorer, right-click the job you created and select Start Job at Step.... The job will run.
- When the job finishes, right-click it again and select View History.
- In Log file summary, expand the job and select its first and only step underneath it.
- In Selected row details:, review the output of the command and confirm that it contains your DNS server IP address(es).
Permissions
A user that is synchronizing DNS server configurations across a virtual network:
- Should be a member of the Subscription Contributor role, or
- Have a custom role with the
Microsoft.Sql/virtualClusters/updateManagedInstanceDnsServers/actionpermission.
Next steps
- For an overview, see What is Azure SQL Managed Instance?
- For information on how managed instance resolves and directs traffic, see Connectivity architecture for Azure SQL Managed Instance.
- To learn more, see Architecture of SQL Managed Instance virtual cluster
- For more on DNS resolution in Azure virtual networks, see Name resolution for resources in Azure virtual networks.
- For a tutorial showing you how to create a new managed instance, see Create a managed instance.
- For information about configuring a virtual network for a managed instance, see Connectivity architecture.
Feedback
Coming soon: Throughout 2024 we will be phasing out GitHub Issues as the feedback mechanism for content and replacing it with a new feedback system. For more information see: https://aka.ms/ContentUserFeedback.
Submit and view feedback for