Creating an MFC Application
An MFC application is an executable application for Windows that is based on the Microsoft Foundation Class (MFC) Library. MFC executables generally fall into five types: standard Windows applications, dialog boxes, forms-based applications, Explorer-style applications, and Web browser-style applications. For more information, see:
The MFC Application Wizard generates the appropriate classes and files for any of these types of applications, depending on the options you select in the wizard.
The easiest way to create an MFC application is to use the MFC Application Wizard (MFC App project in Visual Studio 2019). To create an MFC console application (a command-line program that uses MFC libraries but runs in the console window), use the Windows Desktop Wizard and choose the Console Application and MFC Headers options.
To create an MFC forms or dialog-based application
- From the main menu, choose File > New > Project.
- Enter "MFC" into the search box and then choose MFC App from the result list.
- Modify the defaults as needed, then press Create to open the MFC Application Wizard.
- Modify the configuration values as needed, then press Finish.
For more information, see Creating a forms-based MFC application.
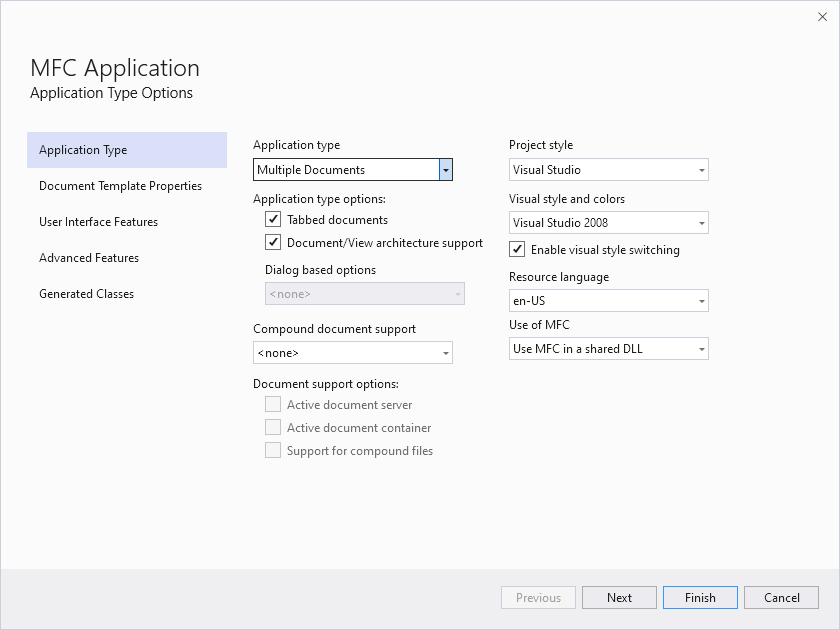
The dialog shows options for the application type, which is set to single document. Application type options include tabbed documents, which is checked, and document/view architecture support, which is checked. There are other options for project style, resource language, and so on, that are set to their default values.
To create an MFC console application
An MFC console application is a command-line program that uses MFC libraries but runs in the console window.
- From the main menu, choose File > New > Project.
- Enter "Desktop" into the search box and then choose Windows Desktop Wizard from the result list, then press Next.
- Modify the project name and location as needed, then press Create to open the Windows Desktop Wizard.
- Check the MFC Headers box and set other values as needed, then press OK.
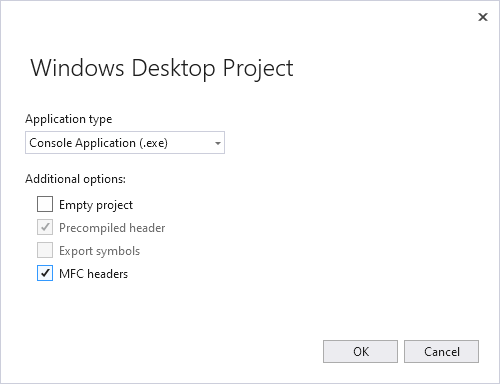
The dialog shows the application type, set to Console Application (.exe). Under Additional Options, Precompiled header is checked as is MFC headers. Precompiled header is checked automatically when MFC headers is checked.
To create an MFC forms or dialog-based application
- From the Visual Studio main menu, choose File > New > Project.
- Under the Installed templates, choose Visual C++ > MFC/ATL. If you don't see these, use the Visual Studio Installer to add MFC/ATL functionality. You can access the installer from the Visual Studio menu via Tools > Get Tools and Features... In the installer, select Individual components and search for mfc and then select the appropriate library for your machine such as Visual C++ MFC for x86 and x64 with Spectre Mitigations.
- Choose MFC App from the center pane.
- Modify the configuration values as needed, then press OK.
For more information, see Creating a Forms-Based MFC Application.
The dialog shows the various settings set to their default, such as the application type set to console application.exe; precompiled header is checked and security development lifecycle (SDL) is checked. Add common headers for: MFC isn't checked, but you select it.
To create an MFC console application
An MFC console application is a command-line program that uses MFC libraries but runs in the console window.
- From the main menu, choose File > New > Project.
- Under the Installed templates, choose Visual C++ > Windows Desktop.
- From the center pane, choose Windows Desktop Wizard.
- Modify the project name as needed, then press OK to open the Windows Desktop Wizard.
- Check the MFC Headers box and set other values as needed, then press OK.
The dialog shows the application type set to Console Application (.exe). Under additional options, Precompiled header is checked and MFC headers is checked.
To create an MFC forms or dialog-based application
- From the main menu, choose File > New > Project.
- Under the Installed templates, choose Visual C++ > MFC.
- Choose MFC Application from the center pane.
- Click Next to start the MFC Application Wizard.
For more information, see Creating a Forms-Based MFC Application.
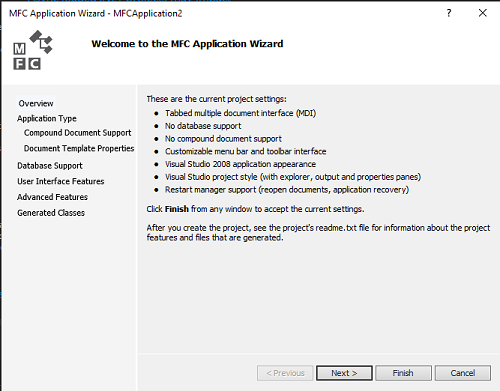
The dialog lists the current project settings such as: tabbed multiple document interface, no database support, no compound document support, customizable menu bar and toolbar interface, Visual Studio 2008 application appearance, Visual Studio project style, and restart manager support.
To create an MFC console application
An MFC console application is a command-line program that uses MFC libraries but runs in the console window.
- From the main menu, choose File > New > Project.
- Under the Installed templates, choose Visual C++ > Win32.
- Choose Win32 Console Application from the center pane.
- Modify the project name as needed, then press OK.
- On the second page of the wizard, check the Add common headers for MFC box and set other values as needed, then press Finish.
Once your project is created, you can view the files created in Solution Explorer. For more information about the files the wizard creates for your project, see the project-generated file ReadMe.txt. For more information about the file types, see File Types Created for Visual Studio C++ projects.
See also
Feedback
Coming soon: Throughout 2024 we will be phasing out GitHub Issues as the feedback mechanism for content and replacing it with a new feedback system. For more information see: https://aka.ms/ContentUserFeedback.
Submit and view feedback for