Enable custom domains in Azure Active Directory B2C
Before you begin, use the Choose a policy type selector at the top of this page to choose the type of policy you’re setting up. Azure Active Directory B2C offers two methods to define how users interact with your applications: through predefined user flows or through fully configurable custom policies. The steps required in this article are different for each method.
This article describes how to enable custom domains in your redirect URLs for Azure Active Directory B2C (Azure AD B2C). Using a verified custom domain has a number of benefits such as:
It provides a more seamless user experience. From the user's perspective, they remain in your domain during the sign in process rather than redirecting to the Azure AD B2C default domain <tenant-name>.b2clogin.com.
By staying in the same domain for your application during sign-in, you mitigate the impact of third-party cookie blocking.
You increase the number of objects (user accounts and applications) you can create in your Azure AD B2C tenant from the default 1.25 million to 5.25 million.

Custom domain overview
You can enable custom domains for Azure AD B2C by using Azure Front Door. Azure Front Door is a global entry point that uses the Microsoft global edge network to create fast, secure, and widely scalable web applications. You can render Azure AD B2C content behind Azure Front Door, and then configure an option in Azure Front Door to deliver the content via a custom domain in your application's URL.
Watch this video to learn about Azure AD B2C custom domain.
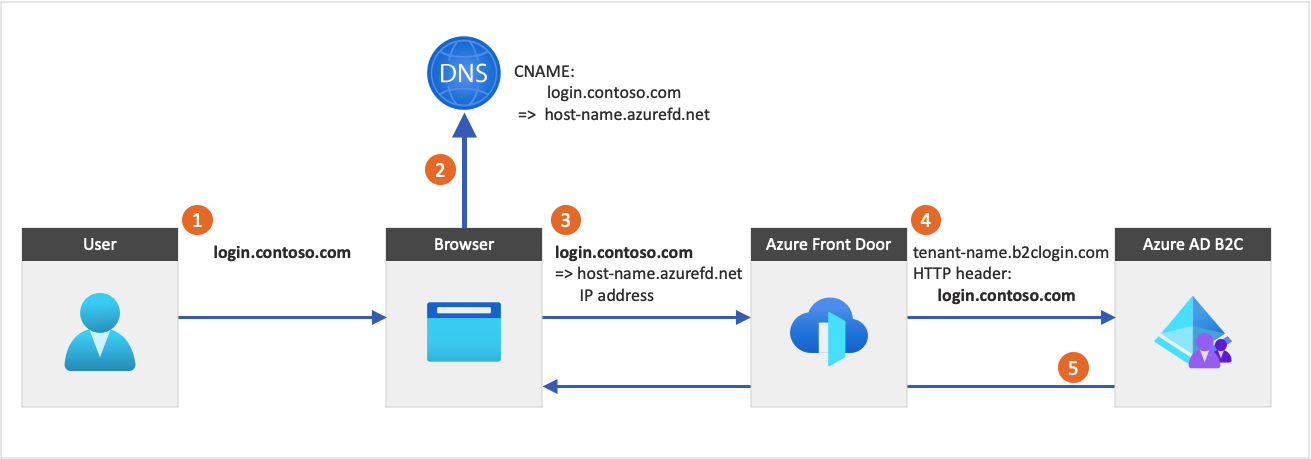
The following diagram illustrates Azure Front Door integration:
- From an application, a user selects the sign in button, which takes them to the Azure AD B2C sign in page. This page specifies a custom domain name.
- The web browser resolves the custom domain name to the Azure Front Door IP address. During DNS resolution, a canonical name (CNAME) record with a custom domain name points to your Front Door default front-end host (for example,
contoso-frontend.azurefd.net). - The traffic addressed to the custom domain (for example,
login.contoso.com) is routed to the specified Front Door default front-end host (contoso-frontend.azurefd.net). - Azure Front Door invokes Azure AD B2C content using the Azure AD B2C
<tenant-name>.b2clogin.comdefault domain. The request to the Azure AD B2C endpoint includes the original custom domain name. - Azure AD B2C responds to the request by displaying the relevant content and the original custom domain.
Important
The connection from the browser to Azure Front Door should always use IPv4 instead of IPv6.
When using custom domains, consider the following:
- You can set up multiple custom domains. For the maximum number of supported custom domains, see Microsoft Entra service limits and restrictions for Azure AD B2C and Azure subscription and service limits, quotas, and constraints for Azure Front Door.
- Azure Front Door is a separate Azure service, so extra charges will be incurred. For more information, see Front Door pricing.
- If you've multiple applications, migrate all of them to the custom domain because the browser stores the Azure AD B2C session under the domain name currently being used.
- After you configure custom domains, users will still be able to access the Azure AD B2C default domain name <tenant-name>.b2clogin.com. You need to block access to the default domain so that attackers can't use it to access your apps or run distributed denial-of-service (DDoS) attacks. Submit a support ticket to request for the blocking of access to the default domain.
Warning
Don't request blocking of the default domain until your custom domain works properly.
Prerequisites
- Create a user flow so users can sign up and sign in to your application.
- Register a web application.
- Complete the steps in Get started with custom policies in Active Directory B2C. This tutorial guides you how to update custom policy files to use your Azure AD B2C tenant configuration.
- Register a web application.
Step 1: Add a custom domain name to your Azure AD B2C tenant
When you create an Azure AD B2C tenant it comes with an initial domain name, <domainname>.onmicrosoft.com. You can't change or delete the initial domain name, but you can add your own custom domain.
Follow these steps to add a custom domain to your Azure AD B2C tenant:
Add your custom domain name to Microsoft Entra ID.
Important
For these steps, be sure to sign in to your Azure AD B2C tenant and select the Microsoft Entra ID service.
Add your DNS information to the domain registrar. After you add your custom domain name to Microsoft Entra ID, create a DNS
TXT, orMXrecord for your domain. Creating this DNS record for your domain verifies ownership of your domain name.The following examples demonstrate TXT records for login.contoso.com and account.contoso.com:
Name (hostname) Type Data login TXT MS=ms12345678 account TXT MS=ms87654321 The TXT record must be associated with the subdomain, or hostname of the domain. For example, the login part of the contoso.com domain. If the hostname is empty or
@, Microsoft Entra ID won't be able to verify the custom domain you added. In the following examples, both records are configured incorrectly.Name (hostname) Type Data TXT MS=ms12345678 @ TXT MS=ms12345678 Tip
You can manage your custom domain with any publicly available DNS service, such as GoDaddy. If you don't have a DNS server, you can use Azure DNS zone, or App Service domains.
Verify your custom domain name. Verify each subdomain, or hostname you plan to use. For example, to be able to sign in with login.contoso.com and account.contoso.com, you need to verify both subdomains and not just the top-level domain contoso.com.
Important
After the domain is verified, delete the DNS TXT record you created.
Step 2: Create a new Azure Front Door instance
Follow these steps to create an Azure Front Door:
Sign in to the Azure portal.
To choose the directory that contains the Azure subscription that you’d like to use for Azure Front Door and not the directory containing your Azure AD B2C tenant select the Settings icon in the top menu to switch to your Azure AD B2C tenant from the Directories + subscriptions menu.
Follow the steps in Create Front Door profile - Quick Create to create a Front Door for your Azure AD B2C tenant using the following settings:
Key Value Subscription Select your Azure subscription. Resource group Select an existing resource group, or create a new one. Name Give your profile a name such as b2cazurefrontdoor.Tier Select either Standard or Premium tier. Standard tier is content delivery optimized. Premium tier builds on Standard tier and is focused on security. See Tier Comparison. Endpoint name Enter a globally unique name for your endpoint, such as b2cazurefrontdoor. The Endpoint hostname is generated automatically.Origin type Select Custom.Origin host name Enter <tenant-name>.b2clogin.com. Replace<tenant-name>with the name of your Azure AD B2C tenant such ascontoso.b2clogin.com.Leave the Caching and WAF policy empty.
Once the Azure Front Door resource is created, select Overview, and copy the Endpoint hostname. You will need this later on. It will look something like
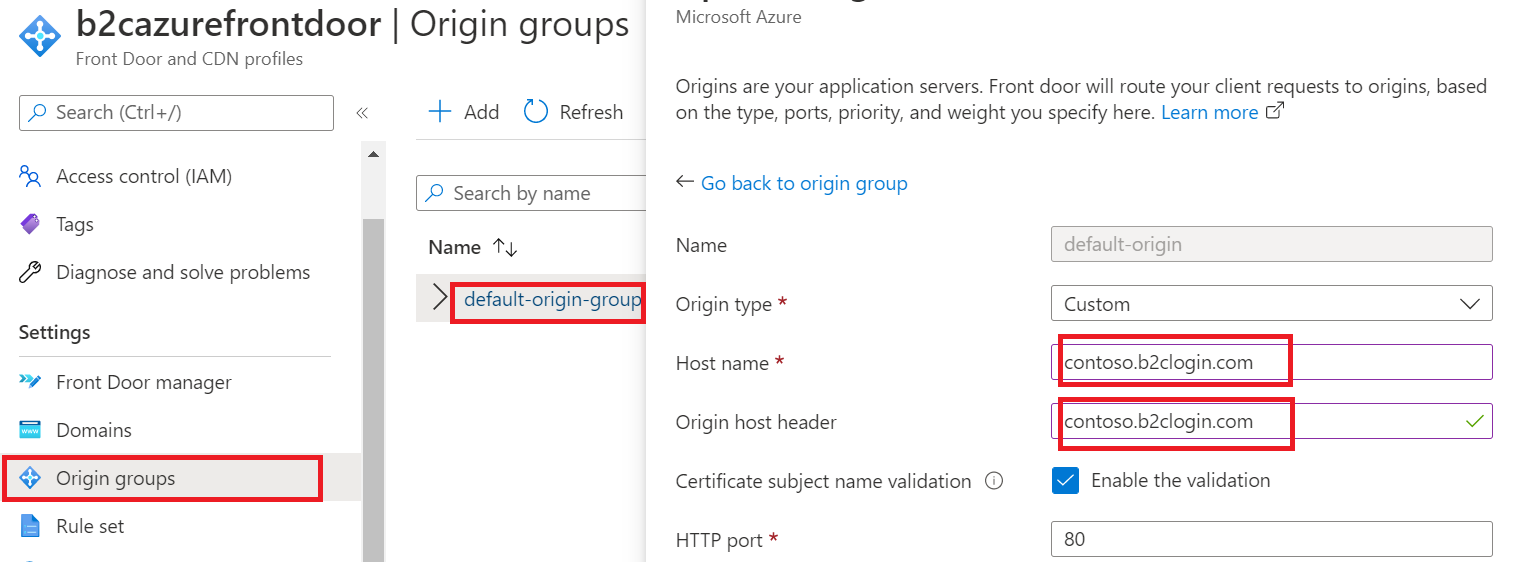
b2cazurefrontdoor-ab123e.z01.azurefd.net.Make sure the Host name and Origin host header of your origin have the same value:
- Under Settings, select Origin groups.
- Select your origin group from the list, such as default-origin-group.
- On the right pane, select your Origin host name such as
contoso.b2clogin.com. - On the Update origin pane, update the Host name and Origin host header to have the same value.
Step 3: Set up your custom domain on Azure Front Door
In this step, you add the custom domain you registered in Step 1 to your Azure Front Door.
3.1. Create a CNAME DNS record
To add the custom domain, create a canonical name (CNAME) record with your domain provider. A CNAME record is a type of DNS record that maps a source domain name to a destination domain name (alias). For Azure Front Door, the source domain name is your custom domain name, and the destination domain name is your Front Door default hostname that you configured in Step 2. Create a new Azure Front Door instance. For example, b2cazurefrontdoor-ab123e.z01.azurefd.net.
After Front Door verifies the CNAME record that you created, traffic addressed to the source custom domain (such as login.contoso.com) is routed to the specified destination Front Door default frontend host, such as contoso-frontend.azurefd.net. For more information, see add a custom domain to your Front Door.
To create a CNAME record for your custom domain:
Sign in to the web site of the domain provider for your custom domain.
Find the page for managing DNS records by consulting the provider's documentation or searching for areas of the web site labeled Domain Name, DNS, or Name Server Management.
Create a CNAME record entry for your custom domain and complete the fields as shown in the following table (field names may vary):
Source Type Destination <login.contoso.com>CNAME contoso-frontend.azurefd.netSource: Enter your custom domain name (for example, login.contoso.com).
Type: Enter CNAME.
Destination: Enter your default Front Door frontend host you create in step 2. It must be in the following format:<hostname>.azurefd.net. For example,
contoso-frontend.azurefd.net.
Save your changes.
3.2. Associate the custom domain with your Front Door
In the Azure portal home, search for and select the
myb2cazurefrontdoorAzure Front Door resource to open it.In the left menu, under Settings, select Domains.
Select Add a domain.
For DNS management, select All other DNS services.
For Custom domain, enter your custom domain, such as
login.contoso.com.Keep the other values as defaults, and then select Add. Your custom domain is added to the list.
Under Validation state of the domain that you just added, select Pending. A pane with a TXT record info opens.
Sign in to the web site of the domain provider for your custom domain.
Find the page for managing DNS records by consulting the provider's documentation or searching for areas of the web site labeled Domain Name, DNS, or Name Server Management.
Create a new TXT DNS record and complete the fields as shown below:
- Name:
_dnsauth.contoso.com, but you need to enter just_dnsauth. - Type:
TXT - Value: Something like
75abc123t48y2qrtsz2bvk.......
After you add the TXT DNS record, the Validation state in the Front Door resource will eventually change from Pending to Approved. You may need to reload your page for the change to happen.
- Name:
Go back to your Azure portal. Under Endpoint association of the domain that you just added, select Unassociated.
For Select endpoint, select the hostname endpoint from the dropdown.
For Select routes list, select default-route, and then select Associate.
3.3. Enable the route
The default-route routes the traffic from the client to Azure Front Door. Then, Azure Front Door uses your configuration to send the traffic to Azure AD B2C. Follow these steps to enable the default-route.
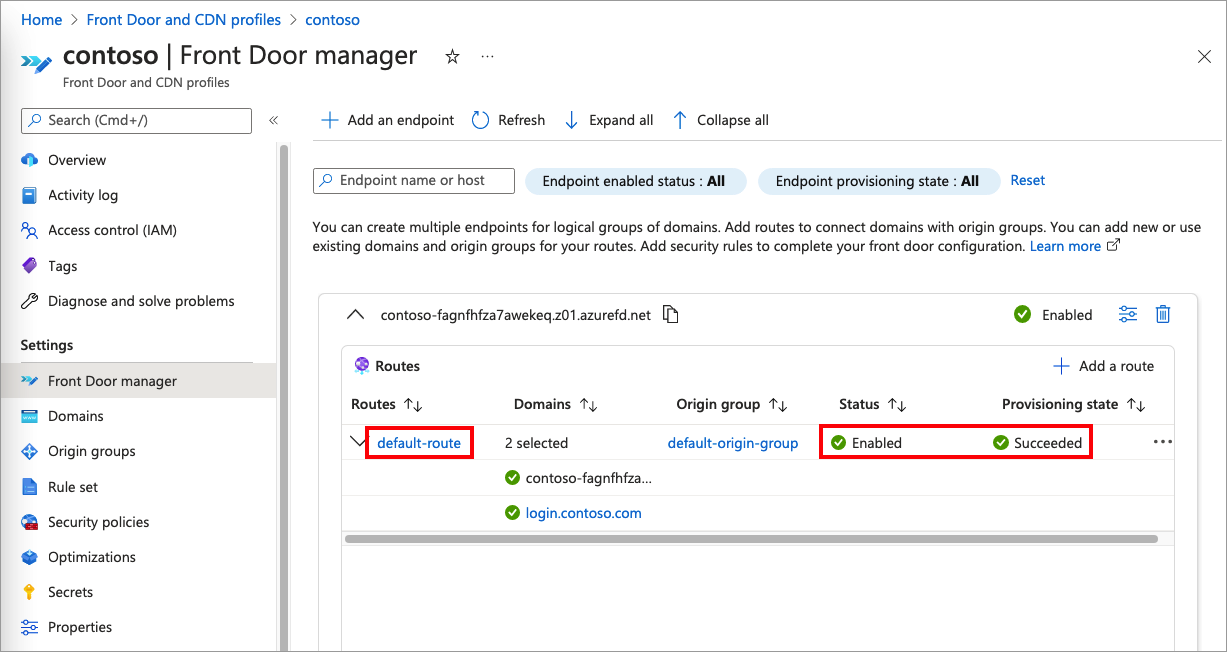
Select Front Door manager.
To add enable the default-route, first expand an endpoint from the list of endpoints in the Front Door manager. Then, select the default-route.
The following screenshot shows how to select the default-route.

Select the Enable route checkbox.
Select Update to save the changes.
Step 4: Configure CORS
If you are using a custom HTML template to customize the Azure AD B2C user interface, you need to Configure CORS with your custom domain.
Configure Azure Blob storage for Cross-Origin Resource Sharing with the following steps:
- In the Azure portal, navigate to your storage account.
- In the menu, select CORS.
- For Allowed origins, enter
https://your-domain-name. Replaceyour-domain-namewith your domain name. For example,https://login.contoso.com. Use all lowercase letters when entering your tenant name. - For Allowed Methods, select both
GETandOPTIONS. - For Allowed Headers, enter an asterisk (*).
- For Exposed Headers, enter an asterisk (*).
- For Max age, enter 200.
- Select Save.
Test your custom domain
Sign in to the Azure portal.
If you have access to multiple tenants, select the Settings icon in the top menu to switch to your Azure AD B2C tenant from the Directories + subscriptions menu.
In the Azure portal, search for and select Azure AD B2C.
Under Policies, select User flows (policies).
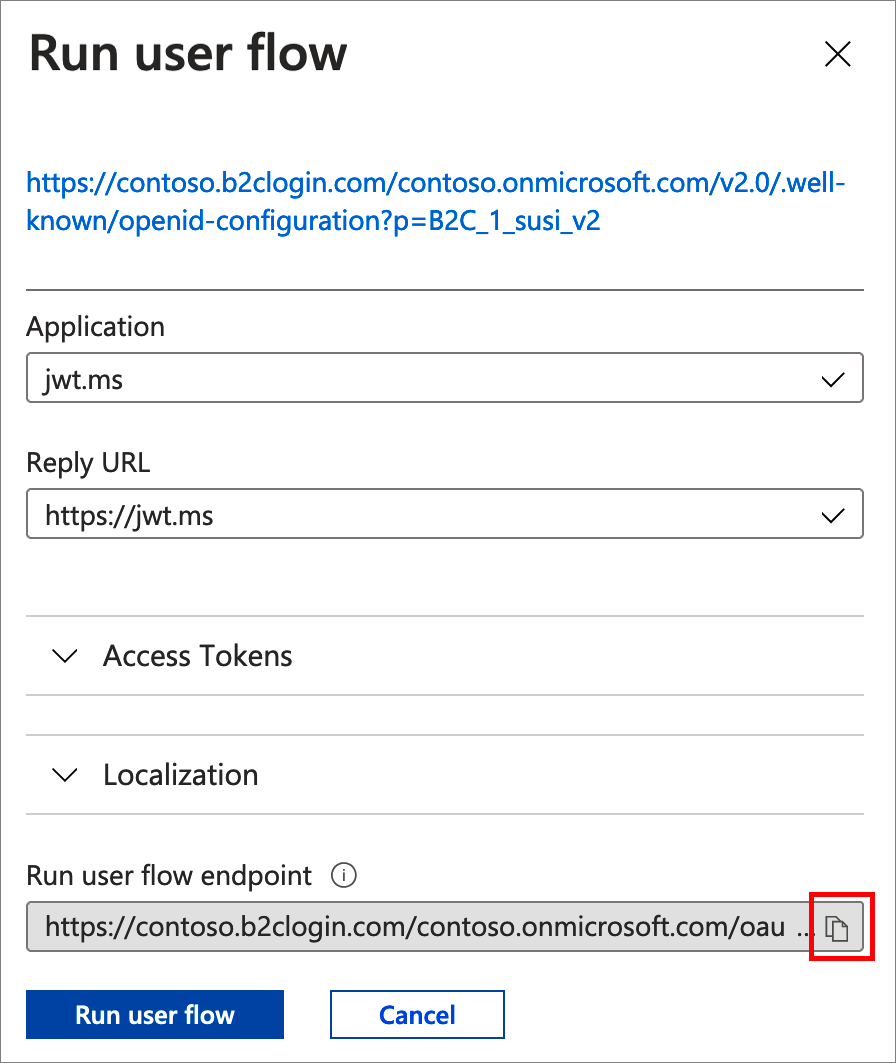
Select a user flow, and then select Run user flow.
For Application, select the web application named webapp1 that you previously registered. The Reply URL should show
https://jwt.ms.Copy the URL under Run user flow endpoint.
To simulate a sign in with your custom domain, open a web browser and use the URL you just copied. Replace the Azure AD B2C domain (<tenant-name>.b2clogin.com) with your custom domain.
For example, instead of:
https://contoso.b2clogin.com/contoso.onmicrosoft.com/oauth2/v2.0/authorize?p=B2C_1_susi&client_id=63ba0d17-c4ba-47fd-89e9-31b3c2734339&nonce=defaultNonce&redirect_uri=https%3A%2F%2Fjwt.ms&scope=openid&response_type=id_token&prompt=loginuse:
https://login.contoso.com/contoso.onmicrosoft.com/oauth2/v2.0/authorize?p=B2C_1_susi&client_id=63ba0d17-c4ba-47fd-89e9-31b3c2734339&nonce=defaultNonce&redirect_uri=https%3A%2F%2Fjwt.ms&scope=openid&response_type=id_token&prompt=loginVerify that the Azure AD B2C is loaded correctly. Then, sign in with a local account.
Repeat the test with the rest of your policies.
Configure your identity provider
When a user chooses to sign in with a social identity provider, Azure AD B2C initiates an authorization request and takes the user to the selected identity provider to complete the sign in process. The authorization request specifies the redirect_uri with the Azure AD B2C default domain name:
https://<tenant-name>.b2clogin.com/<tenant-name>/oauth2/authresp
If you configured your policy to allow sign in with an external identity provider, update the OAuth redirect URIs with the custom domain. Most identity providers allow you to register multiple redirect URIs. We recommend adding redirect URIs instead of replacing them so you can test your custom policy without affecting applications that use the Azure AD B2C default domain name.
In the following redirect URI:
https://<custom-domain-name>/<tenant-name>/oauth2/authresp
- Replace <
custom-domain-name> with your custom domain name. - Replace <
tenant-name> with the name of your tenant, or your tenant ID.
The following example shows a valid OAuth redirect URI:
https://login.contoso.com/contoso.onmicrosoft.com/oauth2/authresp
The SAML identity providers metadata would look like the following sample:
https://<custom-domain-name>.b2clogin.com/<tenant-name>/<your-policy>/samlp/metadata?idptp=<your-technical-profile>
Configure your application
After you configure and test the custom domain, you can update your applications to load the URL that specifies your custom domain as the hostname instead of the Azure AD B2C domain.
The custom domain integration applies to authentication endpoints that use Azure AD B2C policies (user flows or custom policies) to authenticate users. These endpoints may look like the following sample:
https://<custom-domain>/<tenant-name>/<policy-name>/v2.0/.well-known/openid-configurationhttps://<custom-domain>/<tenant-name>/<policy-name>/oauth2/v2.0/authorizehttps://<custom-domain>/<tenant-name>/<policy-name>/oauth2/v2.0/token
Replace:
- <
custom-domain> with your custom domain - <
tenant-name> with your tenant name or tenant ID - <
policy-name> with your policy name.
The SAML service provider metadata may look like the following sample:
https://custom-domain-name/tenant-name/policy-name/Samlp/metadata
(Optional) Use tenant ID
You can replace your B2C tenant name in the URL with your tenant ID GUID so as to remove all references to “b2c” in the URL. You can find your tenant ID GUID in the B2C Overview page in Azure portal.
For example, change https://account.contosobank.co.uk/contosobank.onmicrosoft.com/
to https://account.contosobank.co.uk/<tenant ID GUID>/
If you choose to use tenant ID instead of tenant name, be sure to update the identity provider OAuth redirect URIs accordingly. When using your tenant ID instead of tenant name, a valid OAuth redirect URI would look like the following sample:
https://login.contoso.com/11111111-1111-1111-1111-111111111111/oauth2/authresp
For more information, see Configure your identity provider.
Token issuance
The token issuer name (iss) claim changes based on the custom domain being used. For example:
https://<domain-name>/11111111-1111-1111-1111-111111111111/v2.0/
(Optional) Azure Front Door advanced configuration
You can use Azure Front Door advanced configuration, such as Azure Web Application Firewall (WAF). Azure WAF provides centralized protection of your web applications from common exploits and vulnerabilities.
When using custom domains, consider the following points:
- The WAF policy must be the same tier as the Azure Front Door profile. For more information about how to create a WAF policy to use with Azure Front Door, see Configure WAF policy.
- The WAF managed rules feature isn't officially supported as it can cause false positives and prevent legitimate requests from passing through, so only use WAF custom rules if they meet your needs.
Troubleshooting
Azure AD B2C returns a page not found error
- Symptom - You configure a custom domain, but when you try to sign in with the custom domain, you get an HTTP 404 error message.
- Possible causes - This issue could be related to the DNS configuration or the Azure Front Door backend configuration.
- Resolution:
- Make sure the custom domain is registered and successfully verified in your Azure AD B2C tenant.
- Make sure the custom domain is configured properly. The
CNAMErecord for your custom domain must point to your Azure Front Door default frontend host (for example, contoso-frontend.azurefd.net).
Our services aren't available right now
Symptom - You configure a custom domain, but when you try to sign in with the custom domain, you get the following error message: Our services aren't available right now. We're working to restore all services as soon as possible. Please check back soon.
Possible causes - This issue could be related to the Azure Front Door route configuration.
Resolution: Check the status of the default-route. If it's disabled, Enable the route. The following screenshot shows how the default-route should look like:
Azure AD B2C returns the resource you're looking for has been removed, had its name changed, or is temporarily unavailable.
- Symptom - You configure a custom domain, but when you try to sign in with the custom domain, you get the resource you are looking for has been removed, had its name changed, or is temporarily unavailable error message.
- Possible causes - This issue could be related to the Microsoft Entra custom domain verification.
- Resolution: Make sure the custom domain is registered and successfully verified in your Azure AD B2C tenant.
Identity provider returns an error
- Symptom - After you configure a custom domain, you're able to sign in with local accounts. But when you sign in with credentials from external social or enterprise identity providers, the identity provider presents an error message.
- Possible causes - When Azure AD B2C takes the user to sign in with a federated identity provider, it specifies the redirect URI. The redirect URI is the endpoint to where the identity provider returns the token. The redirect URI is the same domain your application uses with the authorization request. If the redirect URI isn't yet registered in the identity provider, it may not trust the new redirect URI, which results in an error message.
- Resolution - Follow the steps in Configure your identity provider to add the new redirect URI.
Frequently asked questions
When I use Run Now to try to run my policy, why I can't see the custom domain?
Copy the URL, change the domain name manually, and then paste it back to your browser.
Which IP address is presented to Azure AD B2C? The user's IP address, or the Azure Front Door IP address?
Azure Front Door passes the user's original IP address. It's the IP address that you'll see in the audit reporting or your custom policy.
Important
If the client sends an x-forwarded-for header to Azure Front Door, Azure AD B2C will use the originator's x-forwarded-for as the user's IP address for Conditional Access Evaluation and the {Context:IPAddress} claims resolver.
Can I use a third-party Web Application Firewall (WAF) with B2C?
Yes, Azure AD B2C supports BYO-WAF (Bring Your Own Web Application Firewall). However, you must test WAF to ensure that it doesn't block or alert legitimate requests to Azure AD B2C user flows or custom policies. Learn how to configure Akamai WAF and Cloudflare WAF with Azure AD B2C.
Can my Azure Front Door instance be hosted in a different subscription than my Azure AD B2C tenant?
Yes, Azure Front Door can be in a different subscription.
See also
- Learn about OAuth authorization requests.
- Learn about OpenID Connect authorization requests.
- Learn about authorization code flow.
Feedback
Coming soon: Throughout 2024 we will be phasing out GitHub Issues as the feedback mechanism for content and replacing it with a new feedback system. For more information see: https://aka.ms/ContentUserFeedback.
Submit and view feedback for