Deploy custom policies with GitHub Actions
GitHub Actions allows you to create custom continuous integration (CI) and continuous deployment (CD) workflows directly in your GitHub repository. This article describes how to automate the deployment of Azure Active Directory B2C (Azure AD B2C) custom policies using GitHub Actions.
To automate the custom policy deployment process, use the GitHub Action for deploying Azure AD B2C custom policies. This GitHub Action has developed by the Azure AD B2C community.
This action deploys Azure AD B2C custom policies into your Azure AD B2C tenant using the Microsoft Graph API. If the policy does not yet exist in your tenant, it will be created. Otherwise, it will be replaced.
Important
Managing Azure AD B2C custom policies with Azure Pipelines currently uses preview operations available on the Microsoft Graph API /beta endpoint. Use of these APIs in production applications is not supported. For more information, see the Microsoft Graph REST API beta endpoint reference.
Prerequisites
- Complete the steps in Get started with custom policies in Active Directory B2C.
- If you haven't created GitHub repo, create one.
Select a custom policies folder
Your GitHub repository can contain all of your Azure AD B2C policy files and other assets. In the root directory of your repository, create or choose an existing folder that contains your custom policies.
For example, select a folder named policies. Add your Azure AD B2C custom policy files to the policies folder. Then Commit the changes.
Do not Push the changes. You will do this later, after you set up the deployment workflow.
Register a Microsoft Graph application
To allow the GitHub Action to interact with the Microsoft Graph API, create an application registration in your Azure AD B2C tenant. If you haven't already done so, register a Microsoft Graph application.
For the GitHub Action to access data in Microsoft Graph, grant the registered application the relevant application permissions. Grant the Microsoft Graph > Policy > Policy.ReadWrite.TrustFramework permission within the API Permissions of the app registration.
Create a GitHub encrypted secret
GitHub secrets are encrypted environment variables that you create in an organization, repository, or repository environment. In this step, you store the application secret for the application you registered earlier in the Register an MS Graph application step.
The GitHub Action for deploying Azure AD B2C custom policies uses the secret to acquire an access token that is used to interact with the Microsoft Graph API. For more information, see Creating encrypted secrets for a repository.
To create a GitHub secret, follow these steps:
- In GitHub, navigate to the main page of the repository.
- Under your repository name, select Settings.
- In the left sidebar, select Secrets.
- Select New repository secret.
- For the Name, type ClientSecret.
- For the Value, enter the application secret you created earlier.
- Select Add secret.
Create a GitHub workflow
The GitHub workflow is an automated procedure that you add to your repository. Workflows are made up of one or more jobs and can be scheduled or triggered by an event. In this step, you create a workflow the deploys your custom policy.
To create a workflow, follow these steps:
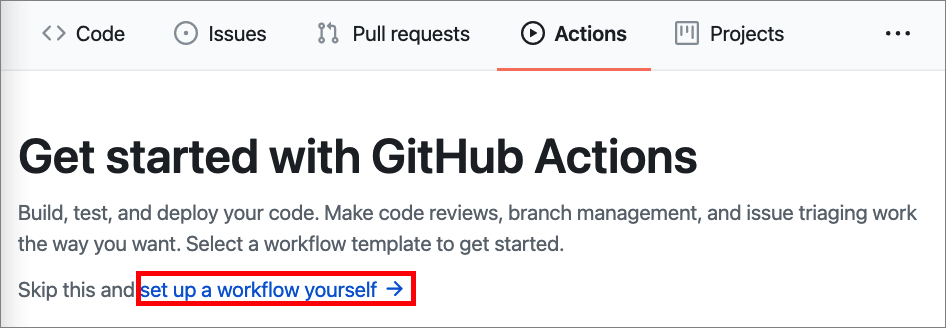
In GitHub, navigate to the main page of your repository.
Under your repository name, select Actions.

If you didn't configure a workflow before, select set up a workflow yourself. Otherwise, select New Workflow.
GitHub offers to create a workflow file named
main.ymlin the.github/workflowsfolder. This file contains information about the workflow, including your Azure AD B2C environment and the custom policies to deploy. In the GitHub web editor, add the following YAML code:on: push env: clientId: 00000000-0000-0000-0000-000000000000 tenant: your-tenant.onmicrosoft.com jobs: build-and-deploy: runs-on: ubuntu-latest steps: - uses: actions/checkout@v2 - name: 'Upload TrustFrameworkBase Policy' uses: azure-ad-b2c/deploy-trustframework-policy@v3 with: folder: "./Policies" files: "TrustFrameworkBase.xml,TrustFrameworkLocalization.xml,TrustFrameworkExtensions.xml,SignUpOrSignin.xml" tenant: ${{ env.tenant }} clientId: ${{ env.clientId }} clientSecret: ${{ secrets.clientSecret }}Update the following properties of the YAML file:
Section Name Value envclientIdApplication (client) ID of the application you registered in the Register an MS Graph application step. envtenantYour Azure AD B2C tenant name (for example, contoso.onmicrosoft.com). withfolderA folder where the custom policies files are stored, for example, ./Policies.withfilesComma-delimited list of policy files to deploy, for example, TrustFrameworkBase.xml,TrustFrameworkLocalization.xml,TrustFrameworkExtensions.xml,SignUpOrSignin.xml.Important
When running the agents and uploading the policy files, make sure they're uploaded in the correct order:
- TrustFrameworkBase.xml
- TrustFrameworkLocalization.xml
- TrustFrameworkExtensions.xml
- SignUpOrSignin.xml
- ProfileEdit.xml
- PasswordReset.xml
Select Start commit.
Below the commit message fields, indicate whether to add your commit to the current branch or to a new branch. Select Commit new file, or Propose new file to create a pull request.
Test your workflow
To test the workflow you created, Push the changes of your custom policy. Once your job has started running, you can see a visualization graph of the run's progress and view each step's activity on GitHub.
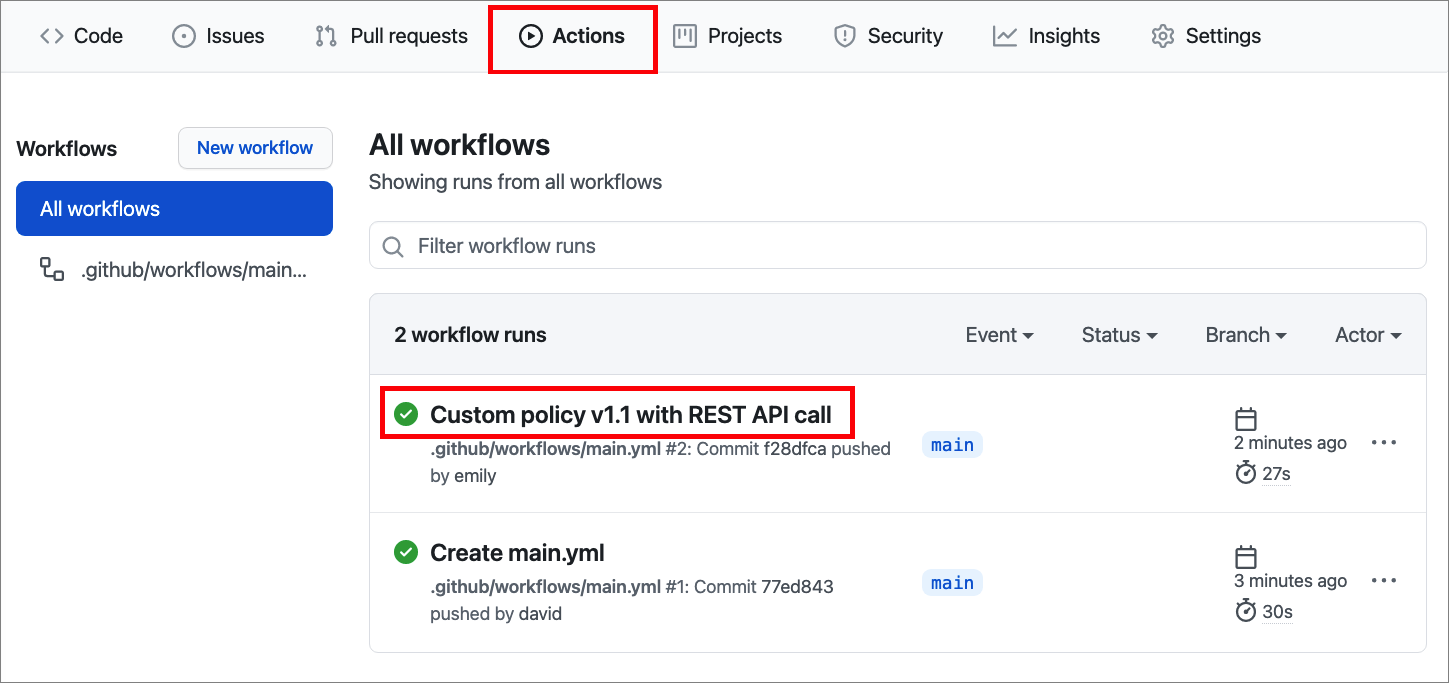
On GitHub, navigate to the main page of your repository.
Under your repository name, select Actions.
In the left sidebar, select the workflow you created.
Under Workflow runs, select the name of the run you want to see.
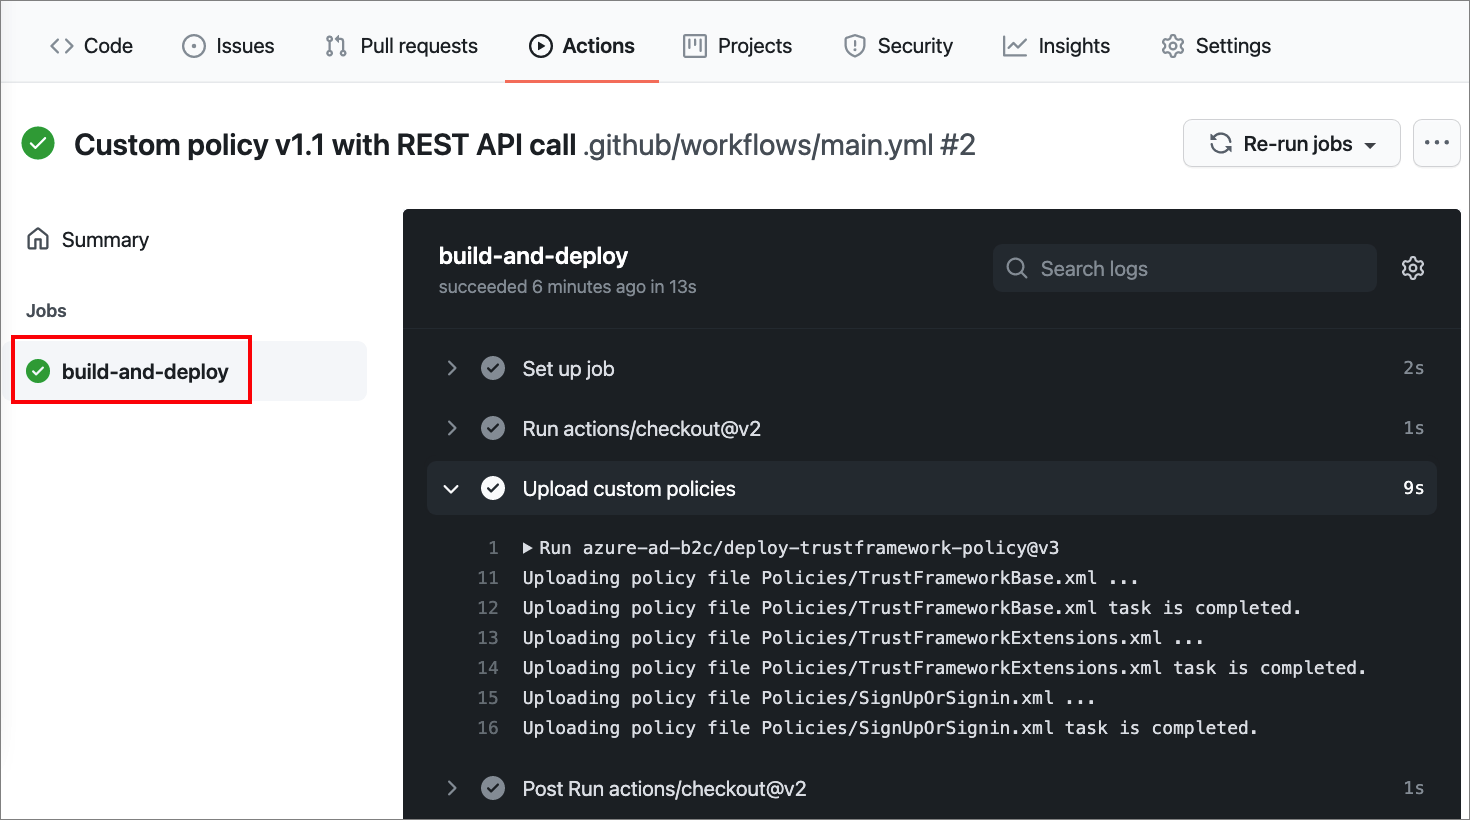
Under Jobs or in the visualization graph, select the job you want to see.
View the results of each step. The following screenshot demonstrates the Upload custom policy step log.
Optional: Schedule your workflow
The workflow you created is triggered by the push event. If you prefer, you can choose another event to trigger the workflow, for example a pull request.
You can also schedule a workflow to run at specific UTC times using POSIX cron syntax. The schedule event allows you to trigger a workflow at a scheduled time. For more information, see Scheduled events.
The following example triggers the workflow every day at 5:30 and 17:30 UTC:
on:
  schedule:
    # * is a special character in YAML so you have to quote this string
    - cron:  '30 5,17 * * *'
To edit your workflow:
In GitHub, navigate to the main page of your repository.
Under your repository name, select Actions.
In the left sidebar, select the workflow you created.
Under Workflow runs, select the name of the run you want to see.
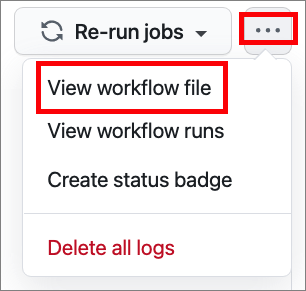
From the menu, select the three dots ..., and then select View the workflow file.
In the GitHub web editor, select Edit.
Change
on: pushto the example above.Commit your changes.
Next steps
- Learn how to configure Events that trigger workflows
Feedback
Coming soon: Throughout 2024 we will be phasing out GitHub Issues as the feedback mechanism for content and replacing it with a new feedback system. For more information see: https://aka.ms/ContentUserFeedback.
Submit and view feedback for