Configure authentication options in an Android app by using Azure AD B2C
This article describes how you can enable, customize, and enhance the Azure Active Directory B2C (Azure AD B2C) authentication experience for your Android application.
Before you start, familiarize yourself with the following articles:
- Configure authentication in a sample Android app by using Azure AD B2C
- Enable authentication in your own Android app by using Azure AD B2C
Use a custom domain
By using a custom domain, you can fully brand the authentication URL. From a user perspective, users remain on your domain during the authentication process, rather than being redirected to the Azure AD B2C b2clogin.com domain name.
To remove all references to "b2c" in the URL, you can also replace your B2C tenant name, contoso.onmicrosoft.com, in the authentication request URL with your tenant ID GUID. For example, you can change https://fabrikamb2c.b2clogin.com/contoso.onmicrosoft.com/ to https://account.contosobank.co.uk/<tenant ID GUID>/.
To use a custom domain and your tenant ID in the authentication URL, follow the guidance in Enable custom domains. Look for your Microsoft Authentication Library (MSAL configuration object, and then update the authorities with your custom domain name and tenant ID.
The following Kotlin code shows the MSAL config object before the change:
val parameters = AcquireTokenParameters.Builder()
        .startAuthorizationFromActivity(activity)
        .fromAuthority("https://contoso.b2clogin.com/fabrikamb2c.contoso.com/B2C_1_susi")
        // More settings here
        .build()

b2cApp!!.acquireToken(parameters)
The following Kotlin code shows the MSAL config object after the change:
val parameters = AcquireTokenParameters.Builder()
        .startAuthorizationFromActivity(activity)
        .fromAuthority("https://custom.domain.com/00000000-0000-0000-0000-000000000000/B2C_1_susi")
        // More settings here
        .build()

b2cApp!!.acquireToken(parameters)
Prepopulate the sign-in name
During a sign-in user journey, your app might target a specific user. When an app targets a user, it can specify in the authorization request the login_hint query parameter with the user's sign-in name. Azure AD B2C automatically populates the sign-in name, and the user needs to provide only the password.
To prepopulate the sign-in name, do the following:
- If you're using a custom policy, add the required input claim, as described in Set up direct sign-in.
- Look for your MSAL configuration object, and then add the
withLoginHint()method with the login hint.
val parameters = AcquireTokenParameters.Builder()
    .startAuthorizationFromActivity(activity)
    .withLoginHint("bob@contoso.com")
    // More settings here
    .build()

b2cApp!!.acquireToken(parameters)
Preselect an identity provider
If you configured the sign-in journey for your application to include social accounts, such as Facebook, LinkedIn, or Google, you can specify the domain_hint parameter. This query parameter provides a hint to Azure AD B2C about the social identity provider that should be used for sign-in. For example, if the application specifies domain_hint=facebook.com, the sign-in flow goes directly to the Facebook sign-in page.
To redirect users to an external identity provider, do the following:
- Check the domain name of your external identity provider. For more information, see Redirect sign-in to a social provider.
- Create or use an existing list object to store extra query parameters.
- Add the
domain_hintparameter with the corresponding domain name to the list (for example,facebook.com). - Pass the extra query parameters list into the MSAL configuration object's
withAuthorizationQueryStringParametersmethod.
val extraQueryParameters: MutableList<Pair<String, String>> = ArrayList()
extraQueryParameters.add(Pair("domain_hint", "facebook.com"))

val parameters = AcquireTokenParameters.Builder()
    .startAuthorizationFromActivity(activity)
    .withAuthorizationQueryStringParameters(extraQueryParameters)
    // More settings here
    .build()

b2cApp!!.acquireToken(parameters)
Specify the UI language
Language customization in Azure AD B2C allows your user flow to accommodate a variety of languages to suit your customers' needs. For more information, see Language customization.
To set the preferred language, do the following:
- Configure language customization.
- Create or use an existing list object to store extra query parameters.
- Add the
ui_localesparameter with the corresponding language code to the list (for example,en-us). - Pass the extra query parameters list into the MSAL configuration object's
withAuthorizationQueryStringParametersmethod.
val extraQueryParameters: MutableList<Map.Entry<String, String>> = ArrayList()

val mapEntry   = object : Map.Entry<String, String> {
      override val key: String = "ui_locales"
      override val value: String = "en-us"
    }

extraQueryParameters.add(mapEntry )

val parameters = AcquireTokenParameters.Builder()
    .startAuthorizationFromActivity(activity)
    .withAuthorizationQueryStringParameters(extraQueryParameters)
    // More settings here
    .build()

b2cApp!!.acquireToken(parameters)
Pass a custom query string parameter
With custom policies, you can pass a custom query string parameter. A good use-case example is when you want to dynamically change the page content.
To pass a custom query string parameter, do the following:
- Configure the ContentDefinitionParameters element.
- Create or use an existing list object to store extra query parameters.
- Add the custom query string parameter, such as
campaignId. Set the parameter value (for example,germany-promotion). - Pass the extra query parameters list into the MSAL configuration object's
withAuthorizationQueryStringParametersmethod.
val extraQueryParameters: MutableList<Pair<String, String>> = ArrayList()
extraQueryParameters.add(Pair("campaignId", "germany-promotion"))

val parameters = AcquireTokenParameters.Builder()
    .startAuthorizationFromActivity(activity)
    .withAuthorizationQueryStringParameters(extraQueryParameters)
    // More settings here
    .build()

b2cApp!!.acquireToken(parameters)
Pass an ID token hint
A relying party application can send an inbound JSON Web Token (JWT) as part of the OAuth2 authorization request. The inbound token is a hint about the user or the authorization request. Azure AD B2C validates the token and then extracts the claim.
To include an ID token hint in the authentication request, do the following:
- In your custom policy, define an ID token hint technical profile.
- In your code, generate or acquire an ID token, and then set the token to a variable (for example,
idToken). - Create or use an existing list object to store extra query parameters.
- Add the
id_token_hintparameter with the corresponding variable that stores the ID token. - Pass the extra query parameters list into the MSAL configuration object's
withAuthorizationQueryStringParametersmethod.
val extraQueryParameters: MutableList<Pair<String, String>> = ArrayList()
extraQueryParameters.add(Pair("id_token_hint", idToken))

val parameters = AcquireTokenParameters.Builder()
    .startAuthorizationFromActivity(activity)
    .withAuthorizationQueryStringParameters(extraQueryParameters)
    // More settings here
    .build()

b2cApp!!.acquireToken(parameters)
Embedded web view experience
Web browsers are required for interactive authentication. By default, the MSAL library uses the system web view. During sign-in, the MSAL library pops up the Android system web view with the Azure AD B2C user interface.
For more information, see the Enable cross-app SSO on Android using MSAL article.
Depending on your requirements, you can use the embedded web view. There are visual and single sign-on behavior differences between the embedded web view and the system web view in MSAL.
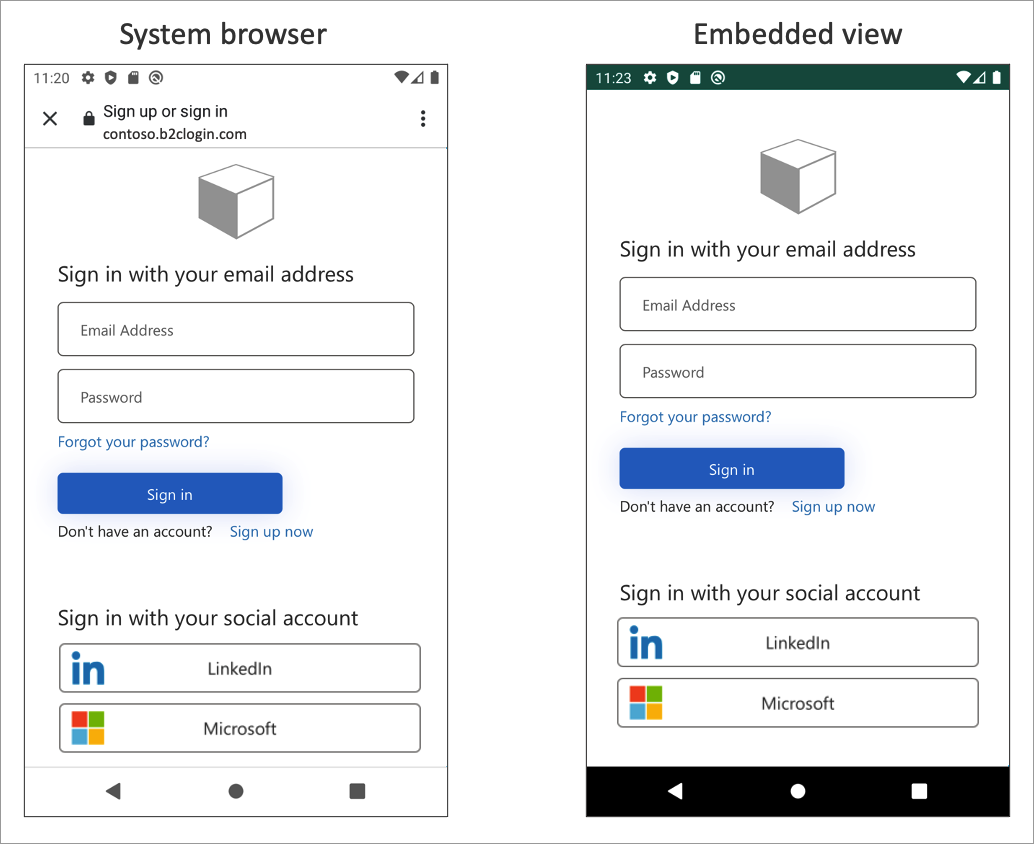
Important
We recommend that you use the platform default, which is ordinarily the system browser. The system browser is better at remembering the users that have logged in before. Some identity providers, such as Google, don't support an embedded view experience.
To change this behavior, open the app/src/main/res/raw/auth_config_b2c.json file. Then add the authorization_user_agent attribute with the WEBVIEW value. The following example demonstrates how to change the web view type to embedded view:
{
  "authorization_user_agent": "WEBVIEW"
}
Next steps
- To learn more about Android configuration, see MSAL for Android configuration options.
Feedback
Coming soon: Throughout 2024 we will be phasing out GitHub Issues as the feedback mechanism for content and replacing it with a new feedback system. For more information see: https://aka.ms/ContentUserFeedback.
Submit and view feedback for