Create and manage a catalog of resources in entitlement management
This article shows you how to create and manage a catalog of resources and access packages in entitlement management.
Create a catalog
A catalog is a container of resources and access packages. You create a catalog when you want to group related resources and access packages. An administrator can create a catalog. In addition, a user who has been delegated the catalog creator role can create a catalog for resources that they own. A nonadministrator who creates the catalog becomes the first catalog owner. A catalog owner can add more users, groups of users, or application service principals as catalog owners.
Prerequisite roles: Global Administrator, Identity Governance Administrator, or Catalog creator
Note
Users who were assigned the User Administrator role will no longer be able to create catalogs or manage access packages in a catalog they don't own. If users in your organization were assigned the User Administrator role to configure catalogs, access packages, or policies in entitlement management, you should instead assign these users the Identity Governance administrator role.
To create a catalog:
Sign in to the Microsoft Entra admin center as at least an Identity Governance Administrator.
Browse to Identity governance > Entitlement management > Catalogs.

Select New catalog.
Enter a unique name for the catalog and provide a description.
Users see this information in an access package's details.
If you want the access packages in this catalog to be available for users to request as soon as they're created, set Enabled to Yes.
If you want to allow users in external directories from connected organizations to be able to request access packages in this catalog, set Enabled for external users to Yes. The access packages must also have a policy allowing users from connected organizations to request. If the access packages in this catalog are intended only for users already in the directory, then set Enabled for external users to No.
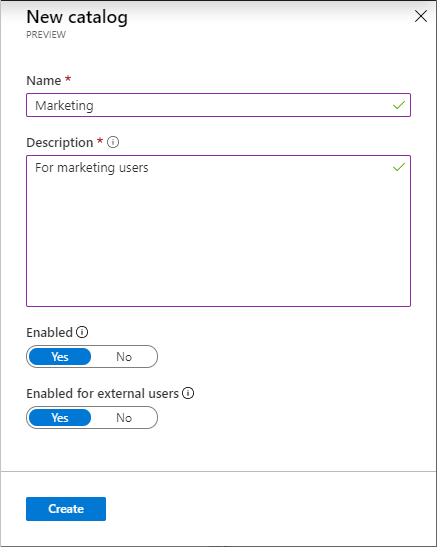
Select Create to create the catalog.
Create a catalog programmatically
There are two ways to create a catalog programmatically.
Create a catalog with Microsoft Graph
You can create a catalog by using Microsoft Graph. A user in an appropriate role with an application that has the delegated EntitlementManagement.ReadWrite.All permission, or an application with the EntitlementManagement.ReadWrite.All application permission, can call the API to create a catalog.
Create a catalog with PowerShell
You can also create a catalog in PowerShell with the New-MgEntitlementManagementCatalog cmdlet from the Microsoft Graph PowerShell cmdlets for Identity Governance module version 2.2.0 or later.
Connect-MgGraph -Scopes "EntitlementManagement.ReadWrite.All"
$catalog = New-MgEntitlementManagementCatalog -DisplayName "Marketing"
Add resources to a catalog
To include resources in an access package, the resources must exist in a catalog. The types of resources you can add to a catalog are groups, applications, and SharePoint Online sites.
Groups can be cloud-created Microsoft 365 Groups or cloud-created Microsoft Entra security groups.
Groups that originate in an on-premises Active Directory can't be assigned as resources because their owner or member attributes can't be changed in Microsoft Entra ID. To give a user access to an application that uses AD security group memberships, create a new security group in Microsoft Entra ID, configure group writeback to AD, and enable that group to be written to AD, so that the cloud-created group can be used by an AD-based application.
Groups that originate in Exchange Online as Distribution groups can't be modified in Microsoft Entra ID either, so cannot be added to catalogs.
Applications can be Microsoft Entra enterprise applications, which include software as a service (SaaS) applications, on-premises applications, and your own applications integrated with Microsoft Entra ID.
If your application has not yet been integrated with Microsoft Entra ID, see govern access for applications in your environment and integrate an application with Microsoft Entra ID and add the application to your directory prior to adding it to the catalog.
For more information on how to select appropriate resources for applications with multiple roles, see how to determine which resource roles to include in an access package.
Sites can be SharePoint Online sites or SharePoint Online site collections.
Note
Search SharePoint Site by site name or an exact URL as the search box is case sensitive.
Prerequisite roles: See Required roles to add resources to a catalog.
To add resources to a catalog:
Sign in to the Microsoft Entra admin center as at least an Identity Governance Administrator.
Browse to Identity governance > Entitlement management > Catalogs.
On the Catalogs page open the catalog you want to add resources to.
On the left menu, select Resources.
Select Add resources.
Select the resource type Groups and Teams, Applications, or SharePoint sites.
If you don't see a resource that you want to add or you're unable to add a resource, make sure you have the required Microsoft Entra directory role and entitlement management role. You might need to have someone with the required roles add the resource to your catalog. For more information, see Required roles to add resources to a catalog.
Select one or more resources of the type that you want to add to the catalog.
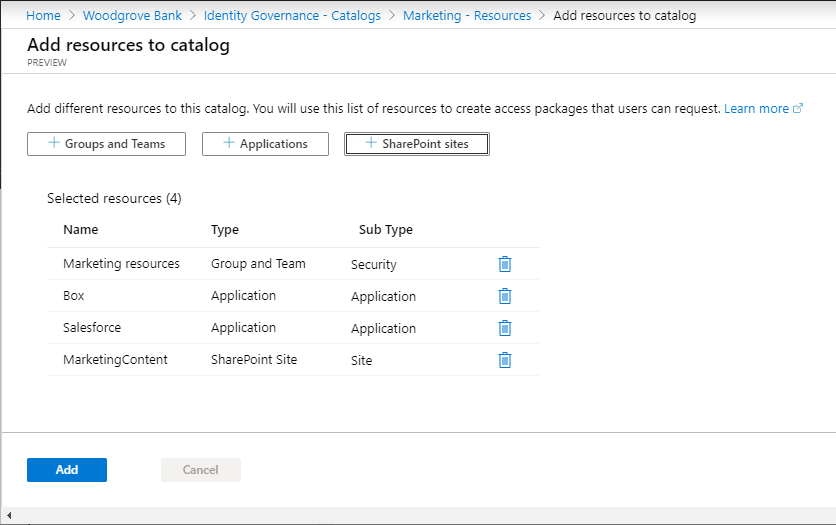
When you're finished, select Add.
These resources can now be included in access packages within the catalog.
Add resource attributes in the catalog
Attributes are required fields that requestors will be asked to answer before they submit their access request. Their answers for these attributes will be shown to approvers and also stamped on the user object in Microsoft Entra ID.
Note
All attributes set up on a resource require an answer before a request for an access package containing that resource can be submitted. If requestors don't provide an answer, their request won't be processed.
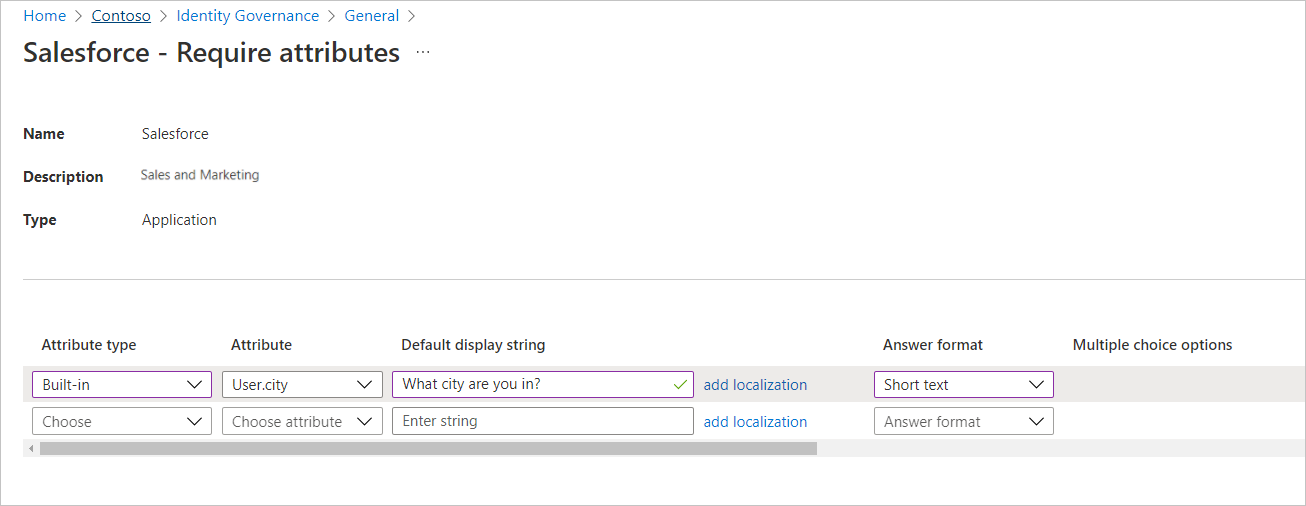
To require attributes for access requests:
Select Resources on the left menu, and a list of resources in the catalog appears.
Select the ellipsis next to the resource where you want to add attributes, and then select Require attributes.

Select the attribute type:
- Built-in includes Microsoft Entra user profile attributes.
- Directory schema extension provides a way to store more data in Microsoft Entra users. You can extend the schema by creating an extension attribute. These extension attributes on user objects can be used to send out claims to applications during provisioning or single-sign on.
If you chose Built-in, select an attribute from the dropdown list. If you chose Directory schema extension, enter the attribute name in the text box.
Note
The User.mobilePhone attribute is a sensitive property that can be updated only by some administrators. Learn more at Who can update sensitive user attributes?.
Select the answer format you want requestors to use for their answer. Answer formats include short text, multiple choice, and long text.
If you select multiple choice, select Edit and localize to configure the answer options.
- In the View/edit question pane that appears, enter the response options you want to give the requestor when they answer the question in the Answer values boxes.
- Select the language for the response option. You can localize response options if you choose more languages.
- Enter as many responses as you need, and then select Save.
If you want the attribute value to be editable during direct assignments and self-service requests, select Yes.
Note
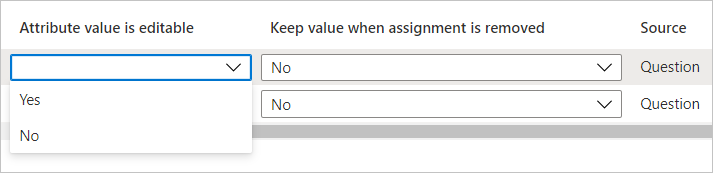
- If you select No in the Attribute value is editable box and the attribute value is empty, users can enter the value of that attribute. After saving, the value can't be edited.
- If you select No in the Attribute value is editable box and the attribute value isn't empty, users can't edit the preexisting value during direct assignments and self-service requests.
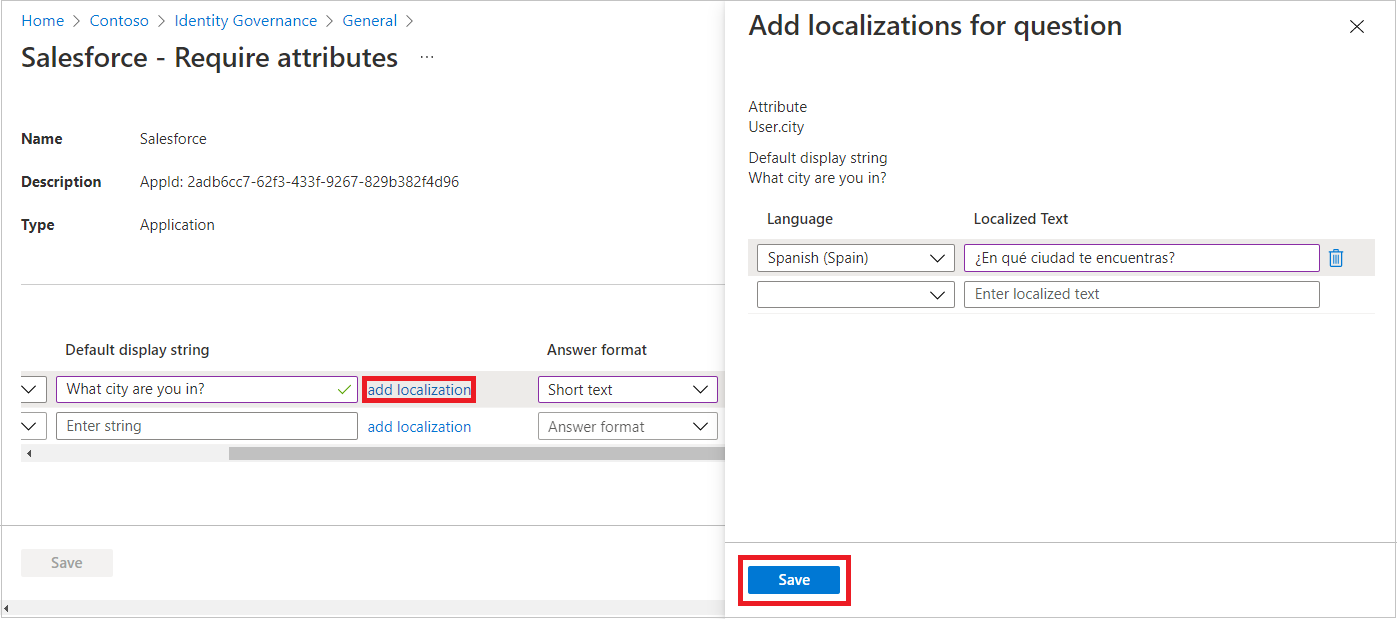
If you want to add localization, select Add localization.
In the Add localizations for question pane, select the language code for the language in which you want to localize the question related to the selected attribute.
In the language you configured, enter the question in the Localized Text box.
After you add all the localizations you need, select Save.
After all attribute information is completed on the Require attributes page, select Save.
Add a Multi-Geo SharePoint site
If you have Multi-Geo enabled for SharePoint, select the environment you want to select sites from.
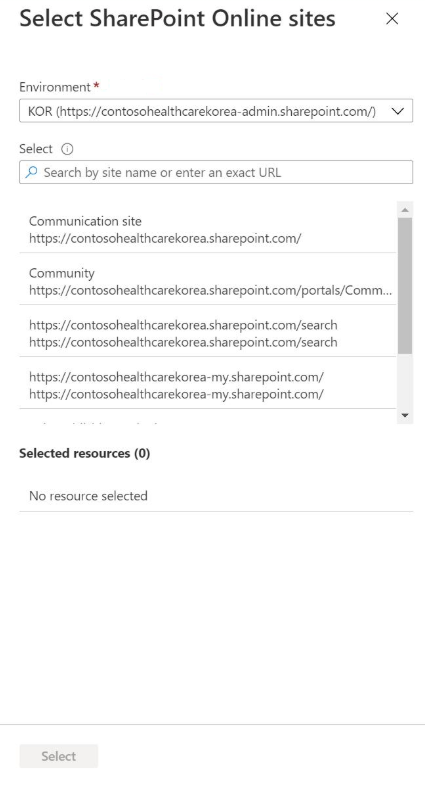
Then select the sites you want to be added to the catalog.
Add a resource to a catalog programmatically
You can also add a resource to a catalog by using Microsoft Graph. A user in an appropriate role, or a catalog and resource owner, with an application that has the delegated EntitlementManagement.ReadWrite.All permission can call the API to create a resourceRequest. An application with the application permission EntitlementManagement.ReadWrite.All and permissions to change resources, such as Group.ReadWrite.All, can also add resources to the catalog.
Add a resource to a catalog with PowerShell
You can also add a resource to a catalog in PowerShell with the New-MgEntitlementManagementResourceRequest cmdlet from the Microsoft Graph PowerShell cmdlets for Identity Governance module version 2.1.x or later module version. The following example shows how to add a group to a catalog as a resource using Microsoft Graph PowerShell cmdlets module version 2.4.0.
Connect-MgGraph -Scopes "EntitlementManagement.ReadWrite.All,Group.ReadWrite.All"

$g = Get-MgGroup -Filter "displayName eq 'Marketing'"
if ($null -eq $g) {throw "no group" }

$catalog = Get-MgEntitlementManagementCatalog -Filter "displayName eq 'Marketing'"
if ($null -eq $catalog) { throw "no catalog" }
$params = @{
  requestType = "adminAdd"
  resource = @{
    originId = $g.Id
    originSystem = "AadGroup"
  }
  catalog = @{ id = $catalog.id }
}

New-MgEntitlementManagementResourceRequest -BodyParameter $params
sleep 5
$ar = Get-MgEntitlementManagementCatalog -AccessPackageCatalogId $catalog.Id -ExpandProperty resources
$ar.resources
Remove resources from a catalog
You can remove resources from a catalog. A resource can be removed from a catalog only if it isn't being used in any of the catalog's access packages.
Prerequisite roles: See Required roles to add resources to a catalog.
To remove resources from a catalog:
Sign in to the Microsoft Entra admin center as at least an Identity Governance Administrator.
Browse to Identity governance > Entitlement management > Catalogs.
On the Catalogs page open the catalog you want to remove resources from.
On the left menu, select Resources.
Select the resources you want to remove.
Select Remove. Optionally, select the ellipsis (...) and then select Remove resource.
Add more catalog owners
Tip
Steps in this article might vary slightly based on the portal you start from.
The user who created a catalog becomes the first catalog owner. To delegate management of a catalog, add users to the catalog owner role. Adding more catalog owners helps to share the catalog management responsibilities.
Prerequisite roles: Global Administrator, Identity Governance Administrator, or Catalog owner
To assign a user to the catalog owner role:
Sign in to the Microsoft Entra admin center as at least an Identity Governance Administrator.
Browse to Identity governance > Entitlement management > Catalogs.
On the Catalogs page open the catalog you want to add administrators to.
On the left menu, select Roles and administrators.
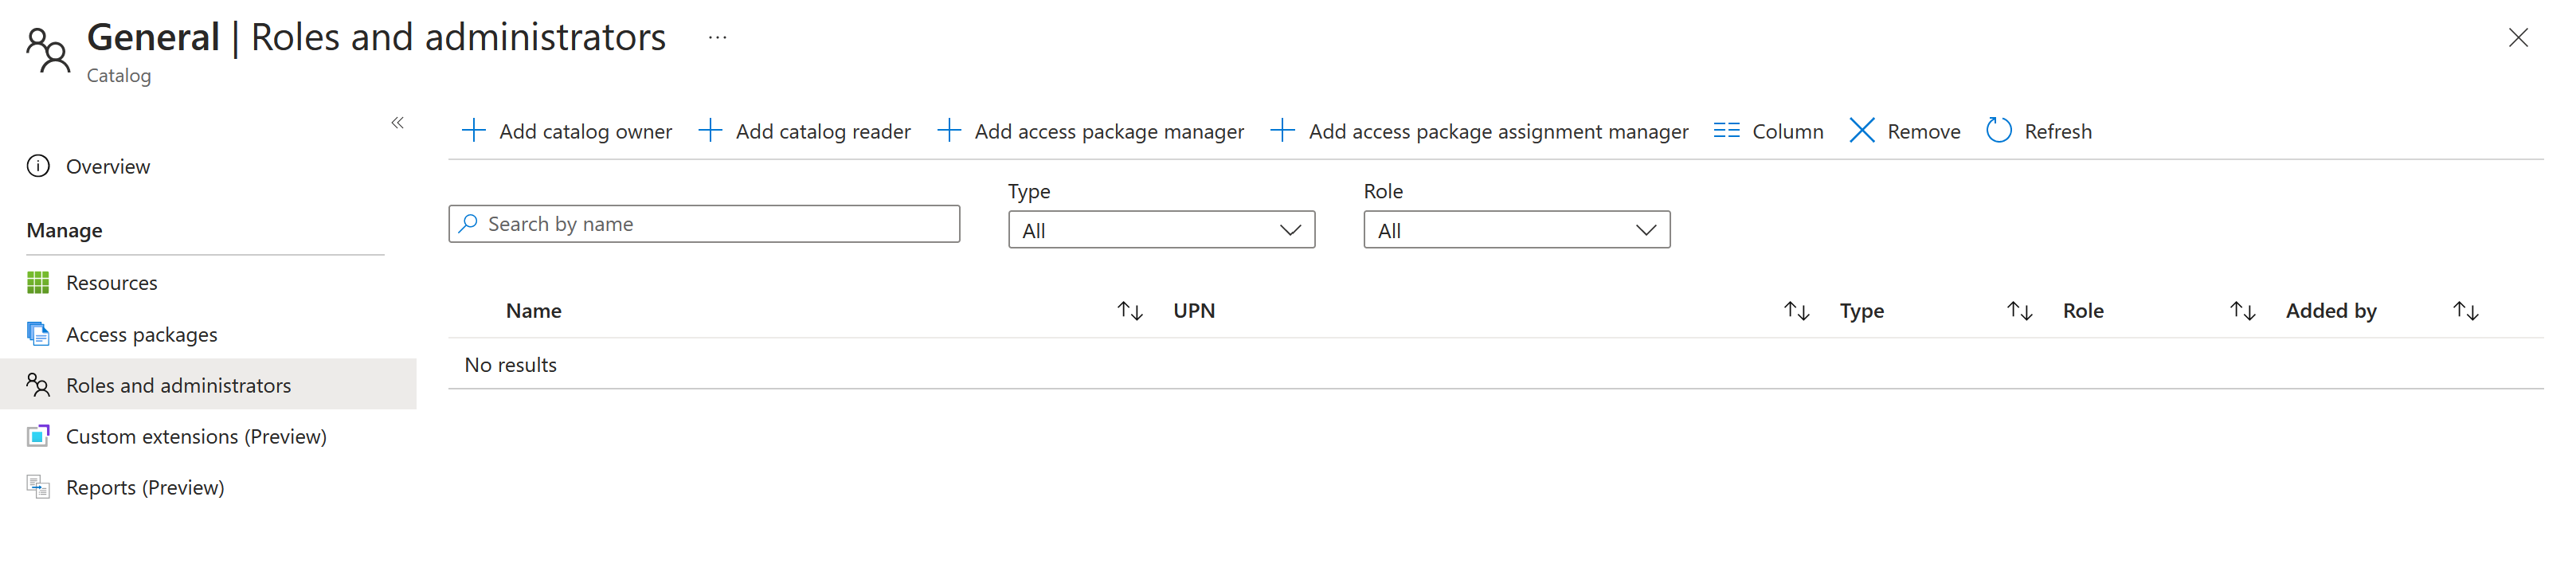
Select Add owners to select the members for these roles.
Select Select to add these members.
Edit a catalog
You can edit the name and description for a catalog. Users see this information in an access package's details.
Prerequisite roles: Global Administrator, Identity Governance Administrator, or Catalog owner
To edit a catalog:
Sign in to the Microsoft Entra admin center as at least an Identity Governance Administrator.
Browse to Identity governance > Entitlement management > Catalogs.
On the Catalogs page open the catalog you want to edit.
On the catalog's Overview page, select Edit.
Edit the catalog's name, description, or enabled settings.

Select Save.
Delete a catalog
You can delete a catalog, but only if it doesn't have any access packages.
Prerequisite roles: Global Administrator, Identity Governance Administrator, or Catalog owner
To delete a catalog:
Sign in to the Microsoft Entra admin center as at least an Identity Governance Administrator.
Browse to Identity governance > Entitlement management > Catalogs.
On the Catalogs page open the catalog you want to delete.
On the catalog's Overview page, select Delete.
On the message box that appears, select Yes.
Delete a catalog programmatically
You can also delete a catalog by using Microsoft Graph. A user in an appropriate role with an application that has the delegated EntitlementManagement.ReadWrite.All permission can call the API to delete an accessPackageCatalog.
Next steps
Feedback
Coming soon: Throughout 2024 we will be phasing out GitHub Issues as the feedback mechanism for content and replacing it with a new feedback system. For more information see: https://aka.ms/ContentUserFeedback.
Submit and view feedback for