Set up password change by using custom policies in Azure Active Directory B2C
Before you begin, use the Choose a policy type selector at the top of this page to choose the type of policy you’re setting up. Azure Active Directory B2C offers two methods to define how users interact with your applications: through predefined user flows or through fully configurable custom policies. The steps required in this article are different for each method.
You can configure Azure Active Directory B2C (Azure AD B2C) so that a user who is signed in with a local account can change their password without using email verification to prove their identity.
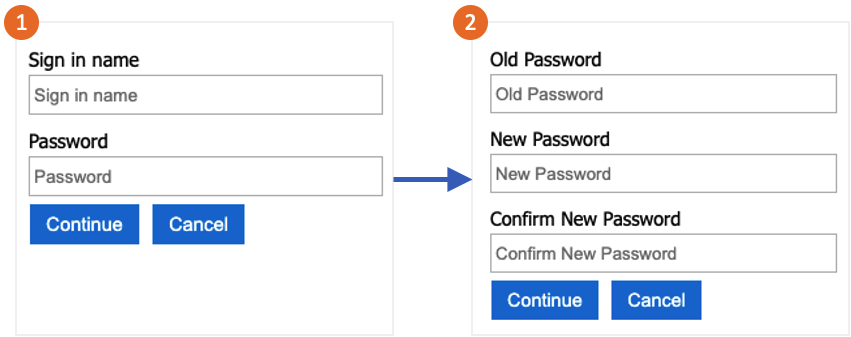
The password change flow involves the following steps:
The user signs in to their local account. If the session is still active, Azure AD B2C authorizes the user and skips to the next step.
In Old password, the user verifies their old password. In New password, they create and confirm their new password.
Tip
A user can use the password change flow that's described in this article only when they know their password and they want to change their password. We recommend that you also enable self-service password reset to support cases in which the user forgets their password.
This feature is available only for custom policies. For setup steps, select Custom policy in the preceding selector.
Prerequisites
- Complete the steps in Get started with custom policies in Active Directory B2C.
- Register a web application in Azure Active Directory B2C.
Add the elements
Open your TrustFrameworkExtensions.xml file. Add the following ClaimType element to the ClaimsSchema element, with an identifier of
oldPassword:<BuildingBlocks> <ClaimsSchema> <ClaimType Id="oldPassword"> <DisplayName>Old Password</DisplayName> <DataType>string</DataType> <UserHelpText>Enter your old password</UserHelpText> <UserInputType>Password</UserInputType> </ClaimType> </ClaimsSchema> </BuildingBlocks>A ClaimsProvider element contains the technical profile that authenticates the user. Add the following claims providers to the ClaimsProviders element:
<ClaimsProviders>
  <ClaimsProvider>
    <DisplayName>Local Account SignIn</DisplayName>
    <TechnicalProfiles>
      <TechnicalProfile Id="login-NonInteractive-PasswordChange">
        <DisplayName>Local Account SignIn</DisplayName>
        <InputClaims>
          <InputClaim ClaimTypeReferenceId="oldPassword" PartnerClaimType="password" Required="true" />
          </InputClaims>
        <IncludeTechnicalProfile ReferenceId="login-NonInteractive" />
      </TechnicalProfile>
    </TechnicalProfiles>
  </ClaimsProvider>
  <ClaimsProvider>
    <DisplayName>Local Account Password Change</DisplayName>
    <TechnicalProfiles>
      <TechnicalProfile Id="LocalAccountWritePasswordChangeUsingObjectId">
        <DisplayName>Change password (username)</DisplayName>
        <Protocol Name="Proprietary" Handler="Web.TPEngine.Providers.SelfAssertedAttributeProvider, Web.TPEngine, Version=1.0.0.0, Culture=neutral, PublicKeyToken=null" />
        <Metadata>
          <Item Key="ContentDefinitionReferenceId">api.selfasserted</Item>
        </Metadata>
        <InputClaims>
          <InputClaim ClaimTypeReferenceId="objectId" />
        </InputClaims>
        <OutputClaims>
          <OutputClaim ClaimTypeReferenceId="oldPassword" Required="true" />
          <OutputClaim ClaimTypeReferenceId="newPassword" Required="true" />
          <OutputClaim ClaimTypeReferenceId="reenterPassword" Required="true" />
        </OutputClaims>
        <ValidationTechnicalProfiles>
          <ValidationTechnicalProfile ReferenceId="login-NonInteractive-PasswordChange" />
          <ValidationTechnicalProfile ReferenceId="AAD-UserWritePasswordUsingObjectId" />
        </ValidationTechnicalProfiles>
      </TechnicalProfile>
    </TechnicalProfiles>
  </ClaimsProvider>
</ClaimsProviders>
The UserJourneys element defines the path that the user takes when they interact with your application. Add the UserJourneys element if it doesn't exist, with the UserJourney identifier of
PasswordChange:<UserJourneys> <UserJourney Id="PasswordChange"> <OrchestrationSteps> <OrchestrationStep Order="1" Type="ClaimsProviderSelection" ContentDefinitionReferenceId="api.signuporsignin"> <ClaimsProviderSelections> <ClaimsProviderSelection TargetClaimsExchangeId="LocalAccountSigninEmailExchange" /> </ClaimsProviderSelections> </OrchestrationStep> <OrchestrationStep Order="2" Type="ClaimsExchange"> <ClaimsExchanges> <ClaimsExchange Id="LocalAccountSigninEmailExchange" TechnicalProfileReferenceId="SelfAsserted-LocalAccountSignin-Email" /> </ClaimsExchanges> </OrchestrationStep> <OrchestrationStep Order="3" Type="ClaimsExchange"> <ClaimsExchanges> <ClaimsExchange Id="NewCredentials" TechnicalProfileReferenceId="LocalAccountWritePasswordChangeUsingObjectId" /> </ClaimsExchanges> </OrchestrationStep> <OrchestrationStep Order="4" Type="ClaimsExchange"> <ClaimsExchanges> <ClaimsExchange Id="AADUserReadWithObjectId" TechnicalProfileReferenceId="AAD-UserReadUsingObjectId" /> </ClaimsExchanges> </OrchestrationStep> <OrchestrationStep Order="5" Type="SendClaims" CpimIssuerTechnicalProfileReferenceId="JwtIssuer" /> </OrchestrationSteps> <ClientDefinition ReferenceId="DefaultWeb" /> </UserJourney> </UserJourneys>Save the TrustFrameworkExtensions.xml policy file.
Copy the ProfileEdit.xml file that you downloaded with the starter pack and name it ProfileEditPasswordChange.xml.
Open the new file and update the PolicyId attribute with a unique value. This value is the name of your policy. For example, B2C_1A_profile_edit_password_change.
Modify the ReferenceId attribute in DefaultUserJourney to match the ID of the new user journey that you created. For example, PasswordChange.
Save your changes.
Upload and test the policy
- Sign in to the Azure portal.
- If you have access to multiple tenants, select the Settings icon in the top menu to switch to your Azure AD B2C tenant from the Directories + subscriptions menu.
- Choose All services in the top-left corner of the Azure portal, and then search for and select Azure AD B2C.
- Select Identity Experience Framework.
- In Custom Policies, select Upload Policy.
- Select Overwrite the policy if it exists, and then search for and select the TrustFrameworkExtensions.xml file.
- Select Upload.
- Repeat steps 5 through 7 for the relying party file, such as ProfileEditPasswordChange.xml.
Run the policy
- Open the policy that you changed. For example, B2C_1A_profile_edit_password_change.
- For Application, select the application that you registered earlier. To see the token, the Reply URL should show
https://jwt.ms. - Select Run now. In the new tab that opens, remove "&prompt=login" from the URL and refresh the tab. Then, sign in with the account you created earlier. A password change dialog gives you the option to change the password.
Next steps
- Find the sample policy on GitHub.
- Learn about how you can configure password complexity in Azure AD B2C.
- Set up a password reset flow.
Feedback
Coming soon: Throughout 2024 we will be phasing out GitHub Issues as the feedback mechanism for content and replacing it with a new feedback system. For more information see: https://aka.ms/ContentUserFeedback.
Submit and view feedback for