Add user attributes and customize user input in Azure Active Directory B2C
Before you begin, use the Choose a policy type selector at the top of this page to choose the type of policy you’re setting up. Azure Active Directory B2C offers two methods to define how users interact with your applications: through predefined user flows or through fully configurable custom policies. The steps required in this article are different for each method.
In this article, you collect a new attribute, such as city, during your sign-up journey in Azure Active Directory B2C (Azure AD B2C). You obtain the users' city, configure it as a drop-down, and define whether it's required to be provided.
Important
This sample uses the built-in claim 'city'. Instead, you can choose one of the supported Azure AD B2C built-in attributes or a custom attribute. To use a custom attribute, enable custom attributes. To use a different built-in or custom attribute, replace 'city' with the attribute of your choice, for example the built-in attribute jobTitle or a custom attribute like extension_loyaltyId.
Prerequisites
- Create a user flow so users can sign up and sign in to your application.
- Register a web application.
- Complete the steps in Get started with custom policies in Active Directory B2C. This tutorial guides you how to update custom policy files to use your Azure AD B2C tenant configuration.
- Register a web application.
Add user attributes your user flow
- Sign in to the Azure portal.
- If you have access to multiple tenants, select the Settings icon in the top menu to switch to your Azure AD B2C tenant from the Directories + subscriptions menu.
- Under Azure services, select Azure AD B2C. Or use the search box to find and select Azure AD B2C.
- In your Azure AD B2C tenant, select User flows.
- Select your policy (for example, "B2C_1_SignupSignin") to open it.
- Select User attributes and then select the user attribute (for example, "City").
- Select Save.
Provide optional claims to your app
The application claims are values that are returned to the application. Update your user flow to contain the desired claims:
- Select your policy (for example, "B2C_1_SignupSignin") to open it.
- Select Application claims.
- Select attributes that you want send back to your application (for example, "City").
- Select Save.
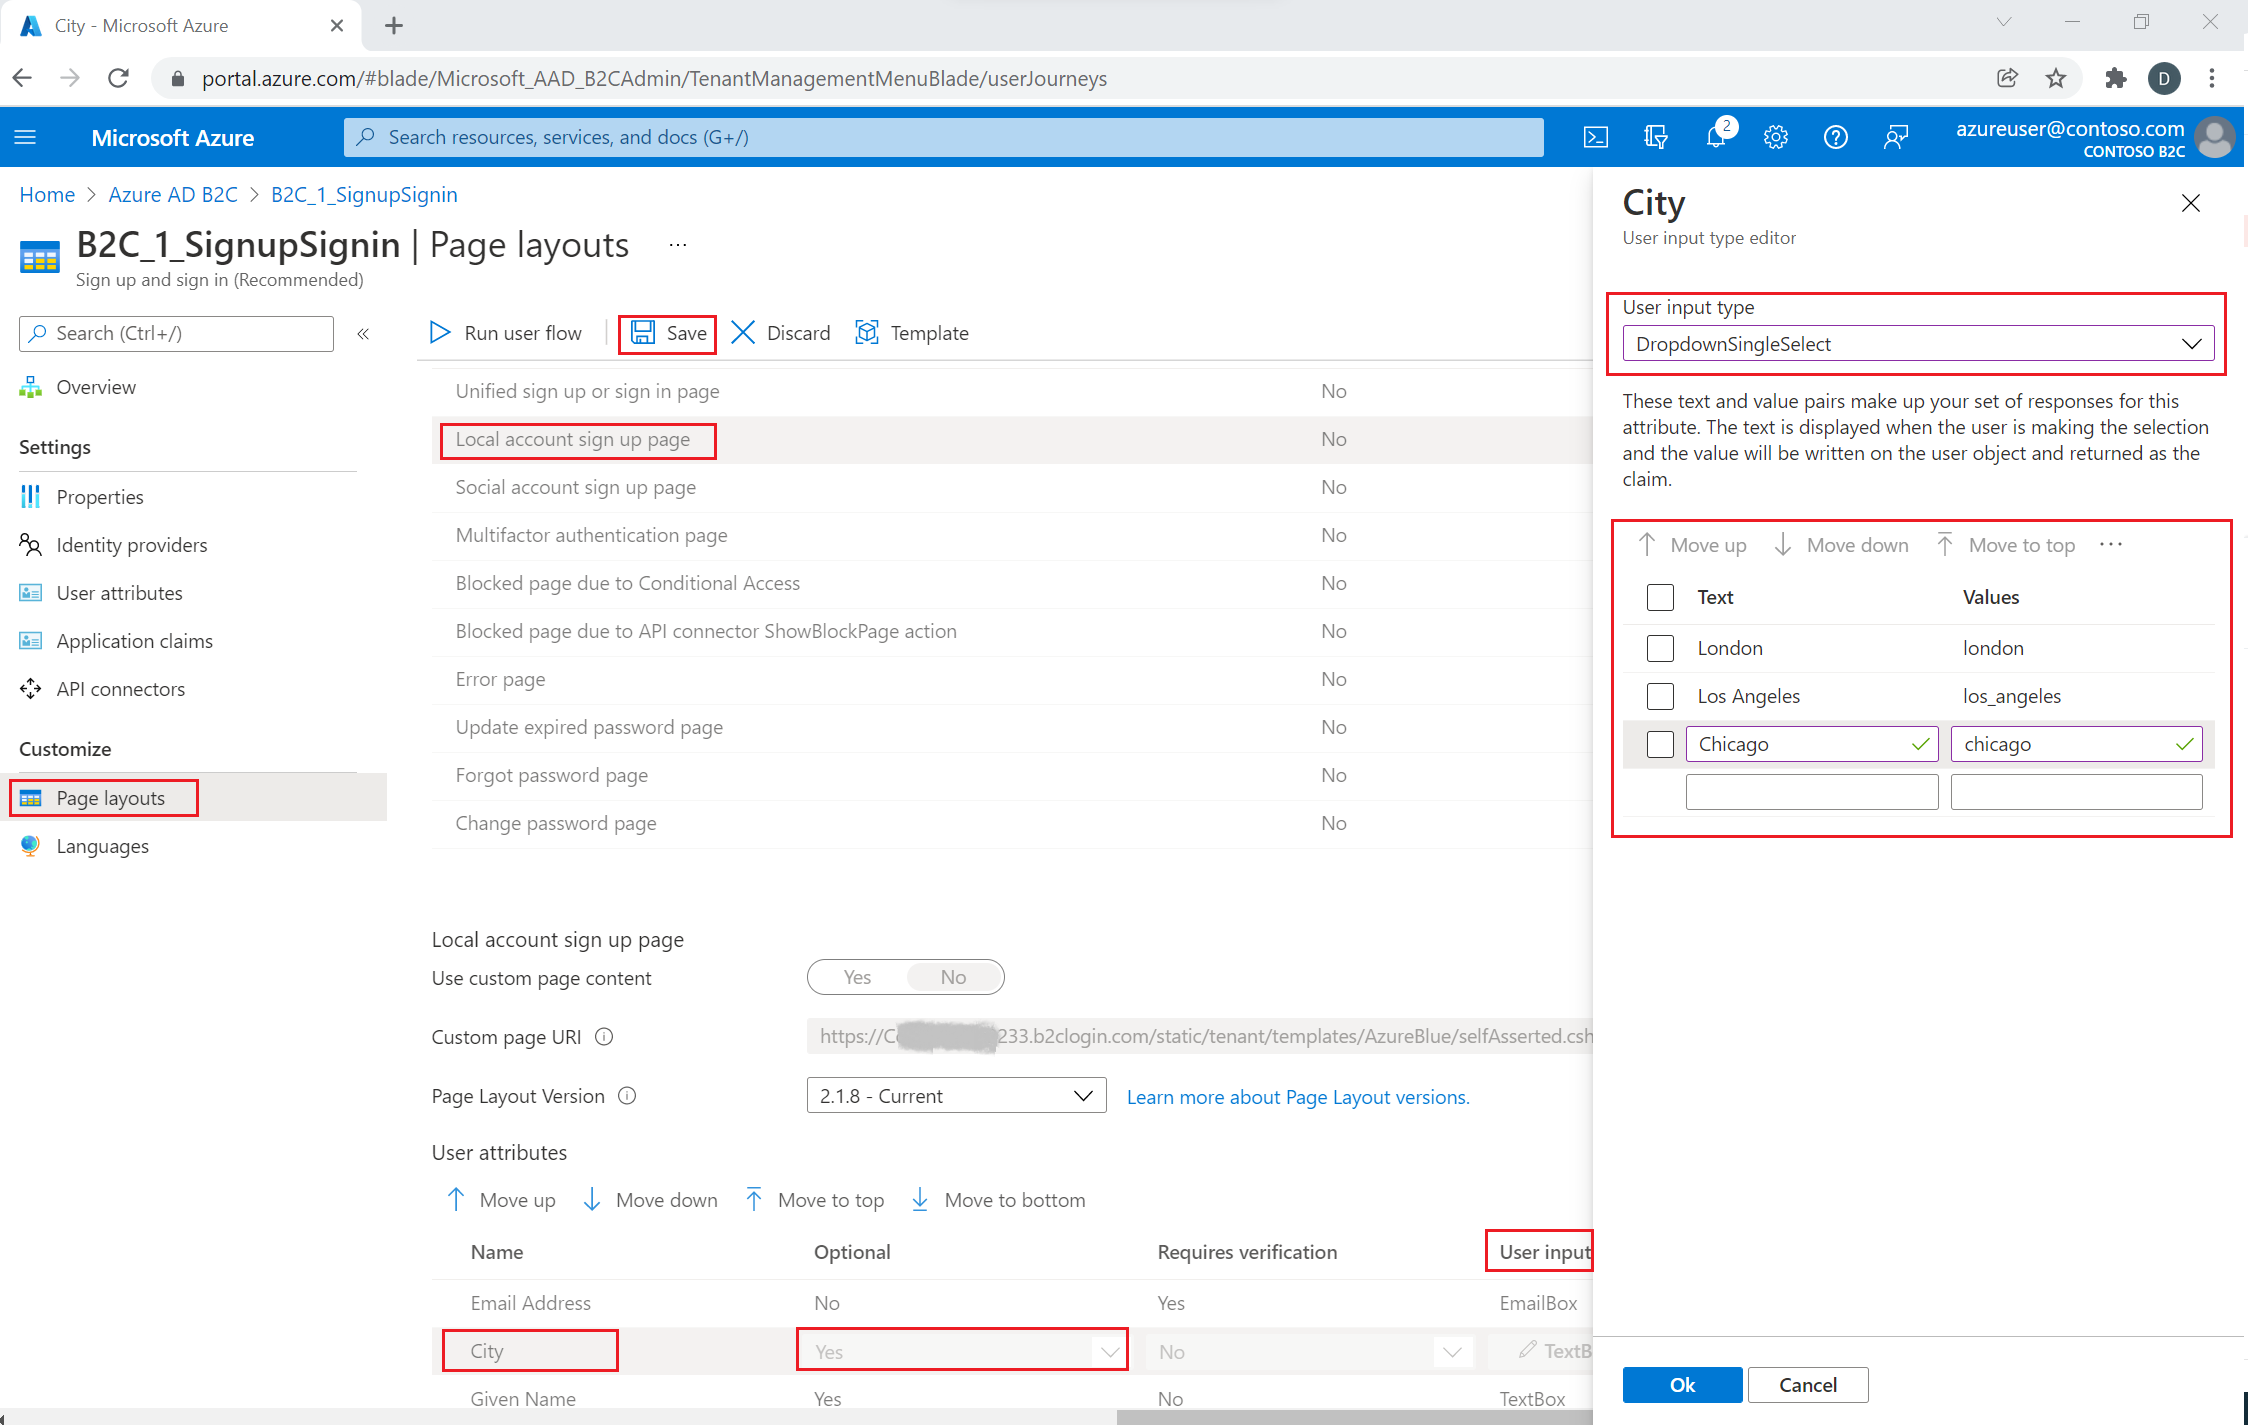
Configure user attributes input type
Select your policy (for example, "B2C_1_SignupSignin") to open it.
Select Page layouts.
Select Local account sign-up page.
Under User attributes, select City.
- In the Optional drop-down, select No.
- In the User input type, select the current user input type, such as TextBox, to open a User input type editor window pane.
- In the User input type drop-down, select DropdownSingleSelect.
- In the Text and Values, enter the text and value pairs that make up your set of responses for the attribute. The Text displays in the web interface for your flow, and the Values is stored to Azure AD B2C for selected Text. Optional: Use the "Move up/down" buttons to reorder drop-down items.
Select Ok. Optional: Use the "Move up/down" buttons to reorder user attributes in the sign-up page.
Select Save.
Provide a list of values by using localized collections
To provide a set list of values for the city attribute:
- Enable language customization on the user flow
- Select your policy (for example, "B2C_1_SignupSignin") to open it.
- On the Languages page for the user flow, select the language that you want to customize.
- Under Page-level resources files, select Local account sign up page.
- Select Download defaults (or Download overrides if you previously edited this language).
- Create a
LocalizedCollectionsattribute.
The LocalizedCollections is an array of Name and Value pairs. The order for the items is the order they are displayed.
ElementIdis the user attribute that thisLocalizedCollectionsattribute is a response to.Nameis the value that's shown to the user.Valueis what is returned in the claim when this option is selected.
{
  "LocalizedStrings": [...],
  "LocalizedCollections": [
    {
      "ElementType": "ClaimType",
      "ElementId": "city",
      "TargetCollection": "Restriction",
      "Override": true,
      "Items": [
        {
          "Name": "Berlin",
          "Value": "Berlin"
        },
        {
          "Name": "London",
          "Value": "London"
        },
        {
          "Name": "Seattle",
          "Value": "Seattle"
        }
      ]
    }
  ]
}
Upload your changes
- After you complete the changes to your JSON file, go back to your B2C tenant.
- Select User flows and select your policy (for example, "B2C_1_SignupSignin") to open it.
- Select Languages.
- Select the language that you want to translate to.
- Under Page-level-resources files, select Local account sign up page.
- Select the folder icon, and select the JSON file to upload. The changes are saved to your user flow automatically.
Test your user flow
- Select your policy (for example, "B2C_1_SignupSignin") to open it.
- To test your policy, select Run user flow.
- For Application, select the web application named testapp1 that you previously registered. The Reply URL should show
https://jwt.ms. - Select Run user flow
Overview
You can gather initial data from your users by using the sign-up or sign-in user journey. You can gather more claims later by using a profile edit user journey. Anytime Azure AD B2C gathers information directly from the user interactively, it uses the self-asserted technical profile. In this sample, you:
- Define a "city" claim.
- Ask the user for their city.
- Persist the city to the user profile in the Azure AD B2C directory.
- Read the city claim from the Azure AD B2C directory on each sign-in.
- Return the city to your relying party application after sign-in or sign-up.
Define a claim
A claim provides a temporary storage of data during an Azure AD B2C policy execution. The claims schema is the place where you declare your claims. The following elements are used to define the claim:
- DisplayName - A string that defines the user-facing label.
- DataType - The type of the claim.
- UserHelpText - Helps the user understand what is required.
- UserInputType - The type of input control, such as text box, radio selection, drop-down list, or multiple selections.
Open the extensions file of your policy. For example, SocialAndLocalAccounts/TrustFrameworkExtensions.xml.
- Search for the BuildingBlocks element. If the element doesn't exist, add it.
- Locate the ClaimsSchema element. If the element doesn't exist, add it.
- Add the city claim to the ClaimsSchema element.
<!--
<BuildingBlocks>
  <ClaimsSchema> -->
    <ClaimType Id="city">
      <DisplayName>City where you work</DisplayName>
      <DataType>string</DataType>
      <UserInputType>DropdownSingleSelect</UserInputType>
      <Restriction>
        <Enumeration Text="Berlin" Value="berlin" />
        <Enumeration Text="London" Value="london" />
        <Enumeration Text="Seattle" Value="seattle" />
      </Restriction>
    </ClaimType>
  <!--
  </ClaimsSchema>
</BuildingBlocks>-->
Include the SelectByDefault attribute on an Enumeration element to make it selected by default when the page first loads. For example, to pre-select the London item, change the Enumeration element as the following example:
<Restriction>
  <Enumeration Text="Berlin" Value="berlin" />
  <Enumeration Text="London" Value="london" SelectByDefault="true" />
  <Enumeration Text="Seattle" Value="seattle" />
</Restriction>
Add a claim to the user interface
The following technical profiles are self-asserted, invoked when a user is expected to provide input:
- LocalAccountSignUpWithLogonEmail - Local account sign-up flow.
- SelfAsserted-Social - Federated account first-time user sign-in.
- SelfAsserted-ProfileUpdate - Edit profile flow.
To collect the city claim during sign-up, it must be added as an output claim to the LocalAccountSignUpWithLogonEmail technical profile. Override this technical profile in the extension file. Specify the entire list of output claims to control the order the claims are presented on the screen. Find the ClaimsProviders element. Add a new ClaimsProviders as follows:
<ClaimsProvider>
  <DisplayName>Local Account</DisplayName>
  <TechnicalProfiles>
    <!--Local account sign-up page-->
    <TechnicalProfile Id="LocalAccountSignUpWithLogonEmail">
      <OutputClaims>
       <OutputClaim ClaimTypeReferenceId="email" PartnerClaimType="Verified.Email" Required="true" />
       <OutputClaim ClaimTypeReferenceId="newPassword" Required="true" />
       <OutputClaim ClaimTypeReferenceId="reenterPassword" Required="true" />
       <OutputClaim ClaimTypeReferenceId="displayName" />
       <OutputClaim ClaimTypeReferenceId="givenName" />
       <OutputClaim ClaimTypeReferenceId="surName" />
       <OutputClaim ClaimTypeReferenceId="city"/>
     </OutputClaims>
   </TechnicalProfile>
  </TechnicalProfiles>
</ClaimsProvider>
To collect the city claim after initial sign-in with a federated account, it must be added as an output claim to the SelfAsserted-Social technical profile. For local and federated account users to be able to edit their profile data later, add the input and output claims to the SelfAsserted-ProfileUpdate technical profile. Override these technical profiles in the extension file. Specify the entire list of the output claims to control the order the claims are presented on the screen. Find the ClaimsProviders element. Add a new ClaimsProviders as follows:
<ClaimsProvider>
  <DisplayName>Self Asserted</DisplayName>
  <TechnicalProfiles>
    <!--Federated account first-time sign-in page-->
    <TechnicalProfile Id="SelfAsserted-Social">
      <InputClaims>
        <InputClaim ClaimTypeReferenceId="city" />
      </InputClaims>
      <OutputClaims>
        <OutputClaim ClaimTypeReferenceId="displayName"/>
        <OutputClaim ClaimTypeReferenceId="givenName"/>
        <OutputClaim ClaimTypeReferenceId="surname"/>
        <OutputClaim ClaimTypeReferenceId="city"/>
      </OutputClaims>
    </TechnicalProfile>
    <!--Edit profile page-->
    <TechnicalProfile Id="SelfAsserted-ProfileUpdate">
      <InputClaims>
        <InputClaim ClaimTypeReferenceId="city" />
      </InputClaims>
      <OutputClaims>
        <OutputClaim ClaimTypeReferenceId="displayName"/>
        <OutputClaim ClaimTypeReferenceId="givenName" />
        <OutputClaim ClaimTypeReferenceId="surname" />
        <OutputClaim ClaimTypeReferenceId="city"/>
      </OutputClaims>
    </TechnicalProfile>
  </TechnicalProfiles>
</ClaimsProvider>
Read and write a claim
The following technical profiles are Active Directory technical profiles, which read and write data to Microsoft Entra ID.
Use PersistedClaims to write data to the user profile and OutputClaims to read data from the user profile within the respective Active Directory technical profiles.
Override these technical profiles in the extension file. Find the ClaimsProviders element. Add a new ClaimsProviders as follows:
<ClaimsProvider>
  <DisplayName>Azure Active Directory</DisplayName>
  <TechnicalProfiles>
    <!-- Write data during a local account sign-up flow. -->
    <TechnicalProfile Id="AAD-UserWriteUsingLogonEmail">
      <PersistedClaims>
        <PersistedClaim ClaimTypeReferenceId="city"/>
      </PersistedClaims>
    </TechnicalProfile>
    <!-- Write data during a federated account first-time sign-in flow. -->
    <TechnicalProfile Id="AAD-UserWriteUsingAlternativeSecurityId">
      <PersistedClaims>
        <PersistedClaim ClaimTypeReferenceId="city"/>
      </PersistedClaims>
    </TechnicalProfile>
    <!-- Write data during edit profile flow. -->
    <TechnicalProfile Id="AAD-UserWriteProfileUsingObjectId">
      <PersistedClaims>
        <PersistedClaim ClaimTypeReferenceId="city"/>
      </PersistedClaims>
    </TechnicalProfile>
    <!-- Read data after user resets the password. -->
    <TechnicalProfile Id="AAD-UserReadUsingEmailAddress">
      <OutputClaims>
        <OutputClaim ClaimTypeReferenceId="city" />
      </OutputClaims>
    </TechnicalProfile>
    <!-- Read data after user authenticates with a local account. -->
    <TechnicalProfile Id="AAD-UserReadUsingObjectId">
      <OutputClaims>
        <OutputClaim ClaimTypeReferenceId="city" />
      </OutputClaims>
    </TechnicalProfile>
    <!-- Read data after user authenticates with a federated account. -->
    <TechnicalProfile Id="AAD-UserReadUsingAlternativeSecurityId">
      <OutputClaims>
        <OutputClaim ClaimTypeReferenceId="city" />
      </OutputClaims>
    </TechnicalProfile>
  </TechnicalProfiles>
</ClaimsProvider>
Include a claim in the token
To return the city claim back to the relying party application, add an output claim to the SocialAndLocalAccounts/SignUpOrSignIn.xml file. The output claim will be added into the token after a successful user journey, and will be sent to the application. Modify the technical profile element within the relying party section to add the city as an output claim.
<RelyingParty>
  <DefaultUserJourney ReferenceId="SignUpOrSignIn" />
  <TechnicalProfile Id="PolicyProfile">
    <DisplayName>PolicyProfile</DisplayName>
    <Protocol Name="OpenIdConnect" />
    <OutputClaims>
      <OutputClaim ClaimTypeReferenceId="displayName" />
      <OutputClaim ClaimTypeReferenceId="givenName" />
      <OutputClaim ClaimTypeReferenceId="surname" />
      <OutputClaim ClaimTypeReferenceId="email" />
      <OutputClaim ClaimTypeReferenceId="objectId" PartnerClaimType="sub"/>
      <OutputClaim ClaimTypeReferenceId="identityProvider" />
      <OutputClaim ClaimTypeReferenceId="tenantId" AlwaysUseDefaultValue="true" DefaultValue="{Policy:TenantObjectId}" />
      <OutputClaim ClaimTypeReferenceId="city" DefaultValue="" />
    </OutputClaims>
    <SubjectNamingInfo ClaimType="sub" />
  </TechnicalProfile>
</RelyingParty>
Upload and test your updated custom policy
- If you have access to multiple tenants, select the Settings icon in the top menu to switch to your Azure AD B2C tenant from the Directories + subscriptions menu.
- Search for and select Azure AD B2C.
- Under Policies, select Identity Experience Framework.
- Select Upload custom policy.
- Upload the policy files that you previously changed.
Test the custom policy
- Select your relying party policy, for example
B2C_1A_signup_signin. - For Application, select a web application that you previously registered. The Reply URL should show
https://jwt.ms. - Select the Run now button.
- From the sign-up or sign-in page, select Sign up now to sign up. Finish entering the user information including the city name, and then select Create. You should see the contents of the token that was returned.
The sign-up screen should look similar to the following screenshot:
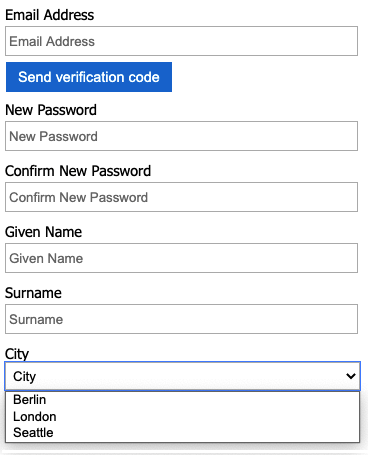
The token sent back to your application includes the city claim.
{
  "typ": "JWT",
  "alg": "RS256",
  "kid": "X5eXk4xyojNFum1kl2Ytv8dlNP4-c57dO6QGTVBwaNk"
}.{
  "exp": 1583500140,
  "nbf": 1583496540,
  "ver": "1.0",
  "iss": "https://contoso.b2clogin.com/f06c2fe8-709f-4030-85dc-38a4bfd9e82d/v2.0/",
  "aud": "e1d2612f-c2bc-4599-8e7b-d874eaca1ee1",
  "acr": "b2c_1a_signup_signin",
  "nonce": "defaultNonce",
  "iat": 1583496540,
  "auth_time": 1583496540,
  "name": "Emily Smith",
  "email": "joe@outlook.com",
  "given_name": "Emily",
  "family_name": "Smith",
  "city": "Berlin"
  ...
}
[Optional] Localize the UI
Azure AD B2C allows you to accommodate your policy to different languages. For more information, learn about customizing the language experience. To localize the sign-up page, set up the list of supported languages, and provide language-specific labels.
Note
When using the LocalizedCollection with the language-specific labels, you can remove the Restriction collection from the claim definition.
The following example demonstrates how to provide the list of cities for English and Spanish. Both set the Restriction collection of the claim city with a list of items for English and Spanish. The SelectByDefault makes an item selected by default when the page first loads.
<!--
<BuildingBlocks>-->
  <Localization Enabled="true">
    <SupportedLanguages DefaultLanguage="en" MergeBehavior="Append">
      <SupportedLanguage>en</SupportedLanguage>
      <SupportedLanguage>es</SupportedLanguage>
    </SupportedLanguages>
    <LocalizedResources Id="api.localaccountsignup.en">
      <LocalizedCollections>
        <LocalizedCollection ElementType="ClaimType" ElementId="city" TargetCollection="Restriction">
          <Item Text="Berlin" Value="Berlin"></Item>
          <Item Text="London" Value="London" SelectByDefault="true"></Item>
          <Item Text="Seattle" Value="Seattle"></Item>
        </LocalizedCollection>
      </LocalizedCollections>
    </LocalizedResources>
    <LocalizedResources Id="api.localaccountsignup.es">
      <LocalizedCollections>
        <LocalizedCollection ElementType="ClaimType" ElementId="city" TargetCollection="Restriction">
          <Item Text="Berlina" Value="Berlin"></Item>
          <Item Text="Londres" Value="London" SelectByDefault="true"></Item>
          <Item Text="Seattle" Value="Seattle"></Item>
        </LocalizedCollection>
      </LocalizedCollections>
    </LocalizedResources>
  </Localization>
<!--
</BuildingBlocks>-->
After you add the localization element, edit the content definition with the localization. In the following example, English (en) and Spanish (es) custom localized resources are added to the sign-up page:
<!--
<BuildingBlocks>
  <ContentDefinitions> -->
   <ContentDefinition Id="api.localaccountsignup">
    <LocalizedResourcesReferences MergeBehavior="Prepend">
        <LocalizedResourcesReference Language="en" LocalizedResourcesReferenceId="api.localaccountsignup.en" />
        <LocalizedResourcesReference Language="es" LocalizedResourcesReferenceId="api.localaccountsignup.es" />
    </LocalizedResourcesReferences>
   </ContentDefinition>
  <!--
  </ContentDefinitions>
</BuildingBlocks>-->
Next steps
- Learn more about the ClaimsSchema element in the IEF reference.
- Learn how to use custom attributes in Azure AD B2C.
Feedback
Coming soon: Throughout 2024 we will be phasing out GitHub Issues as the feedback mechanism for content and replacing it with a new feedback system. For more information see: https://aka.ms/ContentUserFeedback.
Submit and view feedback for