EA Billing administration on the Azure portal
Note
On February 15, 2024, the EA portal retired. It's now read only. All EA customers and partners use Cost Management + Billing in the Azure portal to manage their enrollments.
This article explains the common tasks that an Enterprise Agreement (EA) administrator accomplishes in the Azure portal. A direct enterprise agreement is signed between Microsoft and an enterprise agreement customer. Conversely, an indirect EA is one where a customer signs an agreement with a Microsoft partner. This article is applicable for both direct and indirect EA customers.
Manage your enrollment
To start managing the EA enrollment, the initial enterprise administrator signs in to the Azure portal using the account where they received the invitation email.
If you're set up as the enterprise administrator, then go to the Azure portal and sign in with your work, school, or Microsoft account.
If you have more than one billing account, select a billing account from billing scope menu. You can view your billing account properties and policy from the left menu.
Check out the EA admin manage enrollment video. It's part of the Enterprise Customer Billing Experience in the Azure portal series of videos.
Azure Active Directory is now Microsoft Entra ID. For more information, see New name for Azure AD.
Select a billing scope
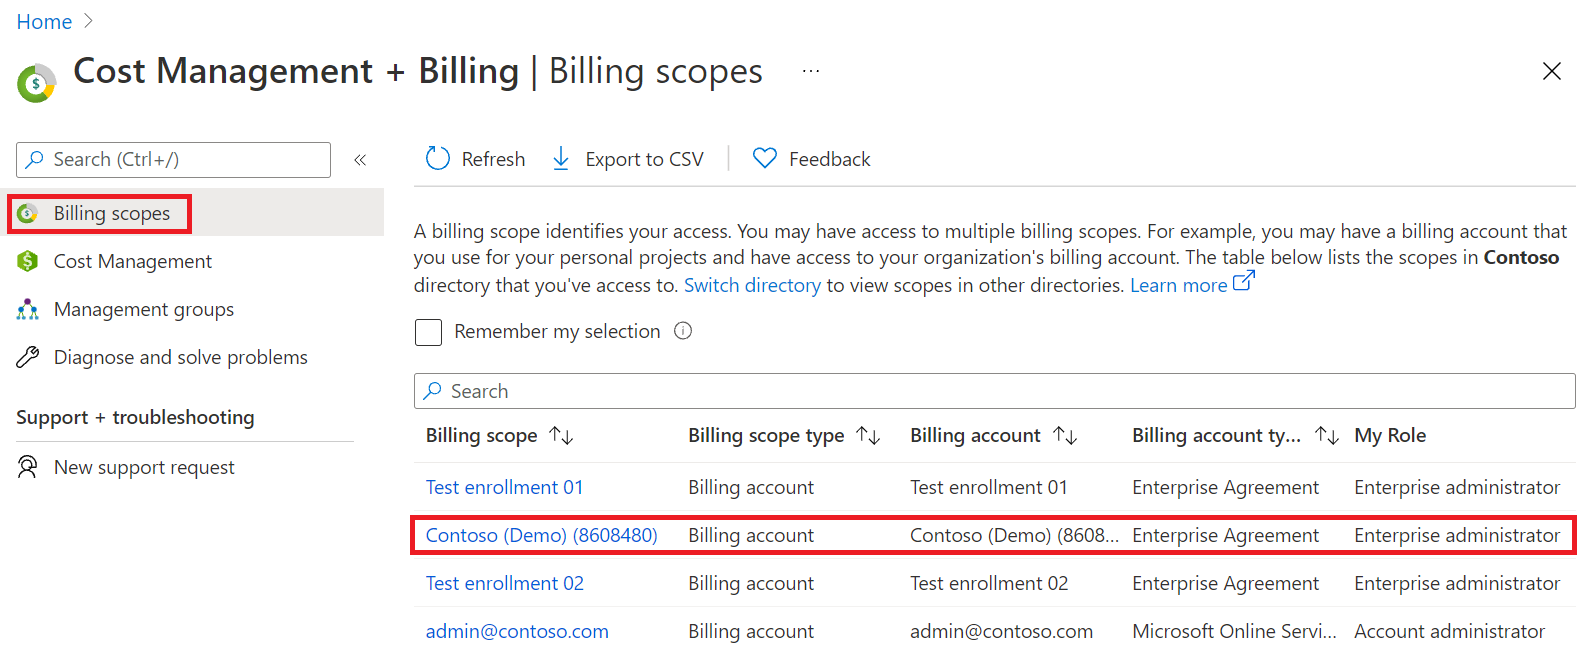
Enterprise agreements and the customers accessing the agreements can have multiple enrollments. A user can have access to multiple enrollment scopes (billing account scopes). All the information and activity in the Azure portal are in the context of a billing account scope. It's important that the enterprise administrator first selects a billing scope and then does administrative tasks.
To select a billing scope
- Sign in to the Azure portal.
- Search for Cost Management + Billing and select it.

- Select Billing scopes from the navigation menu and then select the billing account that you want to work with.


Activate your enrollment
To activate your enrollment, the initial enterprise administrator signs in to the Azure portal using their work, school, or Microsoft account. If you're set up as the enterprise administrator, you don't need to receive the activation email. You can sign in to the Azure portal and activate the enrollment.
To activate an enrollment
- Sign in to the Azure portal.
- Search for Cost Management + Billing and select it.
- Select the enrollment that you want to activate.
- Once the enrollment is selected, status of enrollment is changed to active.
- You can view the status of enrollment under Essentials on Summary view.
View enrollment details
An Azure enterprise administrator (EA admin) can view and manage enrollment properties and policy to ensure that enrollment settings are correctly configured.
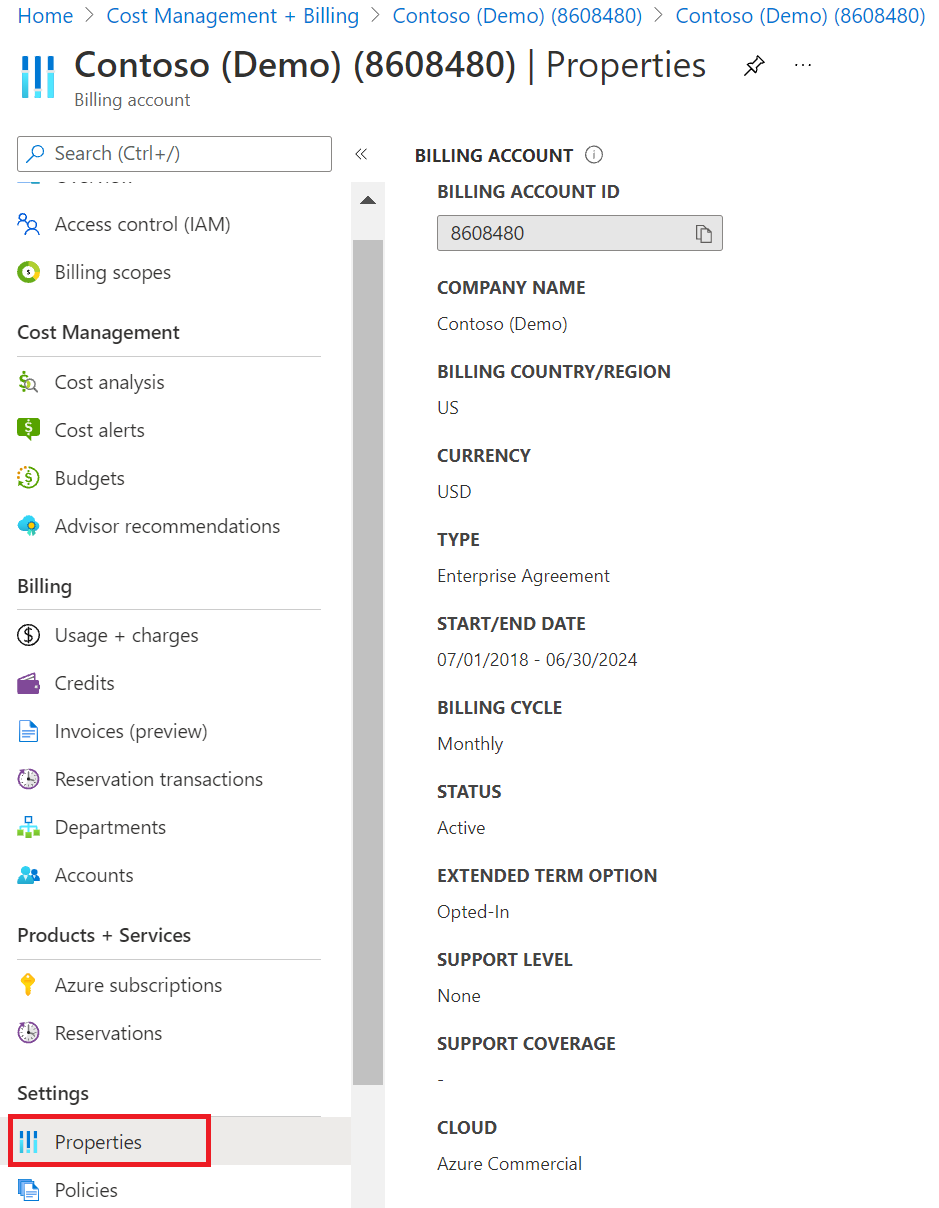
To view enrollment properties
- Sign in to the Azure portal.
- Navigate to Cost Management + Billing.
- In the left menu, select Billing scopes and then select a billing account scope.
- In the navigation menu, under Settings, select Properties.
- View the billing account information.

View and manage enrollment policies
- Sign in to the Azure portal.
- Navigate to Cost Management + Billing.
- In the left menu, select Billing scopes and then select a billing account scope.
- In the navigation menu, select Policies.
- Enable or disable policies by selecting On or Off.


For more information about the department admin (DA) and account owner (AO) view charges policy settings, see Pricing for different user roles.
Authorization levels allowed
Enterprise agreements have an authorization (previously labeled authentication) level set that determines which types of users can be added as EA account owners for the enrollment. There are four authorization levels available.
- Microsoft Account only - For organizations that want to use, create, and manage users through Microsoft accounts.
- Work or School Account only - For organizations that set up Microsoft Entra ID with Federation to the Cloud and all accounts are on a single tenant.
- Work or School Account Cross Tenant - For organizations that set up Microsoft Entra ID with Federation to the Cloud and have accounts in multiple tenants.
- Mixed Mode - Allows you to add users with Microsoft Account and/or with a Work or School Account.
The first work or school account added to the enrollment determines the default domain. To add a work or school account with another tenant, you must change the authorization level under the enrollment to cross-tenant authentication.
Ensure that the authorization level set for the EA allows you to create a new EA account owner using the subscription account administrator noted previously. For example:
- If the subscription account administrator has an email address domain of
@outlook.com, then the EA must have its authorization level set to either Microsoft Account Only or Mixed Mode. - If the subscription account administrator has an email address domain of
@<YourAzureADTenantPrimaryDomain.com>, then the EA must have its authorization level set to either Work or School Account only or Work or School Account Cross Tenant. The ability to create a new EA account owner depends on whether the EA's default domain is the same as the subscription account administrator's email address domain.
Microsoft accounts must have an associated ID created at https://signup.live.com.
Work or school accounts are available to organizations that set up Microsoft Entra ID with federation and where all accounts are on a single tenant. Users can be added with work or school federated user authentication if the company's internal Microsoft Entra ID is federated.
If your organization doesn't use Microsoft Entra ID federation, you can't use your work or school email address. Instead, register or create a new email address and register it as a Microsoft account.
Add another enterprise administrator
Only existing EA admins can create other enterprise administrators. Use one of the following options, based on your situation.
If you're already an enterprise administrator
- Sign in to the Azure portal.
- Navigate to Cost Management + Billing.
- In the left menu, select Billing scopes and then select a billing account scope.
- In the left menu, select Access Control (IAM).
- In the top menu, select + Add , and then select Enterprise administrator.

- Complete the Add role assignment form and then select Add.

Make sure that you have the user's account details and preferred authentication method handy, such as a work, school, or Microsoft account.
An EA admin can manage access for existing enterprise administrators by selecting the ellipsis (…) symbol to right of each user. They can Edit and Delete existing users.
If you're not an enterprise administrator
If you're not an EA admin, contact your EA admin to request that they add you to an enrollment. The EA admin uses the preceding steps to add you as an enterprise administrator. After you're added to an enrollment, you receive an activation email.
If your enterprise administrator can't help you
If your enterprise administrator can't assist you, create an Azure support request. Provide the following information:
- Enrollment number
- Account details and authentication type (work, school, or Microsoft account)
- Approval from an existing enterprise administrator
Note
- We recommend that you have at least one active Enterprise Administrator at all times. If no active Enterprise Administrator is available, contact your partner to change the contact information on the Volume License agreement. Your partner can make changes to the customer contact information by using the Contact Information Change Request (CICR) process available in the eAgreements (VLCM) tool.
- Any new EA administrator account created using the CICR process is assigned read-only permissions to the enrollment in the Azure portal. To elevate access, create an Azure support request.
Create an Azure enterprise department
EA admins and department administrators use departments to organize and report on enterprise Azure services and usage by department and cost center. The enterprise administrator can:
- Add or remove departments.
- Associate an account to a department.
- Create department administrators.
- Allow department administrators to view price and costs.
A department administrator can add new accounts to their departments. They can also remove accounts from their departments, but not from the enrollment.
Check out the Manage departments in the Azure portal video.
Azure Active Directory is now Microsoft Entra ID. For more information, see New name for Azure AD.
To create a department
- Sign in to the Azure portal.
- Navigate to Cost Management + Billing.
- In the left menu, select Billing scopes and then select a billing account scope.
- In the left navigation menu, select Departments.
- Select + Add.

- In the Add new department from, enter your information. The department name is the only required field. It must contain at least three characters.
- When complete, select Save.

Add a department administrator
After a department is created, the EA admin can add department administrators and associate each one to a department. Department administrators can do the following actions for their departments:
- Create other department administrators
- View and edit department properties such as name or cost center
- Add accounts
- Remove accounts
- Download usage details
- View the monthly usage and charges ¹
¹ An EA admin must grant the permissions.
To add a department administrator
As an enterprise administrator:
- Sign in to the Azure portal.
- Navigate to Cost Management + Billing.
- In the left menu, select Billing scopes and then select a billing account scope.
- In the navigation menu, select Departments.
- Select the department where you want to add administrator.
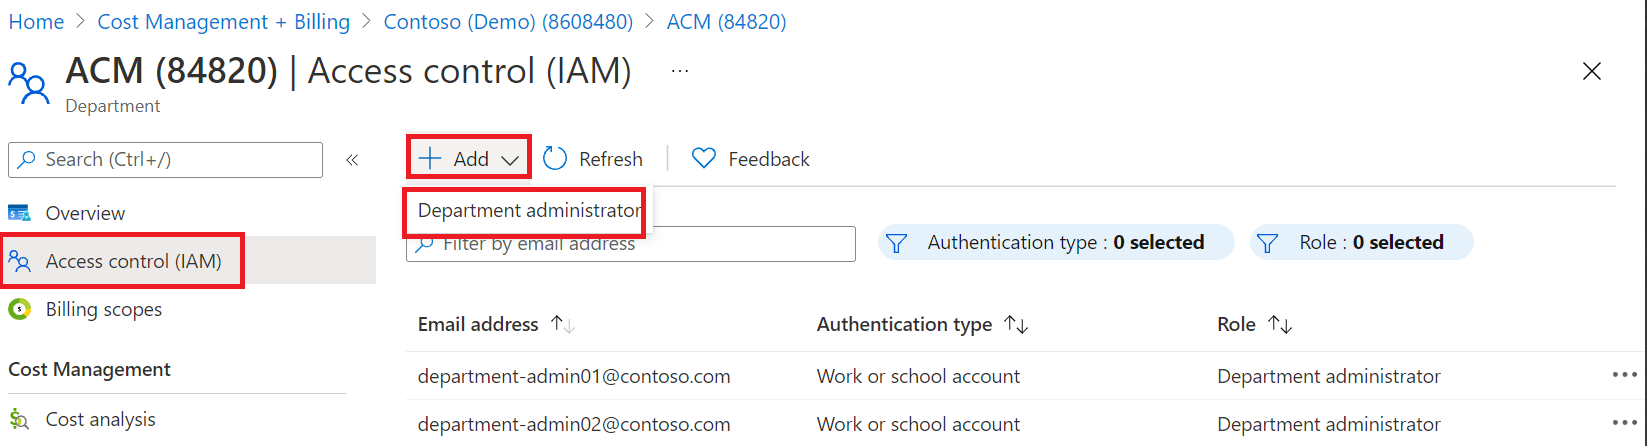
- In the department view, select Access Control (IAM).
- Select + Add, then select Department administrator.
- Enter the account details and other required information.
- For read-only access, set the Read-Only option to Yes, and then select Add.

To set read-only access
EA admins can grant read-only access to department administrators. When you create a new department administrator, set the read-only option to Yes.
To edit an existing department administrator:
- Select the ellipsis symbol (…) to the right side of a row and select it.
- Set the read-only open to Yes and then select Apply.
Enterprise administrators automatically get department administrator permissions.
Add an account and account owner
The structure of accounts and subscriptions affect how they're administered and how they appear on your invoices and reports. Examples of typical organizational structures include business divisions, functional teams, and geographic locations.
After a new account is added to the enrollment, the account owner is sent an account ownership email that gets used to confirm ownership.
Check out the EA admin manage accounts video. It's part of the Enterprise Customer Billing Experience in the Azure portal series of videos.
Azure Active Directory is now Microsoft Entra ID. For more information, see New name for Azure AD.
To add an account and account owner
- Sign in to the Azure portal.
- Navigate to Cost Management + Billing.
- In the left menu, select Billing scopes and then select a billing account scope.
- In the left menu, select Accounts.
- Select + Add.
- On the Add an account page, type a friendly name to identify the account used for reporting.
- Enter the Account Owner email address to associate it with the new account.
- Select a department or leave it as unassigned.
- When completed, select Add.
To confirm account ownership
After the account owner receives an account ownership email, they need to confirm their ownership.
- The account owner receives an email notification titled Invitation to Activate your Account on the Microsoft Azure Service. Select the Activate Account link in the invitation.
- Sign in to the Azure portal.
- On the Activate Account page, select Yes, I wish to continue to confirm account ownership.


After account ownership is confirmed, you can create subscriptions and purchase resources with the subscriptions.
Note
The confirmation process can take up to 24 hours.
To activate an enrollment account with a .onmicrosoft.com account
If you're a new EA account owner with a .onmicrosoft.com account, you might not have a forwarding email address by default. In that situation, you might not receive the activation email. If this situation applies to you, use the following steps to activate your account ownership.
- Sign in to the Azure portal.
- Navigate to Cost Management + Billing and select a billing scope.
- Select your account.
- In the left menu under Settings, select Activate Account.
- On the Activate Account page, select Yes, I wish to continue and the select Activate this account.
- After the activation process completes, copy and paste the following link to your browser. The page opens and creates a subscription that gets associated with your enrollment.
- For Azure global, the URL is
https://signup.azure.com/signup?offer=MS-AZR-0017P&appId=IbizaCatalogBlade. - For Azure Government, the URL is
https://signup.azure.us/signup?offer=MS-AZR-0017P&appId=IbizaCatalogBlade.
- For Azure global, the URL is
Change Azure subscription or account ownership
EA admins can use the Azure portal to transfer account ownership of selected or all subscriptions in an enrollment. When you complete a subscription or account ownership transfer, Microsoft updates the account owner.
Before starting the ownership transfer, get familiar with the following Azure role-based access control (RBAC) policies:
- When doing a subscription or account ownership transfers between two organizational IDs within the same tenant, the following items are preserved:
- Azure RBAC policies
- Existing service administrator
- Coadministrator roles
- Cross-tenant subscription or account ownership transfers result in losing your Azure RBAC policies and role assignments.
- Policies and administrator roles don't transfer across different directories. Service administrators are updated to the owner of destination account.
- To avoid losing Azure RBAC policies and role assignments when transferring subscription between tenants, ensure that the Move the subscriptions to the recipient's Microsoft Entra tenant selection remains cleared. This selection keeps the services, Azure roles, and policies on the current Microsoft Entra tenant and only transfers the billing ownership for the account.
Before changing an account owner:
- View the Account tab and identify the source account. The source account must be active.
- Identify the destination account and make sure it's active.
To transfer account ownership for all subscriptions:
- Sign in to the Azure portal.
- Navigate to Cost Management + Billing.
- In the left menu, select Billing scopes and then select a billing account scope.
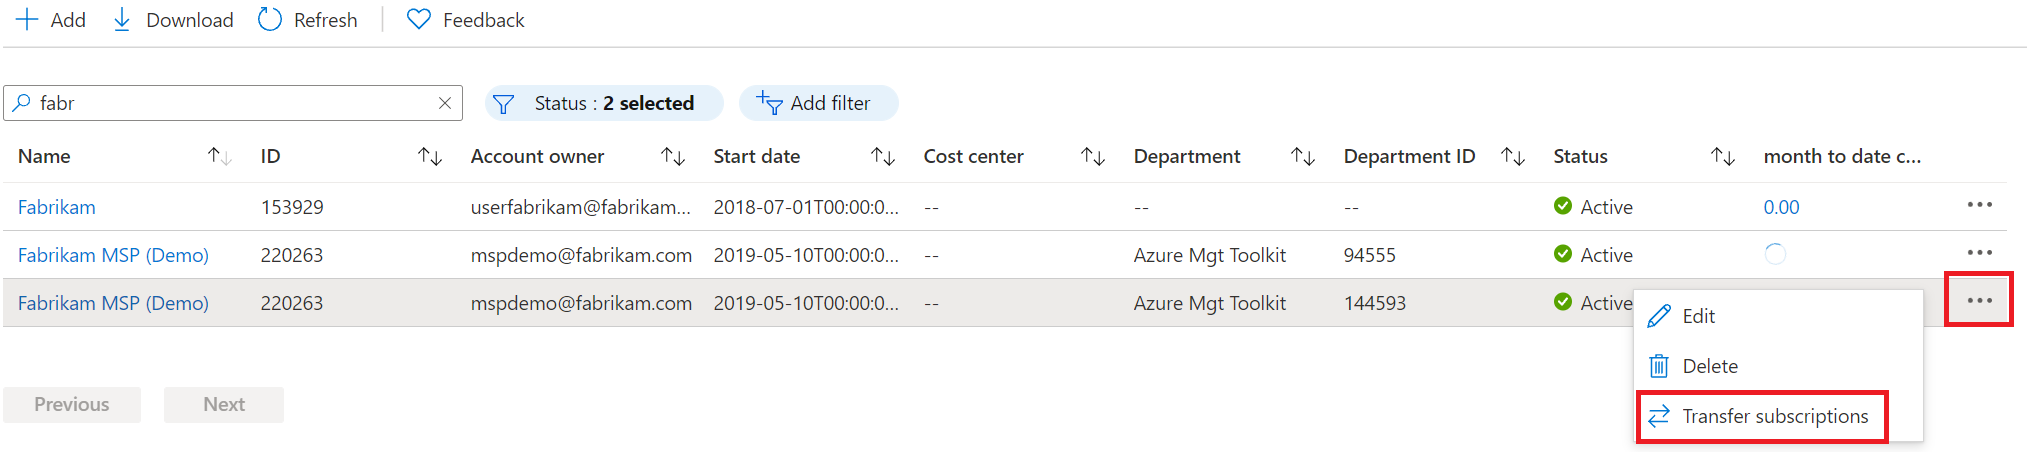
- In the left menu, select Accounts.
- Select an Account and then to right of the row select the ellipsis (…) symbol.
- Select Transfer subscriptions.
- On the Transfer subscriptions page, select the destination account to transfer to and then select Next.
- If you want to transfer the account ownership across Microsoft Entra tenants, select the Yes, I would also like to move the subscriptions to the new account's Microsoft Entra tenant confirmation.
- Confirm the transfer and select Submit.


To transfer account ownership for a single subscription:
- Sign in to the Azure portal.
- Navigate to Cost Management + Billing.
- In the left menu, select Billing scopes and then select a billing account scope.
- In the left menu, select Azure subscriptions.
- On the Azure Subscriptions page, to the right of a subscription, select the ellipsis (…) symbol.
- Select Transfer subscription.
- On the Transfer subscription page, select the destination account to transfer the subscription and then select Next.
- If you want to transfer the subscription ownership across Microsoft Entra tenants, select the Yes, I would like to also move the subscriptions to the to the new account's Microsoft Entra tenant option.
- Confirm the transfer and then select Submit.
Associate an account to a department
EA admins can associate existing accounts to departments in the enrollment.
To associate an account to a department
- Sign in to the Azure portal.
- Navigate to Cost Management + Billing.
- In the left menu, select Billing scopes and then select a billing account scope.
- In the left menu, select Accounts.
- Select the ellipsis (…) symbol to the right side of any account and then select Edit.
- On the Edit account page, select a Department from the list.
- Select Save.
Associate an account with a pay-as-you-go subscription
If you already have an existing school, work, or Microsoft account for an Azure pay-as-you-go subscription, you can associate it with your Enterprise Agreement enrollment.
To associate an account, you must have the EA administrator or department admin role.
To associate an existing account
- Sign in to the Azure portal.
- Navigate to Cost Management + Billing.
- In the left menu, select Billing scopes and then select a billing account scope.
- In the left menu, select Accounts.
- Select + Add.
- On the Add an Account page, enter a name that you want to use to identify the account for reporting purposes.
- Select either Microsoft or Work or school account associated with the existing Azure account.
- Type the account owner's email address and then confirm it.
- Select Add.
It might take up to eight hours for the account to appear in the Azure portal.
To confirm account ownership
- After you complete the previous steps, the Account Owner receives an email notification titled Invitation to Activate your Account on the Microsoft Azure Service.
- Select the Activate account link in the invitation.
- Sign in to the Azure portal.
- On the Activate Account page, select Yes, I wish to continue to confirm account ownership.
Enable Azure Marketplace purchases
To get a single view of all subscriptions and charges, we recommend that you enable Azure Marketplace purchases.
- Sign in to the Azure portal.
- Navigate to Cost Management + Billing.
- In the left menu, select Billing scopes and then select a billing account scope.
- In the left menu, select Policies.
- Under Azure Marketplace, set the policy to On.


The setting applies to all account owners in the enrollment. It allows them to make Azure Marketplace purchases.
Visual Studio subscription transfer
When you transfer a Visual Studio subscription to an enrollment, it gets converted to an Enterprise Dev/Test subscription. After conversion, the subscription loses any existing monetary credit. So, we recommended that you use all your credit before you transfer it to your Enterprise Agreement.
Azure in Open subscription transfer
When you transfer an Azure in Open subscription to an Enterprise Agreement, you lose any unused Azure in Open credits. We recommended that you use all your credit for the Azure in Open subscription before you transfer it to your Enterprise Agreement.
Subscription transfers with support plans
If you try to transfer an existing Microsoft Online Support Agreement (MOSA) subscription that has a support plan to an Enterprise Agreement without one, the subscription doesn't automatically transfer. You need to repurchase a support plan for your EA enrollment during the grace period, which is by the end of the following month.
Manage department and account spending with budgets
EA customers can set budgets for each department and account under an enrollment. Budgets in Cost Management help you plan for and drive organizational accountability. They help you inform others about their spending to proactively manage costs, and to monitor how spending progresses over time. You can configure alerts based on your actual cost or forecasted cost to ensure that your spending is within your organizational spend limit. When the budget thresholds are exceeded, only notifications are triggered. None of your resources are affected and your consumption isn't stopped. You can use budgets to compare and track spending as you analyze costs. For more information about how to create budgets, see Tutorial: Create and manage budgets.
Enterprise Agreement user roles
The Azure portal helps you to administer your Azure EA costs and usage. There are three main EA roles:
- Enterprise Agreement (EA) admin
- Department administrator
- Account owner
Each role has a different level of access and authority. For more information about user roles, see Enterprise user roles.
Add an Azure EA account
An Azure EA account is an organizational unit in the Azure portal. In the Azure portal, it's an account. Its use is to administer subscriptions and for reporting. To access and use Azure services, you need to create an account or have one created for you. For more information about accounts, see Add an account.
Enable the Enterprise Dev/Test offer
As an EA admin, you can allow account owners in your organization to create subscriptions based on the EA Dev/Test offer. To do so, select the Dev/Test option in the Edit account window. After you select the Dev/Test option, let the account owner know so that they can create EA Dev/Test subscriptions needed for their teams of Dev/Test subscribers. The offer enables active Visual Studio subscribers to run development and testing workloads on Azure at special Dev/Test rates. It provides access to the full gallery of Dev/Test images including Windows 8.1 and Windows 10.
Note
The Enterprise Dev/Test Offer isn't available for Azure Government customers. If you're an Azure Government customer, your can't enable the Dev/Test option.
To set up the Enterprise Dev/Test offer
- Sign in to the Azure portal.
- Navigate to Cost Management + Billing.
- In the left menu, select Billing scopes and then select a billing account scope.
- In the left menu, select Accounts.
- Select the account where you want to enable Dev/Test access.
- On the enrollment account Overview page, select Edit Account detail.
- In the Edit account window, select Dev/Test and then select Save.

When a user is added as an account owner, any Azure subscriptions associated with the user that is based on either the pay-as-you-go Dev/Test offer or the monthly credit offers for Visual Studio subscribers get converted to the Enterprise Dev/Test offer. Subscriptions based on other offer types, such as pay-as-you-go, associated with the account owner get converted to Microsoft Azure Enterprise offers.
Create a subscription
You can use subscriptions to give teams in your organization access to development environments and projects. For example:
- Test
- Production
- Development
- Staging
When you create different subscriptions for each application environment, you help secure each environment.
- You can also assign a different service administrator account for each subscription.
- You can associate subscriptions with any number of services.
- The account owner creates subscriptions and assigns a service administrator account to each subscription in their account.
Check out the EA admin manage subscriptions video. It's part of the Enterprise Customer Billing Experience in the Azure portal series of videos.
Azure Active Directory is now Microsoft Entra ID. For more information, see New name for Azure AD.
Add a subscription
A user must have at least one of the following roles to create a new subscription:
- An Enterprise Administrator can create a new subscription under any active enrollment account
- An Account Owner can create new subscriptions within their enrollment account
The first time you add a subscription to your account, you're asked to accept the Microsoft Online Subscription Agreement (MOSA) and a rate plan. Although they aren't applicable to Enterprise Agreement customers, the MOSA and the rate plan are required to create your subscription. Your Microsoft Azure Enterprise Agreement Enrollment Amendment supersedes the preceding items and your contractual relationship doesn't change. When prompted, select the option that indicates you accept the terms.
Microsoft Azure Enterprise is the default name when a subscription is created. You can change the name to differentiate it from the other subscriptions in your enrollment, and to ensure that it's recognizable in reports at the enterprise level.
To add a subscription
- Sign in to the Azure portal.
- Navigate to Cost Management + Billing.
- In the left menu, select Billing scopes and then select a billing account scope for the enrollment.
- In the left menu, select Accounts.
- In the list of enrollment accounts, select the one where you want to create a subscription.
- On the enrollment account page, select + New Subscription.

- On the Create subscription page, enter a subscription name, and then select Create.

The subscription name appears on reports. It's the name of the project associated with the subscription in the development portal.
New subscriptions can take up to 24 hours to appear in the subscriptions list. After you create a subscription, you can:
- Edit subscription details
- Manage subscription services
You can also create subscriptions by navigating to the Azure Subscriptions page and selecting + Add.
Create subscription in other tenant and view transfer requests
A user with the following permission can create subscriptions in another directory if they're allowed or exempted with subscription policy. For more information, see Setting subscription policy.
- Enterprise Administrator
- Account owner
When you try to create a subscription for someone in a directory outside of the current directory (such as a customer's tenant), a subscription creation request is created.

When the request is created, the subscription owner (the customer) is sent an email letting them know that they need to accept subscription ownership. The email contains a link used to accept ownership in the Azure portal. The customer must accept the request within seven days. If not accepted within seven days, the request expires. The person that created the request can also manually send their customer the ownership URL to accept the subscription.
After the request is created, it's visible in the Azure portal at Subscriptions > View Requests by the following people:
- The tenant global administrator of the source tenant where the subscription creation request is made.
- The user who made the subscription creation request for the subscription being created in the other tenant.
- The user who made the request to create the subscription in a different tenant than where they make the Subscription – Alias REST API call instead of the Azure portal.
The subscription owner in the request who resides in the target tenant doesn't see this subscription creation request on the View requests page. Instead, they receive an email with the link to accept ownership of the subscription in the target tenant.

Anyone with access to view the request can view its details. In the request details, the Accept ownership URL is visible. You can copy it to manually share it with the subscription owner in the target tenant for subscription ownership acceptance.

Cancel a subscription
Only account owners can cancel their own subscriptions.
To delete a subscription where you're the account owner:
- Sign in to the Azure portal with the credentials associated with your account.
- In the navigation menu, select Subscriptions.
- Select a subscription.
- On the subscription details page, in the upper left corner of the page, Cancel Subscription.
- Type the subscription name, choose a cancellation reason, and then select Cancel.
For more information, see What happens after I cancel my subscription?.
Delete an enrollment account
You can delete an enrollment account only when there are no active subscriptions.
- Sign in to the Azure portal.
- Navigate to Cost Management + Billing.
- In the left menu, select Billing scopes and then select a billing account scope.
- In the left menu, select Accounts.
- In the Accounts list, search for the account you would like to delete.
- In the account row that you want to delete, select the ellipsis (…) symbol, and then select Delete.
- On the Delete account page, select the Yes, I want to delete this account confirmation and then and select Delete.
Manage notification contacts
Notifications allow enterprise administrators to enroll their team members to receive usage notifications and user management notifications without giving them billing account access in the Azure portal.
Notification contacts are shown in the Azure portal in on the Notifications page under Settings. Managing your notification contacts makes sure that the right people in your organization get Azure EA notifications.
Note
Invoices are only sent to the person set to receive invoices for the enrollment, the Bill to contact. The bill-to contact can send others a copy of the invoice, if needed.
To view current notifications settings and add contacts:
- Sign in to the Azure portal.
- Navigate to Cost Management + Billing.
- In the left menu, select Billing scopes and then select a billing account scope.
- In the left menu, under Settings, select Notifications. Notification contacts are shown on the page.
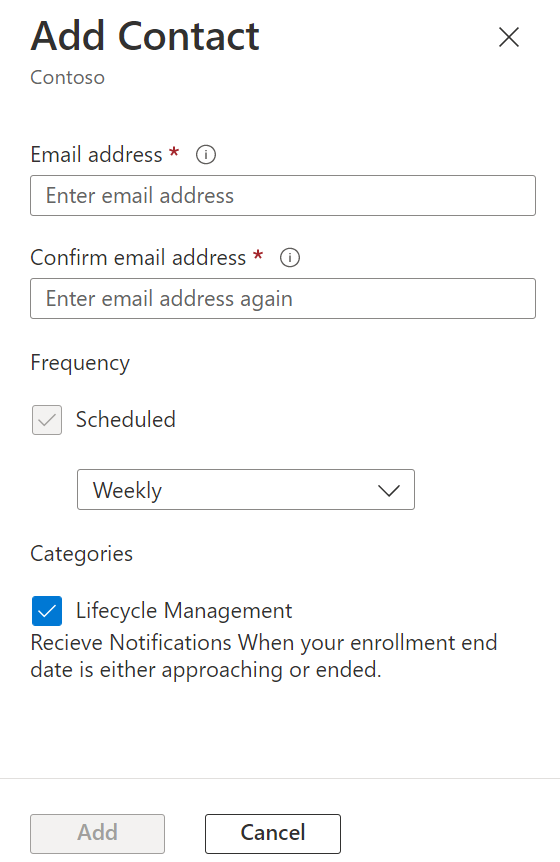
- To add a contact, select + Add.
- In the Add Contact area, enter the contact's email address.
- Under Frequency, select a notification interval. Weekly is the default value.
- Under Categories, select Lifecycle Management to receive notifications when the enrollment end date is approached or ended.
- Select Add to save the changes.
The new notification contact is shown in the Notification list.
An EA admin can manage notification access for a contact by selecting the ellipsis (…) symbol to the right of each contact. They can edit and remove existing notification contacts.
By default, notification contacts are subscribed for the coverage period end date approaching lifecycle notifications. Unsubscribing lifecycle management notifications suppresses notifications for the coverage period and agreement end date.
Azure sponsorship offer
The Azure sponsorship offer is a limited sponsored Microsoft Azure account. It's available by e-mail invitation only to limited customers selected by Microsoft. If you're entitled to the Microsoft Azure sponsorship offer, you receive an e-mail invitation to your account ID.
If you need assistance, create a support request in the Azure portal.
Convert to work or school account authentication
Azure Enterprise users can convert from a Microsoft Account (MSA) or Live ID to a Work or School Account. A Work or School Account uses the Microsoft Entra authentication type.
To begin
- Add the work or school account to the Azure portal with the needed roles.
- If you get errors, the account might not be valid in Microsoft Entra ID. Azure uses User Principal Name (UPN), which isn't always identical to the email address.
- Authenticate to the Azure portal using the work or school account.
To convert subscriptions from Microsoft accounts to work or school accounts
- Sign in to the Azure portal using the Microsoft account that owns the subscriptions.
- Use an account ownership transfer to move to the new account.
- The Microsoft account should be free from any active subscriptions and can be deleted.
- Any deleted accounts remain viewable in the Azure portal with inactive status for historic billing reasons. You can filter it out of the view by selecting Show only active accounts.
Pay your overage with Azure Prepayment
To apply your Azure Prepayment to overages, you must meet the following criteria:
- You incurred overage charges that weren't paid and are within three months of the invoice bill date.
- Your available Azure Prepayment amount covers the full number of incurred charges, including all past unpaid Azure invoices.
- The billing term that you want to complete must be fully closed. Billing fully closes after the fifth day of each month.
- The billing period that you want to offset must be fully closed.
- Your Azure Prepayment Discount (APD) is based on the actual new Prepayment minus any funds planned for the previous consumption. This requirement applies only to overage charges incurred. It's only valid for services that consume Azure Prepayment, so doesn't apply to Azure Marketplace charges. Azure Marketplace charges are billed separately.
To complete an overage offset, you or the account team can open a support request. An emailed approval from your enterprise administrator or Bill to Contact is required.
Move charges to another enrollment
Usage data is only moved when a transfer is backdated. There are two options to move usage data from one enrollment to another:
- Account transfers from one enrollment to another enrollment
- Enrollment transfers from one enrollment to another enrollment
For either option, you must submit a support request to the EA Support Team for assistance.
Azure EA term glossary
Account
An organizational unit used to administer subscriptions and for reporting.
Account owner
The person who manages subscriptions and service administrators on Azure. They can view usage data on this account and its associated subscriptions.
Amendment subscription
A one-year, or coterminous subscription under the enrollment amendment.
Prepayment
Prepayment of an annual monetary amount for Azure services at a discounted Prepayment rate for usage against this prepayment.
Department administrator
The person who manages departments, creates new accounts and account owners, views usage details for the departments they manage, and can view costs when granted permissions.
Enrollment number
A unique identifier supplied by Microsoft to identify the specific enrollment associated with an Enterprise Agreement.
Enterprise administrator
The person who manages departments, department owners, accounts, and account owners on Azure. They can manage enterprise administrators, view usage data, and billed quantities. They also manage unbilled charges across all accounts and subscriptions associated with the enterprise enrollment.
Enterprise agreement
A Microsoft licensing agreement for customers with centralized purchasing who want to standardize their entire organization on Microsoft technology and maintain an information technology infrastructure on a standard of Microsoft software.
Enterprise agreement enrollment
An enrollment in the Enterprise Agreement program providing Microsoft products in volume at discounted rates.
Microsoft account
A web-based service that enables participating sites to authenticate a user with a single set of credentials.
Microsoft Azure Enterprise Enrollment Amendment (enrollment amendment)
An amendment signed by an enterprise, which provides them with access to Azure as part of their enterprise enrollment.
Resource quantity consumed
The quantity of an individual Azure service that was used in a month.
Service administrator
The person who accesses and manages subscriptions and development projects.
Subscription
Represents an Azure EA subscription and is a container of Azure services managed by the same service administrator.
Work or school account
For organizations that set up Microsoft Entra ID with federation to the cloud and all accounts are on a single tenant.
Enrollment status
New
This status is assigned to an enrollment that was created within 24 hours and is updated to a Pending status within 24 hours.
Pending
The enrollment administrator needs to sign in to the Azure portal. After they sign in, the enrollment switches to an Active status.
Active
The enrollment is Active and accounts and subscriptions can be created in the Azure portal. The enrollment remains active until the Enterprise Agreement end date.
Indefinite extended term
An indefinite extended term takes place after the Enterprise Agreement end date. It enables Azure EA customers who are opted in to the extended term to continue to use Azure services indefinitely at the end of their Enterprise Agreement.
Before the Azure EA enrollment reaches the Enterprise Agreement end date, the enrollment administrator should decide which of the following options to take:
- Renew the enrollment by adding more Azure Prepayment.
- Transfer to a new enrollment.
- Migrate to the Microsoft Online Subscription Program (MOSP).
- Confirm disablement of all services associated with the enrollment.
Expired
The Azure EA customer is opted out of the extended term, and the Azure EA enrollment reached the Enterprise Agreement end date. The enrollment expires, and all associated services are disabled.
Transferred
Enrollments where all associated accounts and services were transferred to a new enrollment appear with a transferred status.
Note
Enrollments don't automatically transfer if a new enrollment number is generated at renewal. You must include your prior enrollment number in your renewal paperwork to facilitate an automatic transfer.
Next steps
- If you need to create an Azure support request for your EA enrollment, see How to create an Azure support request for an Enterprise Agreement issue.
- Read the Cost Management + Billing FAQ for questions about EA subscription ownership.
Feedback
Coming soon: Throughout 2024 we will be phasing out GitHub Issues as the feedback mechanism for content and replacing it with a new feedback system. For more information see: https://aka.ms/ContentUserFeedback.
Submit and view feedback for