Protect against malware and other cyberthreats
This article describes how to increase your threat protection with Microsoft 365 Business Premium. It's critical to protect your business against phishing, malware, and other threats. Use this article as a guide to walk through the following steps:
- Review and apply preset security policies for email and collaboration. Preset security policies can save a lot of time in setup and configuration.
- Turn on Microsoft Defender for Business now so that you are ready to secure your organization's managed devices.
- Adjust sharing settings for SharePoint and OneDrive files and folders to prevent accidental oversharing of files.
- Set up and review your alert policies to protect against data loss.
- Manage calendar sharing to determine whether employees can share their calendars with external users or manage the level of detail that can be shared.
- Create more security policies for email and collaboration (if needed). Preset security policies provide strong protection; however, you can define your own custom policies to suit your company's needs.
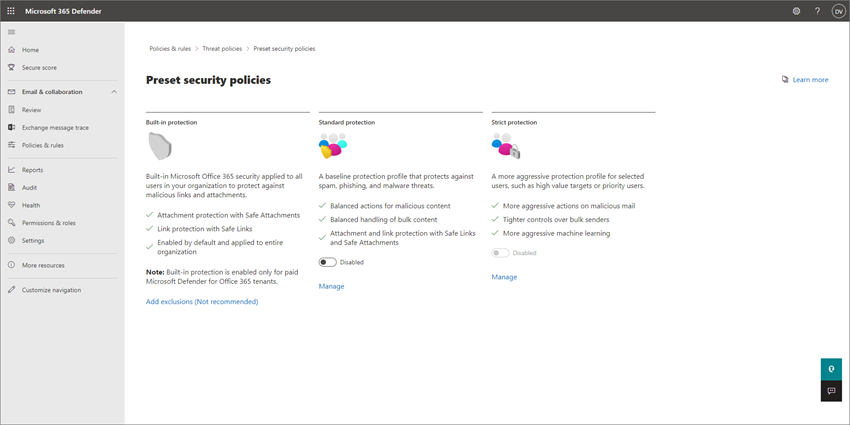
1. Review and apply preset security policies for email and collaboration
Your subscription includes preset security policies that use recommended settings for anti-spam, anti-malware, and anti-phishing protection. By default, built-in protection is enabled; however, consider applying standard or strict protection for increased security.
Note
Preset security policies are not the same thing as security defaults. Typically, you'll be using either security defaults or Conditional Access first, and then you'll add your security policies. Preset security policies simplify the process of adding your security policies. You can also create optional custom security policies (if needed).
What are preset security policies?
Preset security policies provide protection for your email and collaboration content. These policies consist of:
- Profiles, which determine the level of protection
- Policies (such as anti-spam, anti-malware, anti-phishing, spoof settings, impersonation, Safe Attachments, and Safe Links)
- Policy settings (such as groups, users, or domains to receive the policies and any exceptions)
The following table summarizes the levels of protection and preset policy types.
| Level of protection | Description |
|---|---|
| Standard protection (recommended for most businesses) |
Standard protection uses a baseline profile that's suitable for most users. Standard protection includes anti-spam, anti-malware, anti-phishing, spoof settings, impersonation settings, Safe Links, and Safe Attachments policies. |
| Strict protection | Strict protection includes the same kinds of policies as standard protection, but with more stringent settings. If your business must meet extra security requirements or regulations, consider applying strict protection to at least your priority users or high value targets. |
| Built-in protection | Protects against malicious links and attachments in email. Built-in protection is enabled and applied to all users by default. |
Tip
You can specify the users, groups, and domains to receive preset policies, and you can define certain exceptions, but you cannot change the preset policies themselves. If you want to use different settings for your security policies, you can create your own custom policies to suit your company's needs.
Policy order of priority
If users are assigned multiple policies, an order of priority is used to apply the policies. The order of priority works as follows:
Strict protection receives the highest priority and overrides all other policies.
Standard protection
Custom security policies
Built-in protection receives the lowest priority and is overridden by strict protection, standard protection, and custom policies.
Strict protection overrides all other policies, and other policies override built-in protection.
To learn more about preset security policies, see Preset security policies in EOP and Microsoft Defender for Office 365.
How do I assign preset security policies to users?
Important
Before you begin, make sure you have one of the following roles assigned in Exchange Online (which is included in your subscription):
- Global Administrator
- Organization Management
- Security Administrator
To learn more, see Permissions in Exchange Online and About admin roles.
To assign preset security policies, follow these steps:
Go to the Microsoft Defender portal (https://security.microsoft.com) and sign in.
Go to Email & Collaboration > Policies & Rules > Threat policies > Preset Security Policies in the Templated policies section. (To go directly to the Preset security policies page, use https://security.microsoft.com/presetSecurityPolicies.)
On the Preset security policies page, in either the Standard protection or Strict protection section, select Manage Protection Settings.
The Apply Standard protection or Apply Strict protection wizard starts in a flyout. On the EOP protections apply to page, identify the internal recipients that the policies apply to (recipient conditions):
- Users
- Groups
- Domains
In the appropriate box, start typing a value, and then select the value that you want from the results. Repeat this process as many times as necessary. To remove an existing value, select the Remove icon next to the value.
For users or groups, you can use most identifiers (name, display name, alias, email address, account name, etc.), but the corresponding display name is shown in the results. For users, type an asterisk (*) by itself to see all available values.
To specify an exclusion, select the Exclude these users, groups, and domains checkbox, and then specify users, groups, or domains to exclude.
When you're finished, select Next.
On the Defender for Office 365 protections apply to page to identify the internal recipients that the policies apply to (recipient conditions). Specify users, groups, and domains just like what you did in the previous step.
When you're finished, select Next.
On the Review and confirm your changes page, verify your selections, and then select Confirm.
Tip
To learn more about assigning preset security policies, see the following articles:
- Use the Microsoft Defender portal to assign Standard and Strict preset security policies to users
- Recommended settings for email and collaboration content (Microsoft 365 Business Premium includes Exchange Online Protection and Microsoft Defender for Office 365 Plan 1)
2. Turn on Microsoft Defender for Business
Microsoft 365 Business Premium includes Defender for Business, which provides advanced protection for your organization's devices, including client computers, tablets, and mobile phones. Server protection is also available if you have Microsoft Defender for Business servers.
To turn on Defender for Business, you actually initiate the provisioning process.
Go to the Microsoft Defender portal (https://security.microsoft.com) and sign in.
In the navigation bar, go to Assets > Devices. This action initiates the provisioning of Defender for Business for your tenant. You know this process has started when you see a message like what's displayed in the following screenshot:

It might take a few hours for your tenant to finish provisioning before you can onboard devices or complete the setup and configuration process.
Do one of the following steps:
- Proceed to 3. Adjust sharing settings for SharePoint and OneDrive files and folders (recommended) and set up Defender for Business later, when you get to Mission 6: Secure managed devices with Microsoft 365 Business Premium.
- Set up and configure Microsoft Defender for Business now, and then return to this article to complete the remaining steps.

3. Adjust sharing settings for SharePoint and OneDrive files and folders
By default, sharing levels are set to the most permissive level for both SharePoint and OneDrive. We recommend changing the default settings to better protect your business.
Go to Sharing in the SharePoint admin center, and sign in with an account that has admin permissions for your organization.
Under External sharing, specify the level of sharing. (We recommend using Least permissive to prevent external sharing.)
Under File and folder links, select an option (such as Specific people). Then choose whether to grant View or Edit permissions by default for shared links (such as View).
Under Other settings, select the options you want to use.
Then choose Save.
Tip
To learn more about these settings, see Manage sharing settings.
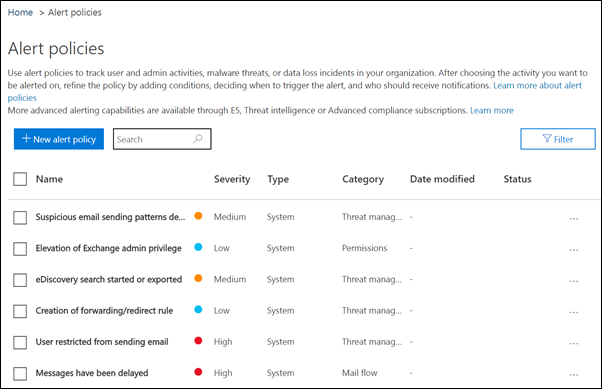
4. Set up and review your alert policies
Alert policies are useful for tracking user and admin activities, potential malware threats, and data loss incidents in your business. Your subscription includes a set of default policies, but you can also create custom ones. For example, if you store an important file in SharePoint that you don't want anyone to share externally, you can create a notification that alerts you if someone does share it.
The following image shows some of the default policies that are included with Microsoft 365 Business Premium.
View your alert policies
Go to the Microsoft Purview compliance portal at https://compliance.microsoft.com and sign in.
In the navigation pane, choose Policies, and then choose Alert policies.
Select an individual policy to view more details or to edit the policy. The following image shows a list of alert policies with one policy selected:


Tip
For more information, see alert policies.
How to view alerts
You can view your alerts in either the Microsoft Defender portal or the Microsoft Purview compliance portal.
| Type of alert | What to do |
|---|---|
| Security alert, such as when a user selects a malicious link, an email is reported as malware or phish, or a device is detected as containing malware | Go to the Microsoft Defender portal and under Email & collaboration select Policies & rules > Alert policy. Alternatively, you can go directly to https://security.microsoft.com/alertpolicies. |
| Compliance alert, such as when a user shares sensitive or confidential information (data loss prevention alert) or there's an unusual volume of external file sharing (information governance alert) | Go to the Microsoft Purview compliance portal, and then select Policies > Alert > Alert policies. |
For more information, see View alerts.
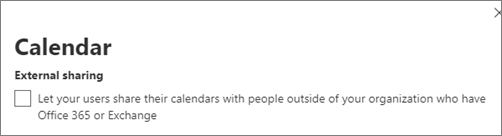
5. Manage calendar sharing
You can help people in your organization share their calendars appropriately for better collaboration. You can manage what level of detail they can share, such as by limiting the details that are shared to free/busy times only.
Go to Org settings in the Microsoft 365 admin center and sign in.
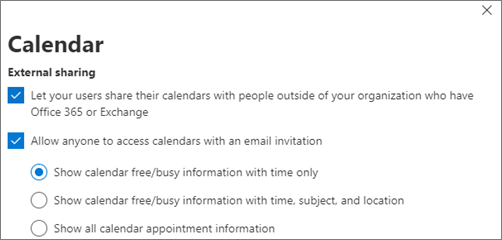
Choose Calendar, and choose whether people in your organization can share their calendars with people outside who have Office 365 or Exchange, or with anyone. We recommend clearing the External sharing option. If you choose to share calendars with anyone option, you can choose to also share free/busy information only.
Choose Save changes on the bottom of the page.
The following image shows that calendar sharing isn't allowed.
The following image shows the settings when calendar sharing is allowed with an email link with only free/busy information.
If your users are allowed to share their calendars, see these instructions for how to share from Outlook on the web.
6. Create additional security policies for email and collaboration (if needed)
The preset security policies described earlier in this article provide strong protection for most businesses. However, you're not limited to using preset security policies only. You can define your own custom security policies to suit your company's needs.
For more information about using preset security policies or custom policies, see Determine your protection policy strategy.
For our recommended policy settings, see the tables in Recommended settings for EOP and Microsoft Defender for Office 365 security.
To create and configure security policies, see the following articles:
- Configure anti-malware policies in EOP
- Configure anti-spam policies in EOP
- Configure anti-phishing policies in Microsoft Defender for Office 365
- Set up Safe Attachments policies in Microsoft Defender for Office 365
- Set up Safe Links policies in Microsoft Defender for Office 365
Next steps
Proceed to:
Feedback
Coming soon: Throughout 2024 we will be phasing out GitHub Issues as the feedback mechanism for content and replacing it with a new feedback system. For more information see: https://aka.ms/ContentUserFeedback.
Submit and view feedback for