Tutorial: How to display route directions using Azure Maps Route service and Map control
This tutorial shows you how to use the Azure Maps Route service API and Map control to display route directions from start to end point. This tutorial demonstrates how to:
- Create and display the Map control on a web page.
- Define the display rendering of the route by defining Symbol layers and Line layers.
- Create and add GeoJSON objects to the Map to represent start and end points.
- Get route directions from start and end points using the Get Route directions API.
See the route tutorial in GitHub for the source code. See Route to a destination for a live sample.
Prerequisites
Create and display the Map control
The following steps show you how to create and display the Map control in a web page.
On your local machine, create a new file and name it MapRoute.html.
Add the following HTML to the file:
<!DOCTYPE html>
<html>
<head>
    <title>Map Route</title>
    <meta charset="utf-8">
    <meta name="viewport" content="width=device-width, initial-scale=1, shrink-to-fit=no">

    <!-- Add references to the Azure Maps Map control JavaScript and CSS files. -->
    <link rel="stylesheet" href="https://atlas.microsoft.com/sdk/javascript/mapcontrol/3/atlas.min.css" type="text/css">
    <script src="https://atlas.microsoft.com/sdk/javascript/mapcontrol/3/atlas.min.js"></script>

    <!-- Add a reference to the Azure Maps Services Module JavaScript file. -->
    <script src="https://atlas.microsoft.com/sdk/javascript/service/2/atlas-service.min.js"></script>

    <script>
        var map, datasource, client;

        function GetMap() {
            //Add Map Control JavaScript code here.
        }
    </script>
    <style>
        html,
        body {
            width: 100%;
            height: 100%;
            padding: 0;
            margin: 0;
        }

        #myMap {
            width: 100%;
            height: 100%;
        }
    </style>
</head>
<body onload="GetMap()">
    <div id="myMap"></div>
</body>
</html>
Some things to know about the above HTML:
- The HTML header includes CSS and JavaScript resource files hosted by the Azure Map Control library.
- The
onloadevent in the body of the page calls theGetMapfunction when the body of the page has loaded. - The
GetMapfunction contains the inline JavaScript code used to access the Azure Maps APIs. It's added in the next step.
Next, add the following JavaScript code to the
GetMapfunction, just beneath the code added in the last step. This code creates a map control and initializes it using your Azure Maps subscription keys that you provide. Make sure and replace the string<Your Azure Maps Key>with the Azure Maps primary key that you copied from your Maps account.//Instantiate a map object var map = new atlas.Map('myMap', { // Replace <Your Azure Maps Key> with your Azure Maps subscription key. https://aka.ms/am-primaryKey authOptions: { authType: 'subscriptionKey', subscriptionKey: '<Your Azure Maps Key>' } });Some things to know about the above JavaScript:
Save your changes to the file and open the HTML page in a browser. The map shown is the most basic map that you can make by calling
atlas.Mapusing your Azure Maps account subscription key.

Define route display rendering
In this tutorial, the route is rendered using a line layer. The start and end points are rendered using a symbol layer. For more information on adding line layers, see Add a line layer to a map. To learn more about symbol layers, see Add a symbol layer to a map.
In the
GetMapfunction, after initializing the map, add the following JavaScript code.//Wait until the map resources are ready. map.events.add('ready', function() { //Create a data source and add it to the map. datasource = new atlas.source.DataSource(); map.sources.add(datasource); //Add a layer for rendering the route lines and have it render under the map labels. map.layers.add(new atlas.layer.LineLayer(datasource, null, { strokeColor: '#2272B9', strokeWidth: 5, lineJoin: 'round', lineCap: 'round' }), 'labels'); //Add a layer for rendering point data. map.layers.add(new atlas.layer.SymbolLayer(datasource, null, { iconOptions: { image: ['get', 'icon'], allowOverlap: true }, textOptions: { textField: ['get', 'title'], offset: [0, 1.2] }, filter: ['any', ['==', ['geometry-type'], 'Point'], ['==', ['geometry-type'], 'MultiPoint']] //Only render Point or MultiPoints in this layer. })); });Some things to know about the above JavaScript:
- This code implements the Map control's
readyevent handler. The rest of the code in this tutorial is placed inside thereadyevent handler. - In the map control's
readyevent handler, a data source is created to store the route from start to end point. - To define how the route line is rendered, a line layer is created and attached to the data source. To ensure that the route line doesn't cover up the road labels, pass a second parameter with the value of
'labels'.
Next, a symbol layer is created and attached to the data source. This layer specifies how the start and end points are rendered. Expressions have been added to retrieve the icon image and text label information from properties on each point object. To learn more about expressions, see Data-driven style expressions.
- This code implements the Map control's
Next, set the start point at Microsoft, and the end point at a gas station in Seattle. Start and points are created by appending the following code in the Map control's
readyevent handler://Create the GeoJSON objects which represent the start and end points of the route. var startPoint = new atlas.data.Feature(new atlas.data.Point([-122.130137, 47.644702]), { title: "Redmond", icon: "pin-blue" }); var endPoint = new atlas.data.Feature(new atlas.data.Point([-122.3352, 47.61397]), { title: "Seattle", icon: "pin-round-blue" }); //Add the data to the data source. datasource.add([startPoint, endPoint]); map.setCamera({ bounds: atlas.data.BoundingBox.fromData([startPoint, endPoint]), padding: 80 });Some things to know about the above JavaScript:
- This code creates two GeoJSON Point objects to represent start and end points, which are then added to the data source.
- The last block of code sets the camera view using the latitude and longitude of the start and end points.
- The start and end points are added to the data source.
- The bounding box for the start and end points is calculated using the
atlas.data.BoundingBox.fromDatafunction. This bounding box is used to set the map cameras view over the entire route using themap.setCamerafunction. - Padding is added to compensate for the pixel dimensions of the symbol icons.
For more information about the Map control's setCamera property, see the setCamera(CameraOptions | CameraBoundsOptions & AnimationOptions) property.
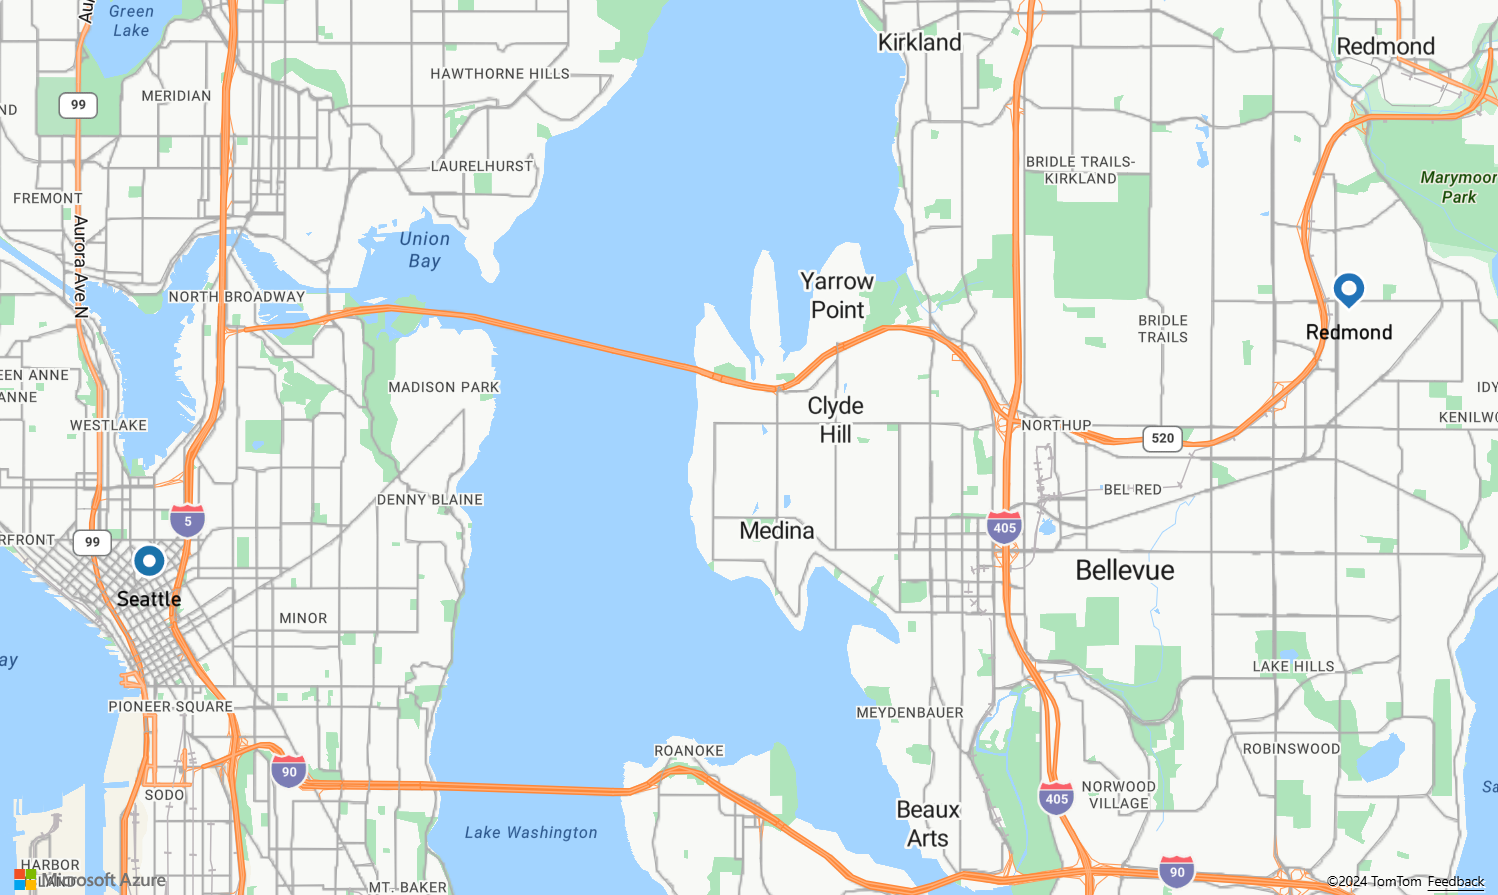
Save MapRoute.html and refresh your browser. The map is now centered over Seattle. The blue teardrop pin marks the start point. The blue round pin marks the end point.

Get route directions
This section shows you how to use the Azure Maps Route Directions API to get route directions and the estimated time of arrival from one point to another.
Tip
The Azure Maps Route services offer APIs to plan routes based on different route types such as fastest, shortest, eco, or thrilling routes based on distance, traffic conditions, and mode of transport used. The service also lets users plan future routes based on historical traffic conditions. Users can see the prediction of route durations for any given time. For more information, see Get Route directions API.
In the
GetMapfunction, inside the control'sreadyevent handler, add the following to the JavaScript code.//Use MapControlCredential to share authentication between a map control and the service module. var pipeline = atlas.service.MapsURL.newPipeline(new atlas.service.MapControlCredential(map)); //Construct the RouteURL object var routeURL = new atlas.service.RouteURL(pipeline);Use MapControlCredential to share authentication between a map control and the service module when creating a new pipeline object.
The routeURL represents a URL to Azure Maps Route service API.
After setting up credentials and the URL, append the following code at the end of the control's
readyevent handler.//Start and end point input to the routeURL var coordinates= [[startPoint.geometry.coordinates[0], startPoint.geometry.coordinates[1]], [endPoint.geometry.coordinates[0], endPoint.geometry.coordinates[1]]]; //Make a search route request routeURL.calculateRouteDirections(atlas.service.Aborter.timeout(10000), coordinates).then((directions) => { //Get data features from response var data = directions.geojson.getFeatures(); datasource.add(data); });Some things to know about the above JavaScript:
- This code constructs the route from the start to end point.
- The
routeURLrequests the Azure Maps Route service API to calculate route directions. - A GeoJSON feature collection from the response is then extracted using the
geojson.getFeatures()method and added to the data source.
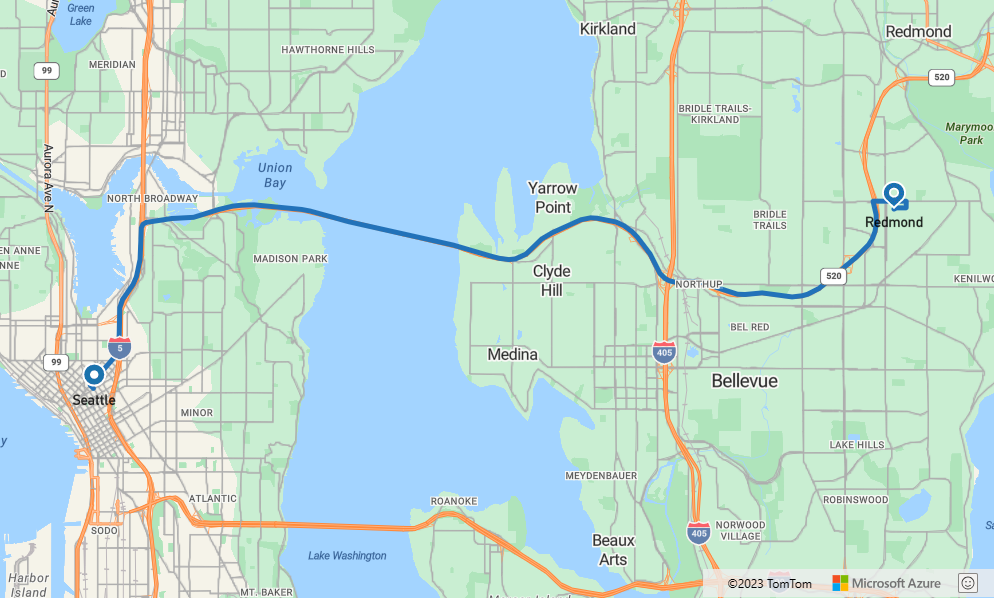
Save the MapRoute.html file and refresh your web browser. The map should now display the route from the start to end points.

- For the completed code used in this tutorial, see the route tutorial on GitHub.
- To view this sample live, see Route to a destination on the Azure Maps Code Samples site.
Next steps
The next tutorial shows you how to create a route query with restrictions, like mode of travel or type of cargo. You can then display multiple routes on the same map.
Feedback
Coming soon: Throughout 2024 we will be phasing out GitHub Issues as the feedback mechanism for content and replacing it with a new feedback system. For more information see: https://aka.ms/ContentUserFeedback.
Submit and view feedback for