Create a token with repository-scoped permissions
This article describes how to create tokens and scope maps to manage access to repositories in your container registry. By creating tokens, a registry owner can provide users or services with scoped, time-limited access to repositories to pull or push images or perform other actions. A token provides more fine-grained permissions than other registry authentication options, which scope permissions to an entire registry.
Common scenarios for creating a token include:
- Allow IoT devices with individual tokens to pull an image from a repository.
- Provide an external organization with permissions to a repository path.
- Limit repository access to different user groups in your organization. For example, provide write and read access to developers who build images that target specific repositories, and read access to teams that deploy from those repositories.
This feature is available in all the service tiers. For information about registry service tiers and limits, see Azure Container Registry service tiers
Limitations
- You can't currently assign repository-scoped permissions to a Microsoft Entra identity, such as a service principal or managed identity.
Concepts
To configure repository-scoped permissions, you create a token with an associated scope map.
A token along with a generated password lets the user authenticate with the registry. You can set an expiration date for a token password, or disable a token at any time.
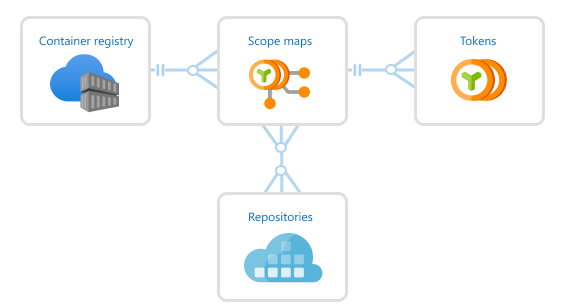
After authenticating with a token, the user or service can perform one or more actions scoped to one or more repositories.
Action Description Example content/deleteRemove data from the repository Delete a repository or a manifest content/readRead data from the repository Pull an artifact content/writeWrite data to the repository Use with content/readto push an artifactmetadata/readRead metadata from the repository List tags or manifests metadata/writeWrite metadata to the repository Enable or disable read, write, or delete operations
Note
Repository-scoped permissions do not support the ability to list the catalog of all repositories in the registry.
A scope map groups the repository permissions you apply to a token and can reapply to other tokens. Every token is associated with a single scope map. With a scope map, you can:
- Configure multiple tokens with identical permissions to a set of repositories.
- Update token permissions when you add or remove repository actions in the scope map, or apply a different scope map.
Azure Container Registry also provides several system-defined scope maps you can apply when creating tokens. The permissions of system-defined scope maps apply to all repositories in your registry.The individual actions corresponds to the limit of Repositories per scope map.
The following image shows the relationship between tokens and scope maps.
Prerequisites
- Azure CLI - Azure CLI command examples in this article require Azure CLI version 2.17.0 or later. Run
az --versionto find the version. If you need to install or upgrade, see Install Azure CLI. - Docker - To authenticate with the registry to pull or push images, you need a local Docker installation. Docker provides installation instructions for macOS, Windows, and Linux systems.
- Container registry - If you don't have one, create a container registry in your Azure subscription. For example, use the Azure portal or the Azure CLI.
Create token - CLI
Create token and specify repositories
Create a token using the az acr token create command. When creating a token, you can specify one or more repositories and associated actions on each repository. The repositories don't need to be in the registry yet. To create a token by specifying an existing scope map, see the next section.
The following example creates a token in the registry myregistry with the following permissions on the samples/hello-world repo: content/write and content/read. By default, the command sets the default token status to enabled, but you can update the status to disabled at any time.
az acr token create --name MyToken --registry myregistry \
  --repository samples/hello-world \
  content/write content/read \
  --output json
The output shows details about the token. By default, two passwords are generated that don't expire, but you can optionally set an expiration date. It's recommended to save the passwords in a safe place to use later for authentication. The passwords can't be retrieved again, but new ones can be generated.
{
  "creationDate": "2020-01-18T00:15:34.066221+00:00",
  "credentials": {
    "certificates": [],
    "passwords": [
      {
        "creationTime": "2020-01-18T00:15:52.837651+00:00",
        "expiry": null,
        "name": "password1",
        "value": "uH54BxxxxK7KOxxxxRbr26dAs8JXxxxx"
      },
      {
        "creationTime": "2020-01-18T00:15:52.837651+00:00",
        "expiry": null,
        "name": "password2",
        "value": "kPX6Or/xxxxLXpqowxxxxkA0idwLtmxxxx"
      }
    ],
    "username": "MyToken"
  },
  "id": "/subscriptions/xxxxxxxx-adbd-4cb4-c864-xxxxxxxxxxxx/resourceGroups/myresourcegroup/providers/Microsoft.ContainerRegistry/registries/myregistry/tokens/MyToken",
  "name": "MyToken",
  "objectId": null,
  "provisioningState": "Succeeded",
  "resourceGroup": "myresourcegroup",
  "scopeMapId": "/subscriptions/xxxxxxxx-adbd-4cb4-c864-xxxxxxxxxxxx/resourceGroups/myresourcegroup/providers/Microsoft.ContainerRegistry/registries/myregistry/scopeMaps/MyToken-scope-map",
  "status": "enabled",
  "type": "Microsoft.ContainerRegistry/registries/tokens"
}
Note
To regenerate token passwords and expiration periods, see Regenerate token passwords later in this article.
The output includes details about the scope map the command created. You can use the scope map, here named MyToken-scope-map, to apply the same repository actions to other tokens. Or, update the scope map later to change the permissions of the associated tokens.
Create token and specify scope map
An alternative way to create a token is to specify an existing scope map. If you don't already have a scope map, first create one by specifying repositories and associated actions. Then, specify the scope map when creating a token.
To create a scope map, use the az acr scope-map create command. The following command creates a scope map with the same permissions on the samples/hello-world repository used previously.
az acr scope-map create --name MyScopeMap --registry myregistry \
  --repository samples/hello-world \
  content/write content/read \
  --description "Sample scope map"
Run az acr token create to create a token, specifying the MyScopeMap scope map. As in the previous example, the command sets the default token status to enabled.
az acr token create --name MyToken \
  --registry myregistry \
  --scope-map MyScopeMap
The output shows details about the token. By default, two passwords are generated. It's recommended to save the passwords in a safe place to use later for authentication. The passwords can't be retrieved again, but new ones can be generated.
Note
To regenerate token passwords and expiration periods, see Regenerate token passwords later in this article.
How to use scope maps to define and assign permissions for multiple repositories
A scope map allows for the use of a wildcard character to define and grant similar permissions for multiple repositories that share a common prefix. Repositories with specific permissions, repositories with a wildcard character can also be used in the same scope map. This provides flexibility in managing permissions for a multiple set of repositories in a single scope map.
Repository permissions can be created when a scope map is created and assigned to a token. Alternatively, a token can be created and directly assigned to a repository.
The following example creates a scope map with a wildcard character and then assigns it to a token.
az acr scope-map create --name MyScopeMapWildcard --registry myregistry \
  --repository samples/* \
  content/write content/read \
  --description "Sample scope map with wildcards"
az acr token create --name MyTokenWildcard \
  --registry myregistry \
  --scope-map MyScopeMapWildcard
The following example creates a token with a wildcard.
 az acr token create --name MyTokenWildcard --registry myregistry \
  --repository samples/* \
  content/write content/read \
The wildcard permissions are additive, which means that when a specific repository is accessed, the resulting permissions will include the permissions for all the scope map rules that match the wildcard prefix.
In this example, the scope map defines permissions for three different types of repositories:
| Repository | Permission |
|---|---|
sample/* |
content/read |
sample/teamA/* |
content/write |
sample/teamA/projectB |
content/delete |
The token is assigned a scope map to grant [content/read, content/write, content/delete] permissions for accessing repository sample/teamA/projectB. However, when the same token is used to access the sample/teamA/projectC repository, it only has [content/read, content/write] permissions.
Important
Repositories using wildcards in the scope map should always end with a /* suffix to be valid and have a single wildcard character in the repository name.
Here are some examples of invalid wildcards:
sample/*/teamAwith a wildcard in the middle of the repository name.sample/teamA*with a wildcard does not end with `/*``.sample/teamA/*/projectB/*with multiple wildcards in the repository name.
Root level wildcards
Wildcards can also be applied at a root level. This means that any permissions assigned to the repository defined as *, will be applied registry wide.
The example shows how to create a token with a root level wildcard that would give the token [content/read, content/write] permissions to all repositories in the registry. This provides a simple way to grant permissions to all repositories in the registry without having to specify each repository individually.
 az acr token create --name MyTokenWildcard --registry myregistry \
  --repository * \
  content/write content/read \
Important
If a wildcard rule encompasses a repository that does not exist yet, the wildcard rule's permissions will still apply to that repository name.
For example, a token that is assigned to a scope map that grants [content/write, metadata/write] permissions for sample/* repositories.
Additionally, suppose the repository sample/teamC/teamCimage does not exist yet.
The token will have permissions for pushing images to repository sample/teamC/teamCimage, which will simultaneously create the repository on successful push.
Create token - portal
You can use the Azure portal to create tokens and scope maps. As with the az acr token create CLI command, you can apply an existing scope map, or create a scope map when you create a token by specifying one or more repositories and associated actions. The repositories don't need to be in the registry yet.
The following example creates a token, and creates a scope map with the following permissions on the samples/hello-world repository: content/write and content/read.
In the portal, navigate to your container registry.
Under Repository permissions, select Tokens > +Add.
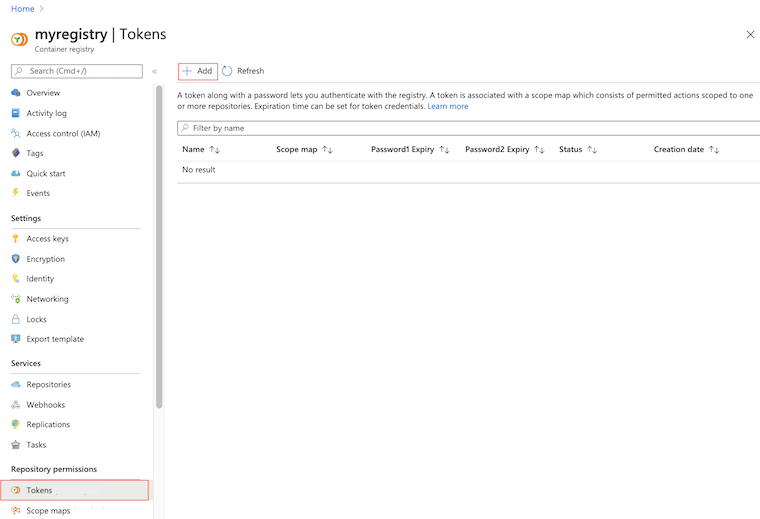
Enter a token name.
Under Scope map, select Create new.
Configure the scope map:
Enter a name and description for the scope map.
Under Repositories, enter
samples/hello-world, and under Permissions, selectcontent/readandcontent/write. Then select +Add.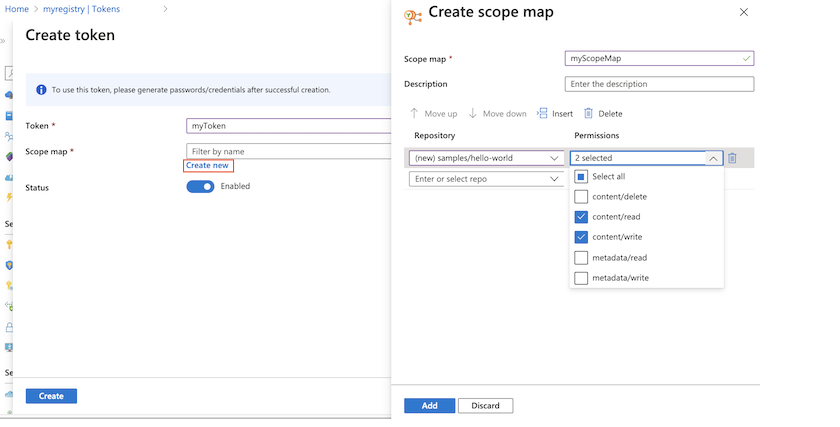
After adding repositories and permissions, select Add to add the scope map.
Accept the default token Status of Enabled and then select Create.
After the token is validated and created, token details appear in the Tokens screen.
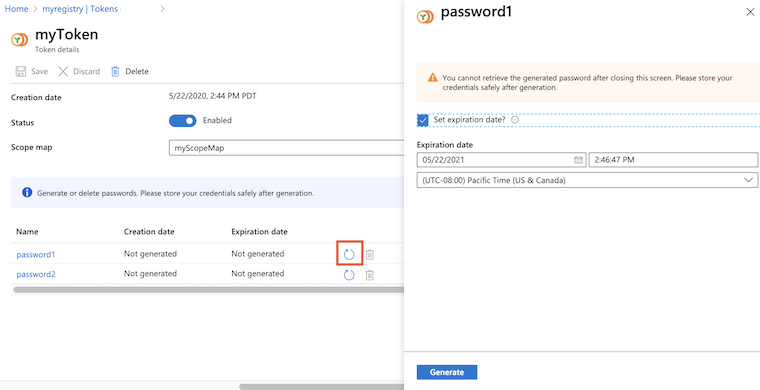
Add token password
To use a token created in the portal, you must generate a password. You can generate one or two passwords, and set an expiration date for each one. New passwords created for tokens are available immediately. Regenerating new passwords for tokens will take 60 seconds to replicate and be available.
In the portal, navigate to your container registry.
Under Repository permissions, select Tokens, and select a token.
In the token details, select password1 or password2, and select the Generate icon.
In the password screen, optionally set an expiration date for the password, and select Generate. It's recommended to set an expiration date.
After generating a password, copy and save it to a safe location. You can't retrieve a generated password after closing the screen, but you can generate a new one.
Authenticate with token
When a user or service uses a token to authenticate with the target registry, it provides the token name as a user name and one of its generated passwords.
The authentication method depends on the configured action or actions associated with the token.
| Action | How to authenticate |
|---|---|
content/delete |
az acr repository delete in Azure CLIExample: az acr repository delete --name myregistry --repository myrepo --username MyToken --password xxxxxxxxxx |
content/read |
docker loginaz acr login in Azure CLIExample: az acr login --name myregistry --username MyToken --password xxxxxxxxxx |
content/write |
docker loginaz acr login in Azure CLI |
metadata/read |
az acr repository showaz acr repository show-tagsaz acr manifest list-metadata in Azure CLI |
metadata/write |
az acr repository untagaz acr repository update in Azure CLI |
Examples: Use token
The following examples use the token created earlier in this article to perform common operations on a repository: push and pull images, delete images, and list repository tags. The token was set up initially with push permissions (content/write and content/read actions) on the samples/hello-world repository.
Pull and tag test images
For the following examples, pull public hello-world and nginx images from Microsoft Container Registry, and tag them for your registry and repository.
docker pull mcr.microsoft.com/hello-world
docker pull mcr.microsoft.com/oss/nginx/nginx:1.15.5-alpine
docker tag mcr.microsoft.com/hello-world myregistry.azurecr.io/samples/hello-world:v1
docker tag mcr.microsoft.com/oss/nginx/nginx:1.15.5-alpine myregistry.azurecr.io/samples/nginx:v1
Authenticate using token
Run docker login or az acr login to authenticate with the registry to push or pull images. Provide the token name as the user name, and provide one of its passwords. The token must have the Enabled status.
The following example is formatted for the bash shell, and provides the values using environment variables.
TOKEN_NAME=MyToken
TOKEN_PWD=<token password>

echo $TOKEN_PWD | docker login --username $TOKEN_NAME --password-stdin myregistry.azurecr.io
Output should show successful authentication:
Login Succeeded
Push images to registry
After successful login, attempt to push the tagged images to the registry. Because the token has permissions to push images to the samples/hello-world repository, the following push succeeds:
docker push myregistry.azurecr.io/samples/hello-world:v1
The token doesn't have permissions to the samples/nginx repo, so the following push attempt fails with an error similar to requested access to the resource is denied:
docker push myregistry.azurecr.io/samples/nginx:v1
Update token permissions
To update the permissions of a token, update the permissions in the associated scope map. The updated scope map is applied immediately to all associated tokens.
For example, update MyToken-scope-map with content/write and content/read actions on the samples/ngnx repository, and remove the content/write action on the samples/hello-world repository.
To use the Azure CLI, run az acr scope-map update to update the scope map:
az acr scope-map update \
  --name MyScopeMap \
  --registry myregistry \
  --add-repository samples/nginx content/write content/read \
  --remove-repository samples/hello-world content/write
In the Azure portal:
- Navigate to your container registry.
- Under Repository permissions, select Scope maps, and select the scope map to update.
- Under Repositories, enter
samples/nginx, and under Permissions, selectcontent/readandcontent/write. Then select +Add. - Under Repositories, select
samples/hello-worldand under Permissions, deselectcontent/write. Then select Save.
After updating the scope map, the following push succeeds:
docker push myregistry.azurecr.io/samples/nginx:v1
Because the scope map only has the content/read permission on the samples/hello-world repository, a push attempt to the samples/hello-world repo now fails:
docker push myregistry.azurecr.io/samples/hello-world:v1
Pulling images from both repos succeeds, because the scope map provides content/read permissions on both repositories:
docker pull myregistry.azurecr.io/samples/nginx:v1
docker pull myregistry.azurecr.io/samples/hello-world:v1
Delete images
Update the scope map by adding the content/delete action to the nginx repository. This action allows deletion of images in the repository, or deletion of the entire repository.
For brevity, we show only the az acr scope-map update command to update the scope map:
az acr scope-map update \
  --name MyScopeMap \
  --registry myregistry \
  --add-repository samples/nginx content/delete
To update the scope map using the portal, see the previous section.
Use the following az acr repository delete command to delete the samples/nginx repository. To delete images or repositories, pass the token's name and password to the command. The following example uses the environment variables created earlier in the article:
az acr repository delete \
  --name myregistry --repository samples/nginx \
  --username $TOKEN_NAME --password $TOKEN_PWD
Show repo tags
Update the scope map by adding the metadata/read action to the hello-world repository. This action allows reading manifest and tag data in the repository.
For brevity, we show only the az acr scope-map update command to update the scope map:
az acr scope-map update \
  --name MyScopeMap \
  --registry myregistry \
  --add-repository samples/hello-world metadata/read
To update the scope map using the portal, see the previous section.
To read metadata in the samples/hello-world repository, run the az acr manifest list-metadata or az acr repository show-tags command.
To read metadata, pass the token's name and password to either command. The following example uses the environment variables created earlier in the article:
az acr repository show-tags \
  --name myregistry --repository samples/hello-world \
  --username $TOKEN_NAME --password $TOKEN_PWD
Sample output:
[
  "v1"
]
Manage tokens and scope maps
List scope maps
Use the az acr scope-map list command, or the Scope maps screen in the portal, to list all the scope maps configured in a registry. For example:
az acr scope-map list \
  --registry myregistry --output table
The output consists of the three system-defined scope maps and other scope maps generated by you. Tokens can be configured with any of these scope maps.
NAME                 TYPE           CREATION DATE         DESCRIPTION
-------------------  -------------  --------------------  ------------------------------------------------------------
_repositories_admin  SystemDefined  2020-01-20T09:44:24Z  Can perform all read, write and delete operations on the ...
_repositories_pull   SystemDefined  2020-01-20T09:44:24Z  Can pull any repository of the registry
_repositories_push   SystemDefined  2020-01-20T09:44:24Z  Can push to any repository of the registry
MyScopeMap           UserDefined    2019-11-15T21:17:34Z  Sample scope map
Show token details
To view the details of a token, such as its status and password expiration dates, run the az acr token show command, or select the token in the Tokens screen in the portal. For example:
az acr scope-map show \
  --name MyScopeMap --registry myregistry
Use the az acr token list command, or the Tokens screen in the portal, to list all the tokens configured in a registry. For example:
az acr token list --registry myregistry --output table
Regenerate token passwords
If you didn't generate a token password, or you want to generate new passwords, run the az acr token credential generate command. Regenerating new passwords for tokens will take 60 seconds to replicate and be available.
The following example generates a new value for password1 for the MyToken token, with an expiration period of 30 days. It stores the password in the environment variable TOKEN_PWD. This example is formatted for the bash shell.
TOKEN_PWD=$(az acr token credential generate \
  --name MyToken --registry myregistry --expiration-in-days 30 \
  --password1 --query 'passwords[0].value' --output tsv)
To use the Azure portal to generate a token password, see the steps in Create token - portal earlier in this article.
Update token with new scope map
If you want to update a token with a different scope map, run az acr token update and specify the new scope map. For example:
az acr token update --name MyToken --registry myregistry \
  --scope-map MyNewScopeMap
In the portal, on the Tokens screen, select the token, and under Scope map, select a different scope map.
Tip
After updating a token with a new scope map, you might want to generate new token passwords. Use the az acr token credential generate command or regenerate a token password in the Azure portal.
Disable or delete token
You might need to temporarily disable use of the token credentials for a user or service.
Using the Azure CLI, run the az acr token update command to set the status to disabled:
az acr token update --name MyToken --registry myregistry \
  --status disabled
In the portal, select the token in the Tokens screen, and select Disabled under Status.
To delete a token to permanently invalidate access by anyone using its credentials, run the az acr token delete command.
az acr token delete --name MyToken --registry myregistry
In the portal, select the token in the Tokens screen, and select Discard.
Next steps
- To manage scope maps and tokens, use additional commands in the az acr scope-map and az acr token command groups.
- See the authentication overview for other options to authenticate with an Azure container registry, including using a Microsoft Entra identity, a service principal, or an admin account.
- Learn about connected registries and using tokens for access.
Feedback
Coming soon: Throughout 2024 we will be phasing out GitHub Issues as the feedback mechanism for content and replacing it with a new feedback system. For more information see: https://aka.ms/ContentUserFeedback.
Submit and view feedback for