Maintain the on-premises management console (Legacy)
Important
Defender for IoT now recommends using Microsoft cloud services or existing IT infrastructure for central monitoring and sensor management, and plans to retire the on-premises management console on January 1st, 2025.
For more information, see Deploy hybrid or air-gapped OT sensor management.
This article describes extra on-premises management console activities that you might perform outside of a larger deployment process.
Caution
Only documented configuration parameters on the OT network sensor and on-premises management console are supported for customer configuration. Do not change any undocumented configuration parameters or system properties, as changes may cause unexpected behavior and system failures.
Removing packages from your sensor without Microsoft approval can cause unexpected results. All packages installed on the sensor are required for correct sensor functionality.
Prerequisites
Before performing the procedures in this article, make sure that you have:
Access to the on-premises management console as an Admin user. Selected procedures and CLI access also requires a privileged user. For more information, see On-premises users and roles for OT monitoring with Defender for IoT.
An SSL/TLS certificate prepared if you need to update your sensor's certificate.
If you're adding a secondary NIC, you'll need access to the CLI as a privileged user.
Download software for the on-premises management console
You may need to download software for your on-premises management console if you're installing Defender for IoT software on your own appliances, or updating software versions.
In Defender for IoT in the Azure portal, use one of the following options:
For a new installation or standalone update, select Getting started > On-premises management console.
- For a new installation, select a version in the Purchase an appliance and install software area, and then select Download.
- For an update, select your update scenario in the On-premises management console area and then select Download.
If you're updating your on-premises management console together with connected OT sensors, use the options in the Sites and sensors page > Sensor update (Preview) menu.
Add a secondary NIC after installation
Enhance security to your on-premises management console by adding a secondary NIC dedicated for attached sensors within an IP address range. When you use a secondary NIC, the first is dedicated for end-users, and the secondary supports the configuration of a gateway for routed networks.
This procedure describes how to add a secondary NIC after installing your on-premises management console.
To add a secondary NIC:
Sign into your on-premises management console via SSH to access the CLI, and run:
sudo cyberx-management-network-reconfigureEnter the following responses to the following questions:
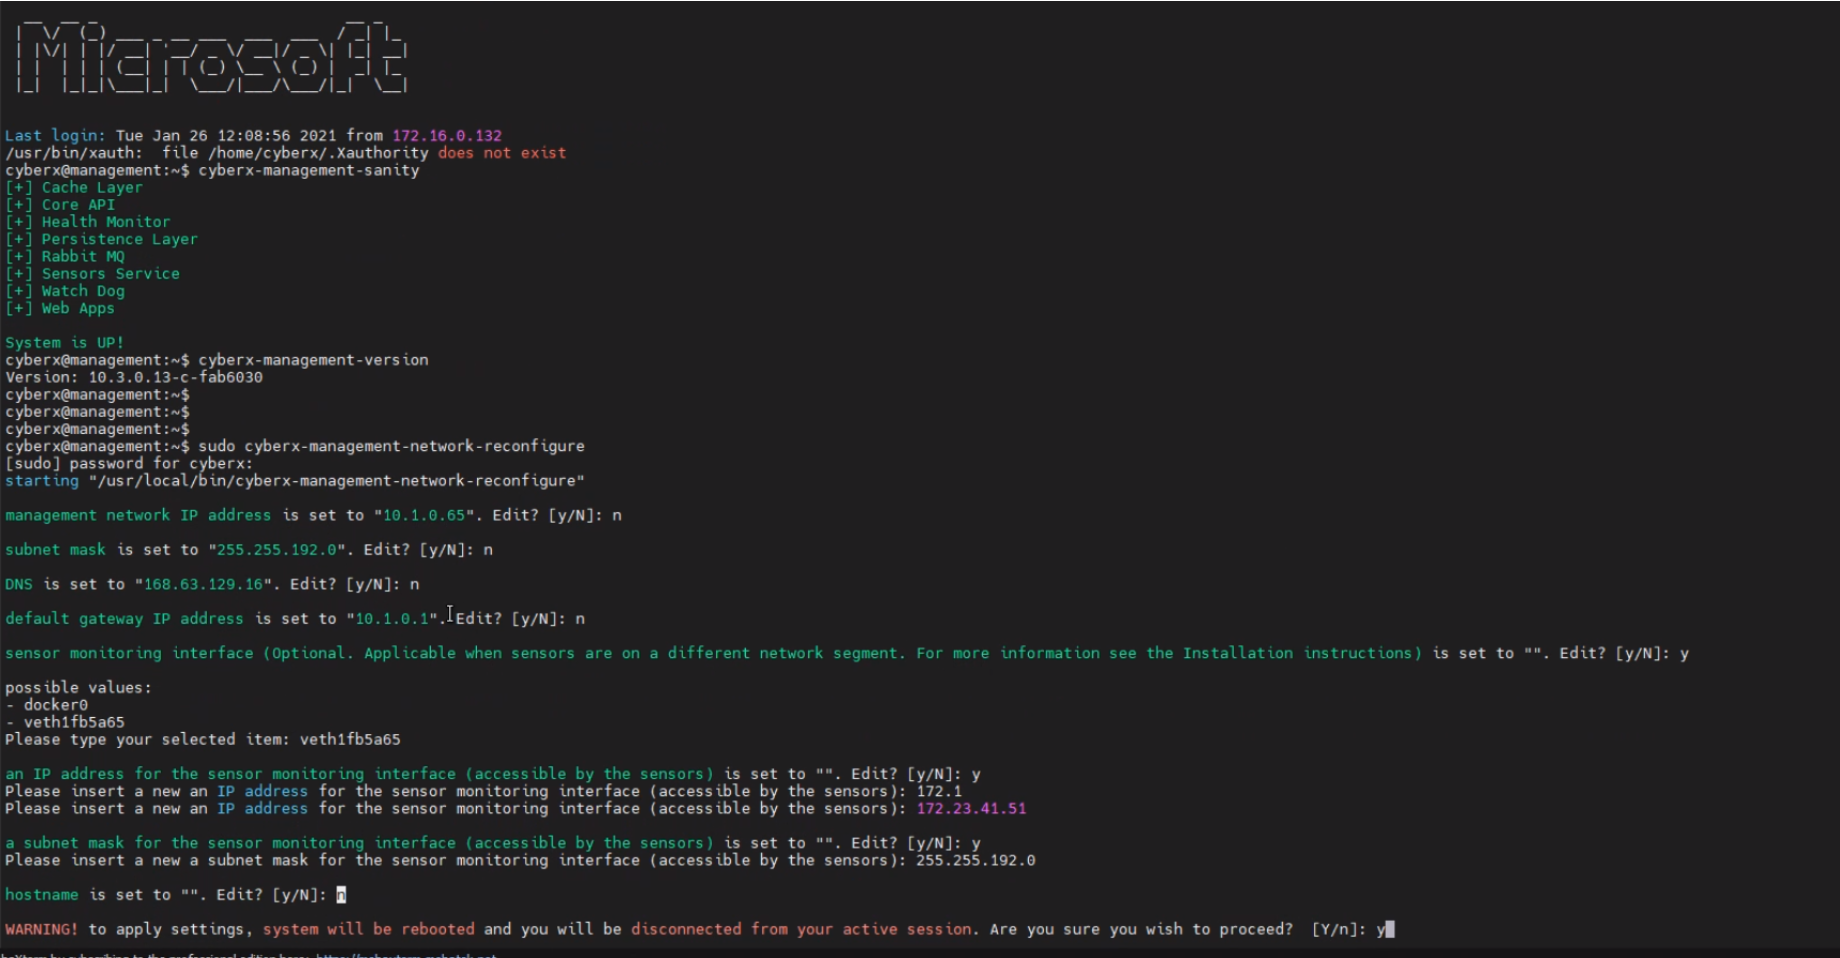
Parameters Response to enter Management Network IP address NSubnet mask NDNS NDefault gateway IP Address NSensor monitoring interface
Optional. Relevant when sensors are on a different network segment.Y, and select a possible valueAn IP address for the sensor monitoring interface Y, and enter an IP address that's accessible by the sensorsA subnet mask for the sensor monitoring interface Y, and enter an IP address that's accessible by the sensorsHostname Enter the hostname Review all choices and enter
Yto accept the changes. The system reboots.
Upload a new activation file
You'd activated your on-premises management console as part of your deployment.
You may need to reactivate your on-premises management console as part of maintenance procedures, such as if the total number of monitored devices exceeds the number of devices that you're licensed for.
To upload a new activation file to your on-premises management console:
In Defender for IoT on the Azure portal, select Plans and pricing.
Select your plan and then select Download on-premises management console activation file.
Save your downloaded file in a location that's accessible from the on-premises management console.
All files downloaded from the Azure portal are signed by root of trust so that your machines use signed assets only.
Sign into your on-premises management console and select System Settings > Activation.
In the Activation dialog, select CHOOSE FILE and browse to the activation file you'd downloaded earlier.
Select Close to save your changes.
Manage SSL/TLS certificates
If you're working with a production environment, you'd deployed a CA-signed SSL/TLS certificate as part of your on-premises management console deployment. We recommend using self-signed certificates only for testing purposes.
The following procedures describe how to deploy updated SSL/TLS certificates, such as if the certificate has expired.
To deploy a CA-signed certificate:
Sign into your on-premises management console and select System Settings > SSL/TLS Certificates.
In the SSL/TLS Certificates dialog, select + Add Certificate and enter the following values:
Parameter Description Certificate Name Enter your certificate name. Passphrase - Optional Enter a passphrase. Private Key (KEY file) Upload a Private Key (KEY file). Certificate (CRT file) Upload a Certificate (CRT file). Certificate Chain (PEM file) - Optional Upload a Certificate Chain (PEM file). For example:

If the upload fails, contact your security or IT administrator. For more information, see SSL/TLS certificate requirements for on-premises resources and Create SSL/TLS certificates for OT appliances.
Select the Enable Certificate Validation option to turn on system-wide validation for SSL/TLS certificates with the issuing Certificate Authority and Certificate Revocation Lists.
If this option is turned on and validation fails, communication between relevant components is halted, and a validation error is shown on the sensor. For more information, see CRT file requirements.
Select Save to save your changes.


Troubleshoot certificate upload errors
You won't be able to upload certificates to your OT sensors or on-premises management consoles if the certificates aren't created properly or are invalid. Use the following table to understand how to take action if your certificate upload fails and an error message is shown:
| Certificate validation error | Recommendation |
|---|---|
| Passphrase does not match to the key | Make sure you have the correct passphrase. If the problem continues, try recreating the certificate using the correct passphrase. For more information, see Supported characters for keys and passphrases. |
| Cannot validate chain of trust. The provided Certificate and Root CA don't match. | Make sure a .pem file correlates to the .crt file. If the problem continues, try recreating the certificate using the correct chain of trust, as defined by the .pem file. |
| This SSL certificate has expired and isn't considered valid. | Create a new certificate with valid dates. |
| This certificate has been revoked by the CRL and can't be trusted for a secure connection | Create a new unrevoked certificate. |
| The CRL (Certificate Revocation List) location is not reachable. Verify the URL can be accessed from this appliance | Make sure that your network configuration allows the sensor or on-premises management console to reach the CRL server defined in the certificate. For more information, see Verify CRL server access. |
| Certificate validation failed | This indicates a general error in the appliance. Contact Microsoft Support. |
Change the name of the on-premises management console
The default name of your on-premises management console is Management console, and is shown in the on-premises management console GUI and troubleshooting logs.
To change the name of your on-premises management console:
Sign into your on-premises management console and select the name on the bottom-left, just above the version number.
In the Edit management console configuration dialog, enter your new name. The name must have a maximum of 25 characters. For example:

Select Save to save your changes.
Recover a privileged user password
If you no longer have access to your on-premises management console as a privileged user, recover access from the Azure portal.
To recover privileged user access:
Go to the sign-in page for your on-premises management console and select Password Recovery.
Select the user that you want to recover access for, either the Support or CyberX user.
Copy the identifier that's displayed in the Password Recovery dialog to a secure location.
Go to Defender for IoT in the Azure portal, and make sure that you're viewing the subscription that was used to onboard the OT sensors currently connected to the on-premises management console.
Select Sites and sensors > More actions > Recover an on-premises management console password.
Enter the secret identifier you'd copied earlier from your on-premises management console and select Recover.
A
password_recovery.zipfile is downloaded from your browser.All files downloaded from the Azure portal are signed by root of trust so that your machines use signed assets only.
In the Password Recovery dialog on the on-premises management console, select Upload and select the
password_recovery.zipfile you'd downloaded.
Your new credentials are displayed.
Edit the host name
The on-premises management console's hostname must match the hostname configured in the organizational DNS server.
To edit the hostname saved on the on-premises management console:
Sign into the on-premises management console and select System Settings.
In the Management console networking area, select Network.
Enter the new hostname and select SAVE to save your changes.
Define VLAN names
VLAN names aren't synchronized between an OT sensor and the on-premises management console. If you've defined VLAN names on your OT sensor, we recommend that you define identical VLAN names on the on-premises management console.
To define VLAN names:
Sign into the on-premises management console and select System Settings.
In the Management console networking area, select VLAN.
In the Edit VLAN Configuration dialog, select Add VLAN and then enter your VLAN ID and name, one at a time.
Select SAVE to save your changes.
Configure SMTP mail server settings
Define SMTP mail server settings on your on-premises management console so that you configure the on-premises management console to send data to other servers and partner services.
For example, you'll need an SMTP mail server configured to set up mail forwarding and configure forwarding alert rules.
Prerequisites:
Make sure you can reach the SMTP server from the on-premises management console.
To configure an SMTP server on your on-premises management console:
Sign into your on-premises management console as a privileged user via SSH/Telnet.
Run:
nano /var/cyberx/properties/remote-interfaces.propertiesEnter the following SMTP server details as prompted:
mail.smtp_servermail.port. The default port is25.mail.sender
Next steps
For more information, see:
Feedback
Coming soon: Throughout 2024 we will be phasing out GitHub Issues as the feedback mechanism for content and replacing it with a new feedback system. For more information see: https://aka.ms/ContentUserFeedback.
Submit and view feedback for