Quickstart: Diagnose a virtual machine network traffic filter problem using the Azure portal
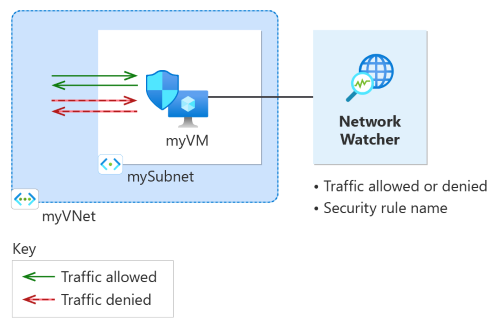
In this quickstart, you deploy a virtual machine and use Network Watcher IP flow verify to test the connectivity to and from different IP addresses. Using the IP flow verify results, you determine the security rule that's blocking the traffic and causing the communication failure and learn how you can resolve it. You also learn how to use the effective security rules for a network interface to determine why a security rule is allowing or denying traffic.
If you don't have an Azure subscription, create a free account before you begin.
Prerequisites
- An Azure account with an active subscription
Sign in to Azure
Sign in to the Azure portal with your Azure account.
Create a virtual machine
In the search box at the top of the portal, enter virtual machines. Select Virtual machines in the search results.
Select + Create and then select Azure virtual machine.
In Create a virtual machine, enter or select the following values in the Basics tab:
Setting Value Project Details Subscription Select your Azure subscription. Resource Group Select Create new. Enter myResourceGroup in Name. Select OK. Instance details Virtual machine name Enter myVM. Region Select (US) East US. Availability Options Select No infrastructure redundancy required. Security type Leave the default of Standard. Image Select Ubuntu Server 20.04 LTS - x64 Gen2. Size Choose a size or leave the default setting. Administrator account Authentication type Select Password. Username Enter a username. Password Enter a password. Confirm password Reenter password. Select the Networking tab, or select Next: Disks, then Next: Networking.
In the Networking tab, select Create new to create new virtual network.
In Create virtual network, enter or select the following values:
Setting Value Name Enter myVNet. Address space Address range Enter 10.0.0.0/16. Subnets Subnet name Enter mySubnet. Address range Enter 10.0.0.0/24. Select OK.
Enter or select the following values in the Networking tab:
Setting Value Public IP Select None. NIC network security group Select Basic. Public inbound ports Select None. Note
Azure will create a default network security group for myVM virtual machine (because you selected Basic NIC network security group). You will use this default network security group to test network communication to and from the virtual machine in the next section.
Select Review + create.
Review the settings, and then select Create.
Test network communication using IP flow verify
In this section, you use the IP flow verify capability of Network Watcher to test network communication to and from the virtual machine.
In the search box at the top of the portal, enter network watcher. Select Network Watcher in the search results.
Under Network diagnostic tools, select IP flow verify.
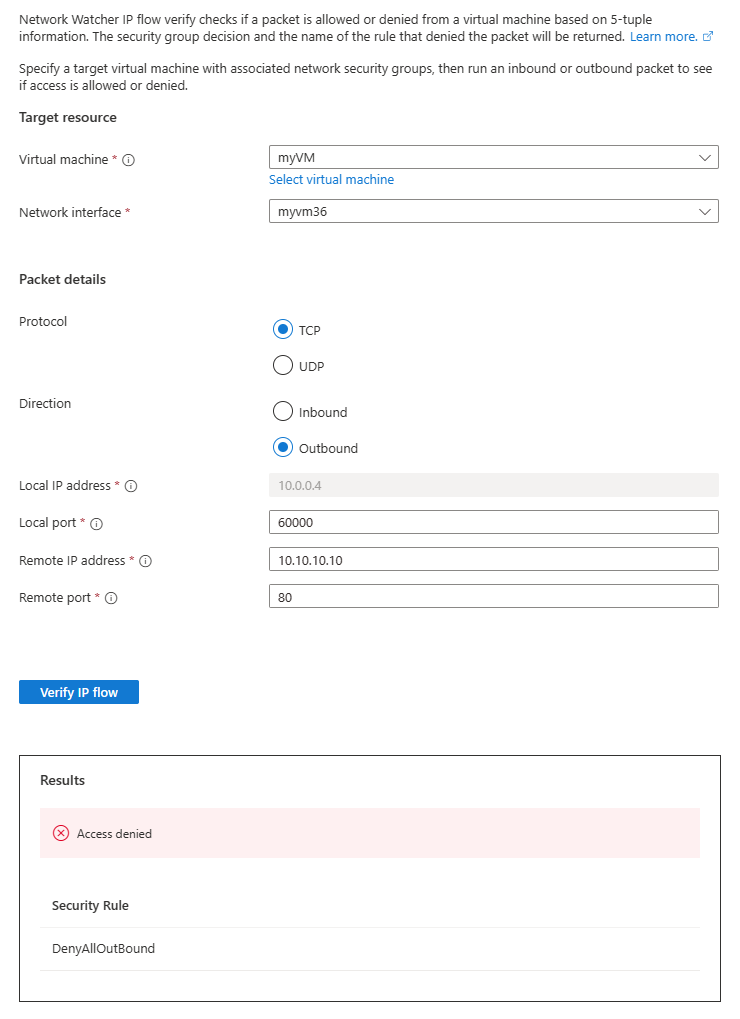
In the IP flow verify page, enter or select the following values:
Setting Value Target resource Virtual machine Select myVM virtual machine. Network interface Select the network interface of myVM. When you use the Azure portal to create a virtual machine, the portal names the network interface using the virtual machine's name and a random number (for example myvm36). Packet details Protocol Select TCP. Direction Select Outbound. Local port Enter 60000. Choose any port number from the Internet Assigned Numbers Authority (IANA) range for dynamic or private ports. Remote IP address Enter 13.107.21.200. This IP address is one of the IP addresses of www.bing.comwebsite.Remote port Enter 80 Note
If you don't see the virtual machine in the list of virtual machines available to select, make sure that it is running. Stopped virtual machines are not available to select for IP flow verify test.
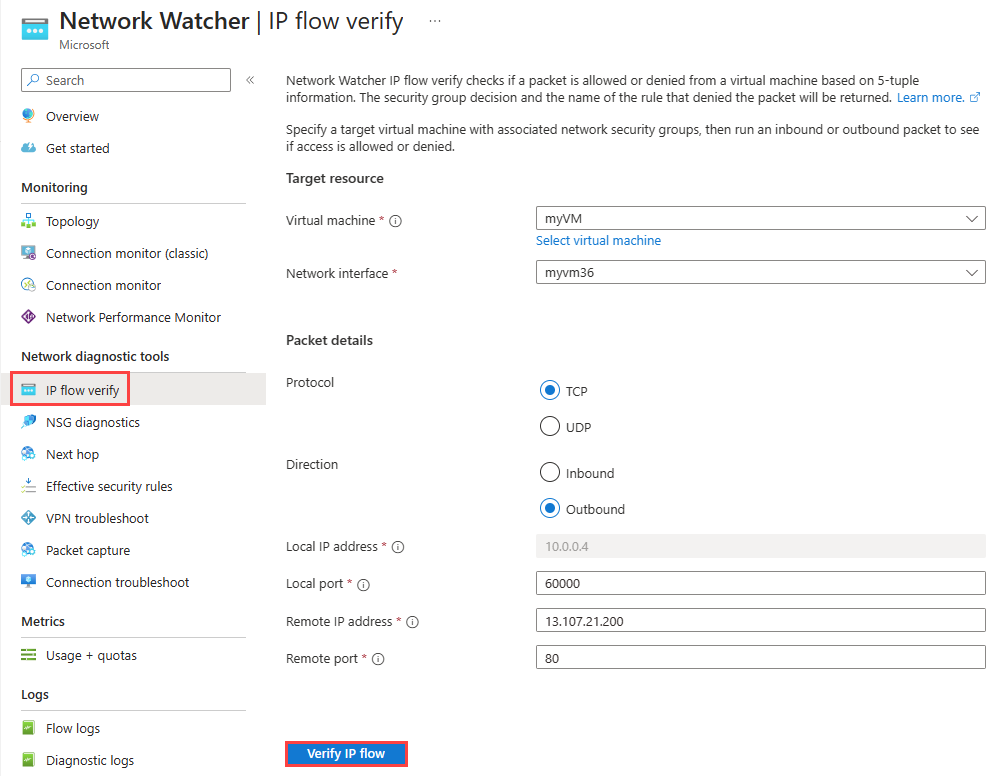
Select Verify IP flow button.
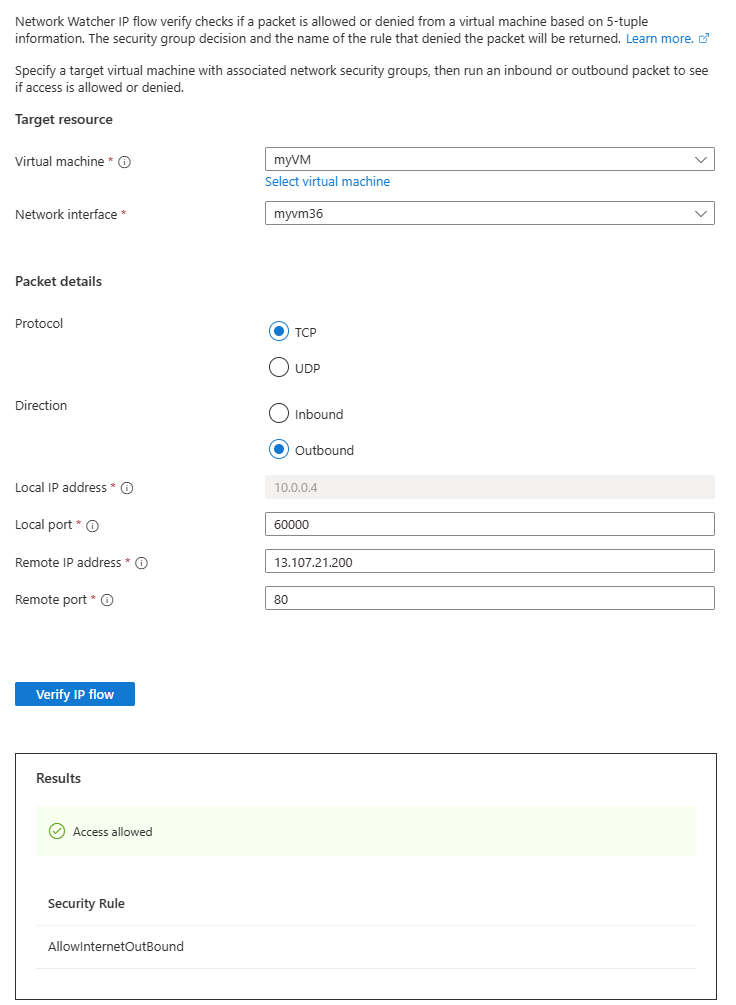
After a few seconds, you can see the test result, which indicates that access is allowed to 13.107.21.200 because of the default security rule AllowInternetOutBound.
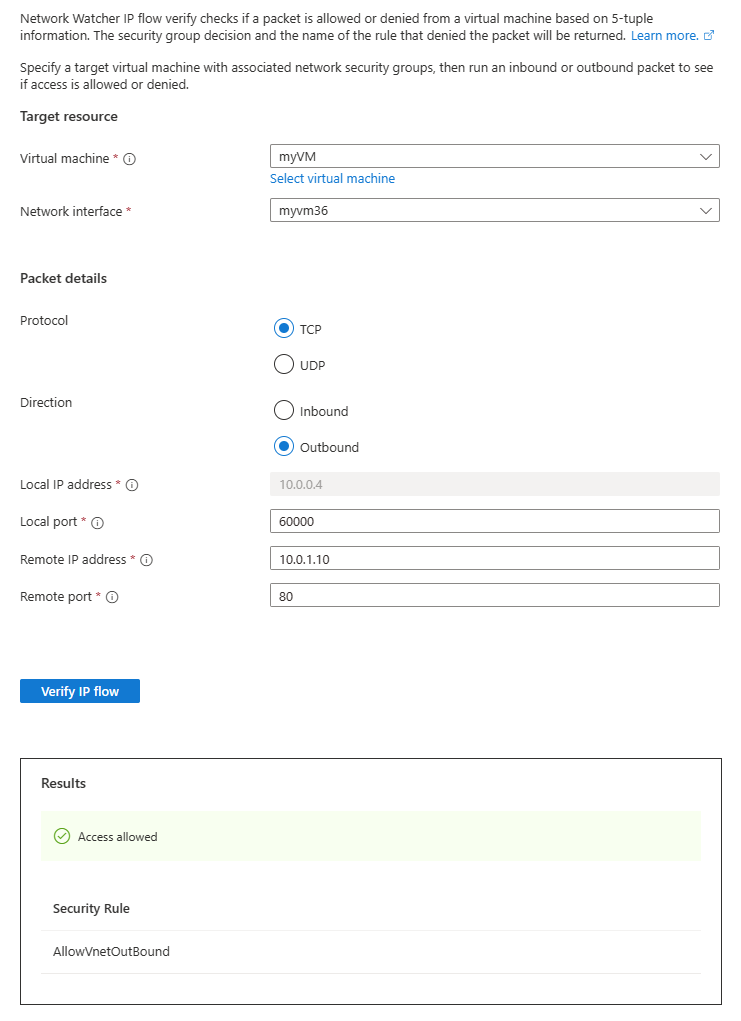
Change Remote IP address to 10.0.1.10, which is a private IP address in myVNet address space. Then, repeat the test by selecting Verify IP flow button again. The result of the second test indicates that access is allowed to 10.0.1.10 because of the default security rule AllowVnetOutBound.
Change Remote IP address to 10.10.10.10 and repeat the test. The result of the third test indicates that access is denied to 10.10.10.10 because of the default security rule DenyAllOutBound.
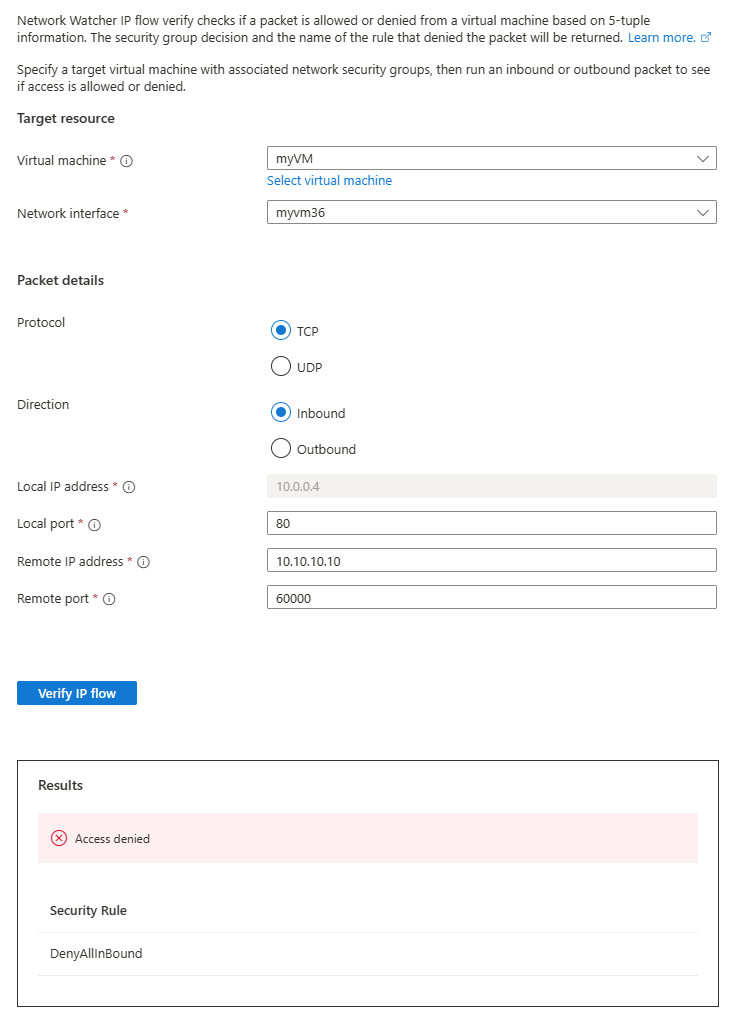
Change Direction to Inbound, the Local port to 80, and the Remote port to 60000, and then repeat the test. The result of the fourth test indicates that access is denied from 10.10.10.10 because of the default security rule DenyAllInBound.


View details of a security rule
To determine why the rules in the previous section allow or deny communication, review the effective security rules for the network interface in myVM virtual machine.
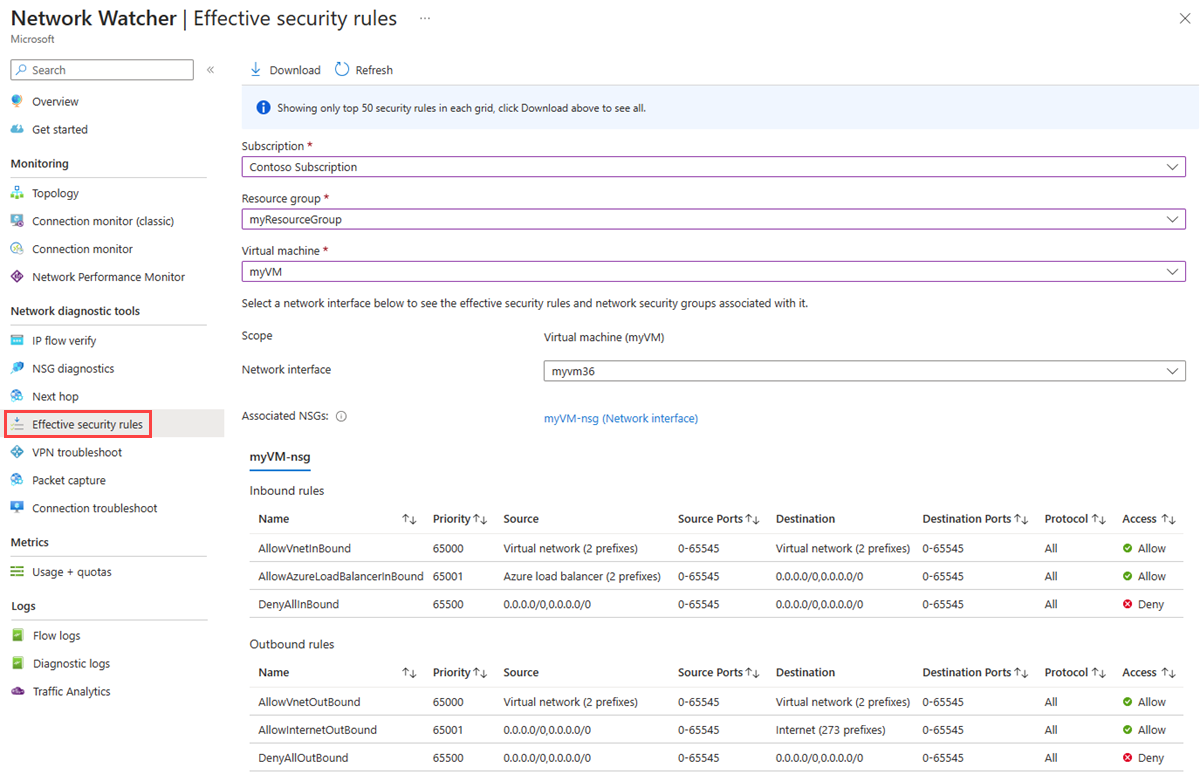
Under Network diagnostic tools in Network Watcher, select Effective security rules.
Select the following information:
Setting Value Subscription Select your Azure subscription. Resource Group Select myResourceGroup. Virtual machine Select myVM. Note
myVM virtual machine has one network interface that will be selected once you select myVM. If your virtual machine has more than one network interface, choose the one that you want to see its effective security rules.
Under Outbound rules, select AllowInternetOutBound to see the allowed destination IP address prefixes under this security rule.
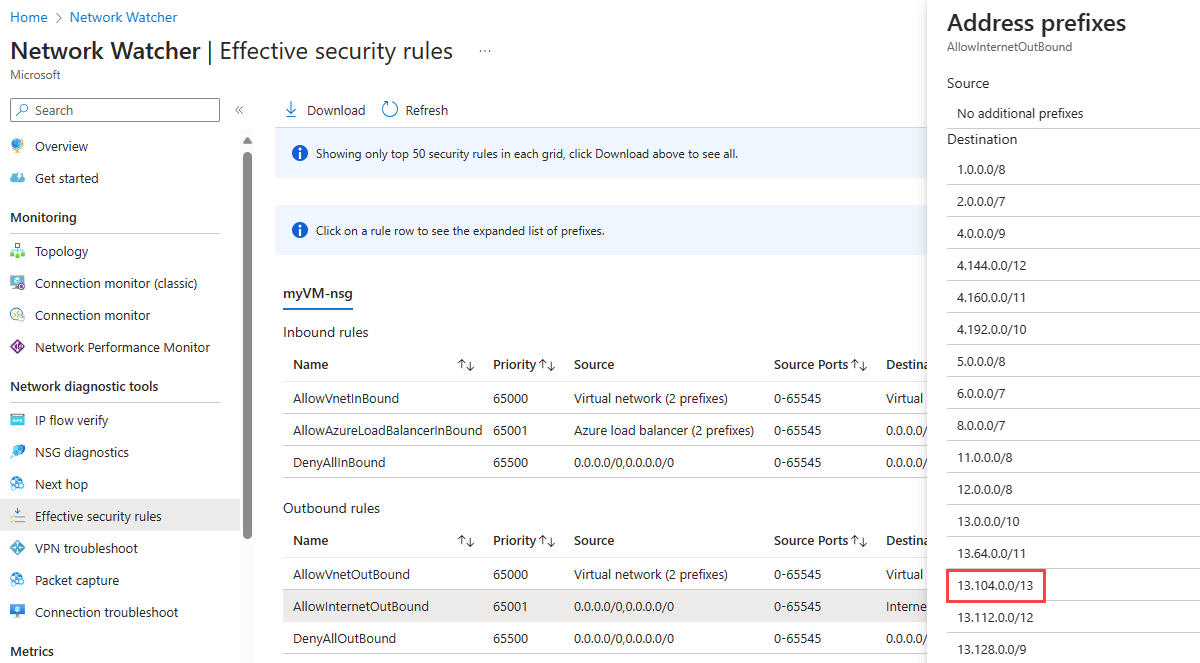
You can see that address prefix 13.104.0.0/13 is among the address prefixes of AllowInternetOutBound rule. This prefix encompasses IP address 13.107.21.200 which you tested in step 4 of previous section.
Similarly, you can check the other rules to see the source and destination IP address prefixes under each rule.


IP flow verify checks Azure default and configured security rules. If the checks return the expected results and you still have network problems, ensure that you don't have a firewall between your virtual machine and the endpoint you're communicating with and that the operating system in your virtual machine doesn't have a firewall that is denying communication.
Clean up resources
When no longer needed, delete the resource group and all of the resources it contains:
In the search box at the top of the portal, enter myResourceGroup. Select myResourceGroup from the search results.
Select Delete resource group.
In Delete a resource group, enter myResourceGroup, and then select Delete.
Select Delete to confirm the deletion of the resource group and all its resources.
Next step
Feedback
Coming soon: Throughout 2024 we will be phasing out GitHub Issues as the feedback mechanism for content and replacing it with a new feedback system. For more information see: https://aka.ms/ContentUserFeedback.
Submit and view feedback for