Configure a managed Spring Cloud Config Server in Azure Spring Apps
Note
Azure Spring Apps is the new name for the Azure Spring Cloud service. Although the service has a new name, you'll see the old name in some places for a while as we work to update assets such as screenshots, videos, and diagrams.
This article applies to: ✔️ Java ✔️ C#
This article applies to: ✔️ Standard consumption and dedicated (Preview) ✔️ Basic/Standard ❌ Enterprise
This article shows you how to configure a managed Spring Cloud Config Server in Azure Spring Apps service.
Spring Cloud Config Server provides server and client-side support for an externalized configuration in a distributed system. The Config Server instance provides a central place to manage external properties for applications across all environments. For more information, see the Spring Cloud Config documentation.
Note
To use config server in the Standard consumption and dedicated plan, you must enable it first. For more information, see Enable and disable Spring Cloud Config Server in Azure Spring Apps.
Prerequisites
- An Azure subscription. If you don't have an Azure subscription, create a free account before you begin.
- An already provisioned and running Azure Spring Apps service instance using the Basic or Standard plan. To set up and launch an Azure Spring Apps service, see Quickstart: Deploy your first application to Azure Spring Apps. Spring Cloud Config Server isn't applicable to the Enterprise plan.
- Git.
Restriction
There are some restrictions when you use Config Server with a Git back end. The following properties are automatically injected into your application environment to access Config Server and Service Discovery. If you also configure those properties from your Config Server files, you might experience conflicts and unexpected behavior.
eureka.client.service-url.defaultZone
eureka.client.tls.keystore
eureka.instance.preferIpAddress
eureka.instance.instance-id
server.port
spring.cloud.config.tls.keystore
spring.config.import
spring.application.name
spring.jmx.enabled
management.endpoints.jmx.exposure.include
Caution
Don't put these properties in your Config Server application files.
Create your Config Server files
Azure Spring Apps supports Azure DevOps Server, GitHub, GitLab, and Bitbucket for storing your Config Server files. When your repository is ready, you can create the configuration files and store them there.
Some configurable properties are available only for certain types. The following sections describe the properties for each repository type.
Note
Config Server takes master (on Git) as the default label if you don't specify one. However, GitHub has recently changed the default branch from master to main. To avoid Azure Spring Apps Config Server failure, be sure to pay attention to the default label when setting up Config Server with GitHub, especially for newly-created repositories.
Public repository
When you use a public repository, your configurable properties are more limited than with a private repository.
The following table lists the configurable properties that you can use to set up a public Git repository.
Note
Using a hyphen (-) to separate words is the only naming convention that's currently supported. For example, you can use default-label, but not defaultLabel.
| Property | Required | Feature |
|---|---|---|
uri |
Yes | The URI of the Git repository that's used as the Config Server back end. Should begin with http://, https://, git@, or ssh://. |
default-label |
No | The default label of the Git repository. Should be the branch name, tag name, or commit ID of the repository. |
search-paths |
No | An array of strings that are used to search subdirectories of the Git repository. |
Private repository with SSH authentication
The following table lists the configurable properties that you can use to set up a private Git repository with SSH.
Note
Using a hyphen (-) to separate words is the only naming convention that's currently supported. For example, you can use default-label, but not defaultLabel.
| Property | Required | Feature |
|---|---|---|
uri |
Yes | The URI of the Git repository used as the Config Server back end. Should begin with http://, https://, git@, or ssh://. |
default-label |
No | The default label of the Git repository. Should be the branch name, tag name, or commit ID of the repository. |
search-paths |
No | An array of strings used to search subdirectories of the Git repository. |
private-key |
No | The SSH private key to access the Git repository. Required when the URI starts with git@ or ssh://. |
host-key |
No | The host key of the Git repository server. Shouldn't include the algorithm prefix as covered by host-key-algorithm. |
host-key-algorithm |
No | The host key algorithm. Should be ssh-dss, ssh-rsa, ecdsa-sha2-nistp256, ecdsa-sha2-nistp384, or ecdsa-sha2-nistp521. Required only if host-key exists. |
strict-host-key-checking |
No | Indicates whether the Config Server instance fails to start when using the private host-key. Should be true (default value) or false. |
Private repository with basic authentication
The following table lists the configurable properties that you can use to set up a private Git repository with basic authentication.
Note
Using a hyphen (-) to separate words is the only naming convention that's currently supported. For example, use default-label, not defaultLabel.
| Property | Required | Feature |
|---|---|---|
uri |
Yes | The URI of the Git repository that's used as the Config Server back end. Should begin with http://, https://, git@, or ssh://. |
default-label |
No | The default label of the Git repository. Should be the branch name, tag name, or commit-id of the repository. |
search-paths |
No | An array of strings used to search subdirectories of the Git repository. |
username |
No | The username that's used to access the Git repository server. Required when the Git repository server supports HTTP basic authentication. |
password |
No | The password or personal access token used to access the Git repository server. Required when the Git repository server supports HTTP basic authentication. |
Note
Many Git repository servers support the use of tokens rather than passwords for HTTP basic authentication. Some repositories allow tokens to persist indefinitely. However, some Git repository servers, including Azure DevOps Server, force tokens to expire in a few hours. Repositories that cause tokens to expire shouldn't use token-based authentication with Azure Spring Apps. If you use such a token, remember to update it before it expires.
GitHub has removed support for password authentication, so you need to use a personal access token instead of password authentication for GitHub. For more information, see Token authentication requirements for Git operations.
Other Git repositories
The following table lists the configurable properties you can use to set up Git repositories with a pattern.
Note
Using a hyphen (-) to separate words is the only naming convention that's currently supported. For example, use default-label, not defaultLabel.
| Property | Required | Feature |
|---|---|---|
repos |
No | A map consisting of the settings for a Git repository with a given name. |
repos."uri" |
Yes on repos |
The URI of the Git repository that's used as the Config Server back end. Should begin with http://, https://, git@, or ssh://. |
repos."name" |
Yes on repos |
A name to identify the repository; for example, team-A or team-B. Required only if repos exists. |
repos."pattern" |
No | An array of strings used to match an application name. For each pattern, use the format {application}/{profile} format with wildcards. |
repos."default-label" |
No | The default label of the Git repository. Should be the branch name, tag name, or commit IOD of the repository. |
repos."search-paths" |
No | An array of strings used to search subdirectories of the Git repository. |
repos."username" |
No | The username used to access the Git repository server. Required when the Git repository server supports HTTP basic authentication. |
repos."password" |
No | The password or personal access token used to access the Git repository server. Required when the Git repository server supports HTTP basic authentication. |
repos."private-key" |
No | The SSH private key to access Git repository. Required when the URI begins with git@ or ssh://. |
repos."host-key" |
No | The host key of the Git repository server. Shouldn't include the algorithm prefix as covered by host-key-algorithm. |
repos."host-key-algorithm" |
No | The host key algorithm. Should be ssh-dss, ssh-rsa, ecdsa-sha2-nistp256, ecdsa-sha2-nistp384, or ecdsa-sha2-nistp521. Required only if host-key exists. |
repos."strict-host-key-checking" |
No | Indicates whether the Config Server instance fails to start when using the private host-key. Should be true (default value) or false. |
The following table shows some examples of patterns for configuring your service with an optional extra repository. For more information, see the Extra repositories section and the Pattern Matching and Multiple Repositories section of the Spring documentation.
| Patterns | Description |
|---|---|
| test-config-server-app-0/* | The pattern and repository URI matches a Spring boot application named test-config-server-app-0 with any profile. |
| test-config-server-app-1/dev | The pattern and repository URI matches a Spring boot application named test-config-server-app-1 with a dev profile. |
| test-config-server-app-2/prod | The pattern and repository URI matches a Spring boot application named test-config-server-app-2 with a prod profile. |

Attach your Config Server repository to Azure Spring Apps
Now that your configuration files are saved in a repository, use the following steps to connect Azure Spring Apps to the repository.
Sign in to the Azure portal.
Go to your Azure Spring Apps Overview page.
Select Config Server in the left navigation pane.
In the Default repository section, set URI to
https://github.com/Azure-Samples/piggymetrics-config.Select Validate.

When validation is complete, select Apply to save your changes.


Updating the configuration can take a few minutes. You should get a notification when the configuration is complete.
Enter repository information directly to the Azure portal
You can enter repository information for the default repository and, optionally, for extra repositories.
Default repository
Use the steps in this section to enter repository information for a public or private repository.
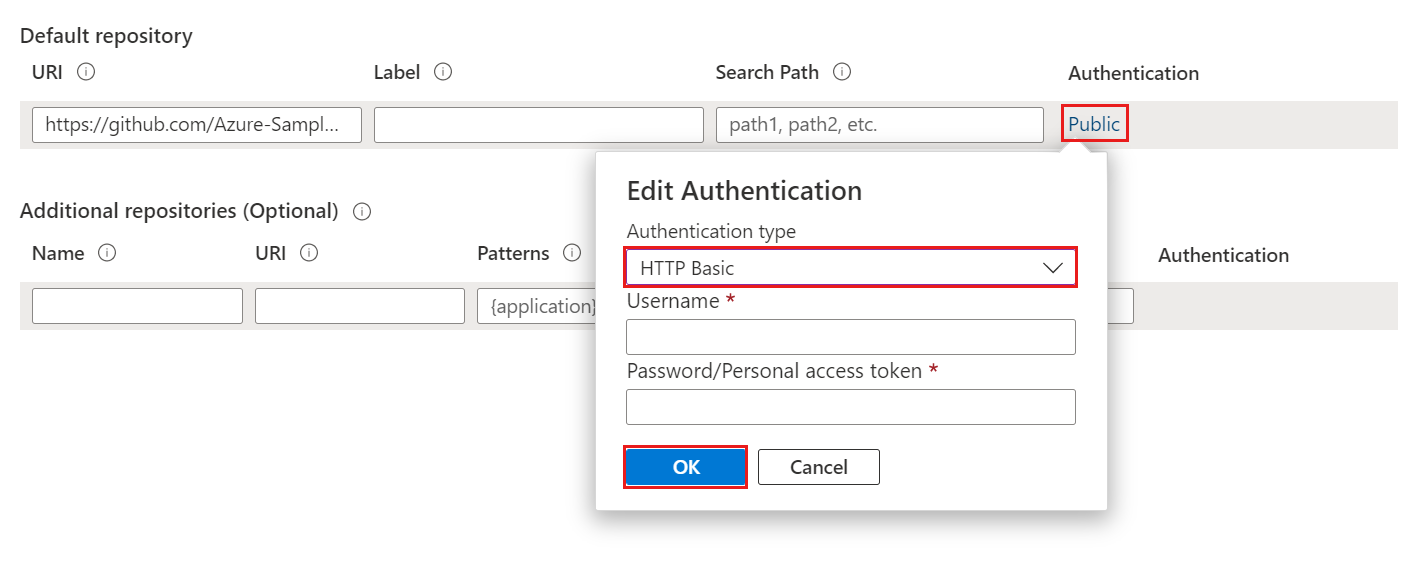
Public repository: In the Default repository section, in the Uri box, paste the repository URI. Enter config for the Label setting. Ensure that the Authentication setting is Public, and then select Apply.
Private repository: Azure Spring Apps supports basic password/token-based authentication and SSH.
- Basic Authentication: In the Default repository section, in the Uri box, paste the repository URI, and then select the setting under Authentication to open the Edit Authentication pane. In the Authentication type drop-down list, select HTTP Basic, and then enter your username and password/token to grant access to Azure Spring Apps. Select OK, and then select Apply to finish setting up your Config Server instance.
Note
Many Git repository servers support the use of tokens rather than passwords for HTTP basic authentication. Some repositories allow tokens to persist indefinitely. However, some Git repository servers, including Azure DevOps Server, force tokens to expire in a few hours. Repositories that cause tokens to expire shouldn't use token-based authentication with Azure Spring Apps. If you use such a token, remember to update it before it expires.
GitHub has removed support for password authentication, so you need to use a personal access token instead of password authentication for GitHub. For more information, see Token authentication requirements for Git operations.
- SSH: In the Default repository section, in the Uri box, paste the repository URI, and then select the setting under Authentication to open the Edit Authentication pane. In the Edit Authentication pane, in the Authentication type drop-down list, select SSH, and then enter your private key. Optionally, specify your host key and host key algorithm. Include your public key in your Config Server repository. Select OK, and then select Apply to finish setting up your Config Server instance.


Extra repositories
If you want to configure your service with an optional extra repository, specify the Uri and Authentication settings as you did for the default repository. Be sure to include a Name setting for your pattern, and then select Apply to attach it to your instance.
Enter repository information into a YAML file
If you've written a YAML file with your repository settings, you can import the file directly from your local machine to Azure Spring Apps. The following example shows a simple YAML file for a private repository with basic authentication.
spring:
  cloud:
    config:
      server:
        git:
          uri: https://github.com/azure-spring-apps-samples-pr/config-server-repository.git
          username: <username>
          password: <password/token>
Select the Import settings button, and then select the YAML file from your project directory. Select Import.

Your Notifications displays an async operation. Config Server should report success after 1-2 minutes. The information from your YAML file displays in the Azure portal. Select Apply to finish the import.
Use Azure Repos for Azure Spring Apps configuration
Azure Spring Apps can access Git repositories that are public, secured by SSH, or secured using HTTP basic authentication. HTTP basic authentication is the easiest of the options for creating and managing repositories with Azure Repos.
Get repo URL and credentials
Use the following steps to get your repo URL and credentials.
In the Azure Repos portal for your project, select the Clone button:
Copy the clone URL from the textbox. This URL is typically in the following form:
https://<organization name>@dev.azure.com/<organization name>/<project name>/_git/<repository name>Remove everything after
https://and beforedev.azure.com, including the@symbol. The resulting URL should be in the following form:https://dev.azure.com/<organization name>/<project name>/_git/<repository name>Save this URL for use in the next section.
Select Generate Git Credentials to display a username and password, which should be saved for use in the following section.
Configure Azure Spring Apps to access the Git repository
Sign in to the Azure portal.
Go to your Azure Spring Apps Overview page.
Select the service to configure.
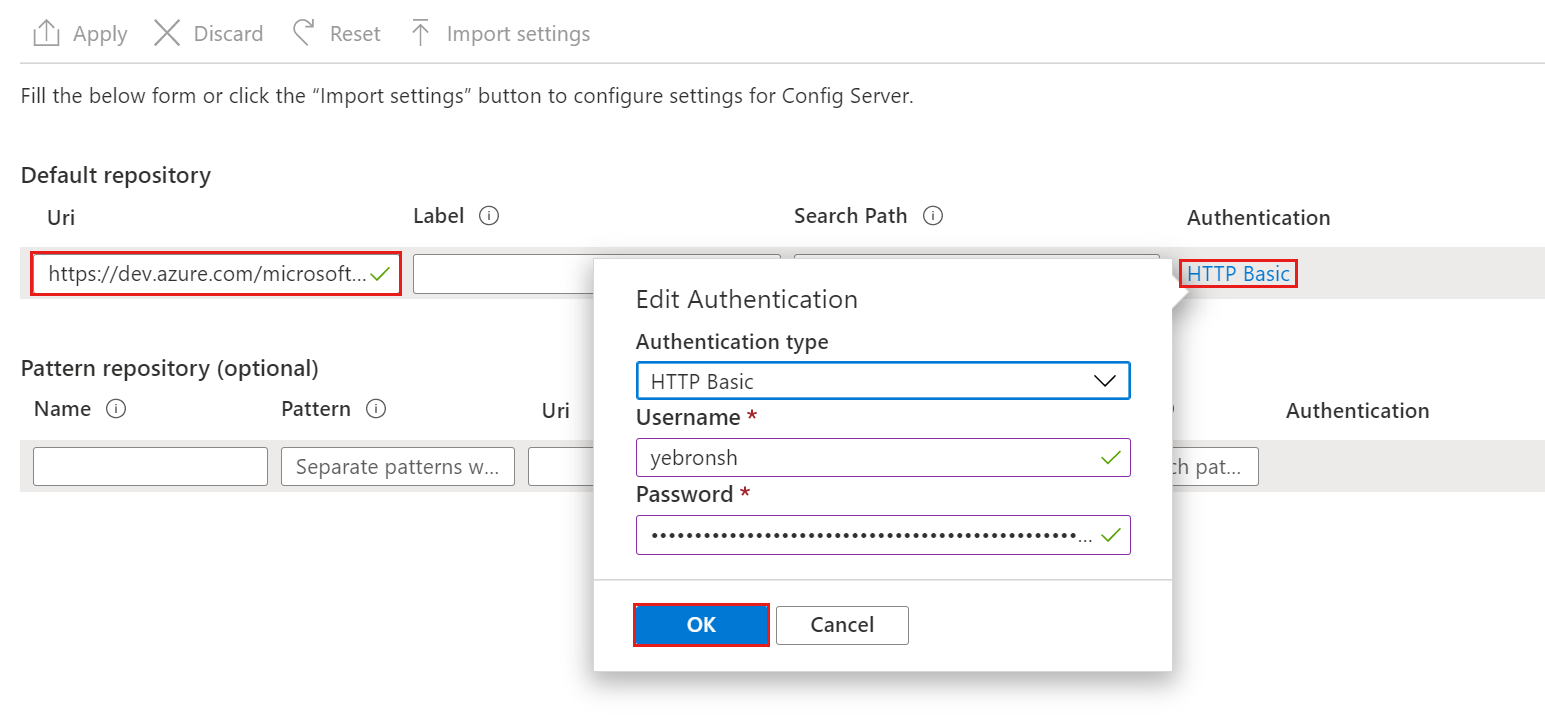
In the left pane of the service page under Settings, select the Config Server tab. Configure the repository you created, as follows:
- Add the repository URI that you saved in the previous section.
- Select the setting under Authentication to open the Edit Authentication pane.
- For Authentication type, select HTTP Basic.
- For Username, specify the user name that you saved in the previous section.
- For Password, specify the password that you saved in the previous section.
- Select OK, and then wait for the operation to complete.

Delete your configuration
Select Reset on the Config Server tab to erase your existing settings. Delete the config server settings if you want to connect your Config Server instance to another source, such as when you're moving from GitHub to Azure DevOps Server.
Config Server refresh
When properties are changed, services consuming those properties must be notified before changes can be made. The default solution for Spring Cloud Config Server is to manually trigger the refresh event, which may not be feasible if there are many app instances. For more information, see Centralized Configuration
Instead, you can automatically refresh values from Config Server by letting the config client poll for changes based on a refresh internal. Use the following steps to automatically refresh values from Config Server.
Register a scheduled task to refresh the context in a given interval, as shown in the following example.
@ConditionalOnBean({RefreshEndpoint.class})
@Configuration
@AutoConfigureAfter({RefreshAutoConfiguration.class, RefreshEndpointAutoConfiguration.class})
@EnableScheduling
public class ConfigClientAutoRefreshConfiguration implements SchedulingConfigurer {
    @Value("${spring.cloud.config.refresh-interval:60}")
    private long refreshInterval;
    @Value("${spring.cloud.config.auto-refresh:false}")
    private boolean autoRefresh;
    private RefreshEndpoint refreshEndpoint;
    public ConfigClientAutoRefreshConfiguration(RefreshEndpoint refreshEndpoint) {
        this.refreshEndpoint = refreshEndpoint;
    }
    @Override
    public void configureTasks(ScheduledTaskRegistrar scheduledTaskRegistrar) {
        if (autoRefresh) {
            // set minimal refresh interval to 5 seconds
            refreshInterval = Math.max(refreshInterval, 5);
            scheduledTaskRegistrar.addFixedRateTask(() -> refreshEndpoint.refresh(), refreshInterval * 1000);
        }
    }
}
Enable autorefresh and set the appropriate refresh interval in your application.yml file. In the following example, the client polls for configuration changes every 60 seconds, which is the minimum value you can set for a refresh interval.
By default, autorefresh is set to false and the refresh-interval is set to 60 seconds.
spring:
    cloud:
         config:
          auto-refresh: true
          refresh-interval: 60
management:
    endpoints:
         web:
          exposure:
            include:
              - refresh
Add @RefreshScope in your code. In the following example, the variable
connectTimeoutis automatically refreshed every 60 seconds.@RestController @RefreshScope public class HelloController { @Value("${timeout:4000}") private String connectTimeout; }
For more information, see the config-client-polling sample.
Next steps
In this article, you learned how to enable and configure your Spring Cloud Config Server instance. To learn more about managing your application, see Scale an application in Azure Spring Apps.
Feedback
Coming soon: Throughout 2024 we will be phasing out GitHub Issues as the feedback mechanism for content and replacing it with a new feedback system. For more information see: https://aka.ms/ContentUserFeedback.
Submit and view feedback for