Tutorial: Create a secured hub and spoke network
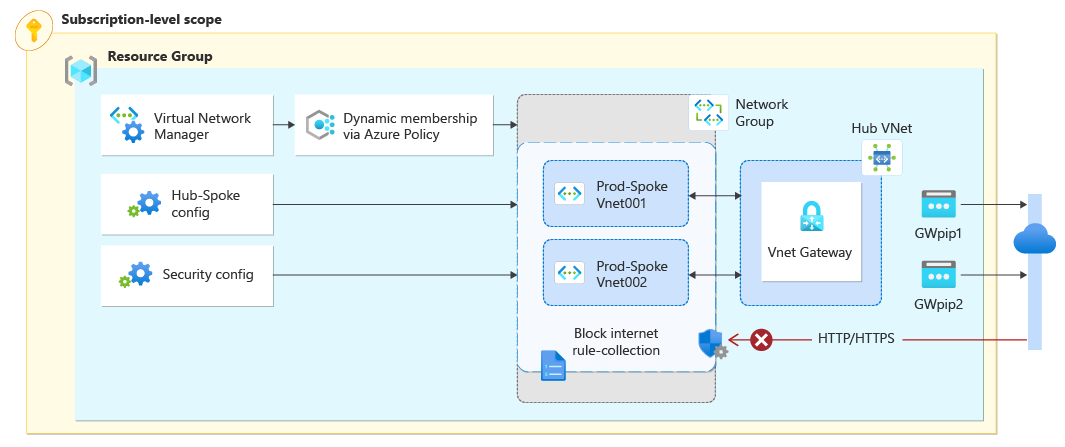
In this tutorial, you create a hub and spoke network topology using Azure Virtual Network Manager. You then deploy a virtual network gateway in the hub virtual network to allow resources in the spoke virtual networks to communicate with remote networks using VPN. Also, you configure a security configuration to block outbound network traffic to the internet on ports 80 and 443. Last, you verify that configurations were applied correctly by looking at the virtual network and virtual machine settings.
Important
Azure Virtual Network Manager is generally available for Virtual Network Manager, hub-and-spoke connectivity configurations, and security configurations with security admin rules. Mesh connectivity configurations remain in public preview.
This preview version is provided without a service level agreement, and it's not recommended for production workloads. Certain features might not be supported or might have constrained capabilities. For more information, see Supplemental Terms of Use for Microsoft Azure Previews.
In this tutorial, you learn how to:
- Create multiple virtual networks.
- Deploy a virtual network gateway.
- Create a hub and spoke network topology.
- Create a security configuration blocking traffic on port 80 and 443.
- Verify configurations were applied.
Prerequisite
- An Azure account with an active subscription. Create an account for free.
- Before you can complete steps in this tutorial, you must first create an Azure Virtual Network Manager instance. The instance needs to included the Connectivity and Security admin features. This tutorial used a Virtual Network Manager instance named vnm-learn-eastus-001.
Create virtual networks
This procedure walks you through creating three virtual networks that will be connected using the hub and spoke network topology.
Sign in to the Azure portal.
Select + Create a resource and search for Virtual network. Then select Create to begin configuring the virtual network.
On the Basics tab, enter or select the following information:
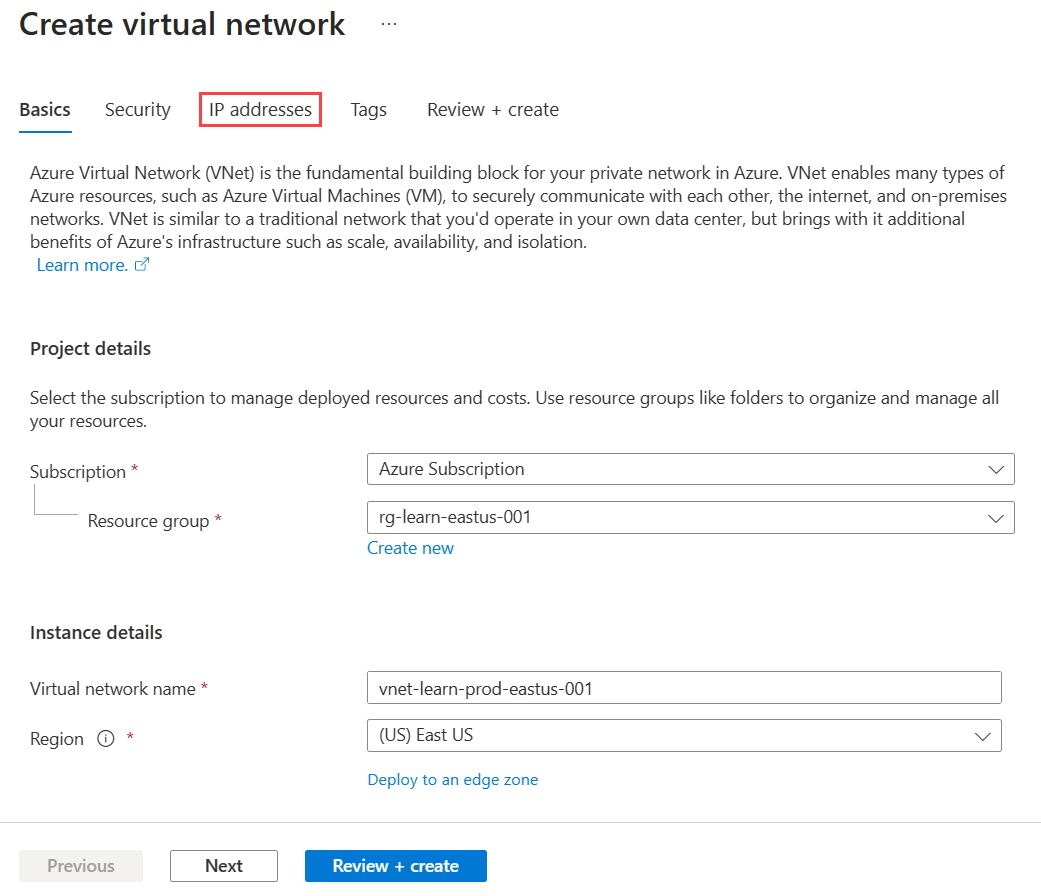
Setting Value Subscription Select the subscription you want to deploy this virtual network into. Resource group Select or create a new resource group to store the virtual network. This quickstart uses a resource group named rg-learn-eastus-001. Name Enter vnet-learn-prod-eastus-001 for the virtual network name. Region Select the East US region. Select Next: IP Addresses and configure the following network address space:
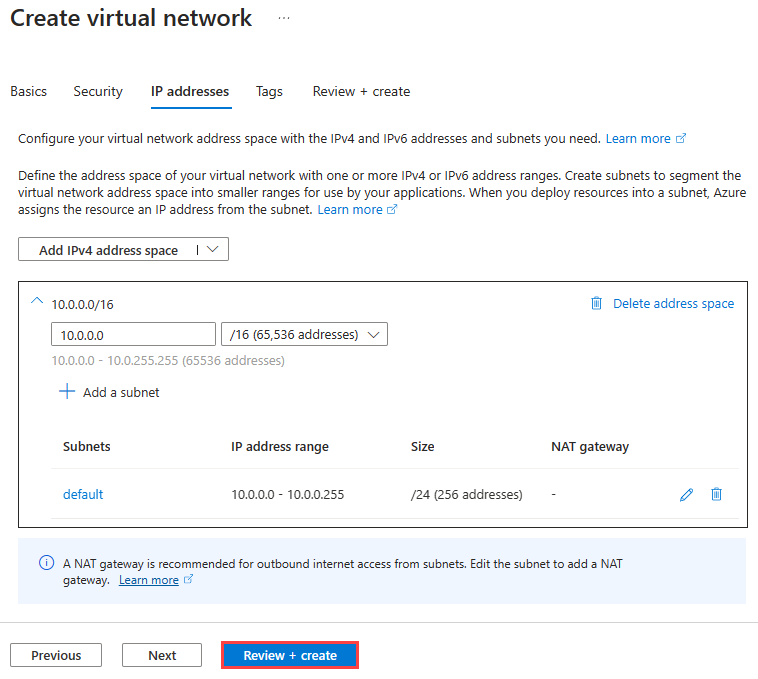
Setting Value IPv4 address space Enter 10.0.0.0/16 as the address space. Subnet name Enter the name default for the subnet. Subnet address space Enter the subnet address space of 10.0.0.0/24. Select Review + create and then select Create to deploy the virtual network.
Repeat steps 2-5 to create two more virtual networks into the same resource group with the following information:
Setting Value Subscription Select the same subscription you selected in step 3. Resource group Select the rg-learn-eastus-001. Name Enter vnet-learn-prod-eastus-002 and vnet-learn-hub-eastus-001 for the two virtual networks. Region Select (US) East US vnet-learn-prod-eastus-002 IP addresses IPv4 address space: 10.1.0.0/16 Subnet name: default Subnet address space: 10.1.0.0/24 vnet-learn-hub-eastus-001 IP addresses IPv4 address space: 10.2.0.0/16 Subnet name: default Subnet address space: 10.2.0.0/24
Deploy a virtual network gateway
Deploy a virtual network gateway into the hub virtual network. This virtual network gateway is necessary for the spokes to Use hub as a gateway setting.
Select + Create a resource and search for Virtual network gateway. Then select Create to begin configuring the virtual network gateway.
On the Basics tab, enter or select the following settings:
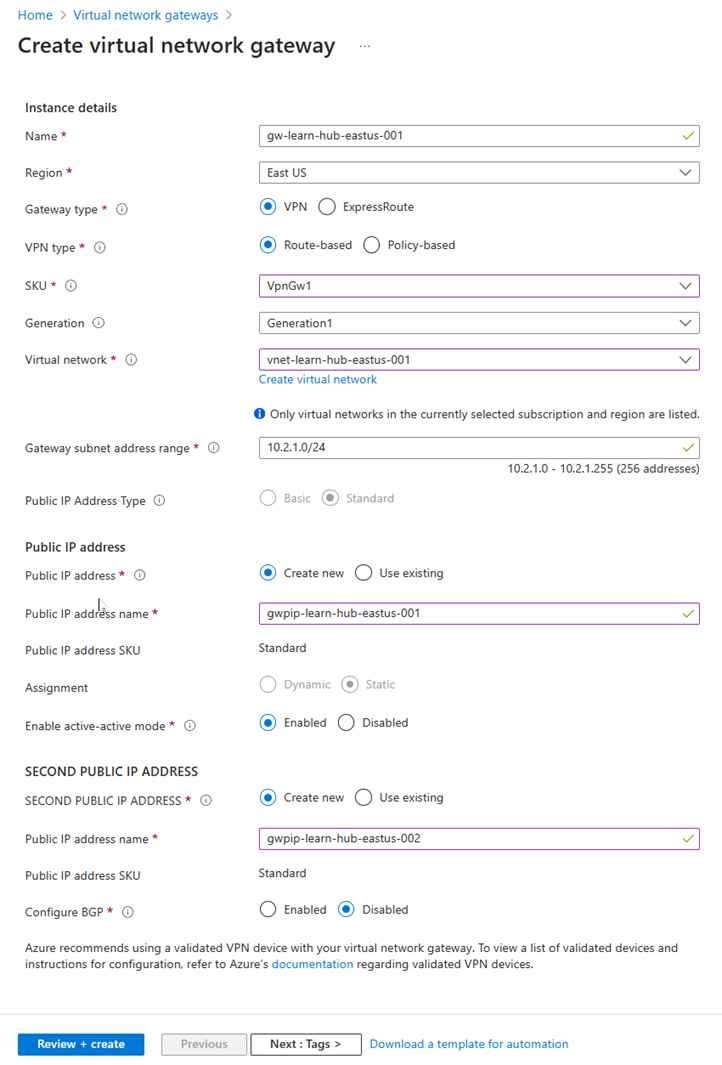
Setting Value Subscription Select the subscription you want to deploy this virtual network into. Name Enter gw-learn-hub-eastus-001 for the virtual network gateway name. SKU Select VpnGW1 for the SKU. Generation Select Generation1 for the generation. Virtual network Select the vnet-learn-hub-eastus-001 for the VNet. Public IP Address Public IP address name Enter the name gwpip-learn-hub-eastus-001 for the public IP. SECOND PUBLIC IP ADDRESS Public IP address name Enter the name gwpip-learn-hub-eastus-002 for the public IP. Select Review + create and then select Create after validation has passed. The deployment of a virtual network gateway can take about 30 minutes. You can move on to the next section while waiting for this deployment to complete. However, you may find gw-learn-hub-eastus-001 doesn't display that it has a gateway due to timing and sync across the Azure portal.
Create a dynamic network group
Go to your Azure Virtual Network Manager instance. This tutorial assumes you've created one using the quickstart guide. The network group in this tutorial is called ng-learn-prod-eastus-001.
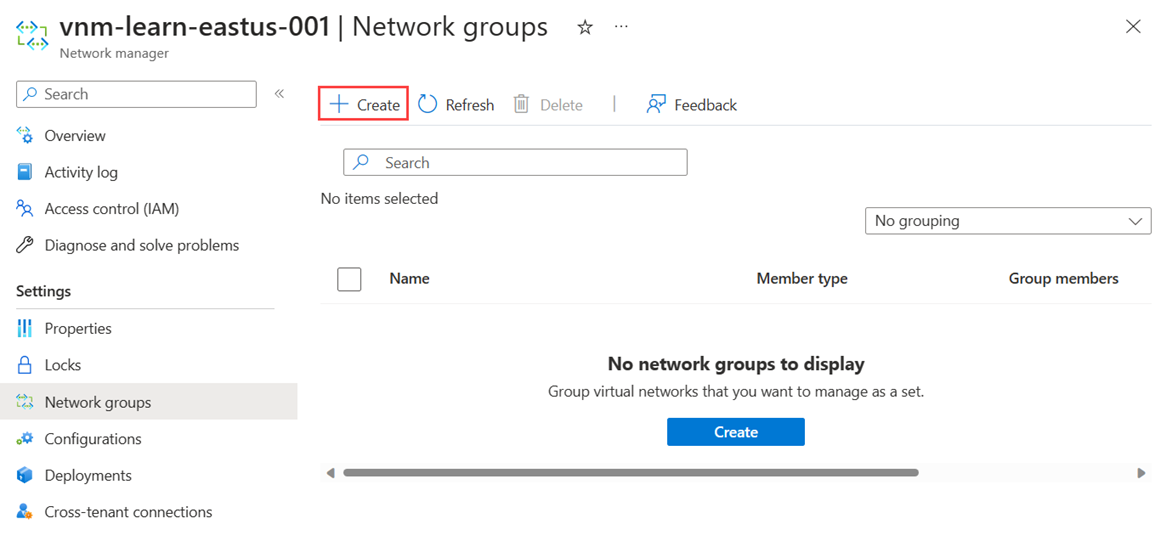
Select Network groups under Settings, and then select + Create to create a new network group.
On the Create a network group screen, enter the following information:
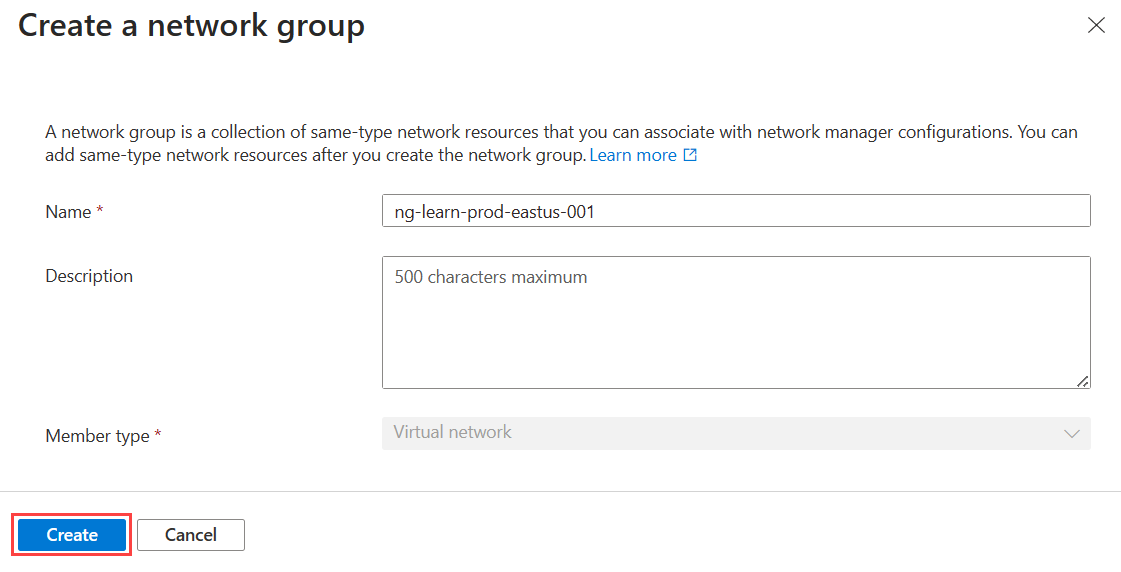
Setting Value Name Enter ng-learn-prod-eastus-001 for the network group name. Description Provide a description about this network group. Select Create to create the virtual network group.
From the Network groups page, select the created network group from above to configure the network group.
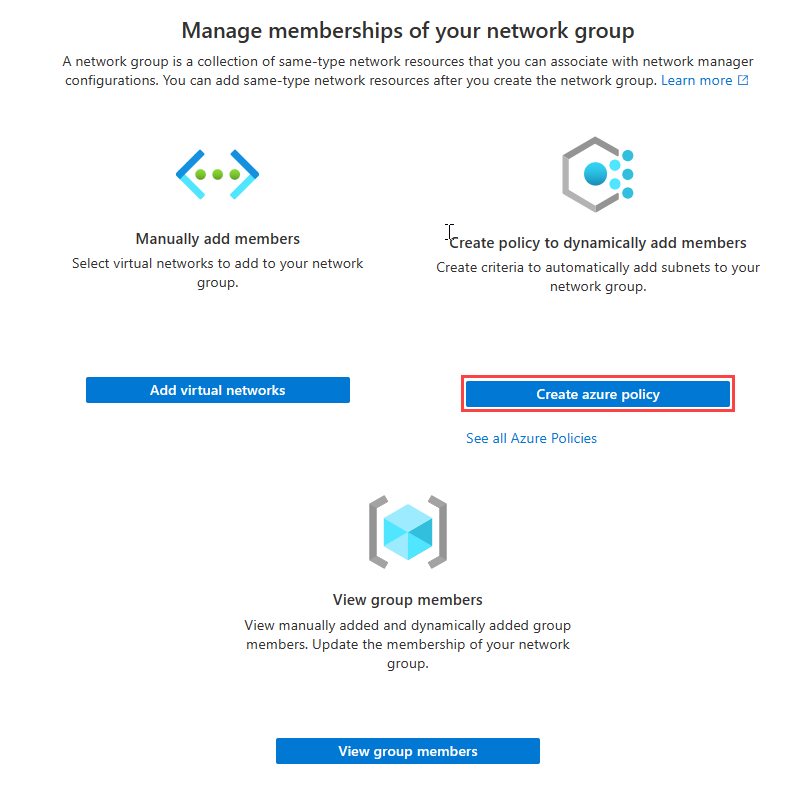
On the Overview page, select Create Azure Policy under Create policy to dynamically add members.
On the Create Azure Policy page, select or enter the following information:
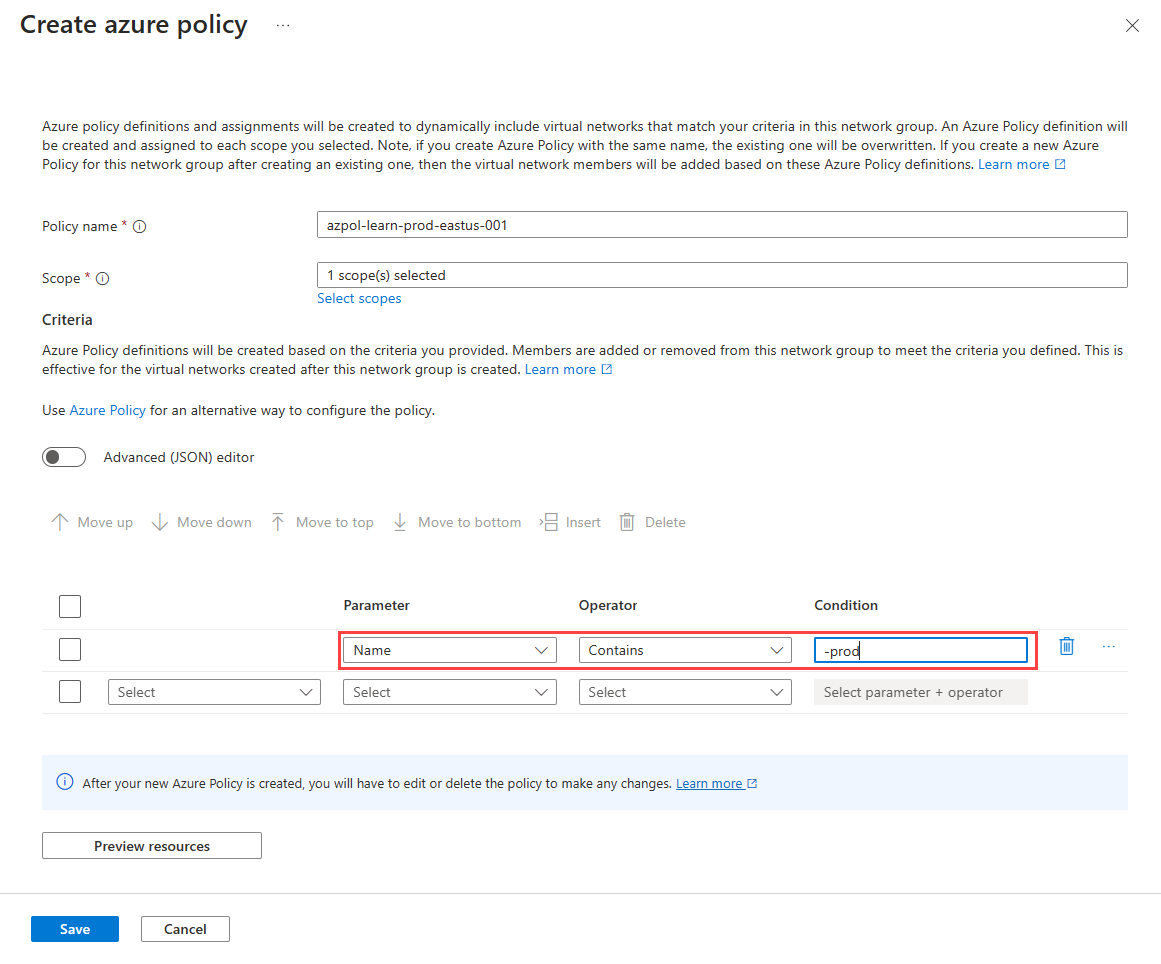
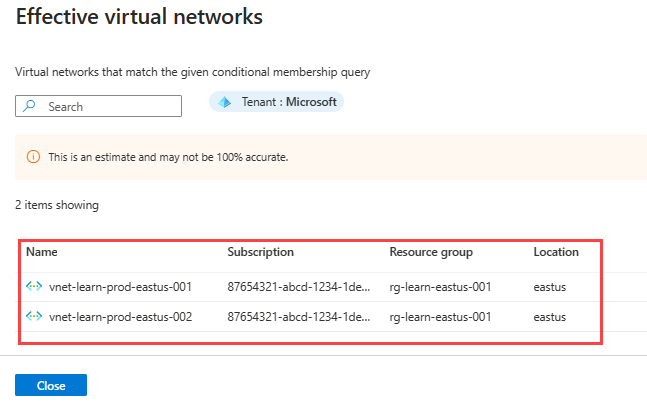
Setting Value Policy name Enter azpol-learn-prod-eastus-001 in the text box. Scope Select Select Scopes and choose your current subscription. Criteria Parameter Select Name from the drop-down. Operator Select Contains from the drop-down. Condition Enter -prod for the condition in the text box. Select Preview resources to view the Effective virtual networks page and select Close. This page shows the virtual networks that will be added to the network group based on the conditions defined in Azure Policy.
Select Save to deploy the group membership. It can take up to one minute for the policy to take effect and be added to your network group.
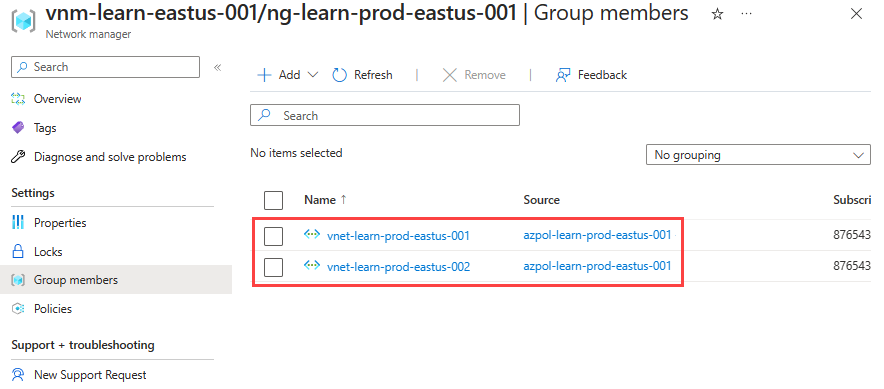
On the Network Group page under Settings, select Group Members to view the membership of the group based on the conditions defined in Azure Policy. The Source is listed as azpol-learn-prod-eastus-001.
Create a hub and spoke connectivity configuration
Select Configurations under Settings, then select + Create.
Select Connectivity configuration from the drop-down menu to begin creating a connectivity configuration.
On the Basics page, enter the following information, and select Next: Topology >.
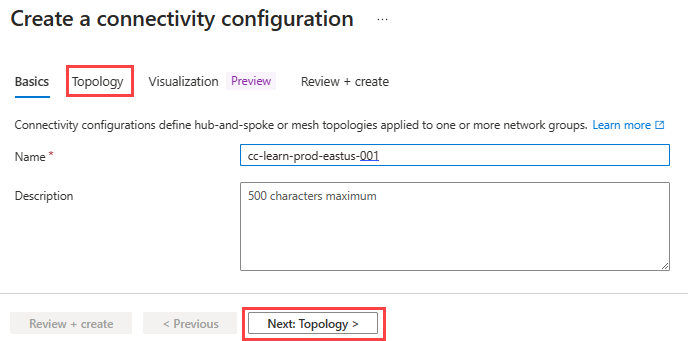
Setting Value Name Enter cc-learn-prod-eastus-001. Description (Optional) Provide a description about this connectivity configuration. On the Topology tab, select Hub and Spoke. This reveals other settings.
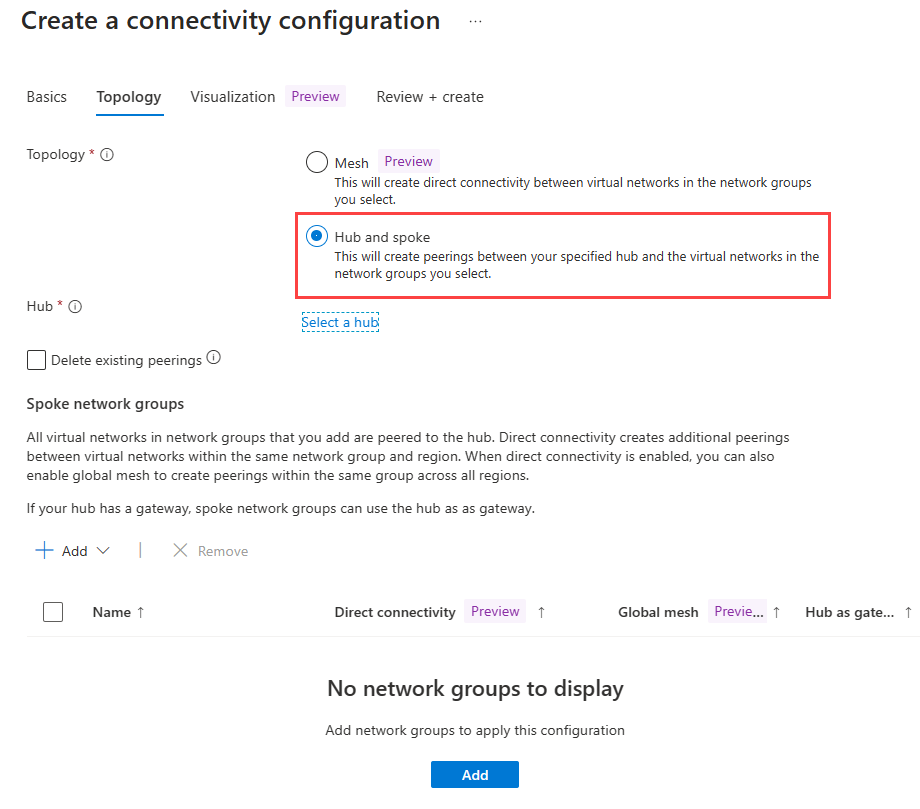
Select Select a hub under Hub setting. Then, select vnet-learn-hub-eastus-001 to serve as your network hub and select Select.

Note
Depending on the timing of deployment, you may not see the target hub virtual networked as have a gateway under Has gateway. This is due to the deployment of the virtual network gateway. It can take up to 30 minutes to deploy, and may not display immediately in the various Azure portal views.
Under Spoke network groups, select + add. Then, select ng-learn-prod-eastus-001 for the network group and select Select.

After you've added the network group, select the following options. Then select add to create the connectivity configuration.
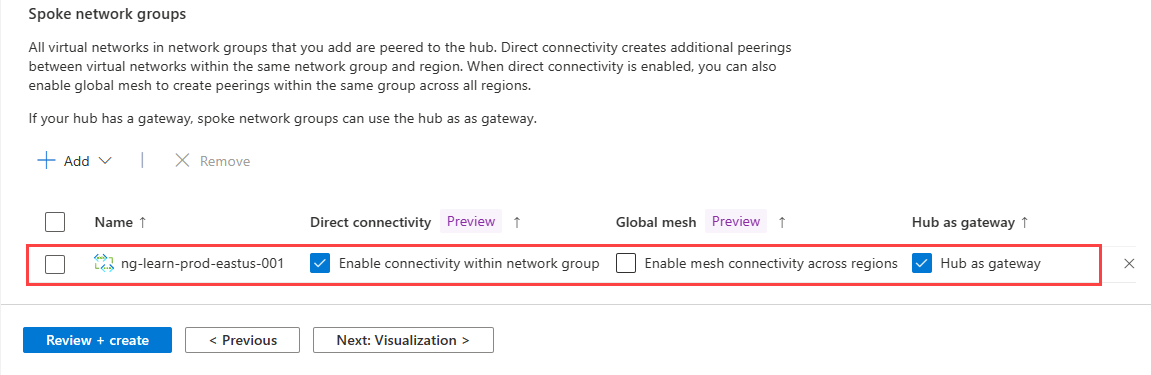
Setting Value Direct Connectivity Select the checkbox for Enable connectivity within network group. This setting allows spoke virtual networks in the network group in the same region to communicate with each other directly. Global Mesh Leave Enable mesh connectivity across regions option unchecked. This setting isn't required as both spokes are in the same region Hub as gateway Select the checkbox for Hub as a gateway. Select Next: Review + create > and then create the connectivity configuration.
Deploy the connectivity configuration
Make sure the virtual network gateway has been successfully deployed before deploying the connectivity configuration. If you deploy a hub and spoke configuration with Use the hub as a gateway enabled and there's no gateway, the deployment fails. For more information, see use hub as a gateway.
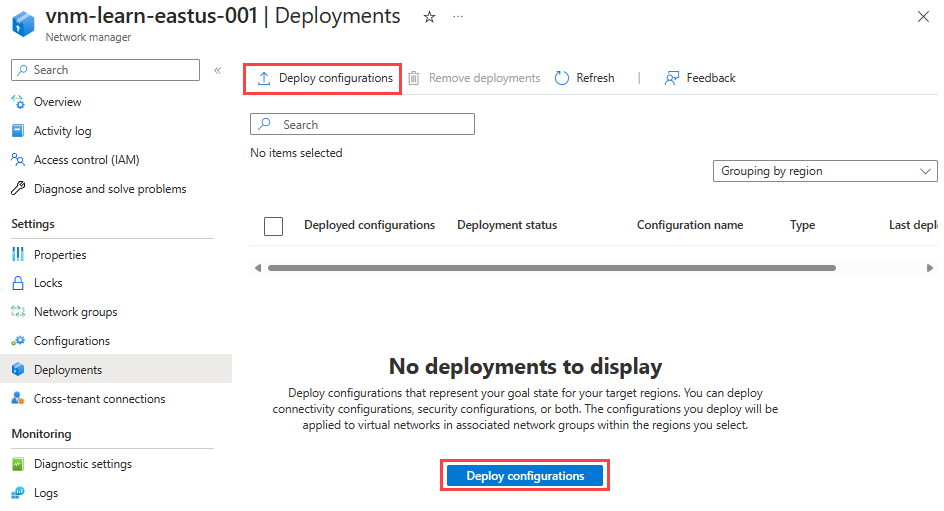
Select Deployments under Settings, then select Deploy configuration.
Select the following settings:
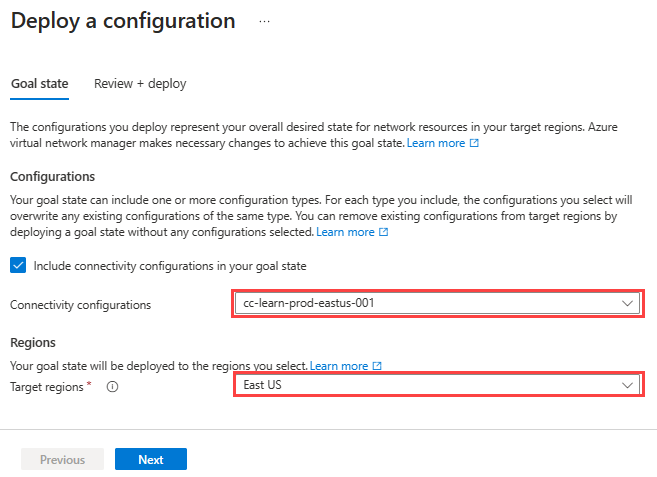
Setting Value Configurations Select Include connectivity configurations in your goal state . Connectivity configurations Select cc-learn-prod-eastus-001. Target regions Select East US as the deployment region. Select Next and then select Deploy to complete the deployment.

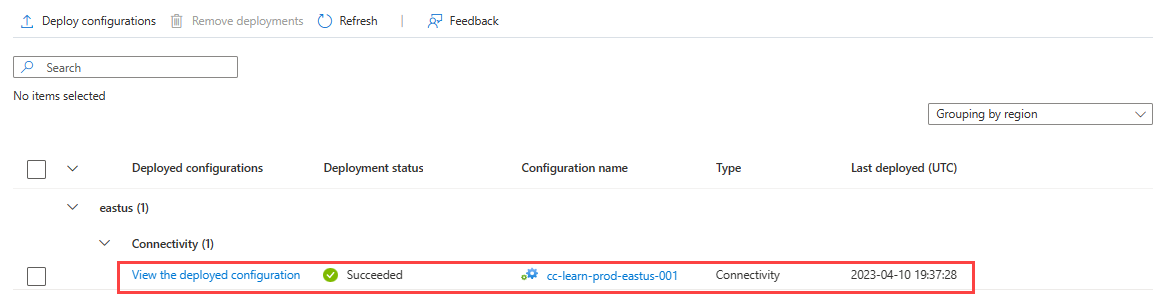
The deployment displays in the list for the selected region. The deployment of the configuration can take a few minutes to complete.
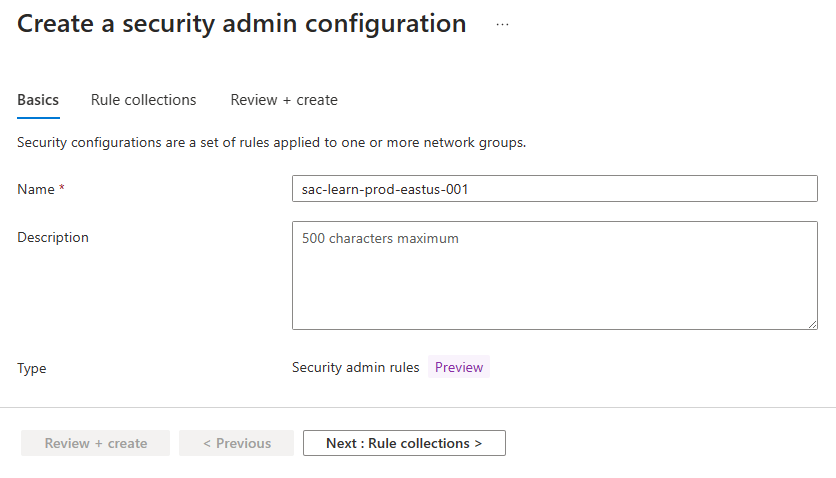
Create a security admin configuration
Select Configuration under Settings again, then select + Create, and select SecurityAdmin from the menu to begin creating a SecurityAdmin configuration.
Enter the name sac-learn-prod-eastus-001 for the configuration, then select Next: Rule collections.
Enter the name rc-learn-prod-eastus-001 for the rule collection and select ng-learn-prod-eastus-001 for the target network group. Then select + Add.
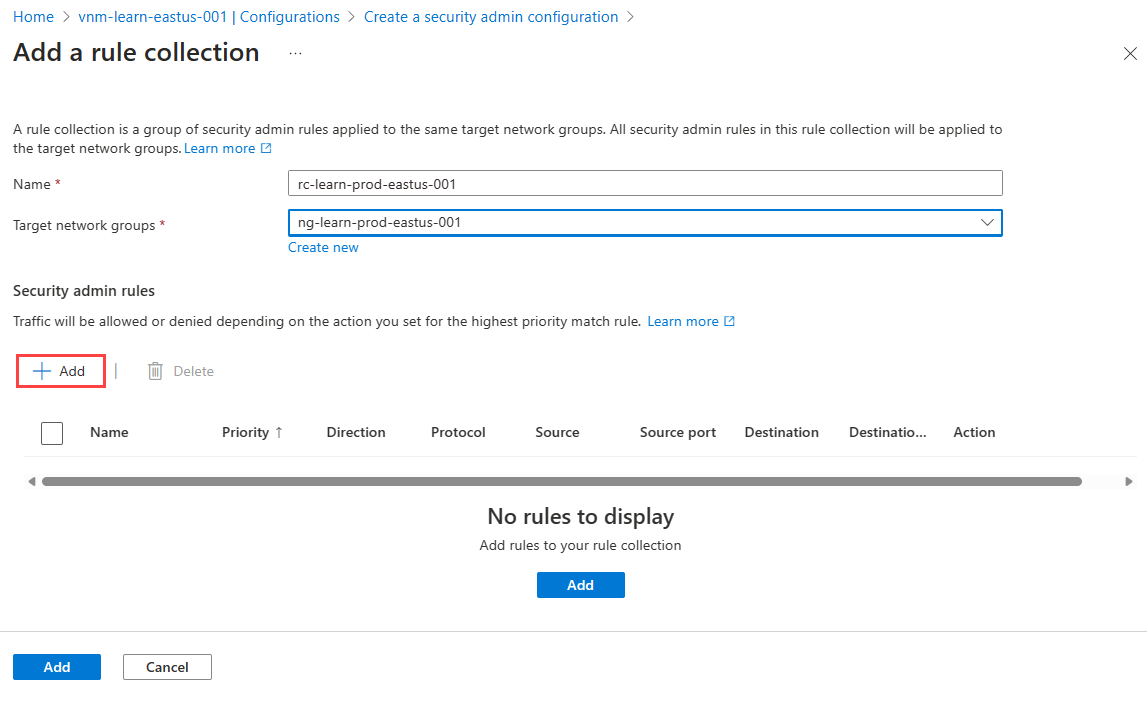
Enter and select the following settings, then select Add:
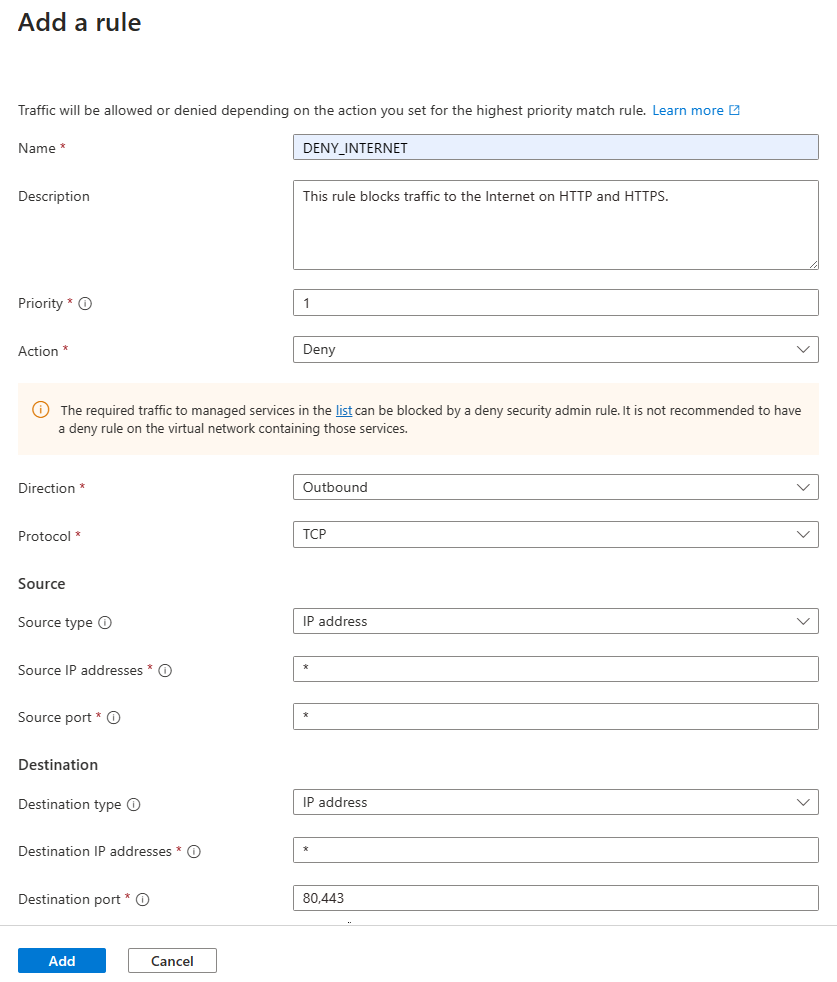
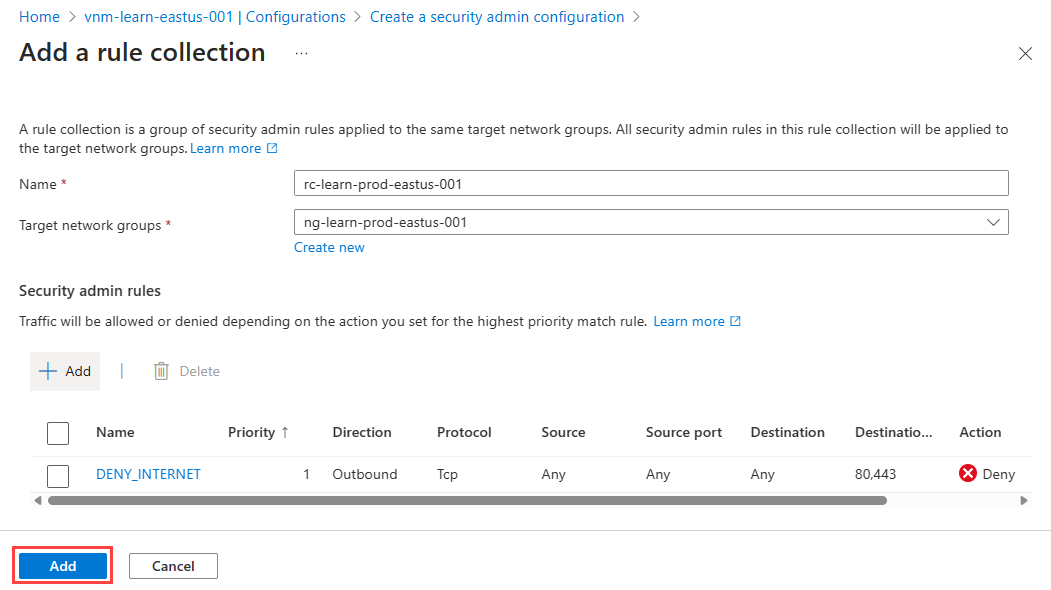
Setting Value Name Enter DENY_INTERNET Description Enter This rule blocks traffic to the internet on HTTP and HTTPS Priority Enter 1 Action Select Deny Direction Select Outbound Protocol Select TCP Source Source type Select IP Source IP addresses Enter * Destination Destination type Select IP addresses Destination IP addresses Enter * Destination port Enter 80, 443 Select Add to add the rule collection to the configuration.
Select Review + create and Create to create the security admin configuration.
Deploy the security admin configuration
Select Deployments under Settings, then select Deploy configurations.
Under Configurations, Select Include security admin in your goal state and the sac-learn-prod-eastus-001 configuration you created in the last section. Then select East US as the target region and select Next.
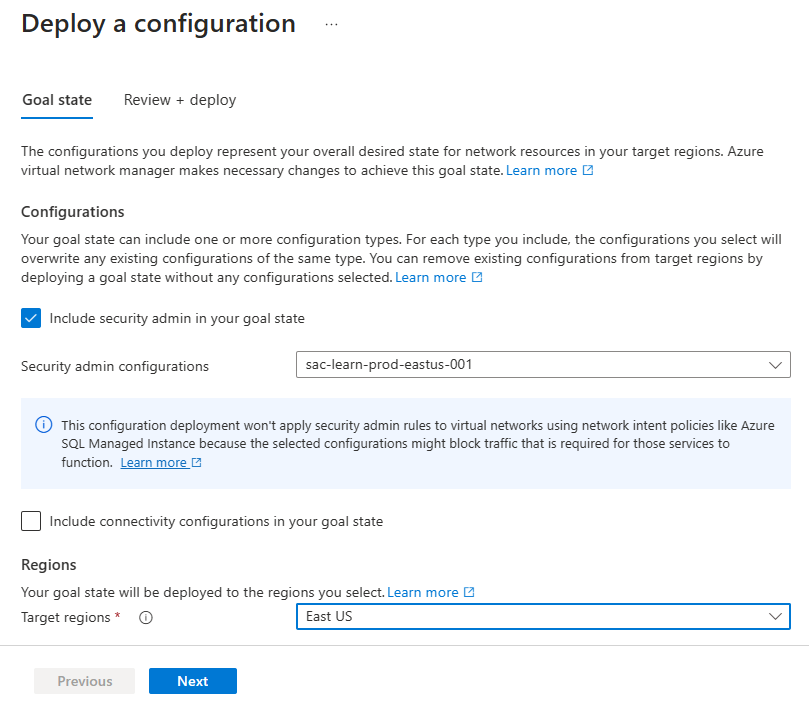
Select Next and then Deploy. You should now see the deployment show up in the list for the selected region. The deployment of the configuration can take a few minutes to complete.
Verify deployment of configurations
Verify from a virtual network
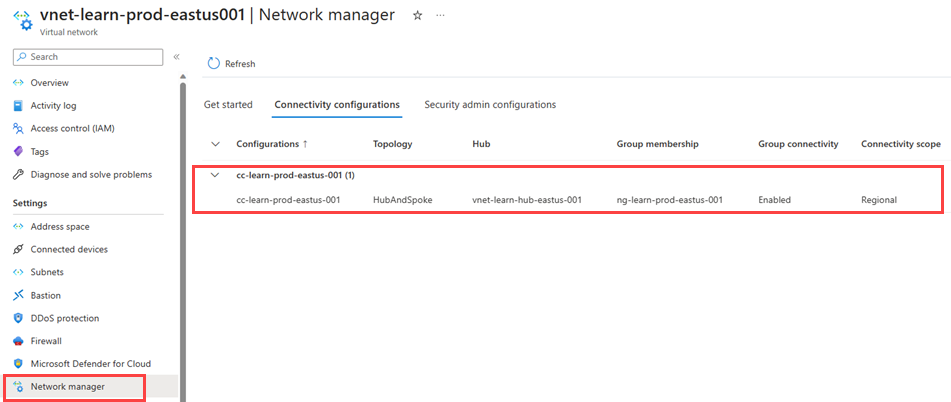
Go to vnet-learn-prod-eastus-001 virtual network and select Network Manager under Settings. The Connectivity configurations tab lists cc-learn-prod-eastus-001 connectivity configuration applied in the virtual network
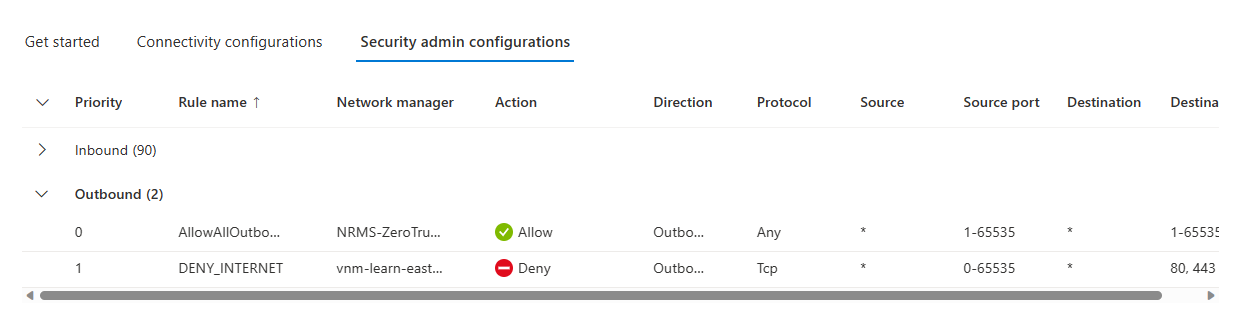
Select the Security admin configurations tab and expand Outbound to list the security admin rules applied to this virtual network.
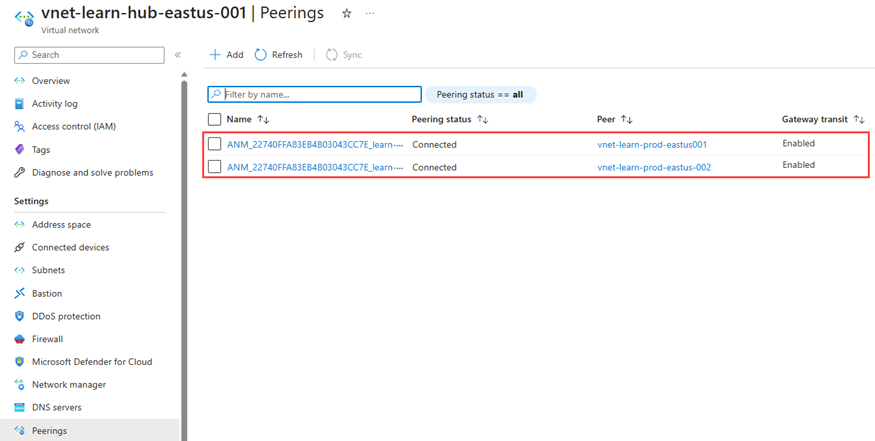
Select Peerings under Settings to list the virtual network peerings created by Virtual Network Manager. Its name starts with ANM_.

Verify from a VM
Deploy a test virtual machine into vnet-learn-prod-eastus-001.
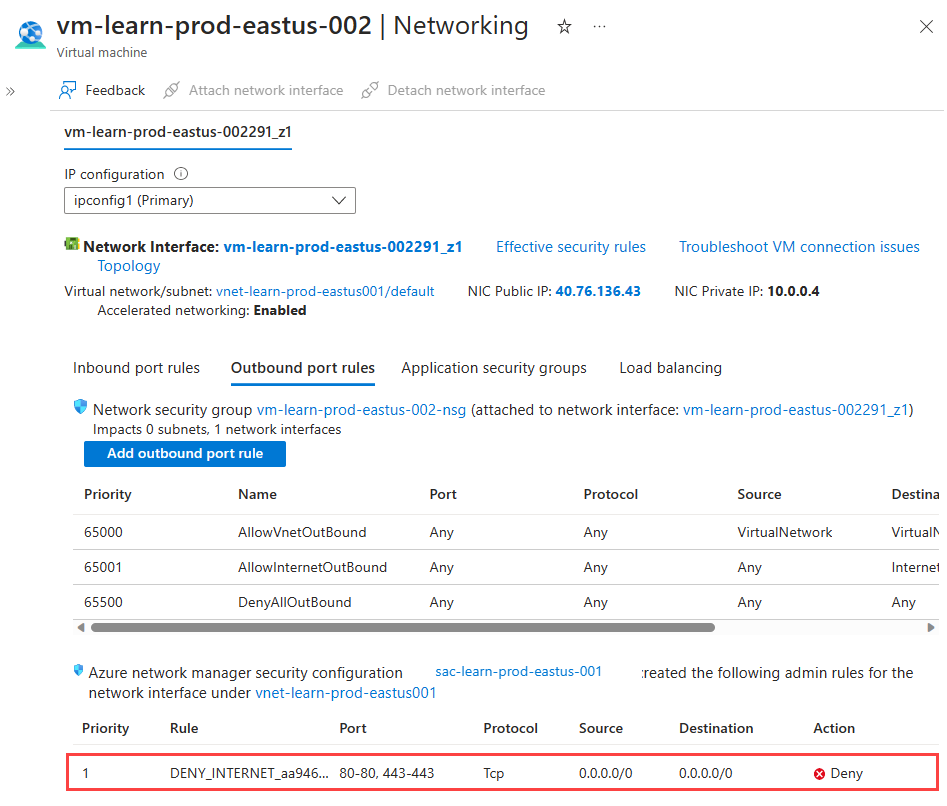
Go to the test VM created in vnet-learn-prod-eastus-001 and select Networking under Settings. Select Outbound port rules and verify the DENY_INTERNET rule is applied.
Select the network interface name and select Effective routes under Help to verify the routes for the virtual network peerings.The
10.2.0.0/16route with the Next Hop Type ofVNet peeringis the route to the hub virtual network.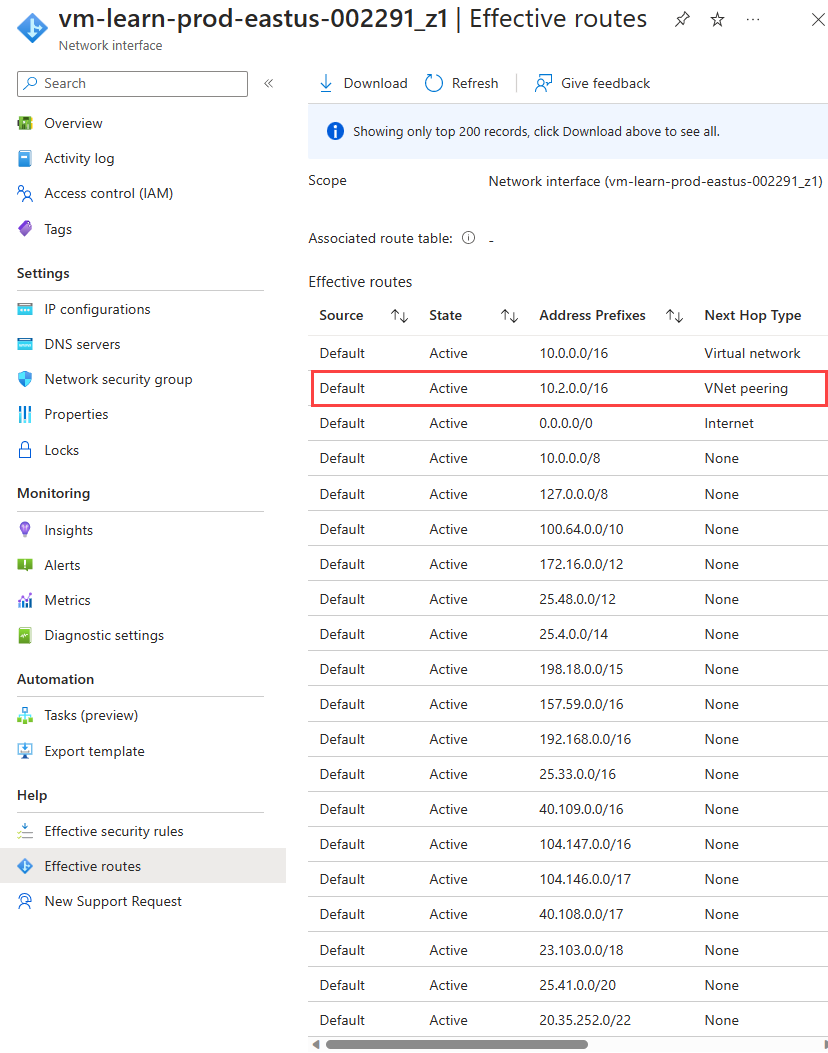
Clean up resources
If you no longer need the Azure Virtual Network Manager, you need to make sure all of following is true before you can delete the resource:
- There are no deployments of configurations to any region.
- All configurations have been deleted.
- All network groups have been deleted.
Use the remove components checklist to make sure no child resources are still available before deleting the resource group.
Next steps
Learn how to block network traffic with a Security admin configuration.
Feedback
Coming soon: Throughout 2024 we will be phasing out GitHub Issues as the feedback mechanism for content and replacing it with a new feedback system. For more information see: https://aka.ms/ContentUserFeedback.
Submit and view feedback for