Note
Access to this page requires authorization. You can try signing in or changing directories.
Access to this page requires authorization. You can try changing directories.
Use certificate authentication to create a site-to-site (S2S) VPN connection between your on-premises network and an Azure virtual network. Certificate authentication uses X.509 certificates, Azure Key Vault, and a user-assigned managed identity. For certificate flow and requirements, see About site-to-site VPN connections with certificate authentication.
Important
Site-to-site certificate authentication isn't supported on Basic SKU VPN gateways.
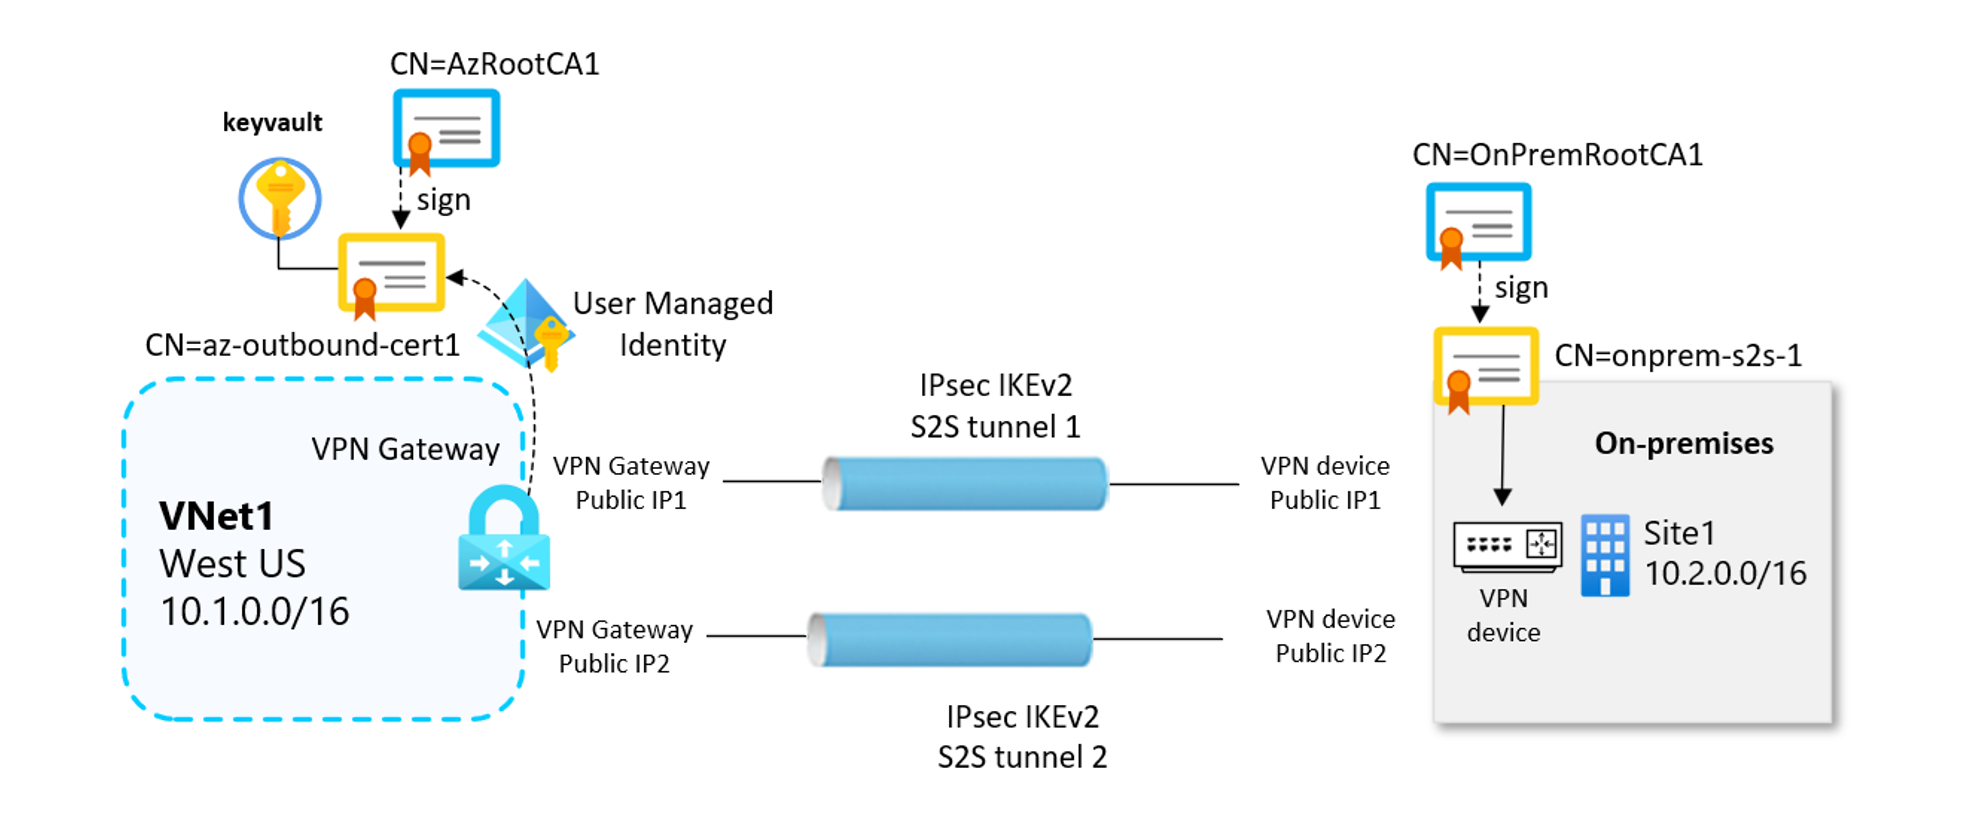
Choose the tool that you use to configure your connection. Each section contains the complete procedure for that tool.
Azure portal
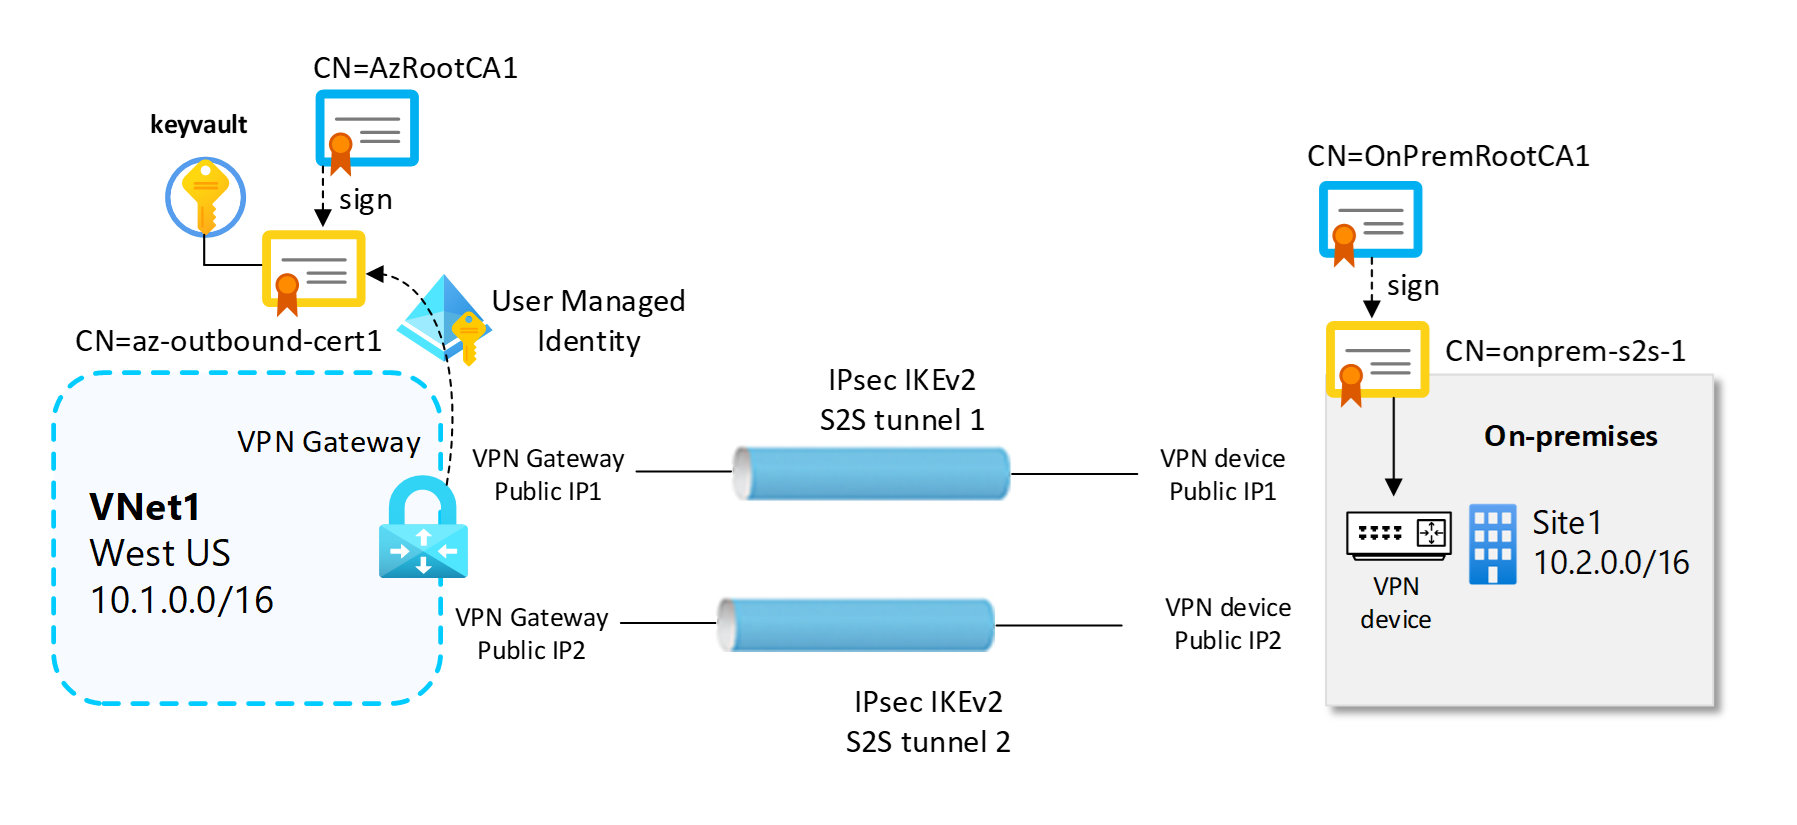
Prerequisites
You already have a virtual network and a VPN gateway. If you don't, follow the steps to Create a VPN gateway, then return to this page to configure your site-to-site certificate authentication connection.
Note
Site-to-site certificate authentication isn't supported on Basic SKU VPN gateways.
Make sure you have a compatible VPN device and someone who can configure it. For more information about compatible VPN devices and device configuration, see About VPN devices.
Verify that you have an externally facing public IPv4 address for your VPN device.
If you're unfamiliar with the IP address ranges located in your on-premises network configuration, coordinate with someone who can provide those details. When you create this configuration, you must specify the IP address range prefixes that Azure routes to your on-premises location. None of the subnets of your on-premises network can overlap with the virtual network subnets that you want to connect to.
Create a managed identity
This configuration requires a managed identity. For more information about managed identities, see What are managed identities for Azure resources. If you already have a user-assigned managed identity, you can use it for this exercise. If not, use the following steps to create a managed identity.
- In the Azure portal, search for and select Managed Identities.
- Select Create.
- Enter the required information. When you create the name, use something intuitive. For example, s2s-user-managed or vpngw-managed. You need the name for key vault configuration steps. The Resource group doesn't have to be the same as the resource group that you use for your VPN gateway.
- Select Review + create.
- The values validate. When validation finishes, select Create.
Enable VPN Gateway for Key Vault and managed identity
In this section, you enable the gateway for Azure Key Vault and the managed identity you created earlier. For more information about Azure Key Vault, see About Azure Key Vault.
- In the portal, go to your virtual network gateway (VPN gateway).
- Go to Settings > Configuration. On the Configuration page, specify the following authentication settings:
- Enable Key Vault Access: Enabled.
- Managed identity: Select the managed identity you created earlier.
- Save your settings.
Create a local network gateway
A local network gateway is an object that represents your on-premises location (the site) for routing purposes. You give the site a name that Azure can use to refer to it, and then specify the IP address of the on-premises VPN device to which you create a connection. You also specify the IP address prefixes that route through the VPN gateway to the VPN device. The address prefixes you specify are the prefixes located on your on-premises network. If your on-premises network changes or you need to change the public IP address for the VPN device, you can easily update the values later.
Note
You deploy the local network gateway object in Azure, not to your on-premises location.
Create a local network gateway by using the following values:
- Name: Site1
- Resource Group: TestRG1
- Location: East US
Configuration considerations:
- VPN Gateway supports only one IPv4 address for each FQDN. If the domain name resolves to multiple IP addresses, VPN Gateway uses the first IP address returned by the DNS servers. To eliminate the uncertainty, we recommend that your FQDN always resolve to a single IPv4 address. IPv6 isn't supported.
- VPN Gateway maintains a DNS cache that's refreshed every 5 minutes. The gateway tries to resolve the FQDNs for disconnected tunnels only. Resetting the gateway also triggers FQDN resolution.
- Although VPN Gateway supports multiple connections to different local network gateways with different FQDNs, all FQDNs must resolve to different IP addresses.
In the portal, go to Local network gateways and open the Create local network gateway page.
On the Basics tab, specify the values for your local network gateway.

- Subscription: Verify that the correct subscription is showing.
- Resource group: Select the resource group that you want to use. You can either create a new resource group or select one that you've already created.
- Region: Select the region for this object. You might want to select the same location where your virtual network resides, but you aren't required to do so.
- Name: Specify a name for your local network gateway object.
- Endpoint: Select the endpoint type for the on-premises VPN device as IP address or FQDN (Fully Qualified Domain Name).
- IP address: If you have a static public IP address allocated from your internet service provider (ISP) for your VPN device, select the IP address option. Fill in the IP address as shown in the example. This address is the public IP address of the VPN device that you want Azure VPN Gateway to connect to. If you don't have the IP address right now, you can use the values shown in the example. Later, you must go back and replace your placeholder IP address with the public IP address of your VPN device. Otherwise, Azure can't connect.
- FQDN: If you have a dynamic public IP address that could change after a certain period of time, often determined by your ISP, you can use a constant DNS name with a Dynamic DNS service to point to your current public IP address of your VPN device. Your Azure VPN gateway resolves the FQDN to determine the public IP address to connect to.
- Address space: The address space refers to the address ranges for the network that this local network represents. You can add multiple address space ranges. Make sure that the ranges you specify here don't overlap with ranges of other networks that you want to connect to. Azure routes the address range that you specify to the on-premises VPN device IP address. Use your own values here if you want to connect to your on-premises site, not the values shown in the example.
On the Advanced tab, you can configure BGP settings, if needed.
After you specify the values, select Review + create at the bottom of the page to validate the page.
Select Create to create the local network gateway object.

Note
When you configure the VPN Gateway in active-active mode (as shown in the network diagram at the beginning of this article), repeat the process to create a second local network gateway. This gateway is required to establish a second IPsec tunnel to the on-premises VPN device by using its second public IP address.
Certificates
Site-to-site certificate authentication architecture relies on both inbound and outbound certificates.
Note
The inbound and outbound certificates don't need to come from the same root certificate.
Outbound certificate
- Use the outbound certificate to verify connections coming from Azure to your on-premises site.
- Store the certificate in Azure Key Vault. You specify the outbound certificate path identifier when you configure your site-to-site connection.
- Create a certificate by using a certificate authority of your choice, or create a self-signed root certificate.
When you generate an outbound certificate, the certificate must follow these guidelines:
- Minimum key length of 2048 bits.
- Includes a private key.
- Includes server and client authentication.
- Includes a subject name.
Inbound certificate
- Use the inbound certificate when connecting from your on-premises location to Azure.
- Use the subject name value when you configure your site-to-site connection.
- Specify the certificate chain public key when you configure your site-to-site connection.
Generate certificates
Use PowerShell locally on your computer to generate certificates. The following steps show you how to create a self-signed root certificate and leaf certificates (inbound and outbound). When using the following examples, don't close the PowerShell window between creating the self-signed root CA and the leaf certificates.
Create a self-signed root certificate
Use the New-SelfSignedCertificate cmdlet to create a self-signed root certificate. For more information about parameters, see New-SelfSignedCertificate.
From a computer running Windows 10 or later, or Windows Server 2016, open a Windows PowerShell console with elevated privileges.
Create a self-signed root certificate. The following example creates a self-signed root certificate named
AzRootCA1, and automatically installs it in Certificates-Current User\Personal\Certificates. After you create the certificate, you can view it by opening certmgr.msc or Manage User Certificates.Make any needed modifications before using this example. The
NotAfterparameter is optional. By default, without this parameter, the certificate expires in one year.$params = @{ Type = 'Custom' Subject = 'CN=AzRootCA1' KeySpec = 'Signature' KeyExportPolicy = 'Exportable' KeyUsage = 'CertSign' KeyUsageProperty = 'Sign' KeyLength = 2048 HashAlgorithm = 'sha256' NotAfter = (Get-Date).AddMonths(120) CertStoreLocation = 'Cert:\CurrentUser\My' TextExtension = @('2.5.29.19={critical}{text}ca=1&pathlength=4') } $cert = New-SelfSignedCertificate @paramsTo generate leaf certificates, leave the PowerShell console open and proceed with the next steps.
Generate leaf certificates
These examples use the New-SelfSignedCertificate cmdlet to generate outbound and inbound leaf certificates. The system automatically installs certificates in Certificates - Current User\Personal\Certificates on your computer.
Outbound certificate
$params = @{
    Type = 'Custom'
    Subject = 'CN=az-outbound-cert1'
    KeySpec = 'Signature'
    KeyExportPolicy = 'Exportable'
    KeyLength = 2048
    HashAlgorithm = 'sha256'
    NotAfter = (Get-Date).AddMonths(120)
    CertStoreLocation = 'Cert:\CurrentUser\My'
    Signer = $cert
    TextExtension = @(
     '2.5.29.37={text}1.3.6.1.5.5.7.3.2,1.3.6.1.5.5.7.3.1')
}
New-SelfSignedCertificate @params
Inbound certificate
$params = @{
    Type = 'Custom'
    Subject = 'CN=on-prem-s2s-1'
    KeySpec = 'Signature'
    KeyExportPolicy = 'Exportable'
    KeyLength = 2048
    HashAlgorithm = 'sha256'
    NotAfter = (Get-Date).AddMonths(120)
    CertStoreLocation = 'Cert:\CurrentUser\My'
    Signer = $cert
    TextExtension = @(
     '2.5.29.37={text}1.3.6.1.5.5.7.3.2,1.3.6.1.5.5.7.3.1')
}
New-SelfSignedCertificate @params
Outbound certificate - export private key data
Export the outbound certificate information (with the private key) to a .pfx or .pem file. Upload this certificate information securely to Azure Key Vault in later steps. To export to .pfx by using Windows, use the following steps:
To get the certificate
.cerfile, open Manage user certificates.Locate the outbound certificate, typically in Certificates - Current User\Personal\Certificates, and right-click it. Select All Tasks > Export. This action opens the Certificate Export Wizard.
In the wizard, select Next.
Select Yes, export the private key, and then select Next.
On the Export File Format page, select Personal Information Exchange - PKCS #12 (PFX). Select the following items:
- Include all certificates in the certification path if possible
- Export all extended properties
- Enable certificate privacy
Select Next. On the Security page, select Password and an encryption method. Then, select Next.
Specify a file name and browse to the location where you want to export the certificate.
Select Finish to export the certificate.
You see a confirmation saying The export was successful.
Inbound certificate - export public key data
Export the public key data for the inbound certificate. Use the information in the file for the inbound certificate chain field when you configure your site-to-site connection. Exported files must be in the .cer format. Don't encrypt the certificate value.
- To get the certificate
.cerfile, open Manage user certificates. - Locate the certificate, typically in Certificates - Current User\Personal\Certificates, and right-click it. Select All Tasks > Export. This action opens the Certificate Export Wizard.
- In the wizard, select Next.
- Select No, do not export the private key. Then select Next.
- Select Base-64 encoded X.509 (.CER), then select Next.
- Specify a file name and browse to the location where you want to export the certificate.
- Select Finish to export the certificate.
- You see a confirmation saying The export was successful.
- Use this
.cerfile later when you configure your connection.
Root certificate - export public key data
Export the public key data for the root certificate. Exported files must be in the .cer format. Don't encrypt the certificate value.
- To get the certificate
.cerfile, open Manage user certificates. - Locate the certificate, typically in Certificates - Current User\Personal\Certificates, and right-click it. Select All Tasks > Export. This action opens the Certificate Export Wizard.
- In the wizard, select Next.
- Select No, do not export the private key. Then select Next.
- Select Base-64 encoded X.509 (.CER), then select Next.
- Specify a file name and browse to the location where you want to export the certificate.
- Select Finish to export the certificate.
- You see a confirmation saying The export was successful.
- Use this
.cerfile later when you configure your connection.
Create a key vault
This configuration requires Azure Key Vault. The following steps create a key vault. You add your certificate and managed identity to your key vault later. For more comprehensive steps, see Quickstart - Create a key vault using the Azure portal.
- In the Azure portal, search for Key Vaults. On the Key vaults page, select +Create.
- On the Create a key vault page, fill out the required information. The resource group doesn't have to be the same as the resource group that you used for your VPN gateway.
- On the Access configuration tab, for Permission model, select Azure role-based access control (recommended).
- Don't fill out any of the other fields.
- Select Review + create, then Create the key vault.
Add the outbound certificate file to your key vault
The following steps help you upload the outbound certificate information to Azure Key Vault.
- Go to your key vault. In the left pane, open the Certificates page.
- On the Certificates page, select +Generate/Import.
- For Method of Certificate Creation, select Import from the dropdown.
- Enter an intuitive certificate name. This name doesn't need to be the certificate CN or the certificate file name.
- Upload your outbound certificate file. The certificate file must be in one of the following formats:
.pfx.pem
- Enter the password to protect the certificate information.
- Select Create to upload the certificate file.
Grant the user-assigned managed identity access to the Key Vault by using built-in RBAC roles
- Open the Key Vault and select Access control (IAM).
- Select Add, and then choose Add role assignment.
- In Search by role name, enter Key Vault Secrets User, select the built-in role, and then select Next.
- On the Members tab, for Assign access to, select Managed identity.
- Select + Select members. In Select managed identities, set Managed identity to User-assigned managed identity, and then choose the user-assigned managed identity you created earlier.
- Select Next, review the settings, and then select Review + assign to apply the role assignment.
- Repeat the previous steps to assign the Key Vault Certificate User role to the same user-assigned managed identity. This role is required; otherwise, the managed identity can't access the outbound certificate stored in Key Vault.
Note
RBAC role assignment changes aren't applied immediately to Key Vault. Before proceeding to the next step, verify under Role assignments that both built-in roles Key Vault Secrets User and Key Vault Certificate User are present.
Configure your VPN device
Site-to-site connections to an on-premises network require a VPN device. In this step, configure your VPN device. When you configure your VPN device, you need the following values:
- Certificate: You need the certificate data for authentication. Use this certificate as the inbound certificate when you create the VPN connection.
- Public IP address values for your virtual network gateway: To find the public IP address for your VPN gateway VM instance using the Azure portal, go to your virtual network gateway and look under Settings > Properties. If you have an active-active mode gateway (recommended), make sure to set up tunnels to each VM instance. Both tunnels are part of the same connection. Active-active mode VPN gateways have two public IP addresses, one for each gateway VM instance.
Depending on the VPN device that you have, you might be able to download a VPN device configuration script. For more information, see Download VPN device configuration scripts.
For more configuration information, see the following links:
- For information about compatible VPN devices, see VPN devices.
- For links to device configuration settings, see Validated VPN devices. The device configuration links are provided on a best-effort basis. It's always best to check with your device manufacturer for the latest configuration information. The list shows the versions we've tested. If your OS isn't on that list, it's still possible that the version is compatible. Check with your device manufacturer to verify that the OS version for your VPN device is compatible.
- For an overview of VPN device configuration, see Overview of third-party VPN device configurations.
- For information about editing device configuration samples, see Editing samples.
- For cryptographic requirements, see About cryptographic requirements and Azure VPN gateways.
- For information about IPsec/IKE parameters, see About VPN devices and IPsec/IKE parameters for site-to-site VPN gateway connections. This link shows information about IKE version, Diffie-Hellman Group, authentication method, encryption and hashing algorithms, SA lifetime, PFS, and DPD, in addition to other parameter information that you need to complete your configuration.
- For IPsec/IKE policy configuration steps, see Configure IPsec/IKE policy for site-to-site VPN or VNet-to-VNet connections.
- To connect multiple policy-based VPN devices, see Connect Azure VPN gateways to multiple on-premises policy-based VPN devices using PowerShell.
Create the site-to-site connection
Gather configuration values
Before moving forward, gather the following information for the required configuration values.
Outbound Certificate path: This path leads to the outbound certificate. The outbound certificate is the certificate you use when connecting from Azure to your on-premises location. This information comes from the same certificate you uploaded to Azure Key Vault.
- Go to Key Vaults and select your key vault. In the left pane, expand Objects and select Certificates.
- Locate and select your certificate to open the certificate page.
- Select the line for your certificate version.
- Copy the path next to Certificate Identifier. The path is specific to the certificate.
Example:
https://s2s-vault1.vault.azure.net/certificates/az-outbound-cert1/<certificate-value>Inbound certificate subject name: This value is the CN for the inbound certificate. To locate this value:
- If you generated the certificate on your Windows computer, you can locate it by using Certificate Management.
- Go to the Details tab. Scroll and select Subject. You see the values in the lower pane.
- Don't include CN= in the value.
Inbound Certificate Chain: Use this certificate information only to verify the incoming inbound certificate. It doesn't contain private keys. You should always have at least two certificates in the inbound certificate section of the portal.
If you have intermediate CAs in your certificate chain, first add the root certificate as the first intermediate certificate, then follow that certificate with the inbound intermediate certificate.
Use the following steps to extract certificate data in the required format for the inbound certificate field.
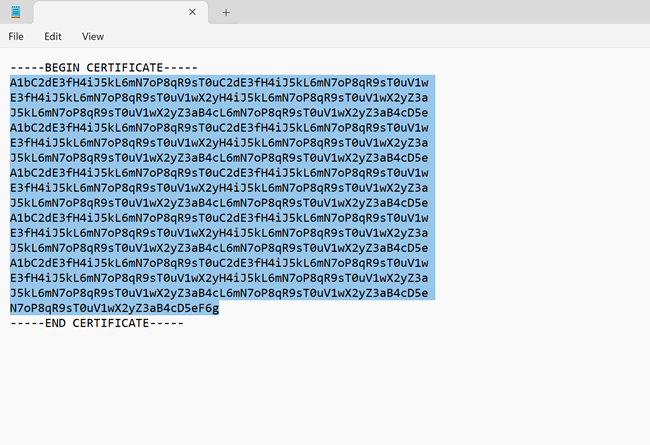
To extract the certificate data, ensure that you exported your inbound certificate as a Base-64 encoded X.509 (.CER) file in the previous steps. You need to export the certificate in this format so you can open the certificate with a text editor.
Locate and open the
.cercertificate file with a text editor. When copying the certificate data, ensure that you copy the text as one continuous line.Copy the data that's listed between
-----BEGIN CERTIFICATE-----and-----END CERTIFICATE-----as one continuous line to the Inbound Certificate Chain field when you create a connection.
Example:
Create a connection
Go to the virtual network gateway you created and select Connections.
At the top of the Connections page, select + Add to open the Create connection page.
On the Create connection page, on the Basics tab, configure the values for your connection:
Under Project details, select the subscription and the resource group where your resources are located.
Under Instance details, configure the following settings:
- Connection type: Select Site-to-site (IPSec).
- Name: Name your connection. Example: VNet-to-Site1.
- Region: Select the region for this connection.
Select the Settings tab.
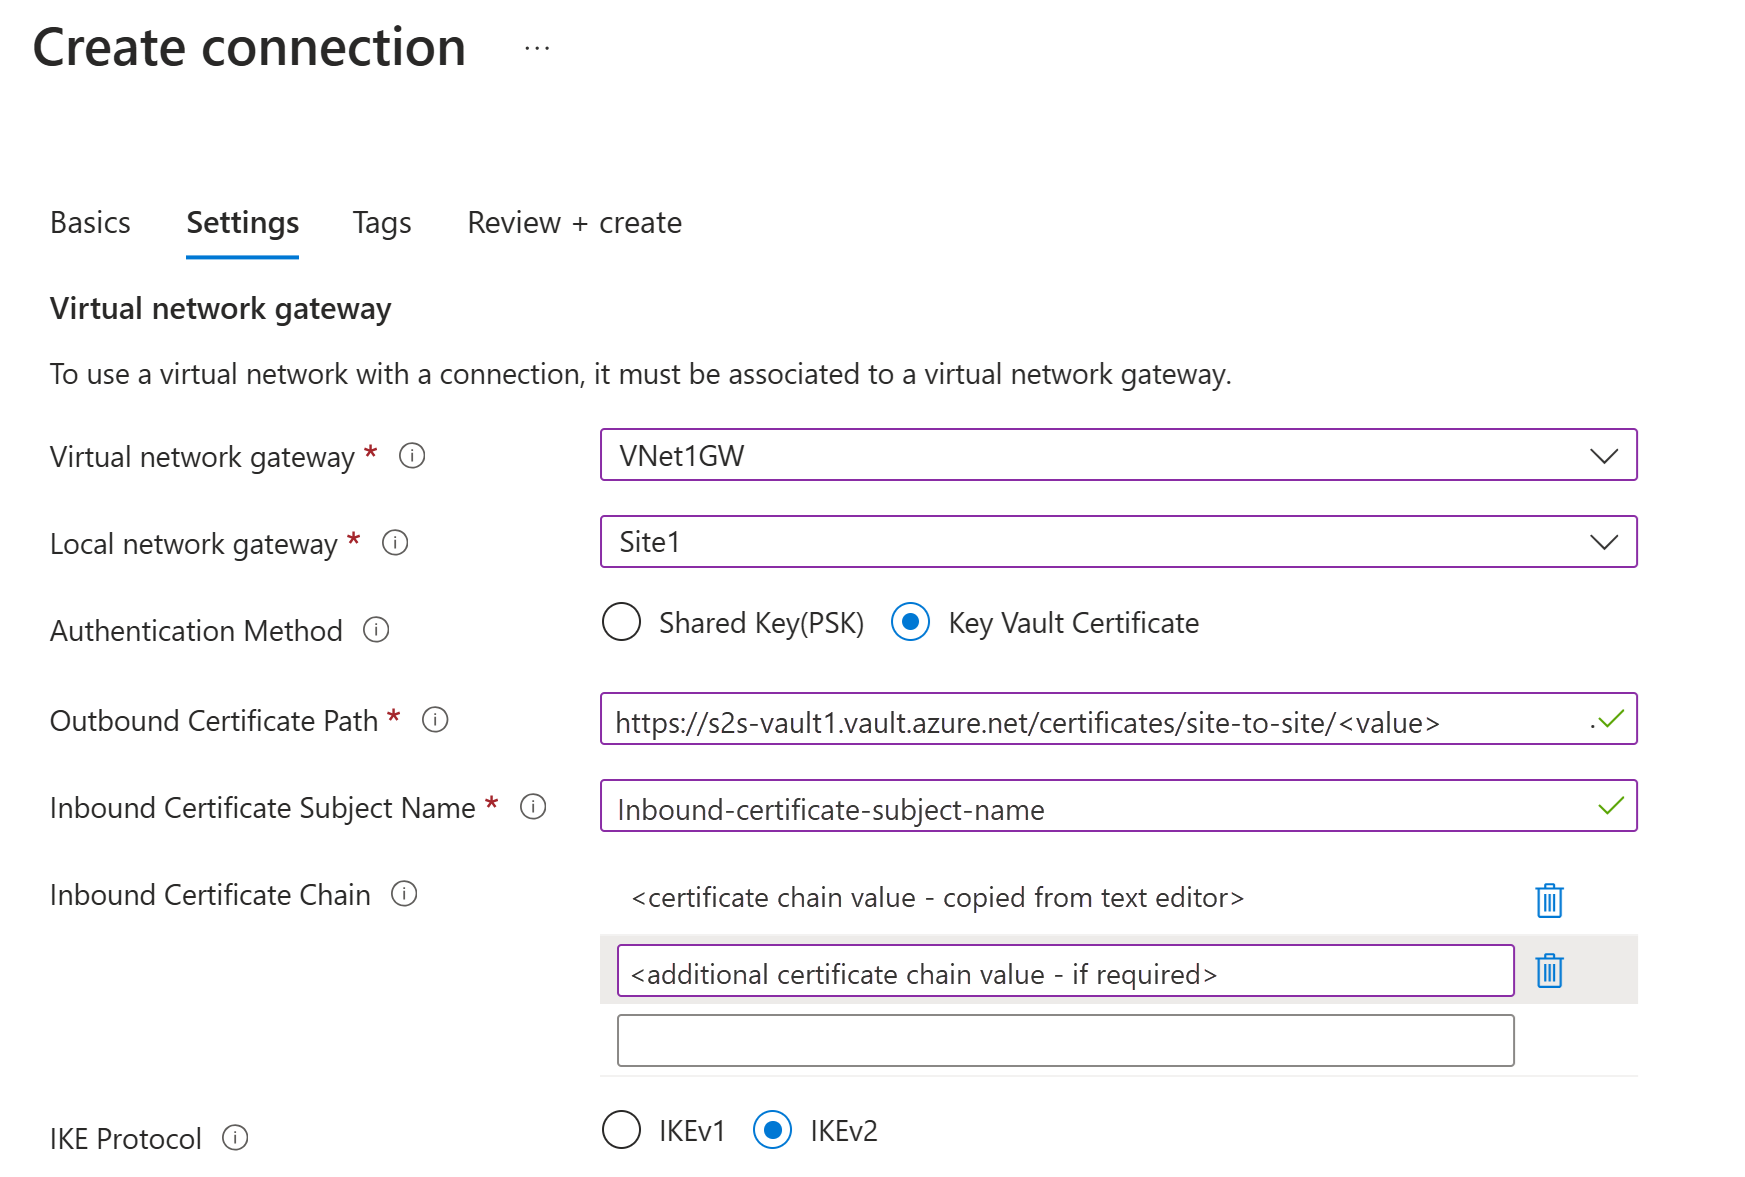
Configure the following values:
- Virtual network gateway: Select the virtual network gateway from the dropdown list.
- Local network gateway: Select the local network gateway from the dropdown list.
- Authentication Method: Select Key Vault Certificate.
- Outbound Certificate Path: The path to the outbound certificate that's located in Key Vault. The method to get this information is at the beginning of this section.
- Inbound Certificate Subject Name: The CN for the inbound certificate. The method to get this information is at the beginning of this section.
- Inbound Certificate Chain: The certificate data you copied from the
.cerfile. Copy and paste the certificate information for the inbound certificate. The method to get this information is at the beginning of this section. - IKE Protocol: Select IKEv2.
- Use Azure Private IP Address: Don't select.
- Enable BGP: Only enable if you want to use BGP.
- IPsec/IKE policy: Select Default.
- Use policy based traffic selector: Select Disable.
- DPD timeout in seconds: Select 45.
- Connection Mode: Select Default. This setting specifies which gateway can initiate the connection. For more information, see VPN Gateway settings - Connection modes.
- For NAT Rules Associations, leave both Ingress and Egress as 0 selected.
Select Review + create to validate your connection settings, and then select Create to create the connection.
After the deployment finishes, you can view the connection on the Connections page of the virtual network gateway. The status changes from Unknown to Connecting and then to Succeeded.
Azure PowerShell
Before you begin
To complete the steps in this article, ensure you have the following prerequisites:
- An Azure account with an active subscription. If you don't have one, create one for free.
- Azure PowerShell installed locally or Azure Cloud Shell. For more information, see Install the Azure PowerShell module.
- A Windows computer running Windows 10 or later, or Windows Server 2016 or later (required for certificate generation).
- Familiarity with IP address ranges in your on-premises network configuration.
- A compatible VPN device and someone who can configure it. For more information about compatible VPN devices, see About VPN devices.
- An externally facing public IPv4 address for your on-premises VPN device.
- Ensure that the subnets of your on-premises network don't overlap with the virtual network subnets you want to connect to.
Generate the digital certificates
First, generate the self-signed root CA certificates and the leaf certificates required for VPN authentication. The root CA certificate establishes the trust chain and is used to sign the leaf certificates.
You have two options:
- Use the same root certificate to sign the leaf certificates for both the Azure VPN gateway and the on-premises device.
- Use separate root certificates, one to sign the leaf certificates for the Azure VPN gateway, and another to sign the leaf certificates for the on-premises device.
In the following examples, two root certificates are used: one root certificate signs the leaf certificate used for outbound authentication from Azure to on-premises, and the other root certificate is used to sign the leaf certificates for the on-premises device.
Create self-signed root CA certificates
Use the New-SelfSignedCertificate cmdlet to create self-signed root certificates. The following example creates a self-signed root certificate named AzRootCA1, which Windows automatically installs in Certificates-Current User\Personal\Certificates. After you create the certificate, you can view it by opening certmgr.msc or Manage User Certificates.
Make any needed modifications before using this example. The NotAfter parameter is optional. By default, without this parameter, the certificate expires in one year. Run the following commands from a Windows PowerShell console with elevated privileges.
# Define Root certificate subjects for Azure
$azureRootcertSubject1 = 'CN=AzRootCA1'

# Create Root Certificate for Azure
$params = @{
    Type              = 'Custom'
    Subject           = $azureRootcertSubject1
    KeySpec           = 'Signature'
    KeyExportPolicy   = 'Exportable'
    KeyUsage          = 'CertSign'
    KeyUsageProperty  = 'Sign'
    KeyLength         = 2048
    HashAlgorithm     = 'sha256'
    NotAfter          = (Get-Date).AddMonths(120)
    CertStoreLocation = 'Cert:\CurrentUser\My'
    TextExtension     = @('2.5.29.19={critical}{text}ca=1&pathlength=4')
}
$azureRootcert = New-SelfSignedCertificate @params

# Assign the certificate subject for the on-premises device
$onpremRootcertSubject1 = 'CN=OnPremRootCA1'
# Create a self-sign Root Certificate for the on-premises site
$params = @{
    Type              = 'Custom'
    Subject           = $onpremRootcertSubject1
    KeySpec           = 'Signature'
    KeyExportPolicy   = 'Exportable'
    KeyUsage          = 'CertSign'
    KeyUsageProperty  = 'Sign'
    KeyLength         = 2048
    HashAlgorithm     = 'sha256'
    NotAfter          = (Get-Date).AddMonths(120)
    CertStoreLocation = 'Cert:\CurrentUser\My'
    TextExtension     = @('2.5.29.19={critical}{text}ca=1&pathlength=4')
}
$onpremRootcert = New-SelfSignedCertificate @params
Keep the PowerShell console open after running the preceding commands, as you need to reference the generated certificates in the next steps.
Generate leaf certificates signed by the root CA certificates
Generate leaf certificates signed by the root certificates. Use these certificates for site-to-site VPN authentication. These examples use the New-SelfSignedCertificate cmdlet to generate outbound and inbound leaf certificates. Windows automatically installs the certificates in Certificates - Current User\Personal\Certificates.
Create outbound certificate for the VPN gateway
# Assign the leaf certificate subjects for the VPN gateway
$azureLeafcertSubject1 = 'CN=az-outbound-cert1'
$certPassword = '12345'

# Get the Root certificates from certificate store
$azureRootcert = Get-ChildItem -Path Cert:\CurrentUser\My | Where-Object { $_.Subject -eq $azureRootcertSubject1 }

# Create Leaf Certificate (signed by Azure Root CA)
$params = @{
    Type              = 'Custom'
    Subject           = $azureLeafcertSubject1
    KeySpec           = 'Signature'
    KeyExportPolicy   = 'Exportable'
    KeyLength         = 2048
    HashAlgorithm     = 'sha256'
    NotAfter          = (Get-Date).AddMonths(120)
    CertStoreLocation = 'Cert:\CurrentUser\My'
    Signer            = $azureRootcert
    TextExtension     = @('2.5.29.37={text}1.3.6.1.5.5.7.3.2,1.3.6.1.5.5.7.3.1')
}
$azureLeafcert = New-SelfSignedCertificate @params
Create outbound certificate for the on-premises device
# Assign leaf certificate subjects for the on-premises device
$onpremLeafcertSubject1 = 'CN=onprem-s2s-1'

# Get the on-premises Root certificate from the certificate store
$onpremRootcert = Get-ChildItem -Path Cert:\CurrentUser\My | Where-Object { $_.Subject -eq $onpremRootcertSubject1 }

# Create Leaf Certificate 1 (signed by on-premises Root CA)
$params = @{
    Type              = 'Custom'
    Subject           = $onpremLeafcertSubject1
    KeySpec           = 'Signature'
    KeyExportPolicy   = 'Exportable'
    KeyLength         = 2048
    HashAlgorithm     = 'sha256'
    NotAfter          = (Get-Date).AddMonths(120)
    CertStoreLocation = 'Cert:\CurrentUser\My'
    Signer            = $onpremRootcert
    TextExtension     = @('2.5.29.37={text}1.3.6.1.5.5.7.3.2,1.3.6.1.5.5.7.3.1')
}
$onpremLeafcert1 = New-SelfSignedCertificate @params
Note
Generation of root and leaf certificates on a Windows host for the on-premises device is shown only as an example to illustrate the correct setup workflow. Because certificate creation varies by device, consult the vendor’s documentation for instructions on generating the required root and leaf certificates and importing them into the on-premises device.
Export the certificates
Export the root certificates in Base64 format (.cer) and the leaf certificates in PKCS#12 format (.pfx).
$certPath="PATH_TO_LOCAL_FOLDER_TO_STORE_EXPORTED_CERTIFICATES"

# password used in export certificates
$certPassword = '12345'

# Export root certificates
$azureRootcert = Get-ChildItem -Path Cert:\CurrentUser\My | Where-Object { $_.Subject -eq $azureRootcertSubject1 }
$onpremRootcert = Get-ChildItem -Path Cert:\CurrentUser\My | Where-Object { $_.Subject -eq $onpremRootcertSubject1 }

# Export root certificates to DER format first
Export-Certificate -Cert $azureRootcert -FilePath "$certPath\AzRootCA1.cert" -Force
Export-Certificate -Cert $onpremRootcert -FilePath "$certPath\OnPremRootCA1.cert" -Force

# Convert root certificates to Base64-encoded PEM format
certutil -encode "$certPath\AzRootCA1.cert" "$certPath\AzRootCA1.cer"
certutil -encode "$certPath\OnPremRootCA1.cert" "$certPath\OnPremRootCA1.cer"

# Export leaf certificates as PFX (with private key)
$mypwd = ConvertTo-SecureString -String $certPassword -Force -AsPlainText

$azureLeafcert1 = Get-ChildItem -Path Cert:\CurrentUser\My | Where-Object { $_.Subject -eq $azureLeafcertSubject1 }

Export-PfxCertificate -Cert $azureLeafcert1 -FilePath "$certPath\az-outbound-cert1.pfx" -Password $mypwd
Declare Azure environment variables
The next sections refer to the variables defined in the following code block. Update the variable values to match your environment before running the code.
# Azure subscription and resource group
$subscriptionName = '<your-subscription-name>'
$rgName = '<your-resource-group-name>'
$location = 'westus'

# Virtual network 1 configuration
$vnet1Name = 'vnet1'
$vnet1Address = '10.1.0.0/16'
$gw1SubnetAddress = '10.1.0.0/24'

# VPN gateway names
$gw1Name = 'gw1'
Create virtual networks and gateway subnets
Create a resource group.
# Create a Resource Group
$rg = New-AzResourceGroup -Name $rgName -Location $location -Force

# Add tags for organization
Set-AzResourceGroup -Name $rgName -Tags @{ usage = "s2s-digitalcert" }
Create the virtual networks with gateway subnets. The gateway subnet must be named GatewaySubnet and should be /27 or larger.
# Create Virtual Network VNet1
$vnet1 = New-AzVirtualNetwork -ResourceGroupName $rgName -Name $vnet1Name `
    -AddressPrefix $vnet1Address -Location $location

# Add subnets to VNet1
Add-AzVirtualNetworkSubnetConfig -Name 'GatewaySubnet' -VirtualNetwork $vnet1 `
    -AddressPrefix $gw1SubnetAddress
Set-AzVirtualNetwork -VirtualNetwork $vnet1
Important
Network security groups (NSGs) on the gateway subnet aren't supported. Associating an NSG to this subnet might cause your virtual network gateway to stop functioning as expected.
Create user-assigned managed identities
This configuration requires a managed identity. VPN gateways use user-assigned managed identities to securely access certificates stored in Azure Key Vault. For more information about managed identities, see What are managed identities for Azure resources.
When creating the managed identity name, use something intuitive, such as gw1-s2s-kv or vpngwy-managed. You need the name for Key Vault configuration steps. The resource group doesn't have to be the same as the resource group used for your VPN gateway.
# Create managed user identity for VPN Gateway to access to the Azure Keyvault
$gw1UserIdentityName = 'gw1-s2s-kv'
$gw1UserIdentity = New-AzUserAssignedIdentity -ResourceGroupName $rgName `
    -Name $gw1UserIdentityName -Location $location
A user-assigned managed identity name doesn't need to be globally unique across subscriptions. It only needs to be unique within the resource group where you create it.
Create Key Vaults and configure RBAC permissions
This configuration requires Azure Key Vault. Create Key Vaults to store the certificates and configure RBAC permissions for secure access. For more information about Azure Key Vault, see About Azure Key Vault.
Note
When using the Azure portal to create a Key Vault for certificate authentication, ensure you select Azure role-based access control as the Permission model on the access configuration. This approach is recommended.
# Generate a globally unique Azure Key Vault name.
# Key Vault names must be unique across all Azure regions and must not exceed 24 characters.
$suffix1 = "ALFANUMERIC_VALUE"
$keyVault1Name = "kv-$suffix1"

# Deleting the Keyvault in removed state to avoid failure
Remove-AzKeyVault -VaultName $keyVault1Name -Location $location -InRemovedState -Force -ErrorAction SilentlyContinue

# Create Key Vault 1 - Azure RBAC is the default access control model for the newly created vaults
$keyVault1 = New-AzKeyVault -VaultName $keyVault1Name -ResourceGroupName $rgName -Location $location
Assign RBAC roles to managed identities
Grant the managed identities the necessary permissions to access certificates in Key Vault by using Azure RBAC.
# Define RBAC role IDs
$secretsUserRoleId = "4633458b-17de-408a-b874-0445c86b69e6"  # built-in role for Key Vault Secrets User
$certUserRoleId = "db79e9a7-68ee-4b58-9aeb-b90e7c24fcba"     # built-in role for Key Vault Certificate User
$certOfficerRoleId = "a4417e6f-fecd-4de8-b567-7b0420556985"  # built-in role for Key Vault Certificates Officer

# Assign Key Vault Certificates Officer role to current user (required to import certificates)
$currentUser = (Get-AzContext).Account.Id
$currentUserObjectId = (Get-AzADUser -UserPrincipalName $currentUser).Id
Write-Host "Assigning Key Vault Certificates Officer role to current user: $currentUser"
New-AzRoleAssignment -ObjectId $currentUserObjectId `
    -RoleDefinitionId $certOfficerRoleId -Scope $keyVault1.ResourceId

# Assign RBAC roles to the user-assigned managed identity to access Key Vault 1
New-AzRoleAssignment -ObjectId $gw1UserIdentity.PrincipalId `
    -RoleDefinitionId $secretsUserRoleId -Scope $keyVault1.ResourceId
New-AzRoleAssignment -ObjectId $gw1UserIdentity.PrincipalId `
    -RoleDefinitionId $certUserRoleId -Scope $keyVault1.ResourceId
RBAC permission changes don't take effect immediately. As a best practice, allow roughly two minutes for the updated role assignments to propagate before validating that the permissions reached the user-assigned managed identity. If RBAC hasn't yet propagated, the next steps might fail.
Note
Microsoft recommends using Azure RBAC for Key Vault access control instead of the legacy Access Policy model. For more information, see Migrate from access policy to Azure RBAC.
Import certificates to Key Vault
Upload the outbound leaf certificate (with the private key) to Azure Key Vault. You must use the .pfx format for the certificate file.
# Import leaf certificate in the Key Vault 1
$certPath="PATH_TO_LOCAL_FOLDER_TO_STORE_EXPORTED_CERTIFICATES"
$gw1OutboundCertName = 'gw1-cert'
$certPassword = ConvertTo-SecureString -String "12345" -Force -AsPlainText

Import-AzKeyVaultCertificate -VaultName $keyVault1Name -Name $gw1OutboundCertName `
    -FilePath "$certPath\az-outbound-cert1.pfx" -Password $certPassword
Create public IP addresses for VPN gateways
Create zone-redundant Standard SKU public IP addresses for the VPN gateways. Configure the VPN gateway in active-active mode, so you need two public IP addresses.
# Create public IP for Gateway 1
$gw1pubIP1Name = $gw1Name + "pip1"
Write-Host "Creating public IP: $gw1pubIP1Name"
$gw1pubIP1 = New-AzPublicIpAddress -ResourceGroupName $rgName -Name $gw1pubIP1Name `
    -Location $location -AllocationMethod Static -Sku Standard -Tier Regional `
    -Zone @("1", "2", "3")

# Create public IP for Gateway 2
$gw1pubIP2Name = $gw1Name + "pip2"
Write-Host "Creating public IP: $gw1pubIP2Name"
$gw1pubIP2 = New-AzPublicIpAddress -ResourceGroupName $rgName -Name $gw1pubIP2Name `
    -Location $location -AllocationMethod Static -Sku Standard -Tier Regional `
    -Zone @("1", "2", "3")
Create VPN gateways
When you create the VPN gateway, specify the user-assigned managed identity so the gateway can access the certificates in Key Vault for authentication. The VPN gateway uses the outbound certificate to authenticate to the on-premises VPN device, and it validates the incoming connection from the on-premises device by using the root certificate chain configured in the gateway.
Create VPN gateways with the user-assigned managed identities for Key Vault access.
Note
VPN gateway deployment can take 30-45 minutes.
# Get virtual network and subnet references
$vnet1 = Get-AzVirtualNetwork -ResourceGroupName $rgName -Name $vnet1Name
$gw1Subnet = Get-AzVirtualNetworkSubnetConfig -Name 'GatewaySubnet' -VirtualNetwork $vnet1

# Create IP configurations for the active-active gateway
$gw1IpConfig1 = New-AzVirtualNetworkGatewayIpConfig -Name 'gw1-config1' `
    -PublicIpAddress $gw1pubIP1 -Subnet $gw1Subnet
$gw1IpConfig2 = New-AzVirtualNetworkGatewayIpConfig -Name 'gw1-config2' `
    -PublicIpAddress $gw1pubIP2 -Subnet $gw1Subnet

# Create VPN gateway 1 with user-assigned managed identity and Key Vault access enabled
# Creation of VPN gateway may take 30-45 minutes
$gw1 = New-AzVirtualNetworkGateway -ResourceGroupName $rgName -Name $gw1Name `
    -Location $location `
    -IpConfigurations @($gw1IpConfig1, $gw1IpConfig2) `
    -GatewayType Vpn `
    -VpnType RouteBased `
    -EnableBgp $false `
    -GatewaySku VpnGw2AZ `
    -EnableActiveActiveFeature `
    -VpnGatewayGeneration Generation2 `
    -UserAssignedIdentityId $gw1UserIdentity.Id
To check the VPN gateway provisioning state, use the following command.
write-host "vpn gateway provisioning state: "$gw1.ProvisioningState
Create local network gateways
A local network gateway is an object that represents your on-premises location (the site) for routing purposes. You give the site a name that Azure can use to refer to it, and then specify the IP address of the on-premises VPN device to which you create a connection. You also specify the IP address prefixes that route through the VPN gateway to the VPN device. The address prefixes you specify are the prefixes located on your on-premises network. If your on-premises network changes or you need to change the public IP address for the VPN device, you can easily update the values later.
Note
You deploy the local network gateway object in Azure, not to your on-premises location.
Configuration considerations:
- FQDN support: If you have a dynamic public IP address, use a constant DNS name with a Dynamic DNS service to point to your current public IP address. Your Azure VPN gateway resolves the FQDN to determine the public IP address to connect to.
- Single IP address: VPN Gateway supports only one IPv4 address for each FQDN. If the domain name resolves to multiple IP addresses, VPN Gateway uses the first IP address returned by the DNS servers. Microsoft recommends that your FQDN always resolve to a single IPv4 address. IPv6 isn't supported.
- DNS cache: VPN Gateway maintains a DNS cache that's refreshed every 5 minutes. The gateway tries to resolve the FQDNs for disconnected tunnels only. Resetting the gateway also triggers FQDN resolution.
- Multiple connections: Although VPN Gateway supports multiple connections to different local network gateways with different FQDNs, all FQDNs must resolve to different IP addresses.
Create local network gateways to represent the on-premises network site. Each local network gateway specifies the public IP address and address prefixes of the remote on-premises site.
# Get public IP addresses of the on-premises VPN device
$site1publicIP1 = "PUBLIC_IP_ADDRESS_1_ON_PREMISES_DEVICE"
$site1publicIP2 = "PUBLIC_IP_ADDRESS_2_ON_PREMISES_DEVICE"
$onpremAddressPrefix ="10.2.0.0/16"

# Create Local Network Gateway for the Site1
# The remote peer is the first on-premises public IP: $site1publicIP1
$localNetGwSite11Name = 'localNetSite11'
$localNetGwSite11 = New-AzLocalNetworkGateway -Name $localNetGwSite11Name `
    -ResourceGroupName $rgName `
    -Location $location `
    -AddressPrefix $onpremAddressPrefix `
    -GatewayIpAddress $site1publicIP1

# Create Local Network Gateway for the Site1
# The remote peer is the second on-premises public IP: $site1publicIP2
$localNetGwSite12Name = 'localNetSite12'
$localNetGwSite12 = New-AzLocalNetworkGateway -Name $localNetGwSite12Name `
    -ResourceGroupName $rgName `
    -Location $location `
    -AddressPrefix $onpremAddressPrefix `
    -GatewayIpAddress $site1publicIP2
Configure your on-premises VPN device
Site-to-site connections to an on-premises network require a VPN device. When you configure your VPN device, you need the following values:
- Certificate: You need the certificate data used for authentication. Use this certificate as the inbound certificate when creating the VPN connection.
- Public IP address values for your virtual network gateway: To find the public IP address for your VPN gateway VM instance by using the Azure portal, go to your virtual network gateway and look under Settings > Properties. If you have an active-active mode gateway (recommended), set up tunnels to each VPN gateway instance. Both tunnels are part of the same connection. Active-active mode VPN gateways have two public IP addresses, one for each gateway VM instance.
Depending on your VPN device, you might be able to download a VPN device configuration script. For more information, see Download VPN device configuration scripts. See the following table for VPN device configuration resources.
| Resource | Description |
|---|---|
| VPN devices | Information about compatible VPN devices |
| Validated VPN devices | Links to device configuration settings |
| About cryptographic requirements | Cryptographic requirements for Azure VPN gateways |
| IPsec/IKE parameters | IKE version, Diffie-Hellman Group, encryption, and hashing algorithms |
| IPsec/IKE policy configuration | Configure custom IPsec/IKE policy |
Create VPN connections with certificate authentication
Create the VPN connections by using certificate authentication. Each connection uses the outbound certificate from Azure Key Vault and validates inbound connections against the remote site's root certificate chain.
Prepare outbound certificate authentication objects for the VPN gateway
Use the following commands to get the reference to the outbound certificate stored in Azure Key Vault and prepare the authentication parameters for the connection.
# Get certificate information from Key Vault
$gw1certOutbound = Get-AzKeyVaultCertificate -VaultName $keyVault1Name -Name $gw1OutboundCertName
$gw1OutboundCertUrl = $gw1certOutbound.Id
$gw1OutboundcertData = Get-AzKeyVaultCertificate -VaultName $keyVault1Name -Name $gw1OutboundCertName
$gw1OutboundcertSubjectName = $gw1OutboundcertData.Certificate.Subject -replace "^CN=", ""
The $gw1OutboundCertUrl variable contains the path to the outbound certificate in Azure Key Vault. The path is specific to the certificate and looks like: https://your-keyvault.vault.azure.net/certificates/certificate-name/<certificate-value>. To check the value, use the following command.
Write-Host $gw1OutboundCertUrl
Prepare inbound certificate information for the VPN gateway
In this section, the following steps assume that you exported the on-premises root certificate in Base64 format to the folder specified by $certPath as OnPremRootCA1.cer. Use the certificate chain in $onpremcertChainInbound1 to verify the incoming certificate in VPN Gateway. The chain doesn't contain private keys.
Run the following commands:
# Read inbound certificate chain files (Root CA certificates in Base64 format for on-premises device)
$certPath = "PATH_TO_LOCAL_FOLDER_TO_STORE_EXPORTED_CERTIFICATES"
$onpremInboundCert1Data = Get-Content -Path "$certPath\OnPremRootCA1.cer" -Raw

# Remove PEM headers and get only the encoded-Base64 certificate content
$onpremInboundCert1Base64 = $onpremInboundCert1Data -replace "-----BEGIN CERTIFICATE-----", "" `
    -replace "-----END CERTIFICATE-----", ""

$onpremcertChainInbound1 = @($onpremInboundCert1Base64)
You should always have at least two certificates in the inbound certificate section when using intermediate CAs.
Important
If you have intermediate CAs in your certificate chain, first add the root certificate as the first intermediate certificate, and then follow that certificate with the inbound intermediate certificate.
Declare the variable
At this stage, assume that you created the on-premises device's leaf certificate and that you can retrieve the certificate's Subject Name. On the on-premises device, extract the Common Name (CN) from the outbound leaf certificate. In the example workflow, the CN is s2s onprem1, but you should verify the CN value used in your own environment. Assign the extracted CN from the on-premises leaf certificate to the variable:
$onpremLeafcertSubject1="onprem-s2s-1"
Don't include the "CN=" in the variable $onpremLeafcertSubject1
Create certificate authentication objects
# Create certificate authentication object for Gateway 1
# Gateway 1 uses its own certificate for outbound, and trusts Root CA 2 for inbound
$gw1certAuth = New-AzVirtualNetworkGatewayCertificateAuthentication `
    -OutboundAuthCertificate $gw1OutboundCertUrl `
    -InboundAuthCertificateSubjectName $onpremLeafcertSubject1 `
    -InboundAuthCertificateChain $onpremcertChainInbound1
Create the VPN connections
Deploy two connections to connect two site-to-site tunnels from the VPN gateway to the on-premises device.
# Get VPN gateway object
$gw1 = Get-AzVirtualNetworkGateway -Name $gw1Name -ResourceGroupName $rgName

# Create connection from Gateway1 to site1-tunnel1
$gw1Connection1Name = 'Connection11'
$vpnConnection11 = New-AzVirtualNetworkGatewayConnection -Name $gw1Connection1Name `
    -ResourceGroupName $rgName `
    -Location $location `
    -VirtualNetworkGateway1 $gw1 `
    -LocalNetworkGateway2 $localNetGwSite11 `
    -ConnectionType IPsec `
    -AuthenticationType "Certificate" `
    -CertificateAuthentication $gw1certAuth

# Create connection from Gateway1 to site1-tunnel2
$gw1Connection2Name = 'Connection12'
$vpnConnection12 = New-AzVirtualNetworkGatewayConnection -Name $gw1Connection2Name `
    -ResourceGroupName $rgName `
    -Location $location `
    -VirtualNetworkGateway1 $gw1 `
    -LocalNetworkGateway2 $localNetGwSite12 `
    -ConnectionType IPsec `
    -AuthenticationType "Certificate" `
    -CertificateAuthentication $gw1certAuth
Verify the VPN connection
After you create the connections, verify the VPN gateway settings:
# Verify connection was created successfully
write-host "gw1-connection name....: "$vpnConnection11.Name
write-host "gw1-auth type..........: "$vpnConnection11.AuthenticationType
write-host "gw1-cert authentication.: "$vpnConnection11.CertificateAuthentication
write-host "gw1-outboundCertUrl....: "$vpnConnection11.CertificateAuthentication.OutboundAuthCertificate
write-host "gw1-Inbound CertSubject: "$vpnConnection11.CertificateAuthentication.InboundAuthCertificateSubjectName

# Verify the status of VPN tunnels
$connection1 = Get-AzVirtualNetworkGatewayConnection -Name $gw1Connection1Name `
    -ResourceGroupName $rgName
$connection2 = Get-AzVirtualNetworkGatewayConnection -Name $gw1Connection2Name `
    -ResourceGroupName $rgName

Write-Host "Connection 1 Status: $($connection1.ConnectionStatus)"
Write-Host "Connection 2 Status: $($connection2.ConnectionStatus)"
When the VPN tunnels are established, the connection status shows Connected.
You can also verify the connection in the Azure portal:
- Go to your virtual network gateway in the portal.
- Select Connections in the left pane.
- Verify the connection status shows Connected.
Azure CLI
Before you begin
To complete the steps in this article, ensure you have the following prerequisites:
- An Azure account with an active subscription. If you don't have one, create one for free.
- Azure CLI installed locally or Azure Cloud Shell. For more information, see Install the Azure CLI.
- Familiarity with IP address ranges in your on-premises network configuration.
- A compatible VPN device and someone who can configure it. For more information about compatible VPN devices, see About VPN devices.
- An externally facing public IPv4 address for your on-premises VPN device.
- Ensure that the subnets of your on-premises network don't overlap with the virtual network subnets you want to connect to.
Generate the digital certificates
First, generate the self-signed root CA certificates and the leaf certificates required for VPN authentication. The root CA certificate establishes the trust chain and is used to sign the leaf certificates.
You have two options:
- Use the same root certificate to sign the leaf certificates for both the Azure VPN gateway and the on-premises device.
- Use separate root certificates, one to sign the leaf certificates for the Azure VPN gateway, and another to sign the leaf certificates for the on-premises device.
In the following examples, two root certificates are used: one root certificate signs the leaf certificate used for outbound authentication from Azure to on-premises, and the other root certificate is used to sign the leaf certificates for the on-premises device.
Note
You can create the digital certificates on Windows or Linux. This article shows the creation on Linux by using OpenSSL.
Create self-signed root CA certificates
Use OpenSSL to create self-signed root certificates. The following example creates a self-signed root certificate named VPNRootCA1, which is automatically stored in the local folder certs.
Run the following commands from a bash terminal to create the root certificate for the Azure VPN gateway.
# Define the root certificate subject for Azure VPN
azureRootcertSubject1='VPNRootCA1'

# Define the local folder to store the digital certificates
pathFiles="$(pwd)"
certPath="$pathFiles/certs/"
echo "folder to store digital certificates: $certPath"

# Create a local folder ./certs/
mkdir -p "$certPath"

# Generate the private key for the Azure VPN gateway root certificate
openssl genrsa -out "$certPath${azureRootcertSubject1}.key" 2048

# Generate the self-signed root certificate for the Azure VPN gateway
openssl req -x509 -new -nodes \
    -key "$certPath${azureRootcertSubject1}.key" \
    -sha256 \
    -days 3650 \
    -out "$certPath${azureRootcertSubject1}.cer" \
    -subj "/CN=$azureRootcertSubject1" \
    -extensions v3_ca \
    -config <(cat <<EOF
[req]
distinguished_name = req_distinguished_name
x509_extensions = v3_ca
[req_distinguished_name]
[v3_ca]
basicConstraints = critical, CA:TRUE, pathlen:4
keyUsage = critical, keyCertSign, cRLSign
EOF
)
Run the following commands to create the root certificate for the on-premises VPN device.
# Define the root certificate subject for the on-premises VPN device
onpremRootcertSubject1='VPNRootCA2'
echo "Creating Root Certificate: $onpremRootcertSubject1"

# Generate the private key for the on-premises root certificate
openssl genrsa -out "$certPath${onpremRootcertSubject1}.key" 2048

# Generate the self-signed root certificate for the on-premises VPN device
openssl req -x509 -new -nodes \
    -key "$certPath${onpremRootcertSubject1}.key" \
    -sha256 \
    -days 3650 \
    -out "$certPath${onpremRootcertSubject1}.cer" \
    -subj "/CN=$onpremRootcertSubject1" \
    -extensions v3_ca \
    -config <(cat <<EOF
[req]
distinguished_name = req_distinguished_name
x509_extensions = v3_ca
[req_distinguished_name]
[v3_ca]
basicConstraints = critical, CA:TRUE, pathlen:4
keyUsage = critical, keyCertSign, cRLSign
EOF
)
echo "Root certificate $onpremRootcertSubject1 created"
To generate leaf certificates, leave the bash terminal open and proceed with the next steps.
Generate leaf certificates signed by the root CA certificates
Generate leaf certificates signed by the root certificates. Use these certificates for site-to-site VPN authentication. The following examples use OpenSSL to generate outbound and inbound leaf certificates. When you create the certificates, the process automatically stores them in ./certs on your Linux computer.
Create outbound certificate for the VPN gateway
azureLeafcertSubject1='s2s-cert1'
echo "$(date) - start creation leaf cert: $azureLeafcertSubject1"

# Generate the private key
openssl genrsa -out "$certPath${azureLeafcertSubject1}.key" 2048

# Generate the certificate signing request (CSR)
openssl req -new \
    -key "$certPath${azureLeafcertSubject1}.key" \
    -out "$certPath${azureLeafcertSubject1}.csr" \
    -subj "/CN=$azureLeafcertSubject1"

# Sign the leaf certificate for the Azure VPN gateway with Root CA 1
openssl x509 -req \
    -in "$certPath${azureLeafcertSubject1}.csr" \
    -CA "$certPath${azureRootcertSubject1}.cer" \
    -CAkey "$certPath${azureRootcertSubject1}.key" \
    -CAcreateserial \
    -out "$certPath${azureLeafcertSubject1}.cer" \
    -days 3650 \
    -sha256 \
    -extfile <(cat <<EOF
extendedKeyUsage = clientAuth, serverAuth
EOF
)
echo "$(date) - Leaf cert: $azureLeafcertSubject1 created"
Create outbound certificate for the on-premises device
onpremLeafcertSubject1='s2s-cert2'

# Generate the private key
openssl genrsa -out "$certPath${onpremLeafcertSubject1}.key" 2048

# Generate the certificate signing request (CSR)
openssl req -new \
   -key "$certPath${onpremLeafcertSubject1}.key" \
   -out "$certPath${onpremLeafcertSubject1}.csr" \
   -subj "/CN=$onpremLeafcertSubject1"

# Sign the leaf certificate with Root CA 2, used for the on-premises VPN device
openssl x509 -req \
   -in "$certPath${onpremLeafcertSubject1}.csr" \
   -CA "$certPath${onpremRootcertSubject1}.cer" \
   -CAkey "$certPath${onpremRootcertSubject1}.key" \
   -CAcreateserial \
   -out "$certPath${onpremLeafcertSubject1}.cer" \
   -days 3650 \
   -sha256 \
   -extfile <(cat <<EOF
extendedKeyUsage = clientAuth, serverAuth
EOF
)
Note
The following example shows how to generate root and leaf certificates on a Linux host for the on-premises device to illustrate the correct setup workflow. Because certificate creation varies by device, consult the vendor's documentation for instructions on generating the required root and leaf certificates and importing them into the on-premises device.
Export the certificates
Export the root certificates in Base64 format (.cer) and the leaf certificates in PKCS#12 format (.pfx).
pathFiles="$(pwd)"
certPath="$pathFiles/certs/"
certPassword="12345"

# Export the Azure leaf certificate and its private key to a .pfx file
openssl pkcs12 -export \
    -out "$certPath${azureLeafcertSubject1}.pfx" \
    -inkey "$certPath${azureLeafcertSubject1}.key" \
    -in "$certPath${azureLeafcertSubject1}.cer" \
    -certfile "$certPath${azureRootcertSubject1}.cer" \
    -passout "pass:$certPassword"
Declare Azure environment variables
The next sections refer to the variables defined in the following code block. Update the variable values to match your environment before running the script.
# Resource group name and location for the deployment of Azure resources
rgName="s2s-cert-azcli"
location='eastus'

# Variables for the virtual network
vnet1Name='vnet1'
vnet1Address='10.1.0.0/16'
gw1SubnetAddress='10.1.0.0/24'

# VPN gateway name
gw1Name='gw1'
gw1ConfigName='gw1-config'
Create virtual networks and gateway subnets
Create a resource group to contain the resources for this deployment. You can either create a new resource group or select one that you already created.
# Create a resource group
az group create --name "$rgName" --location "$location"

# Add tags for organization (optional)
az group update --name "$rgName" --tags usage="s2s-digitalcertificates" --output none
Create the virtual network with a gateway subnet. The gateway subnet must be named GatewaySubnet and should be /27 or larger.
# Create the virtual network
az network vnet create \
    --resource-group "$rgName" \
    --name "$vnet1Name" \
    --address-prefix "$vnet1Address" \
    --location "$location"

# Add the GatewaySubnet
az network vnet subnet create \
    --resource-group "$rgName" \
    --vnet-name "$vnet1Name" \
    --name "GatewaySubnet" \
    --address-prefix "$gw1SubnetAddress"
Important
Network security groups (NSGs) on the gateway subnet aren't supported. Associating an NSG to this subnet might cause your virtual network gateway to stop functioning as expected.
Create a user-assigned managed identity
This configuration requires a managed identity. VPN gateways use user-assigned managed identities to securely access certificates stored in Azure Key Vault. For more information about managed identities, see What are managed identities for Azure resources.
When creating the managed identity name, use something intuitive, such as gw1-s2s-kv or vpngwy-managed. You need the name for Key Vault configuration steps. The resource group doesn't have to be the same as the resource group used for your VPN gateway.
# Create a user-assigned managed identity for the VPN gateway to access the Azure Key Vault
gw1UserIdentityName='gw1-s2s-kv'
az identity create --resource-group "$rgName" --name "$gw1UserIdentityName" --location "$location"
A user-assigned managed identity name doesn't need to be globally unique across subscriptions. It only needs to be unique within the resource group where you create it.
Create a Key Vault and configure RBAC permissions
This configuration requires Azure Key Vault. Create a Key Vault to store the certificates and configure RBAC permissions for secure access. For more information about Azure Key Vault, see About Azure Key Vault.
Note
When using the Azure portal to create a Key Vault for certificate authentication, ensure you select Azure role-based access control as the Permission model on the access configuration. This approach is recommended.
# Generate a globally unique Azure Key Vault name.
# Key Vault names must be unique across all Azure regions and must not exceed 24 characters.
suffix="ALFANUMERIC_VALUE"
keyVault1Name="kv-$suffix"

# Delete the Key Vault if it's in the soft-deleted state, to avoid failure
az keyvault purge --name "$keyVault1Name" --location "$location"

# Create the Key Vault - Azure RBAC is the default access control model for newly created vaults
az keyvault create --name "$keyVault1Name" --resource-group "$rgName" --location "$location"
Assign RBAC roles to managed identities
Grant the managed identities the necessary permissions to access certificates in Key Vault by using Azure RBAC.
# Define the RBAC role IDs
secretsUserRoleId="4633458b-17de-408a-b874-0445c86b69e6"    # built-in role "Key Vault Secrets User"
certUserRoleId="db79e9a7-68ee-4b58-9aeb-b90e7c24fcba"       # built-in role "Key Vault Certificate User"
certOfficerRoleId="a4417e6f-fecd-4de8-b567-7b0420556985"    # built-in role "Key Vault Certificates Officer" (for full certificate management)

keyVaultResourceId=$(az keyvault show --name "$keyVault1Name" --resource-group "$rgName" --query id -o tsv)

# Get the Microsoft Entra service principal object ID of the managed identity
gw1UserIdentityPrincipalId=$(az identity show --resource-group "$rgName" --name "$gw1UserIdentityName" --query principalId -o tsv)

# Assign RBAC roles to the user-assigned managed identity to access the Key Vault
az role assignment create --assignee-object-id "$gw1UserIdentityPrincipalId" \
    --assignee-principal-type ServicePrincipal \
    --role "$certUserRoleId" \
    --scope "$keyVaultResourceId"

az role assignment create --assignee-object-id "$gw1UserIdentityPrincipalId" \
    --assignee-principal-type ServicePrincipal \
    --role "$secretsUserRoleId" \
    --scope "$keyVaultResourceId"

# Assign the Key Vault Certificates Officer role to the current user (required to import certificates)
currentUser=$(az account show --query user.name -o tsv)
currentUserObjectId=$(az ad user show --id "$currentUser" --query id -o tsv)

az role assignment create --assignee-object-id "$currentUserObjectId" \
    --assignee-principal-type User \
    --role "$certOfficerRoleId" \
    --scope "$keyVaultResourceId"
RBAC permission changes don't take effect immediately. As a best practice, allow roughly two minutes for the updated role assignments to propagate before validating that the permissions reached the user-assigned managed identity. If RBAC hasn't yet propagated, the next steps might fail.
Note
Microsoft recommends using Azure RBAC for Key Vault access control instead of the legacy Access Policy model. For more information, see Migrate from access policy to Azure RBAC.
Import certificates to Key Vault
Upload the outbound leaf certificate (with the private key) to Azure Key Vault. You must use the .pfx format for the certificate file.
pathFiles="$(pwd)"
certPath="$pathFiles/certs/"
azureLeafcertSubject1='s2s-cert1'
cert1FilePath="$certPath${azureLeafcertSubject1}.pfx"
certPassword="12345"

# Name assigned to the certificate object stored in Azure Key Vault for the VPN gateway
gw1OutboundCertName='gw1-cert'

az keyvault certificate import \
    --vault-name "$keyVault1Name" \
    --name "$gw1OutboundCertName" \
    --file "$cert1FilePath" \
    --password "$certPassword"
Create public IP addresses for the VPN gateway
Create zone-redundant Standard SKU public IP addresses for the VPN gateway. Because you configure the VPN gateway in active-active mode, you need two public IP addresses.
# Create public IP 1 for Gateway 1
gw1pubIP1Name="${gw1Name}pip1"
az network public-ip create \
    --resource-group "$rgName" \
    --name "$gw1pubIP1Name" \
    --location "$location" \
    --allocation-method Static \
    --sku Standard \
    --tier Regional \
    --zone 1 2 3

# Create public IP 2 for Gateway 1
gw1pubIP2Name="${gw1Name}pip2"
az network public-ip create \
    --resource-group "$rgName" \
    --name "$gw1pubIP2Name" \
    --location "$location" \
    --allocation-method Static \
    --sku Standard \
    --tier Regional \
    --zone 1 2 3
Create a VPN gateway
Create a VPN gateway by using the user-assigned managed identity for Key Vault access.
Note
VPN gateway deployment can take 30-45 minutes.
# Create the Azure VPN gateway in active-active mode
az network vnet-gateway create \
    --resource-group "$rgName" \
    --name "$gw1Name" \
    --location "$location" \
    --public-ip-address "$gw1pubIP1Name" "$gw1pubIP2Name" \
    --vnet "$vnet1Name" \
    --gateway-type Vpn \
    --vpn-type RouteBased \
    --sku VpnGw2AZ \
    --vpn-gateway-generation Generation2

# Get the user-assigned managed identity created earlier
gw1UserIdentityId=$(az identity show \
  --resource-group "$rgName" \
  --name "$gw1UserIdentityName" \
  --query id -o tsv)

# Attach the user-assigned managed identity to the existing Azure VPN gateway
echo "$(date) - updating vpn gateway with managed identity"
az network vnet-gateway identity assign \
    --resource-group "$rgName" \
    --name "$gw1Name" \
    --user-assigned "$gw1UserIdentityId"

# Verify the user-assigned managed identity is associated with the VPN gateway
az network vnet-gateway identity show \
  --resource-group "$rgName" \
  --name "$gw1Name" \
  --query userAssignedIdentities \
  -o json
To check the VPN gateway provisioning state, use the following command.
az network vnet-gateway show \
  --resource-group "$rgName" \
  --name "$gw1Name" \
  --query provisioningState \
  -o tsv
At the end of the deployment, the command returns Succeeded. Proceed with the next step only when the VPN gateway deployment succeeds.
Create local network gateways
A local network gateway is an object that represents your on-premises location (the site) for routing purposes. You give the site a name that Azure can use to refer to it, and then specify the IP address of the on-premises VPN device to which you create a connection. You also specify the IP address prefixes that route through the VPN gateway to the VPN device. The address prefixes you specify are the prefixes located on your on-premises network. If your on-premises network changes or you need to change the public IP address for the VPN device, you can easily update the values later.
Note
You deploy the local network gateway object in Azure, not to your on-premises location.
Configuration considerations:
- FQDN support: If you have a dynamic public IP address, use a constant DNS name with a Dynamic DNS service to point to your current public IP address. Your Azure VPN gateway resolves the FQDN to determine the public IP address to connect to.
- Single IP address: VPN Gateway supports only one IPv4 address for each FQDN. If the domain name resolves to multiple IP addresses, VPN Gateway uses the first IP address returned by the DNS servers. Microsoft recommends that your FQDN always resolve to a single IPv4 address. IPv6 isn't supported.
- DNS cache: VPN Gateway maintains a DNS cache that's refreshed every 5 minutes. The gateway tries to resolve the FQDNs for disconnected tunnels only. Resetting the gateway also triggers FQDN resolution.
- Multiple connections: Although VPN Gateway supports multiple connections to different local network gateways with different FQDNs, all FQDNs must resolve to different IP addresses.
Create local network gateways to represent the on-premises network site. Each local network gateway specifies the public IP address and address prefixes of the remote on-premises site.
# Public IP addresses of the on-premises VPN device
site1publicIP1="PUBLIC_IP_ADDRESS_1_ON_PREMISES_DEVICE"
site1publicIP2="PUBLIC_IP_ADDRESS_2_ON_PREMISES_DEVICE"
onpremAddressPrefix="10.2.0.0/16"

# Create the local network gateway for Site1
# The remote peer is the first on-premises public IP: $site1publicIP1
localNetGwSite11Name='localNetSite11'
az network local-gateway create \
    --resource-group "$rgName" \
    --name "$localNetGwSite11Name" \
    --location "$location" \
    --local-address-prefixes "$onpremAddressPrefix" \
    --gateway-ip-address "$site1publicIP1"

# Create the local network gateway for Site1
# The remote peer is the second on-premises public IP: $site1publicIP2
localNetGwSite12Name='localNetSite12'
az network local-gateway create \
    --resource-group "$rgName" \
    --name "$localNetGwSite12Name" \
    --location "$location" \
    --local-address-prefixes "$onpremAddressPrefix" \
    --gateway-ip-address "$site1publicIP2"
Configure your on-premises VPN device
Site-to-site connections to an on-premises network require a VPN device. When you configure your VPN device, you need the following values:
- Certificate: You need the certificate data used for authentication. Use this certificate as the inbound certificate when creating the VPN connection.
- Public IP address values for your virtual network gateway: To find the public IP address for your VPN gateway VM instance using the Azure portal, go to your virtual network gateway and look under Settings > Properties. If you have an active-active mode gateway (recommended), set up tunnels to each VPN gateway instance. Both tunnels are part of the same connection. Active-active mode VPN gateways have two public IP addresses, one for each gateway VM instance.
Depending on your VPN device, you might be able to download a VPN device configuration script. For more information, see Download VPN device configuration scripts. See the following table for VPN device configuration resources.
| Resource | Description |
|---|---|
| VPN devices | Information about compatible VPN devices |
| Validated VPN devices | Links to device configuration settings |
| About cryptographic requirements | Cryptographic requirements for Azure VPN gateways |
| IPsec/IKE parameters | IKE version, Diffie-Hellman Group, encryption, and hashing algorithms |
| IPsec/IKE policy configuration | Configure custom IPsec/IKE policy |
Create VPN connections with certificate authentication
Create the VPN connections by using certificate authentication. Each connection uses the outbound certificate from Azure Key Vault and validates inbound connections against the remote site's root certificate chain.
Prepare outbound certificate authentication information for the VPN gateway
Use the following commands to get the reference to the outbound certificate stored in Azure Key Vault.
# Get outbound certificate information from Key Vault for the Azure VPN gateway connections
gw1OutboundCertUrl=$(az keyvault certificate show --vault-name "$keyVault1Name" \
  --name "$gw1OutboundCertName" --query id -o tsv)
The gw1OutboundCertUrl variable contains the path to the outbound certificate in Azure Key Vault. To check the value, use the following command.
echo $gw1OutboundCertUrl
The path is specific to the certificate and looks like: https://your-keyvault.vault.azure.net/certificates/certificate-name/<certificate-value>.
Prepare inbound certificate information for the VPN gateway
The following steps assume that you export the root certificate and store it on the local computer in the folder specified by the certPath variable, with the name VPNRootCA2.cer (Base64-encoded). This certificate is the on-premises root certificate generated earlier in Create self-signed root CA certificates. Use the certificate information to verify the incoming inbound certificate in the VPN gateway. It doesn't contain private keys.
pathFiles="$(pwd)"
certPath="$pathFiles/certs"

onpremLeafcertSubject1=$(openssl x509 -in "$certPath/s2s-cert2.cer" -noout -subject | sed -E 's/^subject= ?CN=//')

# Read the inbound certificate chain file for the Azure VPN gateway.
# This is the Root CA certificate in Base64 format for the on-premises VPN device.
inboundCert2Path="$certPath/VPNRootCA2.cer"
inboundCert2Base64=$(grep -v "BEGIN CERTIFICATE" "$inboundCert2Path" | grep -v "END CERTIFICATE" | tr -d '\n\r')
You should always have at least two certificates in the inbound certificate section when using intermediate CAs.
Important
If you have intermediate CAs in your certificate chain, first add the root certificate as the first intermediate certificate, then follow that certificate with the inbound intermediate certificate.
At this stage, assume that you already created the on-premises device's leaf certificate and that you can retrieve the certificate's subject name. On the on-premises device, extract the Common Name (CN) from the outbound leaf certificate. In the example workflow, the CN is onprem-s2s-1, but you should verify the CN value used in your own environment.
Don't include the CN= prefix in the variable value.
Create certificate authentication objects
# Create the certificate authentication object in JSON format for the Azure VPN gateway
# Gateway 1 uses its own certificate for outbound, and trusts Root CA 2 for inbound
certAuthJson="{\"outboundAuthCertificate\":\"$gw1OutboundCertUrl\",\"inboundAuthCertificateChain\":[\"$inboundCert2Base64\"],\"inboundAuthCertificateSubjectName\":\"$onpremLeafcertSubject1\"}"
Create the VPN connections
Deploy two connections to connect two site-to-site tunnels from the VPN gateway to the on-premises device.
# Create connection 1 from Gateway1 to site1
gw1Connection11Name='Connection11'
az network vpn-connection create \
    --resource-group "$rgName" \
    --name "$gw1Connection11Name" \
    --location "$location" \
    --vnet-gateway1 "$gw1Name" \
    --local-gateway2 "$localNetGwSite11Name" \
    --auth-type Certificate \
    --cert-auth "$certAuthJson" \
    --routing-weight 3

# Create connection 2 from Gateway1 to site1
gw1Connection12Name='Connection12'
az network vpn-connection create \
    --resource-group "$rgName" \
    --name "$gw1Connection12Name" \
    --location "$location" \
    --vnet-gateway1 "$gw1Name" \
    --local-gateway2 "$localNetGwSite12Name" \
    --auth-type Certificate \
    --cert-auth "$certAuthJson" \
    --routing-weight 3
Verify the VPN connection
After you create the connections, verify the VPN gateway setting.
echo "$(date) - checking vpn connection: $gw1Connection11Name"
vpnConnection11=$(az network vpn-connection show --resource-group "$rgName" --name "$gw1Connection11Name")
echo "$gw1Name - connection name......: $(echo "$vpnConnection11" | jq -r '.name')"
echo "$gw1Name - connection type......: $(echo "$vpnConnection11" | jq -r '.connectionType')"
echo "$gw1Name - authentication type..: $(echo "$vpnConnection11" | jq -r '.authenticationType')"
echo "$gw1Name - connection status....: $(echo "$vpnConnection11" | jq -r '.connectionStatus')"

echo "$(date) - checking vpn connection: $gw1Connection12Name"
vpnConnection12=$(az network vpn-connection show --resource-group "$rgName" --name "$gw1Connection12Name")
echo "$gw1Name - connection name......: $(echo "$vpnConnection12" | jq -r '.name')"
echo "$gw1Name - connection type......: $(echo "$vpnConnection12" | jq -r '.connectionType')"
echo "$gw1Name - authentication type..: $(echo "$vpnConnection12" | jq -r '.authenticationType')"
echo "$gw1Name - connection status....: $(echo "$vpnConnection12" | jq -r '.connectionStatus')"
When the VPN tunnels are successfully established, the connection status shows as Connected.
You can also verify the connection in the Azure portal:
- Go to your virtual network gateway in the portal.
- Select Connections in the left pane.
- Verify the connection status shows Connected.
Next steps
- About VPN Gateway configuration settings
- Configure BGP for VPN Gateway
- About highly available VPN gateway connections
- About VPN devices
- About cryptographic requirements and Azure VPN gateways
- About Key Vault
- Azure Key Vault RBAC guide