Use variables
Important
Power Virtual Agents capabilities and features are now part of Microsoft Copilot Studio following significant investments in generative AI and enhanced integrations across Microsoft Copilot.
Some articles and screenshots may refer to Power Virtual Agents while we update documentation and training content.
You can use variables to save customers' responses and reuse their content later in the conversation.
You can also use variables to create logical expressions that dynamically route the customer down different conversation paths. For example, save a customer's name in a variable called UserName, and the copilot can address the customer by name as the conversation continues.
Variables can also be passed to, and returned from, other topics and Power Automate flows.
Variables can exist at three levels, or scopes:
- Topic variables can only be used in the topics in which they're created. This scope is the default for variables that you create.
- Global variables can be used in all topics. You can change the scope of a topic variable to make it a global variable.
- System variables are created automatically with your copilot. They provide more contextual information about the conversation or the user. They're available in all topics.
Variable types
A variable is associated with a base type. The type determines what values the variable can contain and the operators that you can use when you construct a logical expression with it.
| Type | Description |
|---|---|
| String | A sequence of characters used to represent text |
| Boolean | A logical value that can only be true or false |
| Number | Any real number |
| Table | A list of values, but all values must be of the same type |
| Record | A collection of name-value pairs where values can be of any type |
| DateTime | A date, time, day of the week, or month relative to a point in time |
| Choice | A list of string values that have associated synonyms |
| Blank | A placeholder for "no value" or "unknown value"; for more information, see Blanks in Power Fx |
A variable's type is set the first time a value is assigned to it. After that, the type for that variable is fixed and it can't be assigned values of any other type. For example, a variable given the starting value of 1 is assigned the type Number. Attempting to assign it to a String value of "apples" will result in an error.
When you're testing a copilot, a variable may appear temporarily as the type unknown. An unknown variable hasn't been assigned a value yet.
Order of variables is determined from top to bottom of the authoring canvas. That is, nodes at the top of the authoring canvas are considered before nodes at the bottom. When you create branches with Condition nodes, branches are ordered from left to right. That is, nodes in the leftmost branch are considered before nodes in the rightmost branch.
Entities
Microsoft Copilot Studio uses entities to identify a specific type of information from a user's responses. The identified information is saved in a variable of the type that's appropriate for the information. The following table lists the variable base type that's associated with prebuilt entities.
| Entity | Variable Base Type |
|---|---|
| Multiple-choice options | Choice |
| User's entire response | String |
| Age | Number |
| Boolean | Boolean |
| City | String |
| Color | String |
| Continent | String |
| Country or region | String |
| Date and time | DateTime |
| String | |
| Event | String |
| Integer | Integer |
| Language | String |
| Money | Number |
| Number | Number |
| Ordinal | Number |
| Organization | String |
| Percentage | Number |
| Person name | String |
| Phone number | String |
| Point of interest | String |
| Speed | Number |
| State | String |
| Street address | String |
| Temperature | Number |
| URL | String |
| Weight | Number |
| Zip code | String |
| Custom entity | Choice |
Create a variable
Any node that prompts you to select a variable as an output, such as a Question node, automatically creates an output variable of the appropriate type.

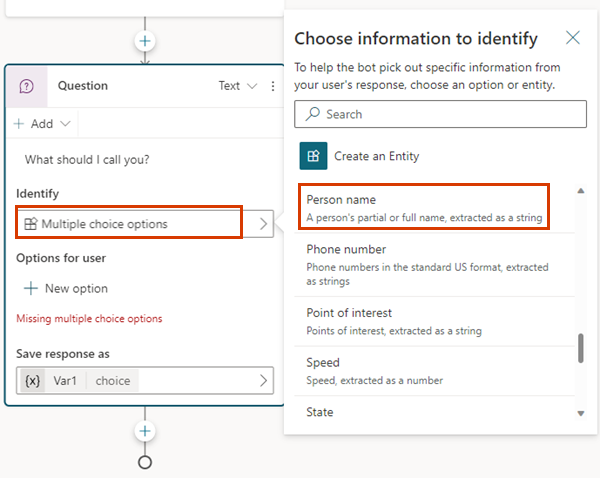
Pick an entity to use
Question nodes are created with multiple-choice options by default. To use a different prebuilt or custom entity, select the Identify box and choose the type of information the copilot should listen for.
Rename a variable
Variables are automatically assigned a name when you create them. A best practice is to give your variables meaningful names to make their purpose clear to anyone else who must maintain your copilot.
Select the variable to open it in the Variable properties pane.
Under Variable name, enter a new name for your variable.
Set a variable
Typically you'll use a Question node to save user input to a variable. There may be situations where you want to set the value yourself, however. In those cases, use a Set Variable Value node.
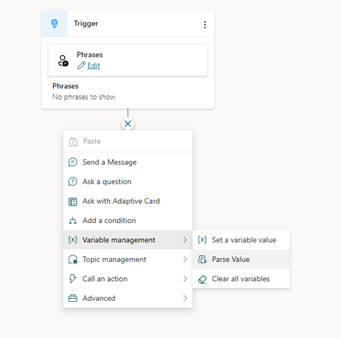
Select Add node (+) to add a node, and then select Set a variable value.
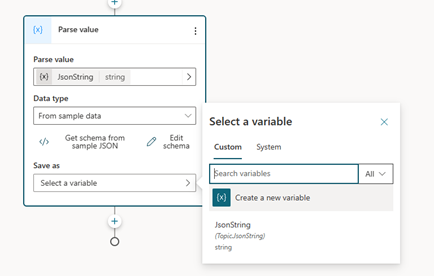
Select the box under Set variable, and then select Create a new variable.
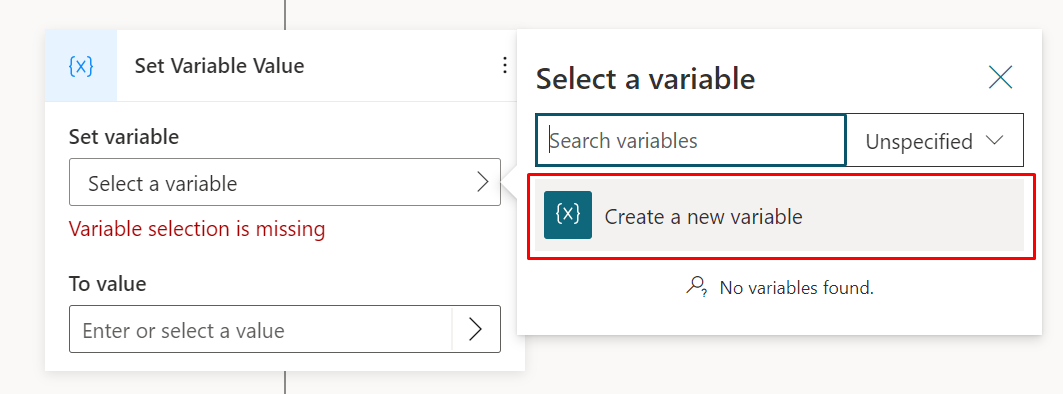
A new variable is created. Its type is unknown until you assign a value to it.
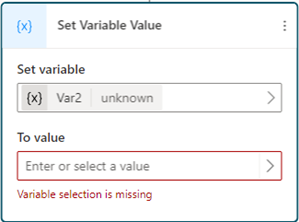
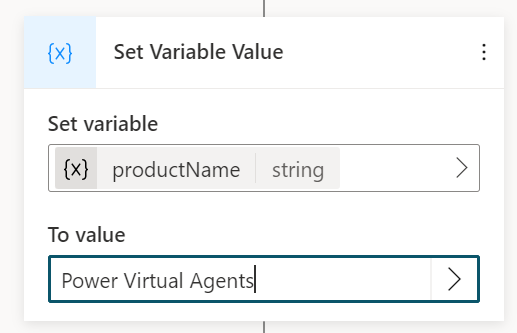
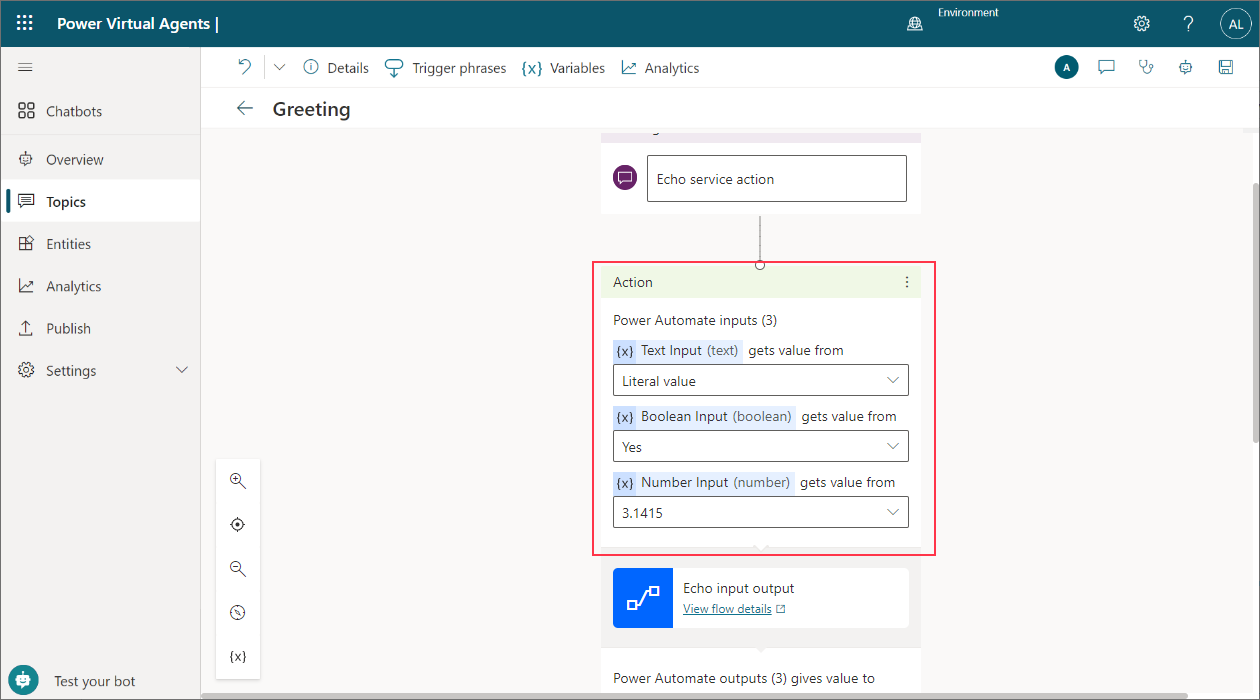
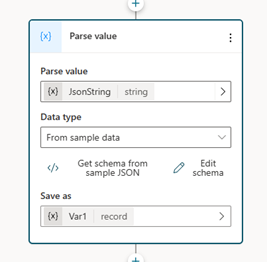
For To value, assign a value using one of the following options:
- Type a literal value.
- Select an existing variable of the same type. This action sets your variable to the same value as the variable you select.
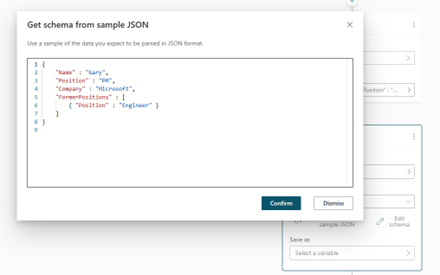
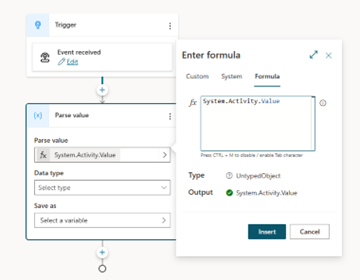
- Use a Power Fx formula. Power Fx formulas are useful for more complex types where literal values can't be used, such as Table and Record types.
Use literal values
Instead of selecting a variable value, you can enter a literal value into any variable.
The node attempts to interpret literal values as a string, a number, or a boolean type. For example, 123 is interpreted as a number. If you want it to be interpreted as a string value instead, you can wrap the value in double quotes, like this: "123".
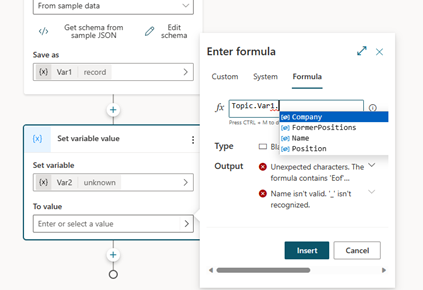
For some scenarios, or where you're using more complex types, use a Power Fx formula to set a specific type.
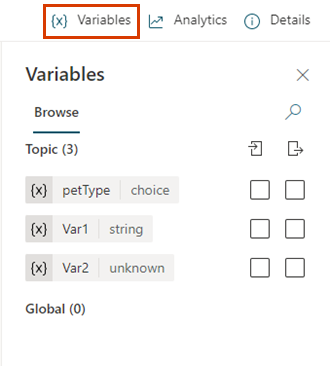
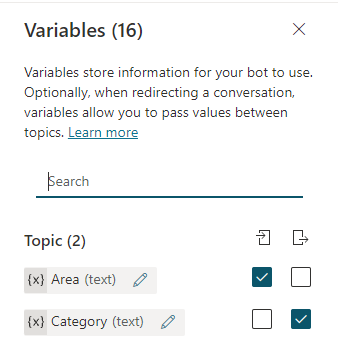
Variables pane
The Variables pane is where you can view all the variables that are available in the topic, regardless of which nodes they're defined or used in. For each variable, you can select whether it can receive its value from other topics, return its value to other topics, or both. You can also select a variable to edit its properties in the Variable properties pane.
To open the Variables pane, in the topic's menu bar, select Variables.
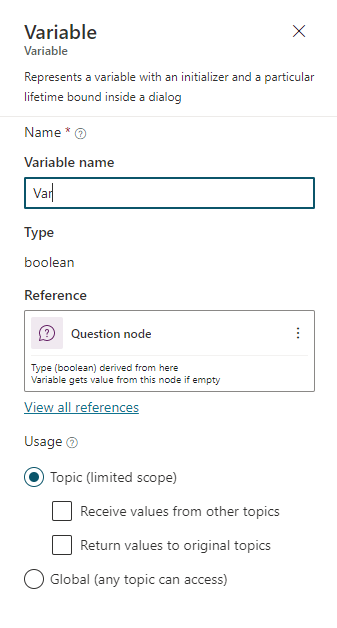
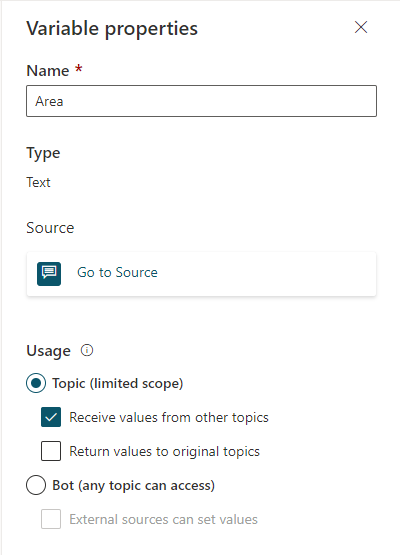
Variable properties pane
In the Variable properties pane, you can rename a variable, see where it's used, or convert it to a global variable. You can't convert it from a global variable back to a topic variable, however. You can also select whether it can receive values from or pass its value to other topics.
To open the Variable properties pane, select a variable in the Variables pane. You can also open the Variable properties pane by selecting a variable in any node.
System variables
Every copilot comes with built-in system variables that provide additional information about a conversation.
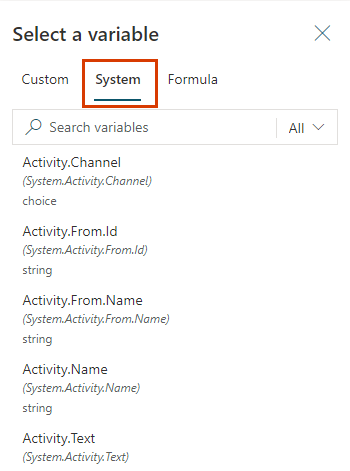
Not all system variables are shown in the list. You must access these hidden system variables with a Power Fx formula.
To use system variables in a Power Fx formula, you must add System. before the variable name. For example, to include the system variable User.DisplayName in a formula, you'd need to refer to it as System.User.DisplayName.
| Name | Type | Hidden | Definition |
|---|---|---|---|
| Activity.Channel | choice | visible | The channel ID of the current conversation |
| Activity.ChannelData | any | hidden | An object that contains channel-specific content |
| Activity.ChannelId | string | hidden | The channel ID of the current conversation, as a string |
| Activity.From.Id | string | hidden | The channel-specific unique ID of the sender |
| Activity.From.Name | string | hidden | The channel-specific user-friendly name of the sender |
| Activity.Name | string | visible | The name of the event |
| Activity.Text | string | visible | The most recent message sent by the user |
| Activity.Type | choice | visible | Type of activity |
| Activity.TypeId | string | hidden | Type of activity, as a string |
| Activity.Value | any | hidden | Open-ended value |
| Bot.Name | string | visible | The name of your copilot |
| Channel.DisplayName | string | hidden | The display the name of the channel |
| Conversation.Id | string | visible | The unique ID of the current conversation |
| LastActivity.Id | string | visible | The ID of the previously sent activity |
| LastMessage.Id | string | visible | The ID of the previous message sent by the user |
| LastMessage.Text | string | visible | The previous message sent by the user |
| Recognizer.TriggerMessage.Id | string | visible | The ID of the user message that triggered the current topic |
| Recognizer.TriggerMessage.Text | string | visible | The user message that triggered the current topic |
| User.DisplayName | string | visible | The display name of the signed-in user |
Pass variables between topics
When you redirect one topic to another, you can pass the values of variables between the original topic and the destination topic. Passing variables between topics is especially useful when an earlier topic already collected information that a later topic needs. Your users will appreciate not having to answer the same questions again.
Receive values from other topics
When a topic defines a variable (for example, in a Question node), the copilot asks the user the question to fill in the variable's value. If the copilot has already acquired the value in an earlier topic, there's no reason to ask the question again. In these cases, you can set the variable to Receive values from other topics. When another topic redirects to this one, it can pass either the value of a variable (or a literal value) to this variable and skip the question. The experience for the user talking to the copilot is seamless.
In this example, we'll use two topics, Greeting and Talk to Customer. Both topics ask for the customer's name. However, if the Greeting topic runs first, the Talk to Customer topic skips its question. Instead, it uses the value of the variable that's passed from the Greeting topic.
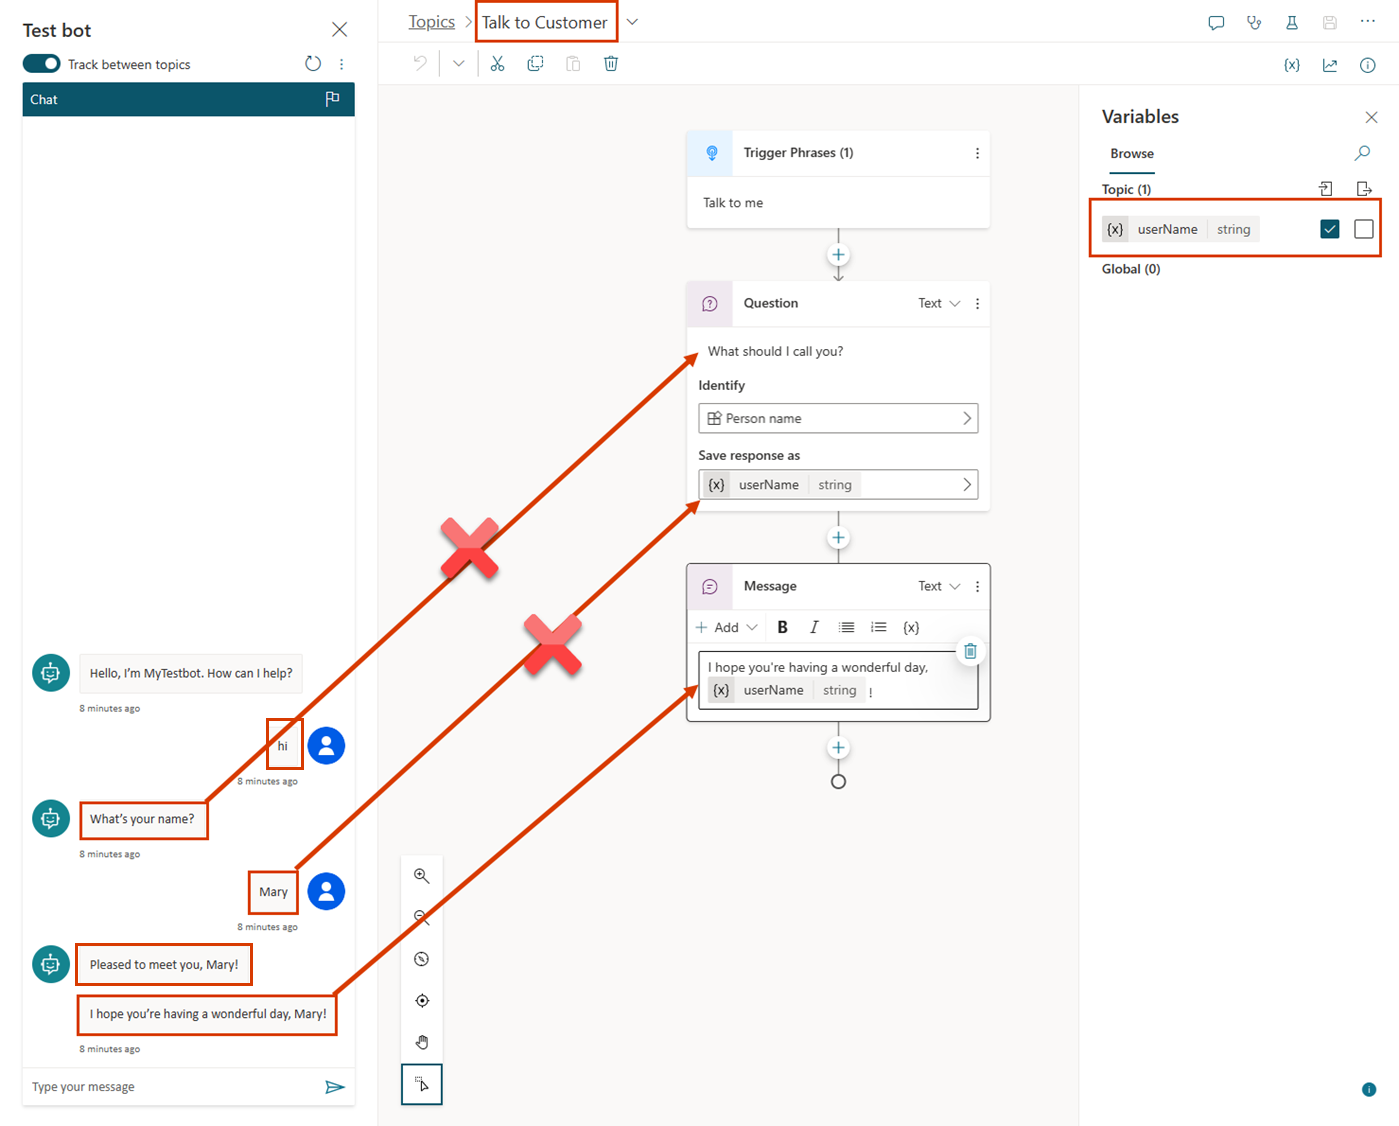
Here's the flow of the Talk to Customer topic:

As shown in the Test copilot pane, if this topic is triggered first, it asks the user, "What should I call you?" It stores the value in a string variable called userName. The userName variable is also set to get its value from other topics. The topic concludes with the message, "I hope you're having a wonderful day, {userName}!"
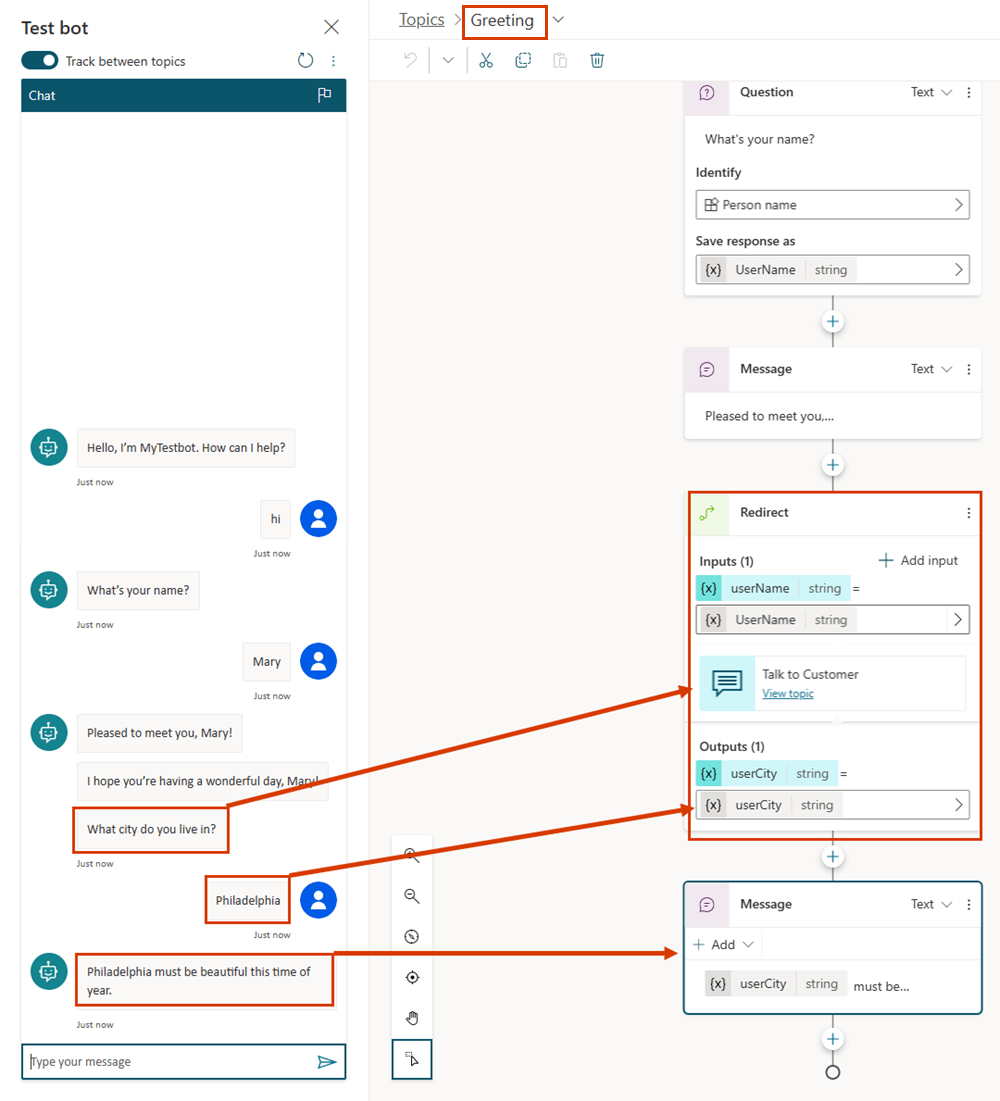
Here's the flow of the Greeting topic:
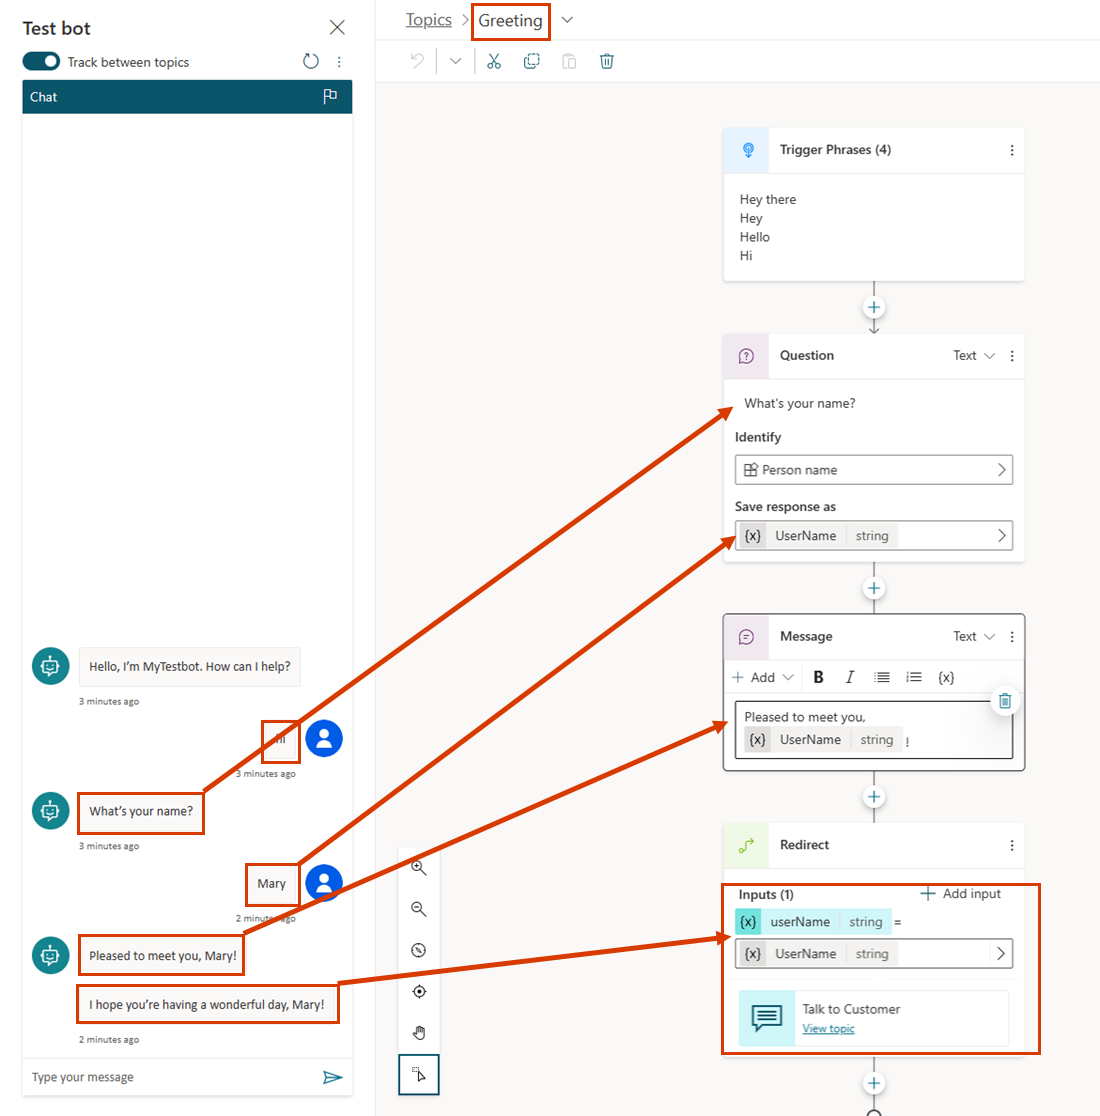
As shown in the Test copilot pane, if this topic is triggered first, it asks the user, "What's your name?" It stores the value in a string variable called UserName. The topic sends the message, "Pleased to meet you, {UserName}!" It then redirects to the Talk to Customer topic, which sends the message, "I hope you're having a wonderful day, {userName}!" Note, however, that the Talk to Customer topic skipped asking for the user's name again. Instead, it used the value of the UserName variable passed from the Greeting topic.
Finally, here's that second conversation again, this time from the perspective of the Talk to Customer topic:
Let's walk through the steps to set up a topic to receive values from other topics. We'll use our current example, but the same steps will work anytime a topic needs to get a value from an earlier topic.
Set up the destination topic
The destination topic is the topic being redirected to, the one that will receive values from other topics. In our example, it's Talk to Customer.
Create or go to your destination topic.
Add a Question node and enter
What should I call you?for the message.Under Identify, select the prebuilt entity Person name.
Select the variable to open the Variable properties pane. Name it
userName, and then select Receive values from other topics.
In the message box, type
I hope you're having a wonderful day,.Select the Insert variable icon ({x}), and then select userName.
Select the space after the variable and type
!.Save the topic.
Set up the source topic
The source topic is the topic doing the redirecting, the one that provides the value that will be passed to the destination topic. In our example, it's Greeting.
Go to the source topic.
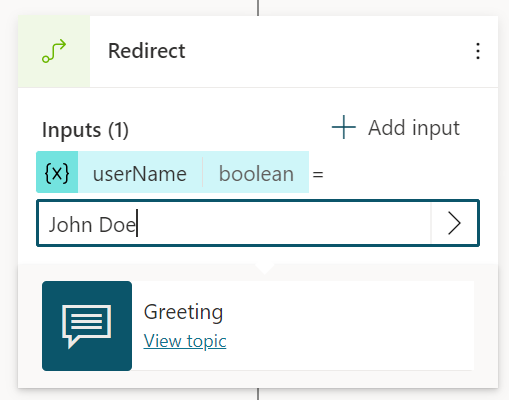
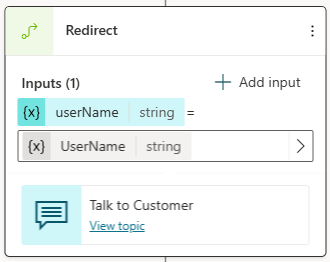
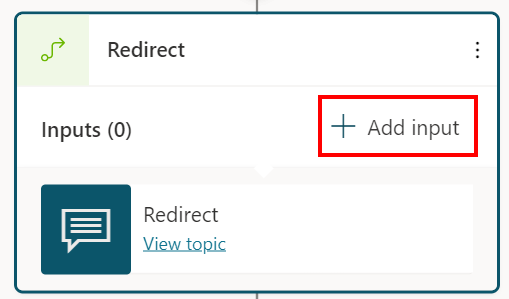
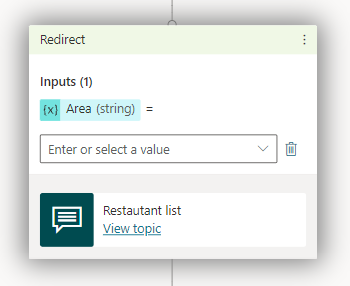
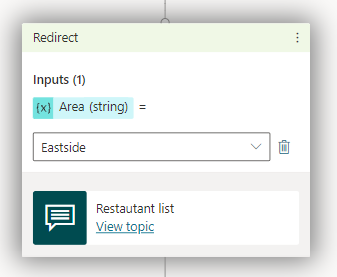
Add a Redirect node and select the destination topic.
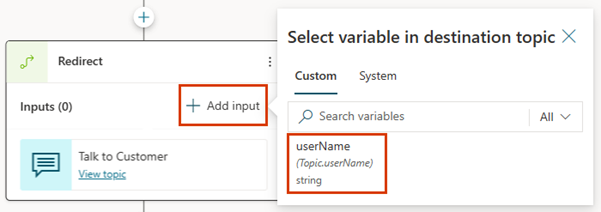
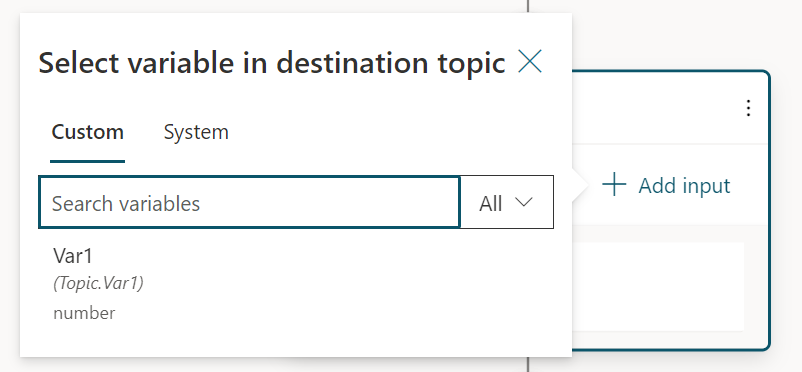
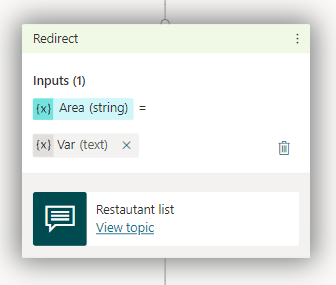
Select + Add input, and then select the variable from the destination topic that you want to pass a value to.
Select the > icon, and then select the variable whose value you want to pass.
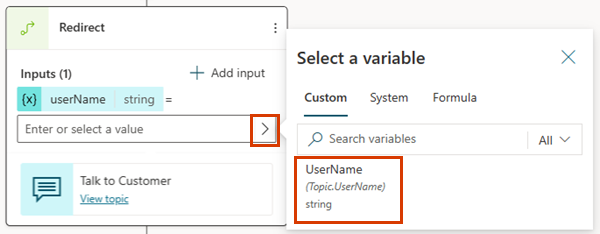
The Redirect node should look like this:
Save the topic.
Return values to original topics
When a topic is redirected to and obtains a variable by asking a question or in some other way, the variable can be returned to the original topic. The variable becomes part of the original topic and can be used like any other variable. Information the copilot obtains is thus available across topics, reducing the need for global variables.
Let's continue with the example from the previous section. We'll ask a new question in the Talk to Customer topic, and then return the answer to the Greeting topic.
Set up the source topic for a returned variable
When you're returning a variable to a topic, the source topic is the topic being redirected to, the one that provides the value that will be passed back to the original topic. In this example, it's Talk to Customer.
Go to the source topic.
Add a Question node and enter
What city do you live in?for the message.Under Identify, select the prebuilt entity City.
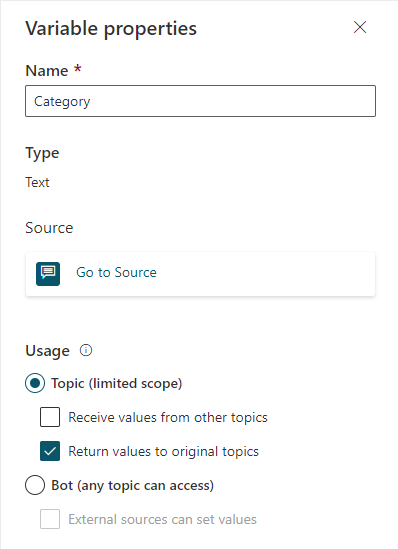
Select the variable to open the Variable properties pane. Name it
userCity, and then select Return values to original topics.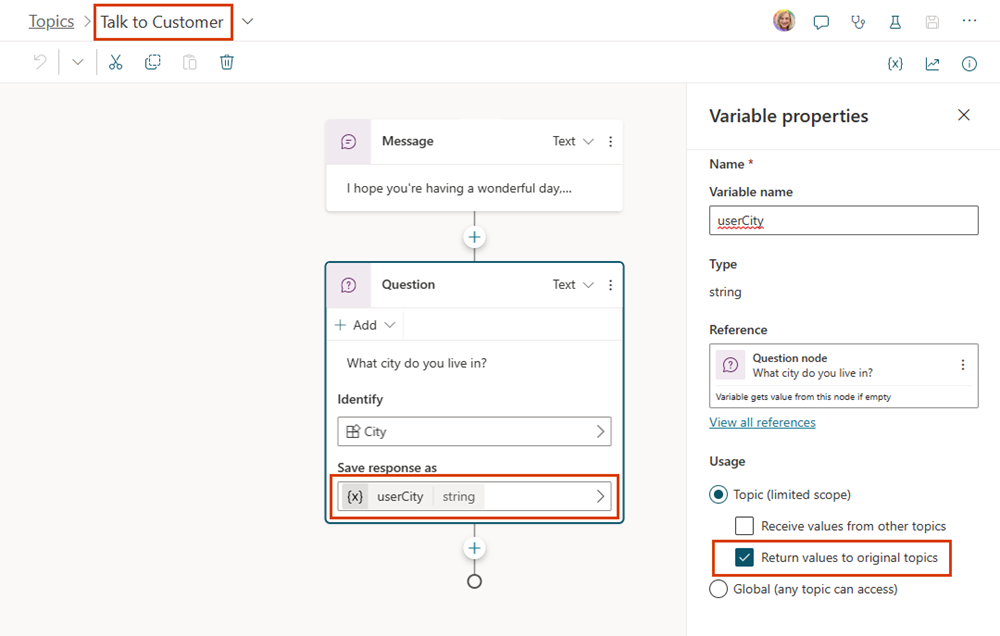
Save the topic.
Set up the destination topic for a returned variable
When you're returning a variable to a topic, the destination topic is the topic doing the redirecting, the one that will receive values from other topics. In our example, it's Greeting.
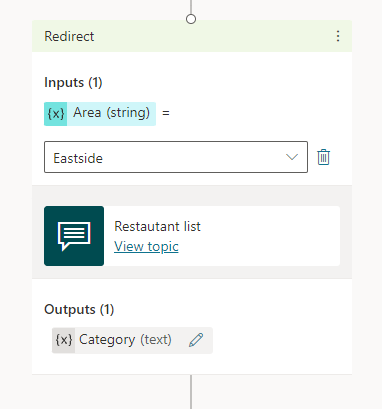
Go to the destination topic.
The variable you selected in the source topic should appear in the Redirect node as an output variable.
Save the topic.
.png)
.png)
.png)
.png)

Related topics
Feedback
Coming soon: Throughout 2024 we will be phasing out GitHub Issues as the feedback mechanism for content and replacing it with a new feedback system. For more information see: https://aka.ms/ContentUserFeedback.
Submit and view feedback for