Tutorial: Configure Haventec Authenticate with Azure Active Directory B2C for single-step, multi-factor passwordless authentication
Learn to integrate Azure Active Directory B2C (Azure AD B2C) with Haventec Authenticate, a passwordless technology that eliminates passwords, shared secrets, and friction.
To learn more, go to haventec.com: Haventec
Scenario description
The Authenticate integration includes the following components:
- Azure AD B2C - authorization server that verifies user credentials
- Also known as the identity provider (IdP)
- Web and mobile applications - OpenID Connect (OIDC) mobile or web applications protected by Authenticate and Azure AD B2C
- Haventec Authenticate service - external IdP for the Azure AD B2C tenant
The following diagram illustrates sign-up and sign-in user flows in the Haventec Authenticate integration.
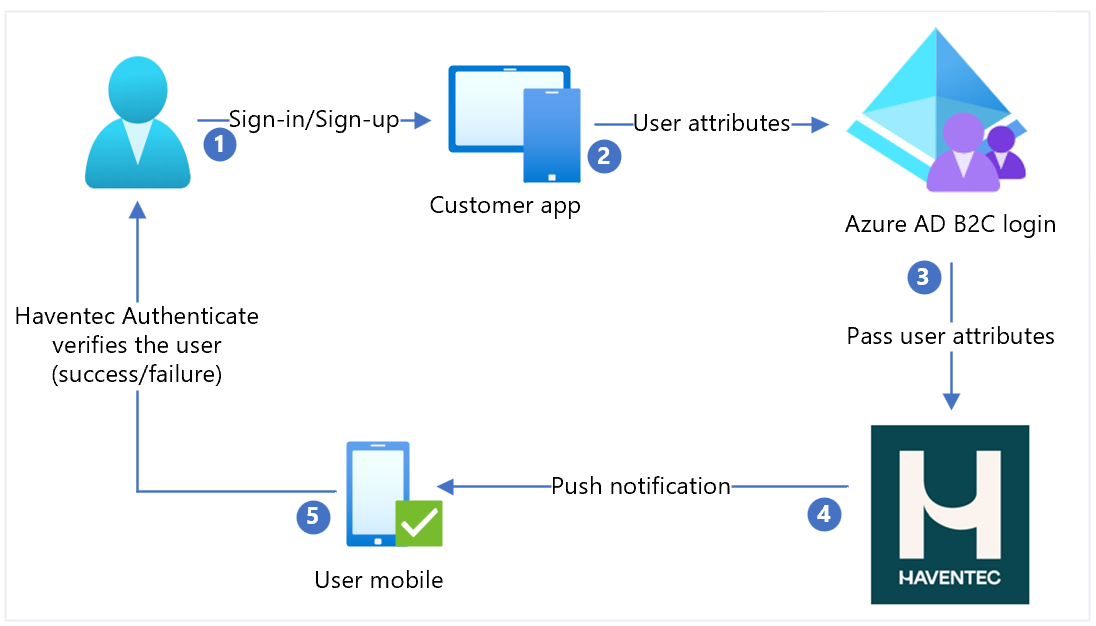
- User selects sign-in or sign-up and enters a username.
- The application sends user attributes to Azure AD B2C for identity verification.
- Azure AD B2C collects user attributes and sends them to Haventec Authenticate.
- For new users, Authenticate sends push notification to the user mobile device. It can send email with a one-time password (OTP) for device registration.
- User responds and is granted or denied access. New cryptographic keys are pushed to the user device for a future session.
Get started with Authenticate
Go to the haventec.com Get a demo of Haventec Authenticate page. In the personalized demo request form, indicate your interest in Azure AD B2C integration. An email arrives when the demo environment is ready.
Integrate Authenticate with Azure AD B2C
Use the following instructions to prepare for and integrate Azure AD B2C with Authenticate.
Prerequisites
To get started, you need:
An Azure subscription
- If you don't have one, get an Azure free account
An Azure AD B2C tenant linked to the Azure subscription
A Haventec Authenticate demo environment
Create a web application registration
Before applications can interact with Azure AD B2C, register them in a tenant you manage.
See, Tutorial: Register a web application in Azure Active Directory B2C
Add a new identity provider in Azure AD B2C
For the following instructions, use the directory with the Azure AD B2C tenant.
- Sign in to the Azure portal as the Global Administrator of your Azure AD B2C tenant.
- In the top menu, select Directory + subscription.
- Select the directory with the tenant.
- In the top-left corner of the Azure portal, select All services.
- Search for and select Azure AD B2C.
- Navigate to Dashboard > Azure Active Directory B2C > Identity providers.
- Select New OpenID Connect Provider.
- Select Add.
Configure an identity provider
To configure an identity provider:
- Select Identity provider type > OpenID Connect.
- For Name, enter Haventec, or another name.
- For Metadata URL, use
https://iam.demo.haventec.com/auth/realms/*your\_realm\_name*/.well-known/openid-configuration. - For Client ID, enter the application ID recorded from the Haventec admin UI.
- For Client Secret, enter the application Secret recorded from the Haventec admin UI.
- For Scope, select OpenID email profile.
- For Response type, select Code.
- For Response mode, select forms_post.
- For Domain hint, leave blank.
- Select OK.
- Select Map this identity provider's claims.
- For User ID, select From subscription.
- For Display name, select From subscription.
- For Given name, use given_name.
- For Surname, use family_name.
- For Email, use Email.
- Select Save.
Create a user flow policy
For the following instructions, Haventec is a new OIDC identity provider in the B2C identity providers list.
- In the Azure AD B2C tenant, under Policies, select User flows.
- Select New user flow.
- Select Sign up and sign in > version > Create.
- Enter a Name for the policy.
- In Identity providers, select the created Haventec identity provider.
- For Local Accounts, select None. This selection disables email and password authentication.
- Select Run user flow.
- In the form, enter the replying URL, for example,
https://jwt.ms. - The browser redirects to the Haventec sign-in page.
- User is prompted to register, or enter a PIN.
- The authentication challenge is performed.
- The browser redirects to the replying URL.
Test the user flow
- In the Azure AD B2C tenant, under Policies, select User flows.
- Select the created User Flow.
- Select Run user flow.
- For Application, select the registered app. The example is JWT.
- For Reply URL, select the redirect URL.
- Select Run user flow.
- Perform a sign-up flow and create an account.
- Haventec Authenticate is called.
Next steps
- Go to docs.haventec.com for Haventec Documentation
- Azure AD B2C custom policy overview
Feedback
Coming soon: Throughout 2024 we will be phasing out GitHub Issues as the feedback mechanism for content and replacing it with a new feedback system. For more information see: https://aka.ms/ContentUserFeedback.
Submit and view feedback for