Tutorial for configuring IDology with Azure Active Directory B2C
In this sample tutorial, we provide guidance on how to integrate Azure AD B2C with IDology. IDology is an identity verification and proofing provider with multiple solutions. In this sample, we will cover ExpectID solution by IDology.
Prerequisites
To get started, you'll need:
- An Azure subscription. If you don't have a subscription, you can get a free account.
- An Azure AD B2C tenant that is linked to your Azure subscription.
Scenario description
The IDology integration includes the following components:
- Azure AD B2C – The authorization server responsible for verifying the user’s credentials. It's also known as the identity provider.
- IDology – The IDology service takes input provided by the user and verifies the user’s identity.
- Custom REST API – This API implements the integration between Microsoft Entra ID and the IDology service.
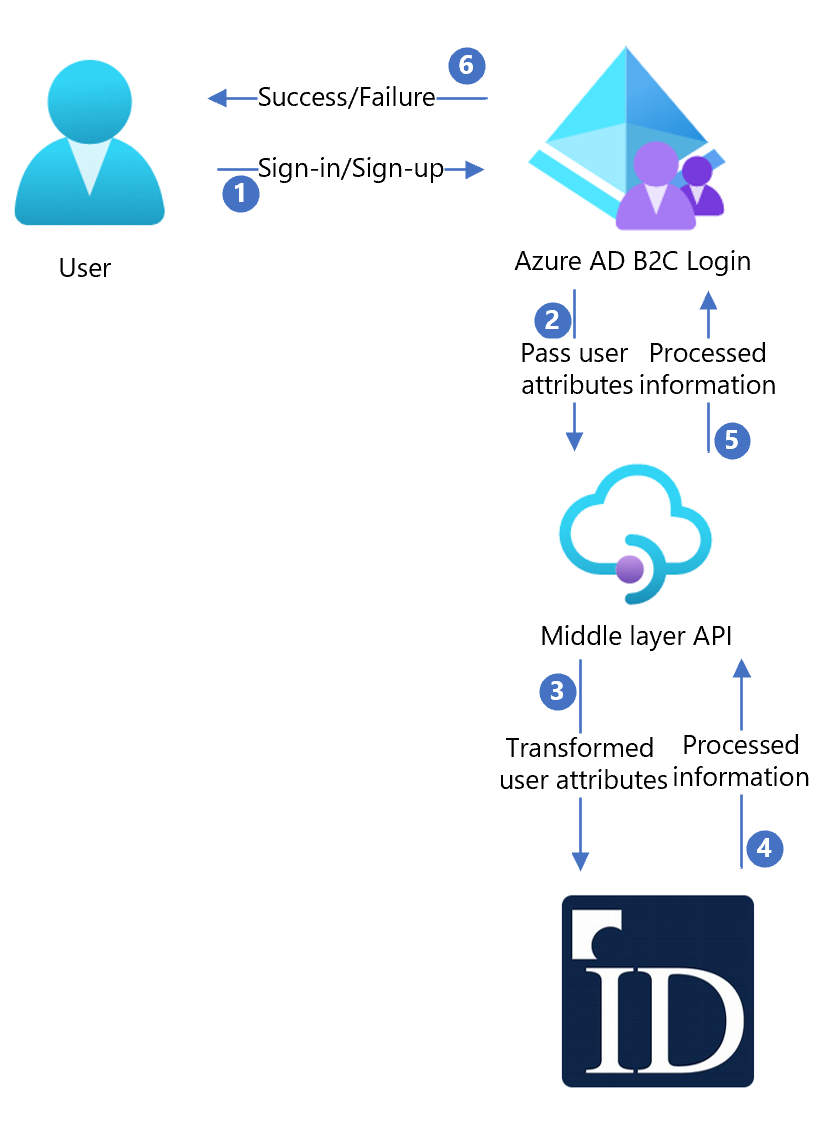
The following architecture diagram shows the implementation.
| Step | Description |
|---|---|
| 1 | A user arrives at the sign-in page. |
| 2 | The user selects the sign-up option to create a new account and enter information into the page. Azure AD B2C collects the user attributes. |
| 3 | Azure AD B2C calls the middle layer API and passes on the user attributes. |
| 4 | The middle layer API collects user attributes and transforms them into a format that IDOlogy API can consume. Then it sends the information to IDology. |
| 5 | IDology consumes the information and processes it, and then returns the result to the middle layer API. |
| 6 | The middle layer API processes the information and sends the relevant information back to Azure AD B2C. |
| 7 | Azure AD B2C receives information back from middle layer API. If it shows a Failure response, an error message is displayed to user. If it shows a Success response, the user is authenticated and written into the directory. |
Note
Azure AD B2C can also ask the customer to perform step-up authentication, but this scenario is out of scope of this tutorial.
Onboard with IDology
IDology provides a variety of solutions, which you can find here. For this sample, we use ExpectID.
To create an IDology account, contact IDology.
Once an account is created, you'll receive the information you need for API configuration. The following sections describe the process.
Integrate with Azure AD B2C
Part 1 - Deploy the API
Deploy the provided API code to an Azure service. The code can be published from Visual Studio, following these instructions.
You'll need the URL of the deployed service to configure Microsoft Entra ID with the required settings.
Part 2 - Configure the API
Application settings can be configured in App Service in Azure. With this method, settings can be securely configured without checking them into a repository. You'll need to provide the following settings to the REST API:
| Application settings | Source | Notes |
|---|---|---|
| IdologySettings:ApiUsername | IDology account configuration | |
| IdologySettings:ApiPassword | IDology account configuration | |
| WebApiSettings:ApiUsername | Define a username for the API | Used in the ExtId configuration |
| WebApiSettings:ApiPassword | Define a password for the API | Used in the ExtId configuration |
Part 3 - Create API Policy Keys
Follow this document to create two policy keys: one for the API username, and one for the API password that you defined above.
The sample policy uses these key names:
- B2C_1A_RestApiUsername
- B2C_1A_RestApiPassword
Part 4 - Configure the Azure AD B2C Policy
Follow this document to download the LocalAccounts starter pack and configure the policy for the Azure AD B2C tenant. Follow the instructions until you complete the Test the Custom Policy section.
Download the two sample policies here.
Update the two sample policies:
Open both policies:
In the section
Idology-ExpectId-API, update theServiceUrlmetadata item with the location of the API deployed above.Replace
yourtenantwith the name of your Azure AD B2C tenant. For example, if the name of your Azure AD B2C tenant iscontosotenant, replace all instances ofyourtenant.onmicrosoft.comwithcontosotenant.onmicrosoft.com.
Open the file TrustFrameworkExtensions.xml:
Find the element
<TechnicalProfile Id="login-NonInteractive">. Replace both instances ofIdentityExperienceFrameworkAppIdwith the application ID of the IdentityExperienceFramework application that you created earlier.Replace both instances of
ProxyIdentityExperienceFrameworkAppIdwith the application ID of the ProxyIdentityExperienceFramework application that you created earlier.
Replace the SignInorSignUp.xml and TrustFrameworkExtensions.xml previously uploaded to Azure AD B2C in step 1 with the two updated sample policies.
Note
As a best practice, we recommend that customers add consent notification in the attribute collection page. Notify users that information will be sent to third-party services for Identity Verification.
Test the user flow
Open the Azure AD B2C tenant, and under Policies, select User flows.
Select your previously created User Flow.
Select Run user flow and select the settings:
Application - select the registered app (sample is JWT).
Reply URL - select the Redirect URL.
Select Run user flow.
Go through the sign-up flow and create an account.
Sign out.
Go through the sign-in flow.
The IDology puzzle will appear after you enter continue.
Next steps
For additional information, review the following articles:
Feedback
Coming soon: Throughout 2024 we will be phasing out GitHub Issues as the feedback mechanism for content and replacing it with a new feedback system. For more information see: https://aka.ms/ContentUserFeedback.
Submit and view feedback for