Tutorial to configure Nevis with Azure Active Directory B2C for passwordless authentication
In this tutorial, learn to enable passwordless authentication in Azure Active Directory B2C (Azure AD B2C) with the Nevis Access app to enable customer authentication and comply with Payment Services Directive 2 (PSD2) transaction requirements. PSD2 is a European Union (EU) directive, administered by the European Commission (Directorate General Internal Market) to regulate payment services and payment service providers throughout the EU and European Economic Area (EEA).
Prerequisites
To get started, you'll need:
- A Nevis demo account
- Go to nevis.net for Nevis + Microsoft Azure AD B2C to request an account
An Azure subscription
- If you don't have one, you can get an Azure free account
- An Azure AD B2C tenant linked to your Azure subscription
Note
To integrate Nevis into your sign-up policy flow, configure the Azure AD B2C environment to use custom policies. See, Tutorial: Create user flows and custom policies in Azure Active Directory B2C.
Scenario description
Add the branded Access app to your back-end application for passwordless authentication. The following components make up the solution:
- Azure AD B2C tenant with a combined sign-in and sign-up policy for your back end
- Nevis instance and its REST API to enhance Azure AD B2C
- Your branded Access app
The diagram shows the implementation.
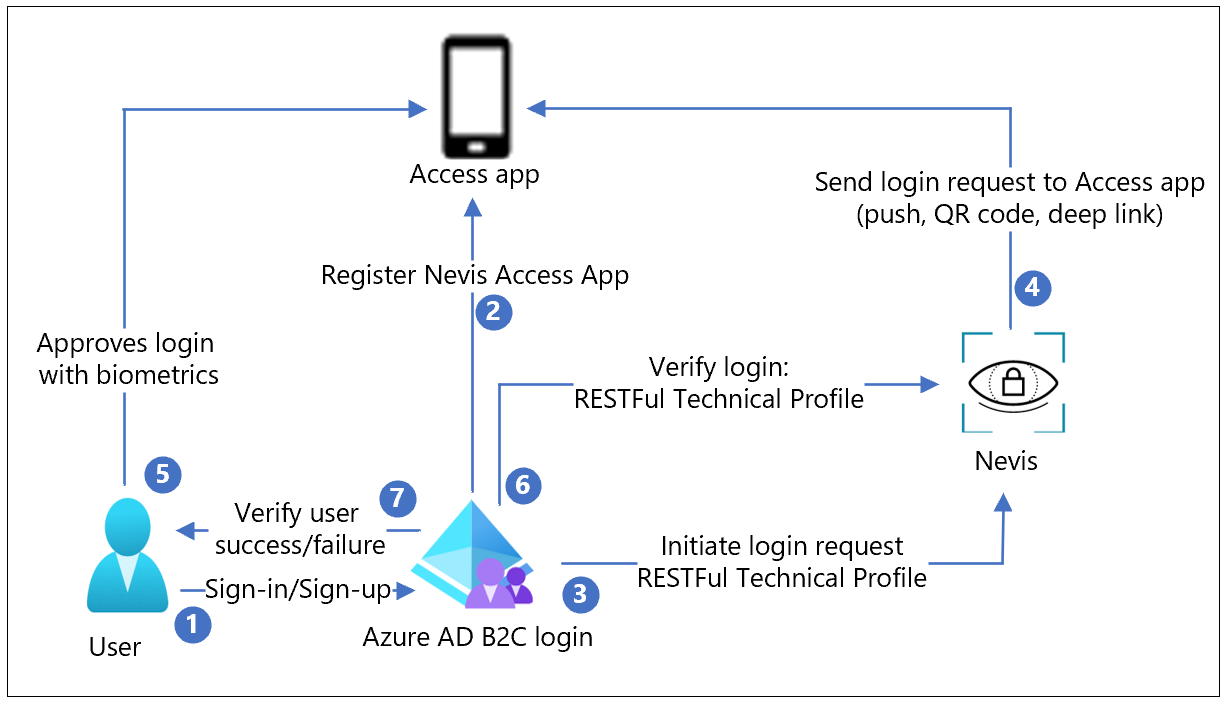
- A user attempts sign-in or sign-up to an application with Azure AD B2C policy.
- During sign-up, the Access is registered to the user device using a QR code. A private key is generated on the user device and is used to sign user requests.
- Azure AD B2C uses a RESTful technical profile to start sign-in with the Nevis solution.
- The sign-in request goes to Access, as a push message, QR code, or a deep-link.
- The user approves the sign-in attempt with their biometrics. A message goes to Nevis, which verifies sign-in with the stored public key.
- Azure AD B2C sends a request to Nevis to confirm sign-in is complete.
- The user is granted, or denied, access to the application with an Azure AD B2C success, or failure, message.
Integrate your Azure AD B2C tenant
Request a Nevis account
- Go to nevis.net for Nevis + Microsoft Azure AD B2C.
- Use the form request an account.
- Two emails arrive:
- Management account notification
- Mobile app invitation
Add your Azure AD B2C tenant to your Nevis account
- From the management account trial email, copy your management key.
- In a browser, open https://console.nevis.cloud/.
- Use the management key to sign in to the management console.
- Select Add Instance.
- Select the created instance.
- In the side navigation, select Custom Integrations.
- Select Add custom integration.
- For Integration Name, enter your Azure AD B2C tenant name.
- For URL/Domain, enter
https://yourtenant.onmicrosoft.com. - Select Next
- Select Done.
Note
You'll need the Nevis access token later.
Install Nevis Access on your phone
- From the Nevis mobile app invitation email, open the Test Flight app invitation.
- Install the app.
Integrate Azure AD B2C with Nevis
- Sign in to the Azure portal.
- Switch to your Azure AD B2C tenant. Note: the Azure AD B2C tenant usually is in a separate tenant.
- In the menu, select Identity Experience Framework (IEF).
- Select Policy Keys.
- Select Add.
- Create a new key.
- For Options, select Manual.
- For Name, select AuthCloudAccessToken.
- For Secret, paste the stored Nevis Access Token.
- For Key Usage, select Encryption.
- Select Create.
Configure and upload the nevis.html to Azure blob storage
- In your Identity Environment (IDE), go to the /master/samples/Nevis/policy folder.
- In /samples/Nevis/policy/nevis.html open the nevis.html file.
- Replace the authentication_cloud_url with the Nevis Admin console URL
https://<instance_id>.mauth.nevis.cloud. - Select Save.
- Create an Azure Blob storage account.
- Upload the nevis.html file to your Azure blob storage.
- Configure CORS.
- Enable cross-origin resource sharing (CORS) for the file.
- In the list, select the nevis.html file.
- In the Overview tab, next to the URL, select the copy link icon.
- Open the link in a new browser tab to confirm a grey box appears.
Note
You'll need the blob link later.
Customize TrustFrameworkBase.xml
- In your IDE, go to the /samples/Nevis/policy folder.
- Open TrustFrameworkBase.xml.
- Replace your tenant with your Azure tenant account name in TenantId.
- Replace your tenant with your Azure tenant account name in PublicPolicyURI.
- Replace all authentication_cloud_url instances with the Nevis Admin console URL.
- Select Save.
Customize TrustFrameworkExtensions.xml
- In your IDE, go to the /samples/Nevis/policy folder.
- Open TrustFrameworkExtensions.xml.
- Replace your tenant with your Azure tenant account name in TenantId.
- Replace your tenant with your Azure tenant account name in PublicPolicyURI.
- Under BasePolicy, in the TenantId, replace your tenant with your Azure tenant account name.
- Under BuildingBlocks, replace LoadUri with the nevis.html blob link URL, in your blob storage account.
- Select Save.
Customize SignUpOrSignin.xml
- In your IDE, go to the /samples/Nevis/policy folder.
- Open the SignUpOrSignin.xml file.
- Replace your tenant with your Azure tenant account name in TenantId.
- Replace your tenant with your Azure tenant account name in PublicPolicyUri.
- Under BasePolicy, in TenantId, replace your tenant with your Azure tenant account name.
- Select Save.
Upload custom policies to Azure AD B2C
- In the Azure portal, open your Azure AD B2C tenant.
- Select Identity Experience Framework.
- Select Upload custom policy.
- Select the TrustFrameworkBase.xml file you modified.
- Select the Overwrite the custom policy if it already exists checkbox.
- Select Upload.
- Repeat step 5 and 6 for TrustFrameworkExtensions.xml.
- Repeat step 5 and 6 for SignUpOrSignin.xml.
Test the user flow
Test account creation and Access setup
- In the Azure portal, open your Azure AD B2C tenant.
- Select Identity Experience Framework.
- Scroll down to Custom policies and select B2C_1A_signup_signin.
- Select Run now.
- In the window, select Sign up now.
- Add your email address.
- Select Send verification code.
- Copy the verification code from the email.
- Select Verify.
- Fill in the form with your new password and display name.
- Select Create.
- The QR code scan page appears.
- On your phone, open the Nevis Access app.
- Select Face ID.
- The Authenticator registration was successful screen appears.
- Select Continue.
- On your phone, authenticate with your face.
- The jwt.ms welcome page appears with your decoded token details.
Test passwordless sign-in
- Under Identity Experience Framework, select the B2C_1A_signup_signin.
- Select Run now.
- In the window, select Passwordless Authentication.
- Enter your email address.
- Select Continue.
- On your phone, in Notifications, select Nevis Access app notification.
- Authenticate with your face.
- The jwt.ms welcome page appears with your tokens.
Next steps
Feedback
Coming soon: Throughout 2024 we will be phasing out GitHub Issues as the feedback mechanism for content and replacing it with a new feedback system. For more information see: https://aka.ms/ContentUserFeedback.
Submit and view feedback for