Move Azure VMware Solution resources to another region
Important
The steps in this article are strictly for moving Azure VMware Solution (source) in one region to Azure VMware Solution (target) in another region.
You can move Azure VMware Solution resources to a different region for several reasons. For example, deploy features or services available in specific regions only, meet policy and governance requirements, or respond to capacity planning requirements.
This article helps you plan and migrate Azure VMware Solution from one Azure region to another, such as Azure region A to Azure region B.
The diagram shows the recommended ExpressRoute connectivity between the two Azure VMware Solution environments. An HCX site pairing and service mesh are created between the two environments. The HCX migration traffic and Layer-2 extension moves (depicted by the purple line) between the two environments. For VMware recommended HCX planning, see Planning an HCX Migration.

Note
You don't need to migrate any workflow back to on-premises because the traffic will flow between the private clouds (source and target):
Azure VMware Solution private cloud (source) > ExpressRoute gateway (source) > Global Reach -> ExpressRoute gateway (target) > Azure VMware Solution private cloud (target)
The diagram shows the connectivity between both Azure VMware Solution environments.

In this article, walk through the steps to:
- Prepare and plan the move to another Azure region
- Establish network connectivity between the two Azure VMware Solution private clouds
- Export the configuration from the Azure VMware Solution source environment
- Reapply the supported configuration elements to the Azure VMware Solution target environment
- Migrate workloads using VMware HCX
Prerequisites
VMware HCX appliance is upgraded to the latest patch to avoid migration issues if any.
Source's local content library is a published content library.
Prepare
The following steps show how to prepare your Azure VMware Solution private cloud to move to another Azure VMware Solution private cloud.
Export the source configuration
From the source, export the extended segments, firewall rules, port details, and route tables.
Export the contents of an inventory list view to a CSV file.
Deploy the target environment
Before you can move the source configuration, you need to deploy the target environment.
Back up the source configuration
Back up the Azure VMware Solution (source) configuration that includes vCenter Server, NSX-T Data Center, and firewall policies and rules.
Compute: Export existing inventory configuration. For Inventory backup, you can use RVTools (an open-source app).
Network and firewall policies and rules: This is included as part of the VMware HCX Network Extension.
Azure VMware Solution supports all backup solutions. You need CloudAdmin privileges to install, backup data, and restore backups. For more information, see Backup solutions for Azure VMware Solution VMs.
VM workload backup using the Commvault solution:
Create a VMware client from the Command center for Azure VMware Solution vCenter.
Create a VM group with the required VMs for backups.
VM workload backup using Veritas NetBackup solution.
Tip
You can use Azure Resource Mover to verify and migrate the list of supported resources to move across regions, which are dependent on Azure VMware Solution.
Locate the source ExpressRoute circuit ID
From the source, sign in to the Azure portal.
Select Manage > Connectivity > ExpressRoute.
Copy the source’s ExpressRoute ID. You need it to peer between the private clouds.
Create the target’s authorization key
From the target, sign in to the Azure portal.
Note
If you need access to the Azure US Gov portal, go to https://portal.azure.us/
Select Manage > Connectivity > ExpressRoute, then select + Request an authorization key.
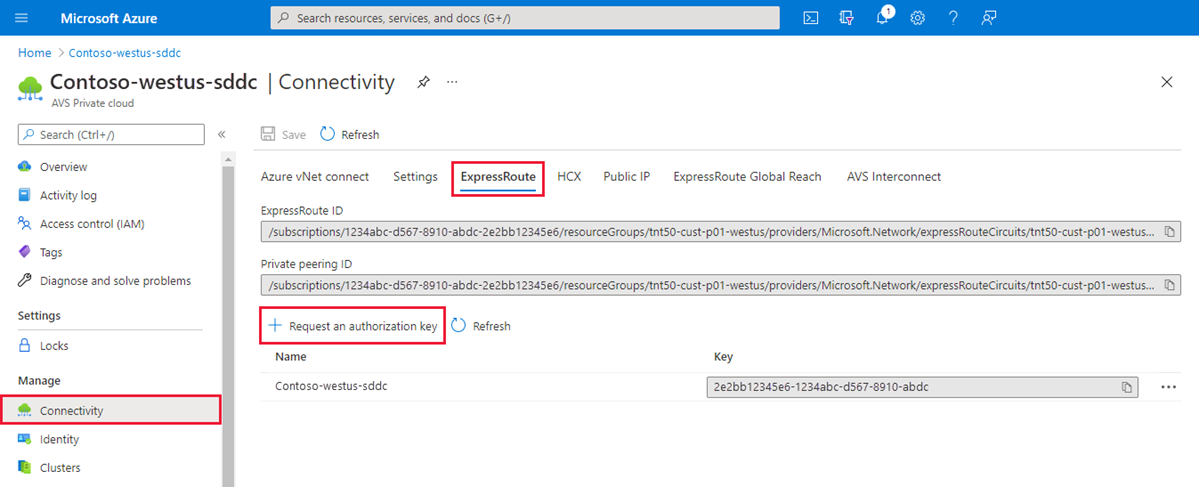
Provide a name for it and select Create.
It can take about 30 seconds to create the key. Once created, the new key appears in the list of authorization keys for the private cloud.
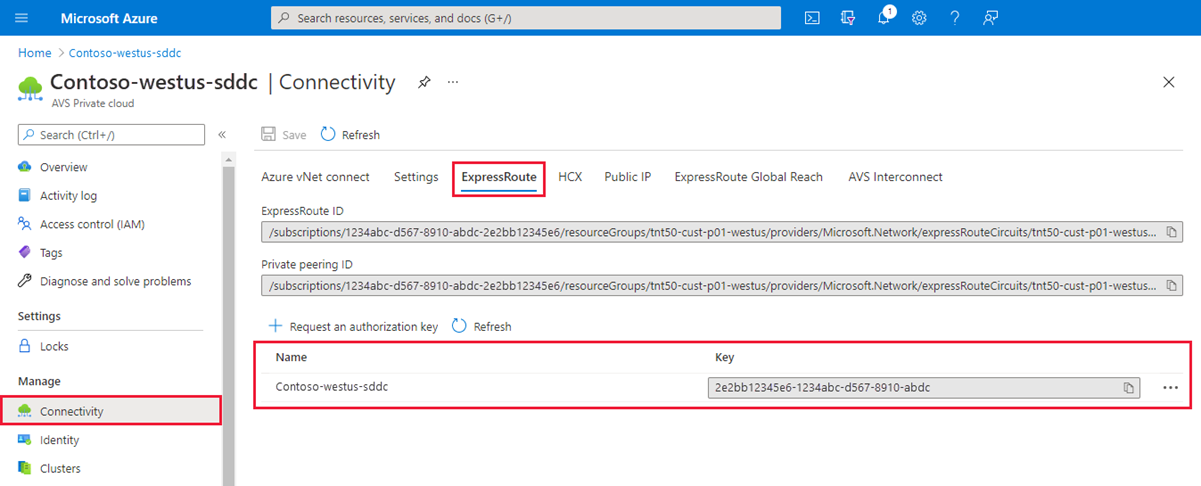
Copy the authorization key and ExpressRoute ID. You need them to complete the peering. The authorization key disappears after some time, so copy it as soon as it appears.

Peer between private clouds
Now that you have the ExpressRoute circuit IDs and authorization keys for both environments, you can peer the source to the target. You use the resource ID and authorization key of your private cloud ExpressRoute circuit to finish the peering.
From the target, sign in to the Azure portal using the same subscription as the source’s ExpressRoute circuit.
Note
If you need access to the Azure US Gov portal, go to https://portal.azure.us/
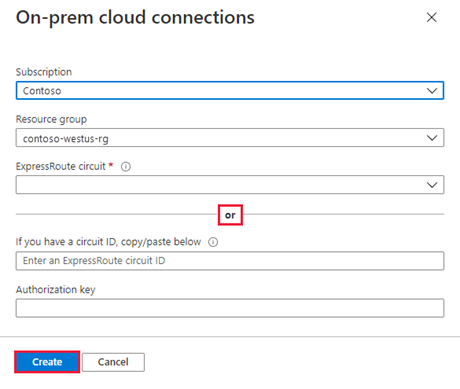
Under Manage, select Connectivity > ExpressRoute Global Reach > Add.
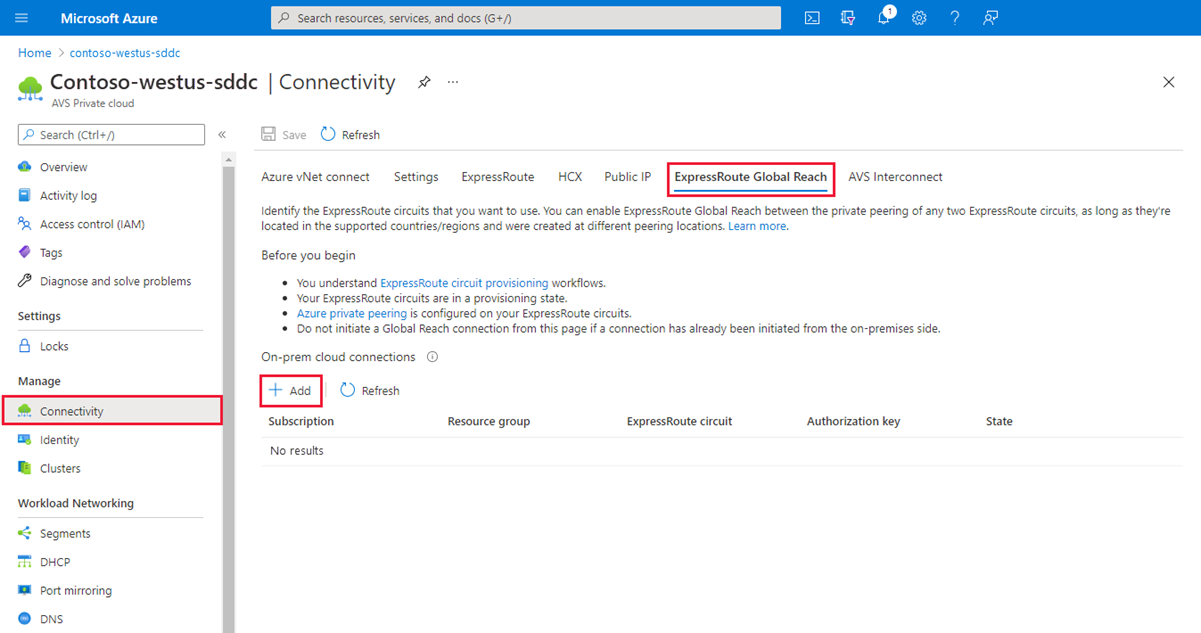
Paste the ExpressRoute circuit ID and target’s authorization key you created in the previous step. Then select Create:
Create a site pairing between private clouds
After you establish connectivity, you'll create a VMware HCX site pairing between the private clouds to facilitate the migration of your VMs. You can connect or pair the VMware HCX Cloud Manager in Azure VMware Solution with the VMware HCX Connector in your data center.
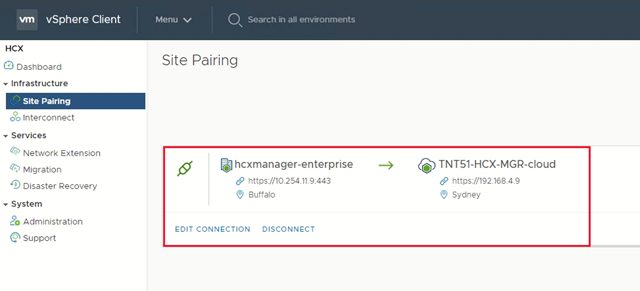
Sign in to your source's vCenter Server, and under Home, select HCX.
Under Infrastructure, select Site Pairing and select the Connect To Remote Site option (in the middle of the screen).
Enter the Azure VMware Solution HCX Cloud Manager URL or IP address you noted earlier
https://x.x.x.9, the Azure VMware Solution cloudadmin@vsphere.local username, and the password. Then select Connect.Note
To successfully establish a site pair:
Your VMware HCX Connector must be able to route to your HCX Cloud Manager IP over port 443.
Use the same password that you used to sign in to vCenter Server. You defined this password on the initial deployment screen.
You see a screen showing that your VMware HCX Cloud Manager in Azure VMware Solution and your on-premises VMware HCX Connector are connected (paired).
Create a service mesh between private clouds
Note
To successfully establish a service mesh with Azure VMware Solution:
Ports UDP 500/4500 are open between your on-premises VMware HCX Connector 'uplink' network profile addresses and the Azure VMware Solution HCX Cloud 'uplink' network profile addresses.
Be sure to review the VMware HCX required ports.
Under Infrastructure, select Interconnect > Service Mesh > Create Service Mesh.
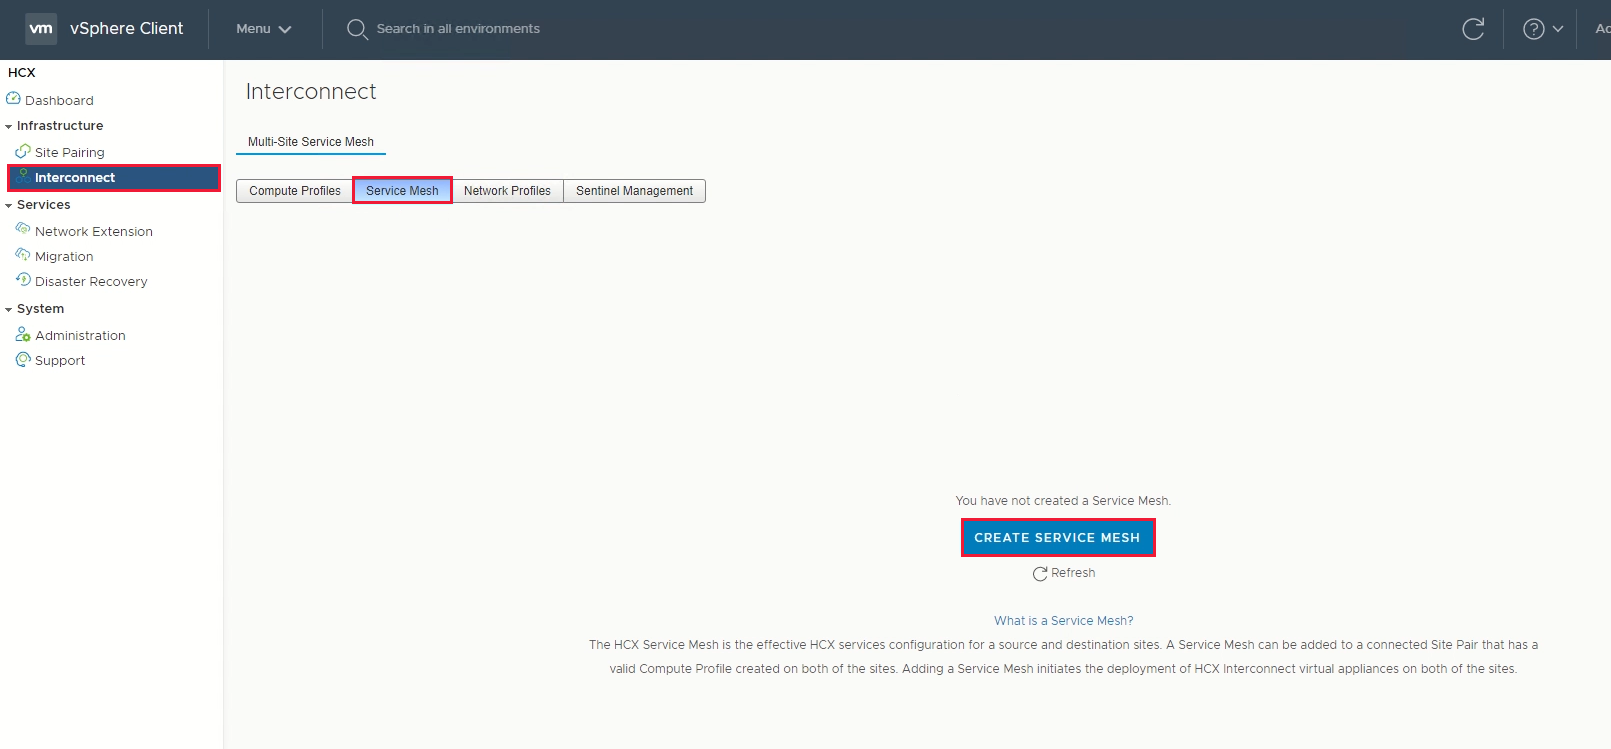
Review the prepopulated sites, and then select Continue.
Note
If this is your first service mesh configuration, you won't need to modify this screen.
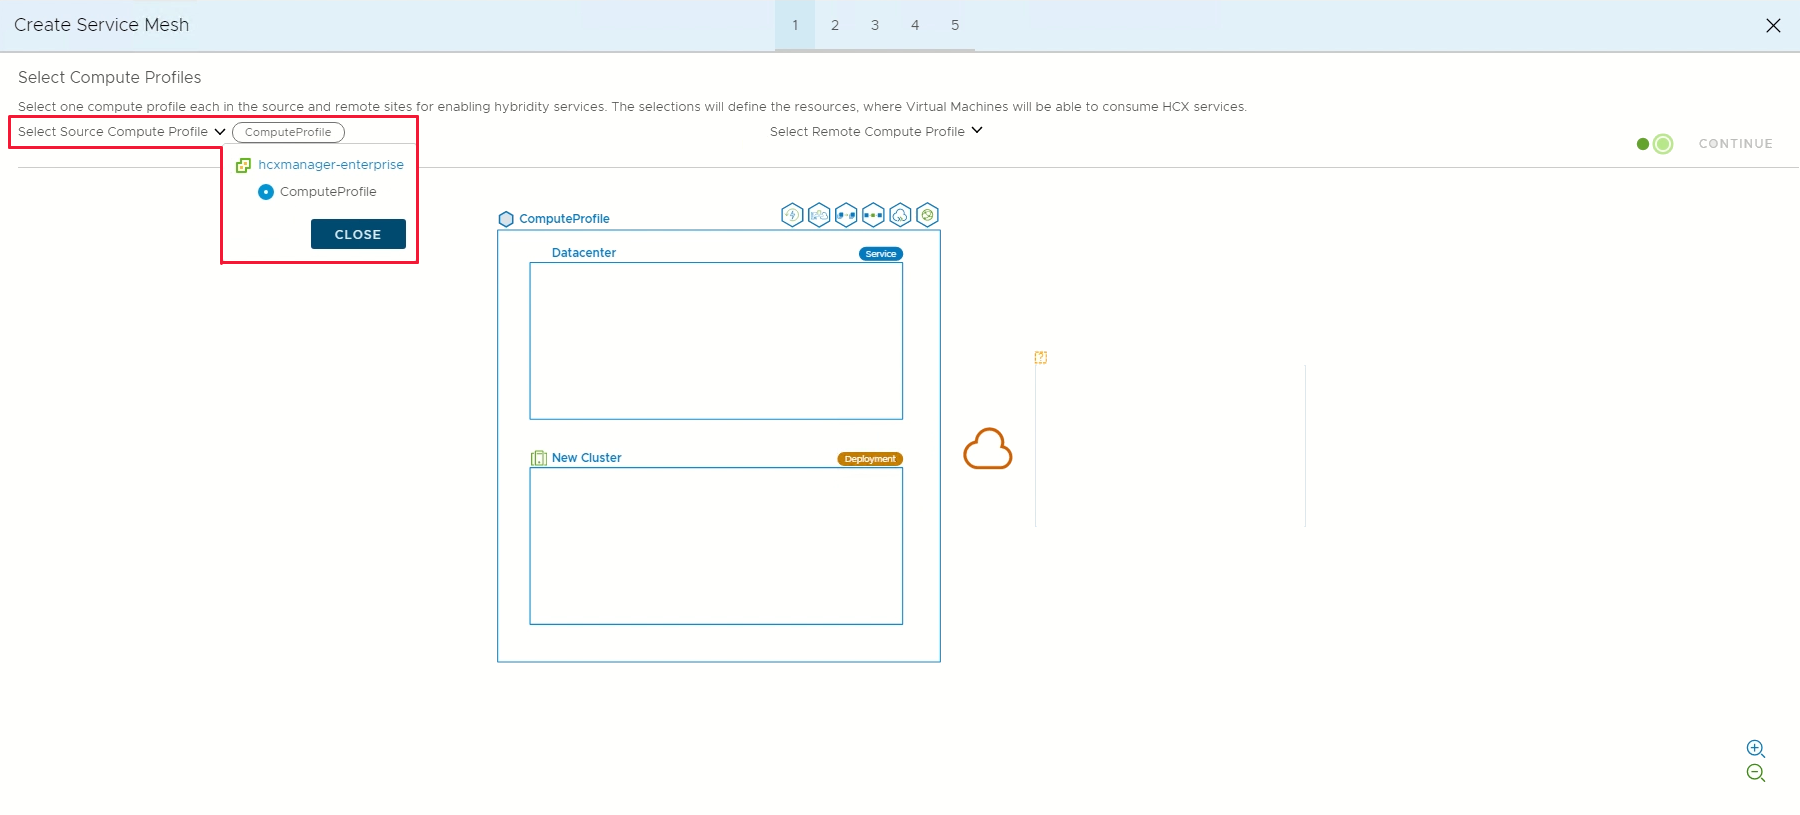
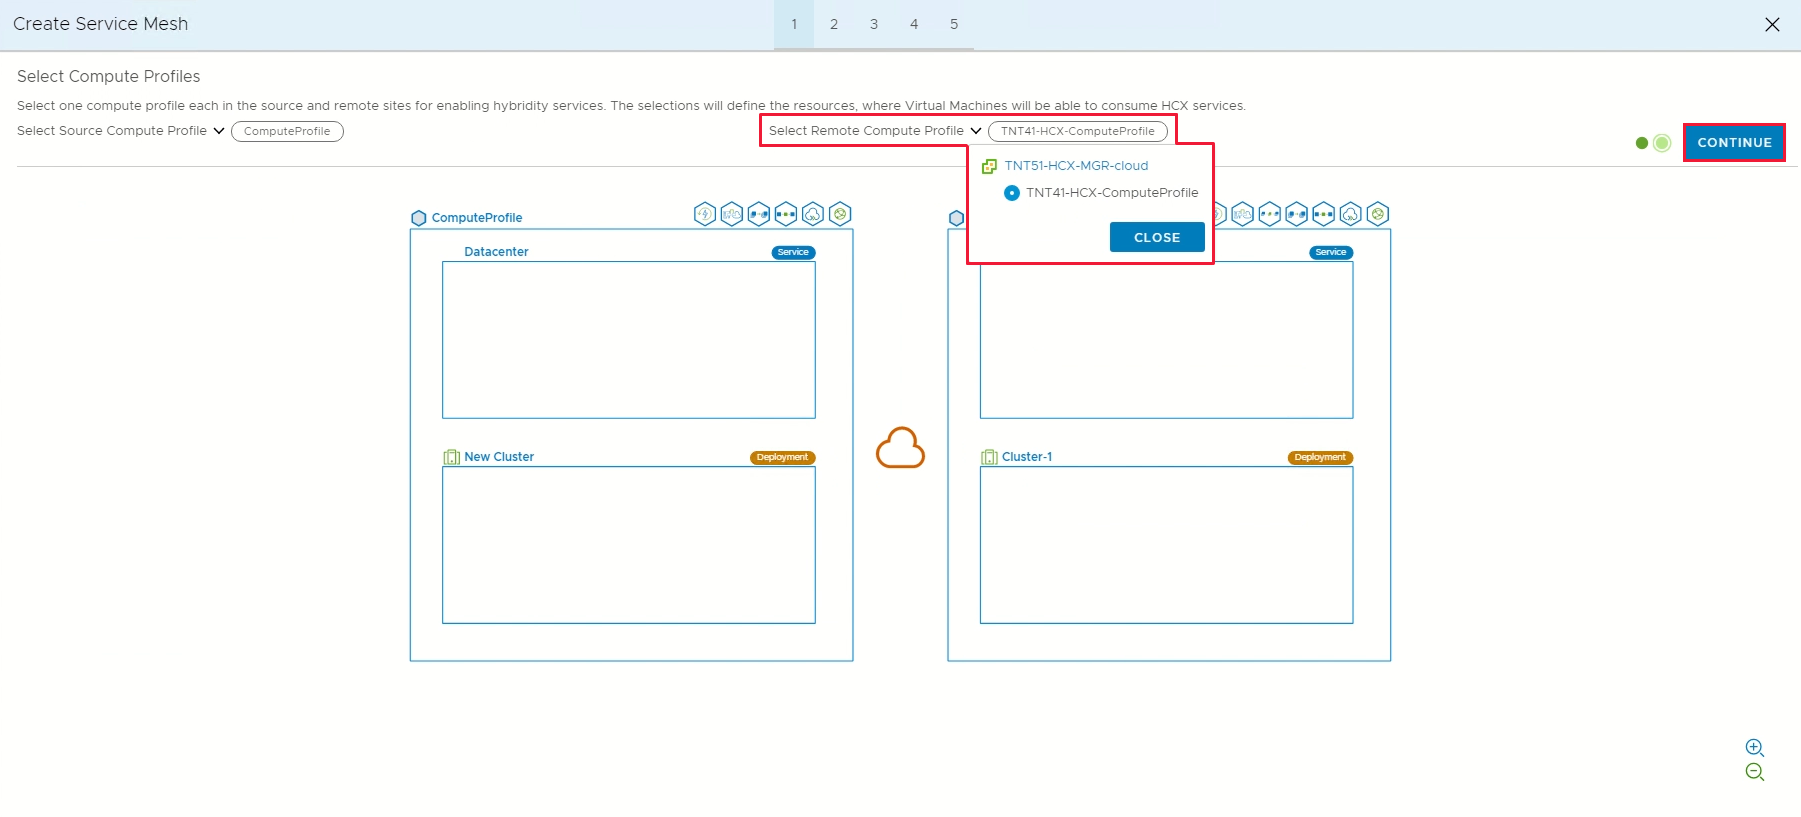
Select the source and remote compute profiles from the drop-down lists, and then select Continue.
The selections define the resources where VMs can consume VMware HCX services.
Review services that you want to be enabled, and then select Continue.
In Advanced Configuration - Override Uplink Network profiles, select Continue.
Uplink network profiles connect to the network through which the remote site's interconnect appliances can be reached.
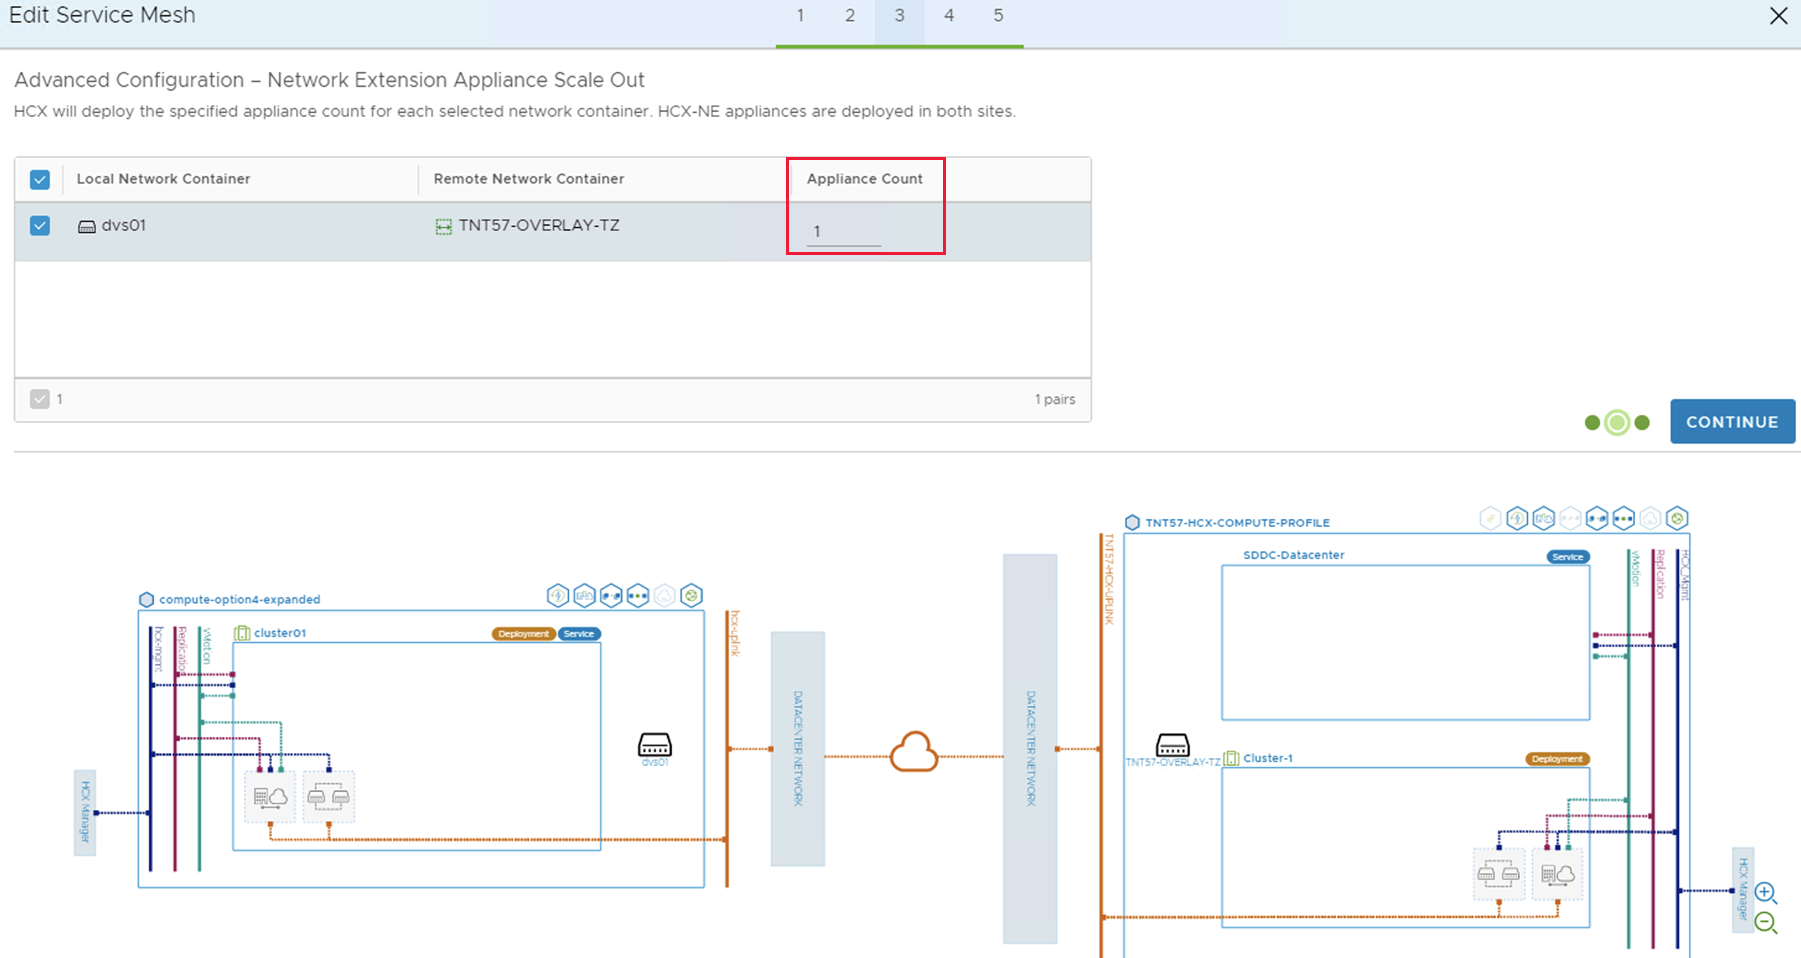
In Advanced Configuration - Network Extension Appliance Scale Out, review and select Continue.
You can have up to eight Network Segments per appliance, but you can deploy another appliance to add another eight Network Segments. You must also have IP space to account for the more appliances, and it's one IP per appliance. For more information, see VMware HCX Configuration Limits.
In Advanced Configuration - Traffic Engineering, review and make any modifications that you feel are necessary, and then select Continue.
Review the topology preview and select Continue.
Enter a user-friendly name for this service mesh and select Finish to complete.
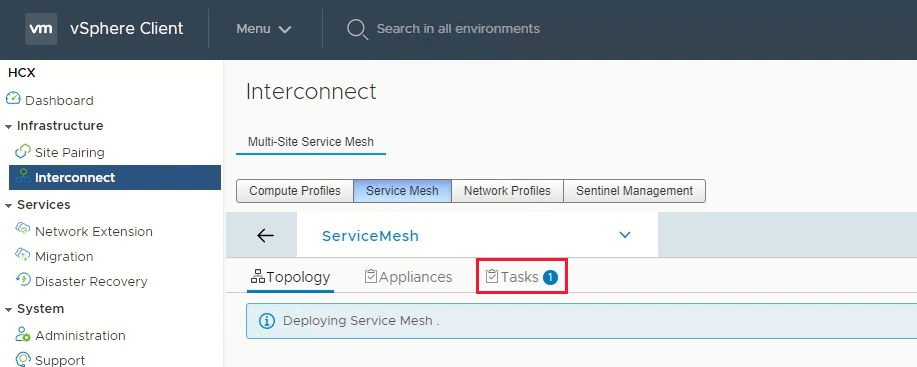
Select View Tasks to monitor the deployment.
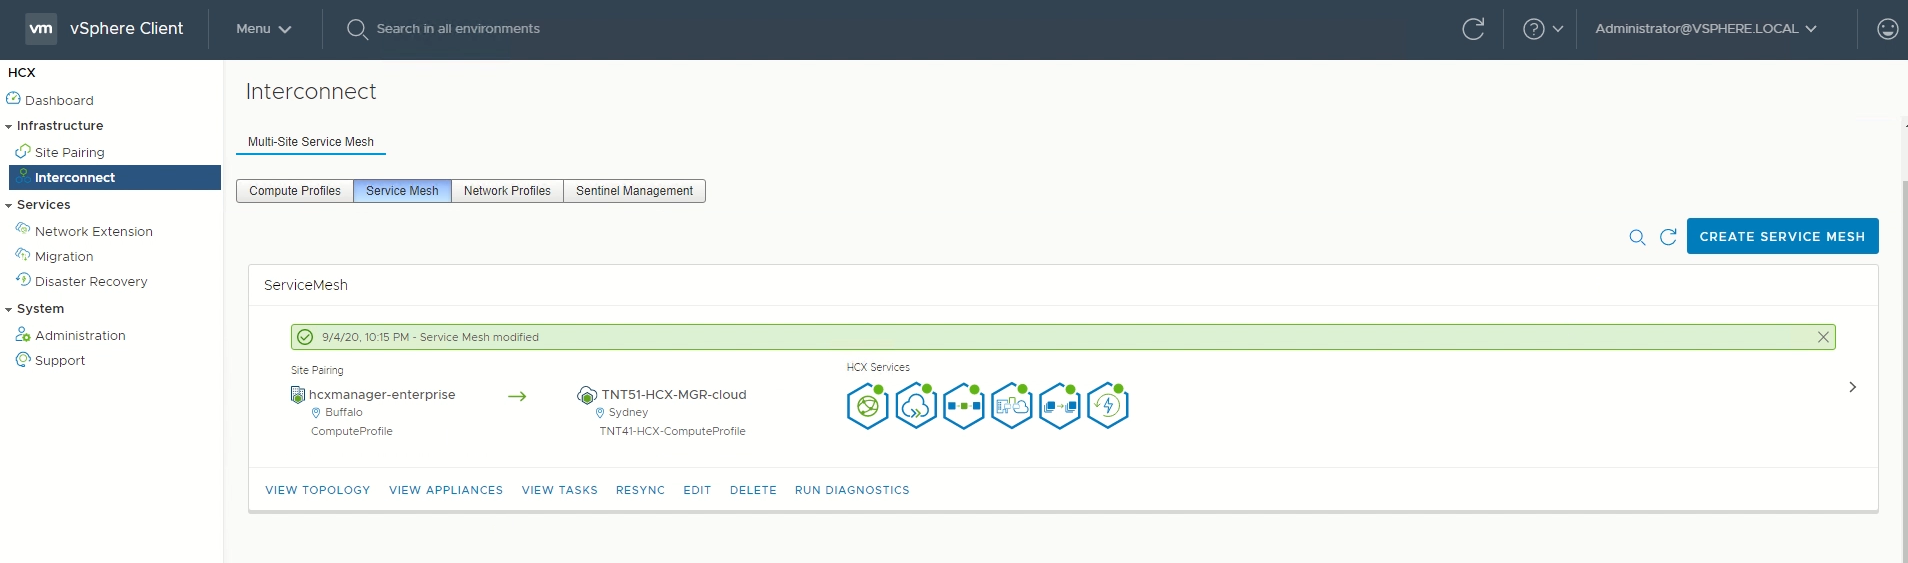
When the service mesh deployment finishes successfully, you see the services as green.
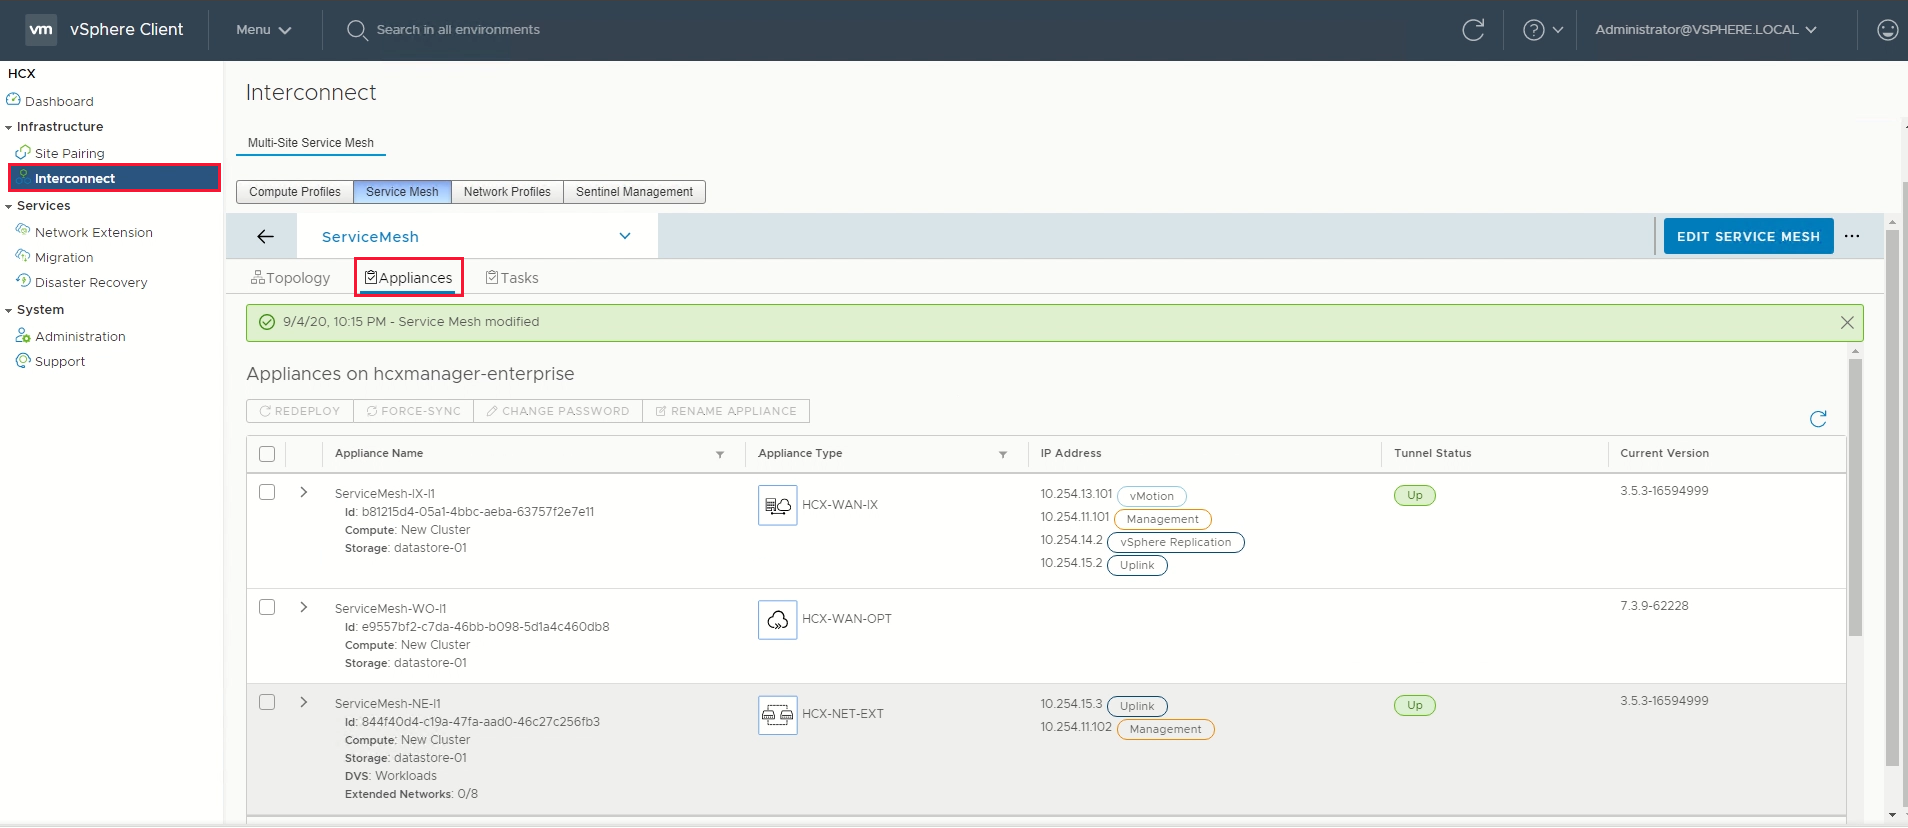
Verify the service mesh's health by checking the appliance status.
Select Interconnect > Appliances.


Move
The following steps show how to move your Azure VMware Solution private cloud resources to another Azure VMware Solution private cloud in a different region.
In this section, you migrate the:
Resource pool configuration and folder creation
VM templates and the associated tags
Logical segments deployment based on the source's port groups and associated VLANs
Network security services and groups
Gateway firewall policy and rules based on the source's firewall policies
Migrate the source vSphere configuration
In this step, copy the source vSphere configuration and move it to the target environment.
From the source vCenter Server, use the same resource pool configuration and create the same resource pool configuration on the target's vCenter Server.
From the source's vCenter Server, use the same VM folder name and create the same VM folder on the target's vCenter Server under Folders.
Use VMware HCX to migrate all VM templates from the source's vCenter Server to the target's vCenter Server.
From the source, convert the existing templates to VMs and then migrate them to the target.
From the target, convert the VMs to VM templates.
From the source environment, use the same VM Tags name and create them on the target's vCenter.
From the source's vCenter Server Content Library, use the subscribed library option to copy the ISO, OVF, OVA, and VM Templates to the target content library:
If the content library isn't already published, select the Enable publishing option.
From the source's Content Library, copy the URL of the published library.
From the target, create a subscribed content library with the URL from the source's library.
Select Sync Now.
Configure the target NSX-T Data Center environment
In this step, use the source NSX-T Data Center configuration to configure the target NSX-T Data Center environment.
Note
You'll have multiple features configured on the source NSX-T Data Center, so you must copy or read from the source NSX-T Data Center and recreate it in the target private cloud. Use L2 Extension to keep same IP address and Mac Address of the VM while migrating Source to target Azure VMware Solution Private Cloud to avoid downtime due to IP change and related configuration.
Configure NSX-T Data Center network components required in the target environment under default Tier-1 gateway.
Configure a new Tier-1 gateway (other than default). This configuration is based on the NSX-T Data Center configured on the source.
Migrate the VMs from the source
In this step, use VMware HCX to migrate the VMs from the source to the target. You can opt to do a Layer-2 extension from the source and use HCX to vMotion the VMs from the source to the target with minimal interruption.
Besides vMotion, other methods, like Bulk and Cold vMotion, are also recommended. Learn more about:
Cutover extended networks
In this step, perform a final gateway cutover to terminate the extended networks. Move (migrate) the gateways from the source Azure VMware Solution environment to the target environment.
Important
You must do the gateway cutover post VLAN workload migration to the target Azure VMware Solution environment. Also, there shouldn't be any VM dependency on the source and target environments.
Before the gateway cutover, verify all migrated workload services and performance. Once application and web service owners accept the performance (except for any latency issues), you can continue with the gateway cutover. Once the cutover is completed, you need to modify the public DNS A and PTR records.
For VMware recommendations, see Cutover of extended networks.
Public IP DNAT for migrated DMZ VMs
To this point, you migrated the workloads to the target environment. These application workloads must be reachable from the public internet. The target environment provides two ways of hosting any application. Applications can be:
Hosted and published under the application gateway load balancer.
Published through the public IP feature in vWAN.
Public IP is typically the destination NAT translated into the Azure firewall. With DNAT rules, firewall policy would translate the public IP address request to a private address (webserver) with a port. For more information, see How to use the public IP functionality in Azure Virtual WAN.
Note
SNAT is by default configured in Azure VMware Solution, so you must enable SNAT from Azure VMware Solution private cloud connectivity settings under the Manage tab.
Decommission
For this last step, verify that all the VM workloads were migrated successfully, including the network configuration. If there's no dependency, you can disconnect the HCX service mesh, site pairing, and network connectivity from the source environment.
Note
Once you decommission the private cloud, you cannot undo it as the configuration and data will be lost.
Next steps
Learn more about:
Feedback
Coming soon: Throughout 2024 we will be phasing out GitHub Issues as the feedback mechanism for content and replacing it with a new feedback system. For more information see: https://aka.ms/ContentUserFeedback.
Submit and view feedback for