Attach Azure NetApp Files to Azure VMware Solution VMs
Azure NetApp Files is an Azure service for migration and running the most demanding enterprise file-workloads in the cloud: databases, SAP, and high-performance computing applications, with no code changes. In this article, learn how to set up, test, and verify the Azure NetApp Files volume as a file share for Azure VMware Solution workloads using the Network File System (NFS) protocol. The guest operating system runs inside virtual machines (VMs) accessing Azure NetApp Files volumes.
Azure NetApp Files and Azure VMware Solution are created in the same Azure region. Azure NetApp Files is available in many Azure regions and supports cross-region replication. For information on Azure NetApp Files configuration methods, see Storage hierarchy of Azure NetApp Files.
Services where Azure NetApp Files are used:
Active Directory connections: Azure NetApp Files supports Understand guidelines for Active Directory Domain Services site design and planning for Azure NetApp Files.
Share Protocol: Azure NetApp Files supports Server Message Block (SMB) and Network File System (NFS) protocols. This support means the volumes can be mounted on the Linux client and can be mapped on Windows client.
Azure VMware Solution: Azure NetApp Files shares can be mounted from VMs that are created in the Azure VMware Solution environment.
The diagram shows a connection through Azure ExpressRoute to an Azure VMware Solution private cloud. The Azure VMware Solution environment accesses the Azure NetApp Files share mounted on Azure VMware Solution VMs.

Prerequisites
- Azure subscription with Azure NetApp Files enabled
- Subnet for Azure NetApp Files
- Linux VM on Azure VMware Solution
- Windows VMs on Azure VMware Solution
Create and mount Azure NetApp Files volumes
Use the following steps to create and mount Azure NetApp Files volumes onto Azure VMware Solution VMs.
Verify preconfigured Azure NetApp Files
Verify the preconfigured Azure NetApp Files created in Azure on Azure NetApp Files Premium service level.
In the Azure portal, under STORAGE, select Azure NetApp Files. A list of your configured Azure NetApp Files appears.

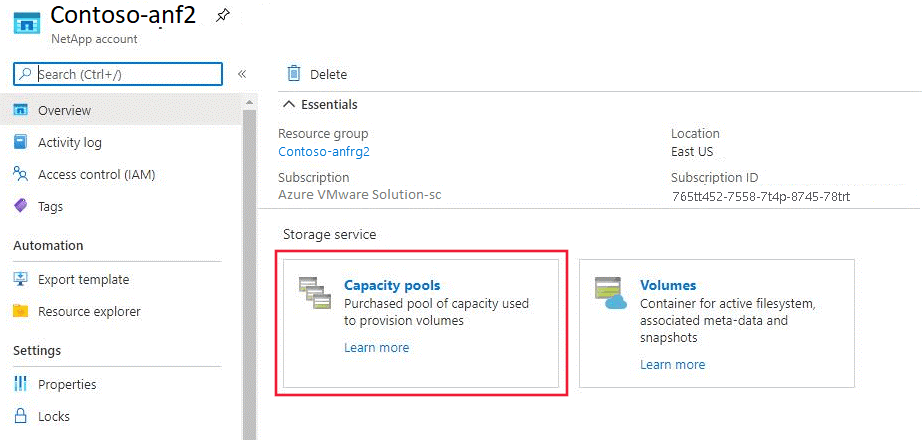
Select a configured NetApp Files account to view its settings. For example, select Contoso-anf2.
Select Capacity pools to verify the configured pool.
The Capacity pools page opens showing the capacity and service level. In this example, the storage pool is configured as 4 TiB with a Premium service level.
Select Volumes to view volumes created under the capacity pool. (See preceding screenshot.)
Select a volume to view its configuration.

A window opens showing the configuration details of the volume.
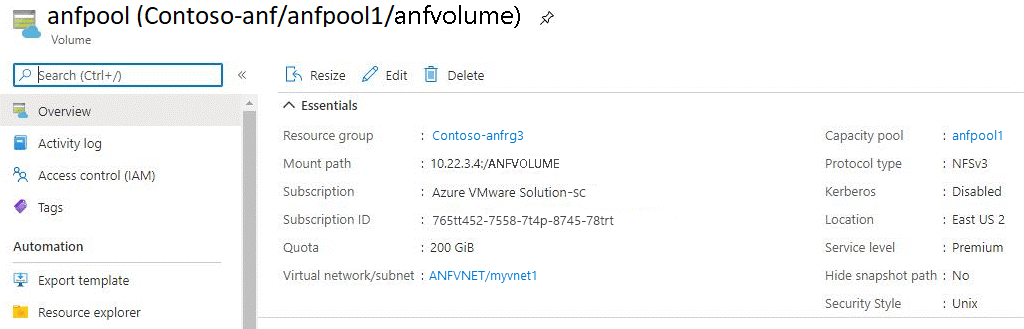
You can see that anfvolume has a size of 200 GiB and is in capacity pool anfpool1. It gets exported as an NFS file share via 10.22.3.4:/ANFVOLUME. One private IP from the Azure virtual network was created for Azure NetApp Files and the NFS path to mount on the VM.
To learn about Azure NetApp Files volume performance by size or "Quota," see Performance considerations for Azure NetApp Files.


Verify preconfigured Azure VMware Solution VM share mapping
To make your Azure NetApp Files share accessible to your Azure VMware Solution VM, you need to understand SMB and NFS share mapping. Once the SMB or NFS volumes are configured, you can mount them as documented here.
SMB share: Create an Active Directory connection before deploying an SMB volume. The specified domain controllers must be accessible by the delegated subnet of Azure NetApp Files for a successful connection. Once the Active Directory is configured within the Azure NetApp Files account, it appears as a selectable item while creating SMB volumes.
NFS share: Azure NetApp Files contributes to creating the volumes using NFS or dual protocol (NFS and SMB). A volume's capacity consumption counts against its pool's provisioned capacity. NFS can be mounted to the Linux server by using the command lines or /etc/fstab entries.
Next steps
Now that you covered integrating Azure NetApp Files with your Azure VMware Solution workloads, learn more about:
Feedback
Coming soon: Throughout 2024 we will be phasing out GitHub Issues as the feedback mechanism for content and replacing it with a new feedback system. For more information see: https://aka.ms/ContentUserFeedback.
Submit and view feedback for