Quickstart: Recognize intents with Conversational Language Understanding
Reference documentation | Package (NuGet) | Additional Samples on GitHub
In this quickstart, you'll use Speech and Language services to recognize intents from audio data captured from a microphone. Specifically, you'll use the Speech service to recognize speech, and a Conversational Language Understanding (CLU) model to identify intents.
Important
Conversational Language Understanding (CLU) is available for C# and C++ with the Speech SDK version 1.25 or later.
Prerequisites
- Azure subscription - Create one for free
- Create a Language resource in the Azure portal.
- Get the Language resource key and endpoint. After your Language resource is deployed, select Go to resource to view and manage keys. For more information about Azure AI services resources, see Get the keys for your resource.
- Create a Speech resource in the Azure portal.
- Get the Speech resource key and region. After your Speech resource is deployed, select Go to resource to view and manage keys. For more information about Azure AI services resources, see Get the keys for your resource.
Set up the environment
The Speech SDK is available as a NuGet package and implements .NET Standard 2.0. You install the Speech SDK later in this guide, but first check the SDK installation guide for any more requirements.
Set environment variables
This example requires environment variables named LANGUAGE_KEY, LANGUAGE_ENDPOINT, SPEECH_KEY, and SPEECH_REGION.
Your application must be authenticated to access Azure AI services resources. For production, use a secure way of storing and accessing your credentials. For example, after you get a key for your Speech resource, write it to a new environment variable on the local machine running the application.
Tip
Don't include the key directly in your code, and never post it publicly. See the Azure AI services security article for more authentication options like Azure Key Vault.
To set the environment variables, open a console window, and follow the instructions for your operating system and development environment.
- To set the
LANGUAGE_KEYenvironment variable, replaceyour-language-keywith one of the keys for your resource. - To set the
LANGUAGE_ENDPOINTenvironment variable, replaceyour-language-endpointwith one of the regions for your resource. - To set the
SPEECH_KEYenvironment variable, replaceyour-speech-keywith one of the keys for your resource. - To set the
SPEECH_REGIONenvironment variable, replaceyour-speech-regionwith one of the regions for your resource.
setx LANGUAGE_KEY your-language-key
setx LANGUAGE_ENDPOINT your-language-endpoint
setx SPEECH_KEY your-speech-key
setx SPEECH_REGION your-speech-region
Note
If you only need to access the environment variable in the current running console, you can set the environment variable with set instead of setx.
After you add the environment variables, you may need to restart any running programs that will need to read the environment variable, including the console window. For example, if you are using Visual Studio as your editor, restart Visual Studio before running the example.
Create a Conversational Language Understanding project
Once you have a Language resource created, create a conversational language understanding project in Language Studio. A project is a work area for building your custom ML models based on your data. Your project can only be accessed by you and others who have access to the Language resource being used.
Go to the Language Studio and sign in with your Azure account.
Create a conversational language understanding project
For this quickstart, you can download this sample home automation project and import it. This project can predict the intended commands from user input, such as turning lights on and off.
Under the Understand questions and conversational language section of Language Studio, select Conversational language understanding.

This will bring you to the Conversational language understanding projects page. Next to the Create new project button select Import.

In the window that appears, upload the JSON file you want to import. Make sure that your file follows the supported JSON format.


Once the upload is complete, you will land on Schema definition page. For this quickstart, the schema is already built, and utterances are already labeled with intents and entities.
Train your model
Typically, after you create a project, you should build a schema and label utterances. For this quickstart, we already imported a ready project with built schema and labeled utterances.
To train a model, you need to start a training job. The output of a successful training job is your trained model.
To start training your model from within the Language Studio:
Select Train model from the left side menu.
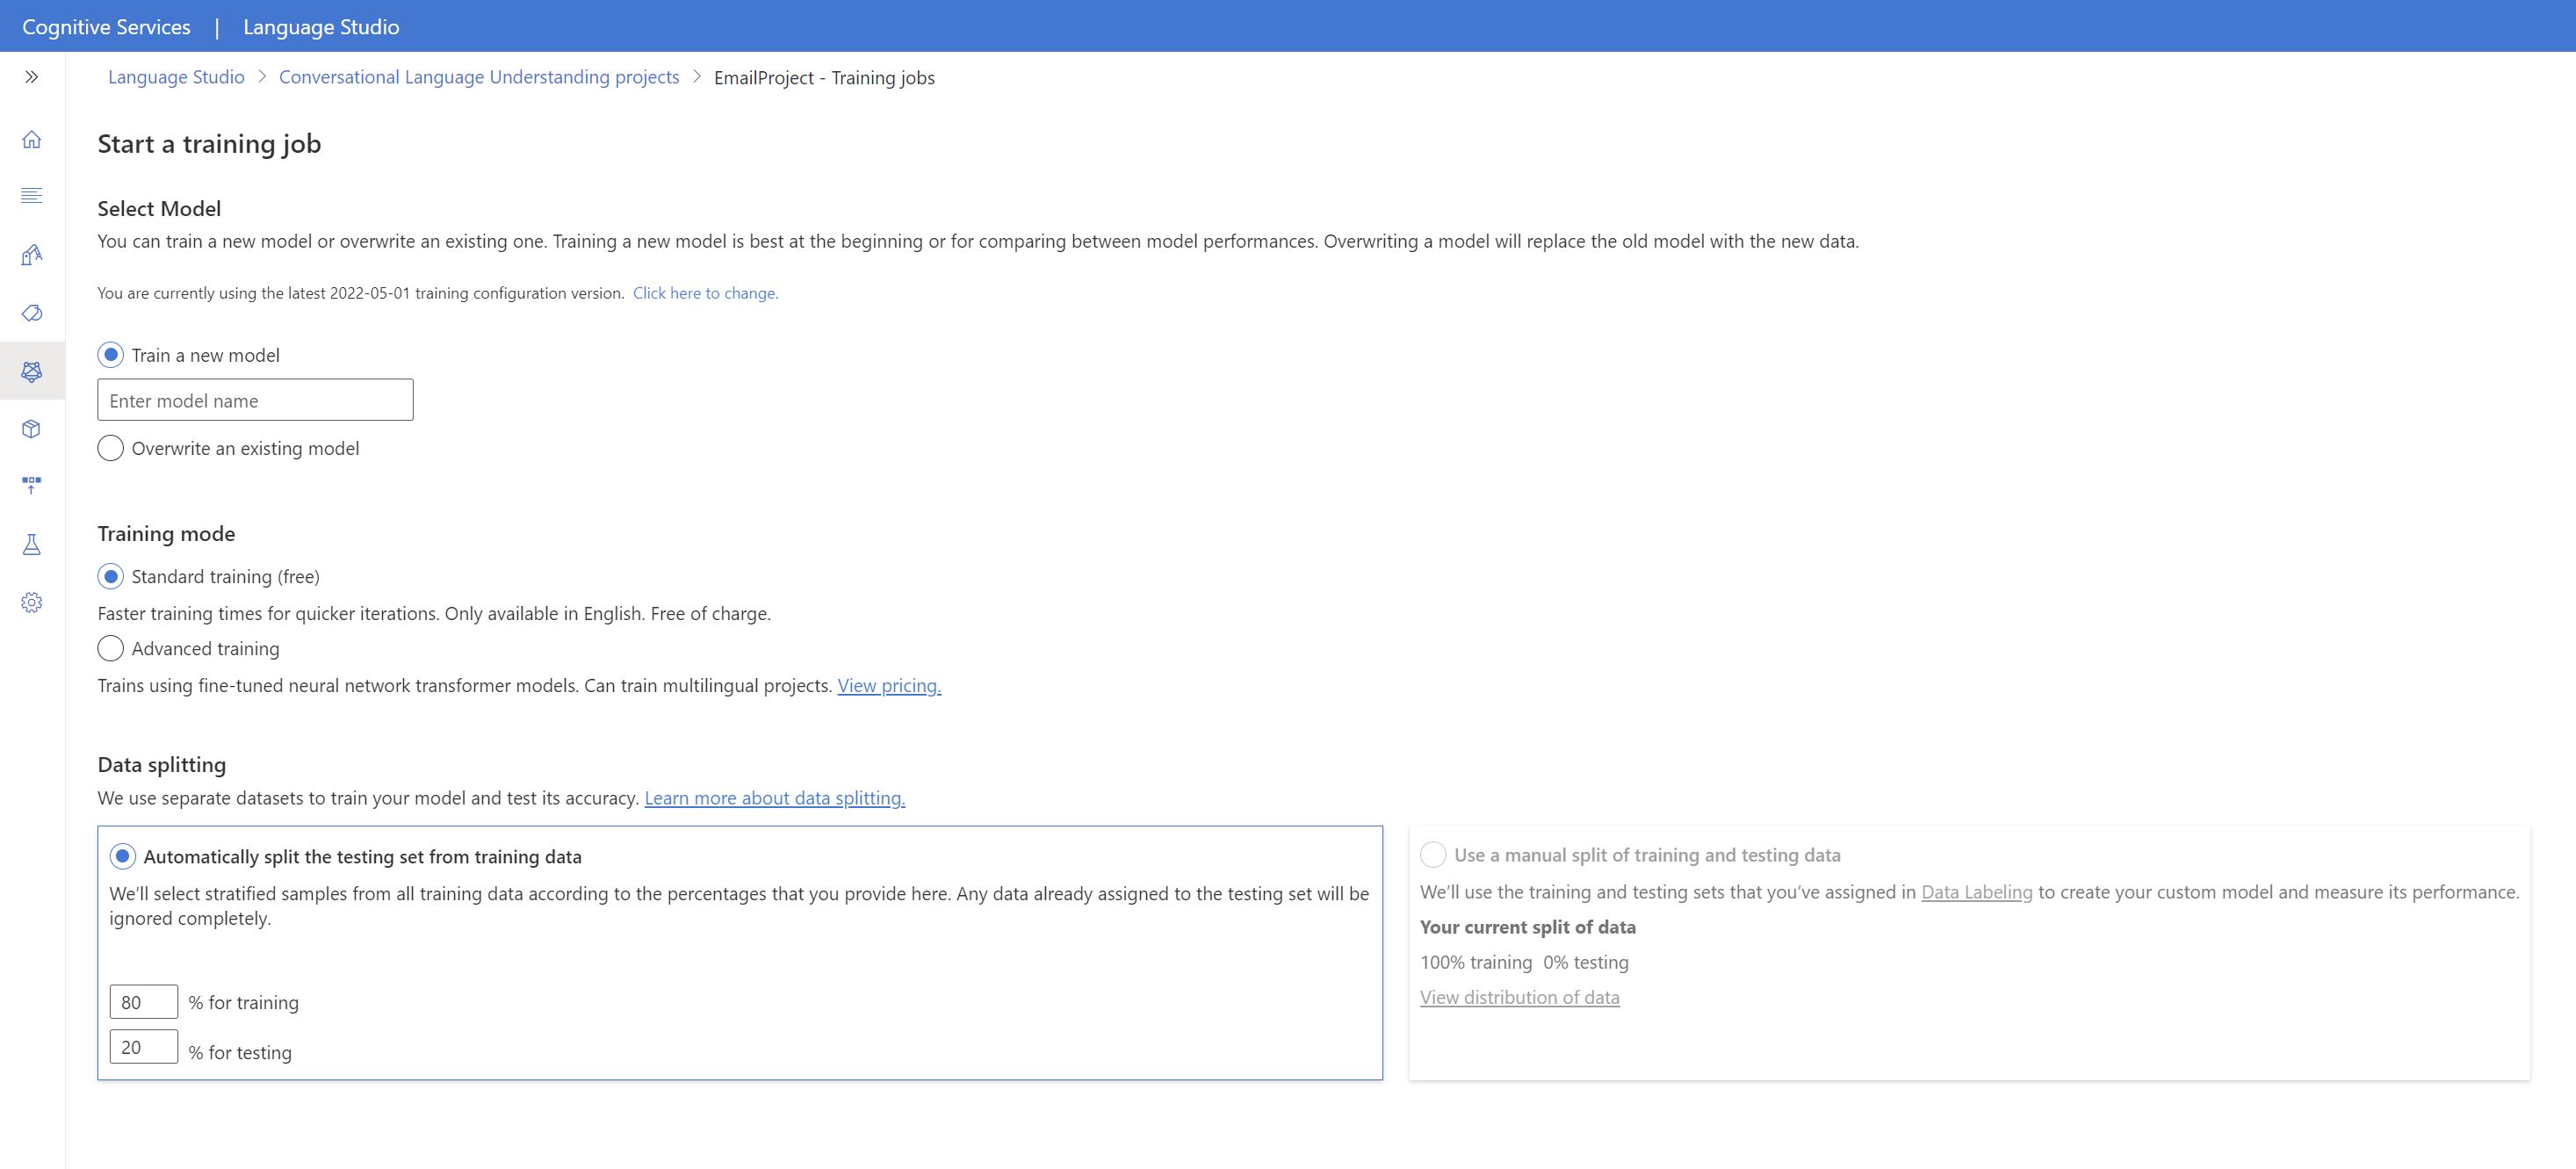
Select Start a training job from the top menu.
Select Train a new model and enter a new model name in the text box. Otherwise to replace an existing model with a model trained on the new data, select Overwrite an existing model and then select an existing model. Overwriting a trained model is irreversible, but it won't affect your deployed models until you deploy the new model.
Select training mode. You can choose Standard training for faster training, but it is only available for English. Or you can choose Advanced training which is supported for other languages and multilingual projects, but it involves longer training times. Learn more about training modes.
Select a data splitting method. You can choose Automatically splitting the testing set from training data where the system will split your utterances between the training and testing sets, according to the specified percentages. Or you can Use a manual split of training and testing data, this option is only enabled if you have added utterances to your testing set when you labeled your utterances.
Select the Train button.
Select the training job ID from the list. A panel will appear where you can check the training progress, job status, and other details for this job.
Note
- Only successfully completed training jobs will generate models.
- Training can take some time between a couple of minutes and couple of hours based on the count of utterances.
- You can only have one training job running at a time. You can't start other training jobs within the same project until the running job is completed.
- The machine learning used to train models is regularly updated. To train on a previous configuration version, select Select here to change from the Start a training job page and choose a previous version.

Deploy your model
Generally after training a model you would review its evaluation details. In this quickstart, you will just deploy your model, and make it available for you to try in Language studio, or you can call the prediction API.
To deploy your model from within the Language Studio:
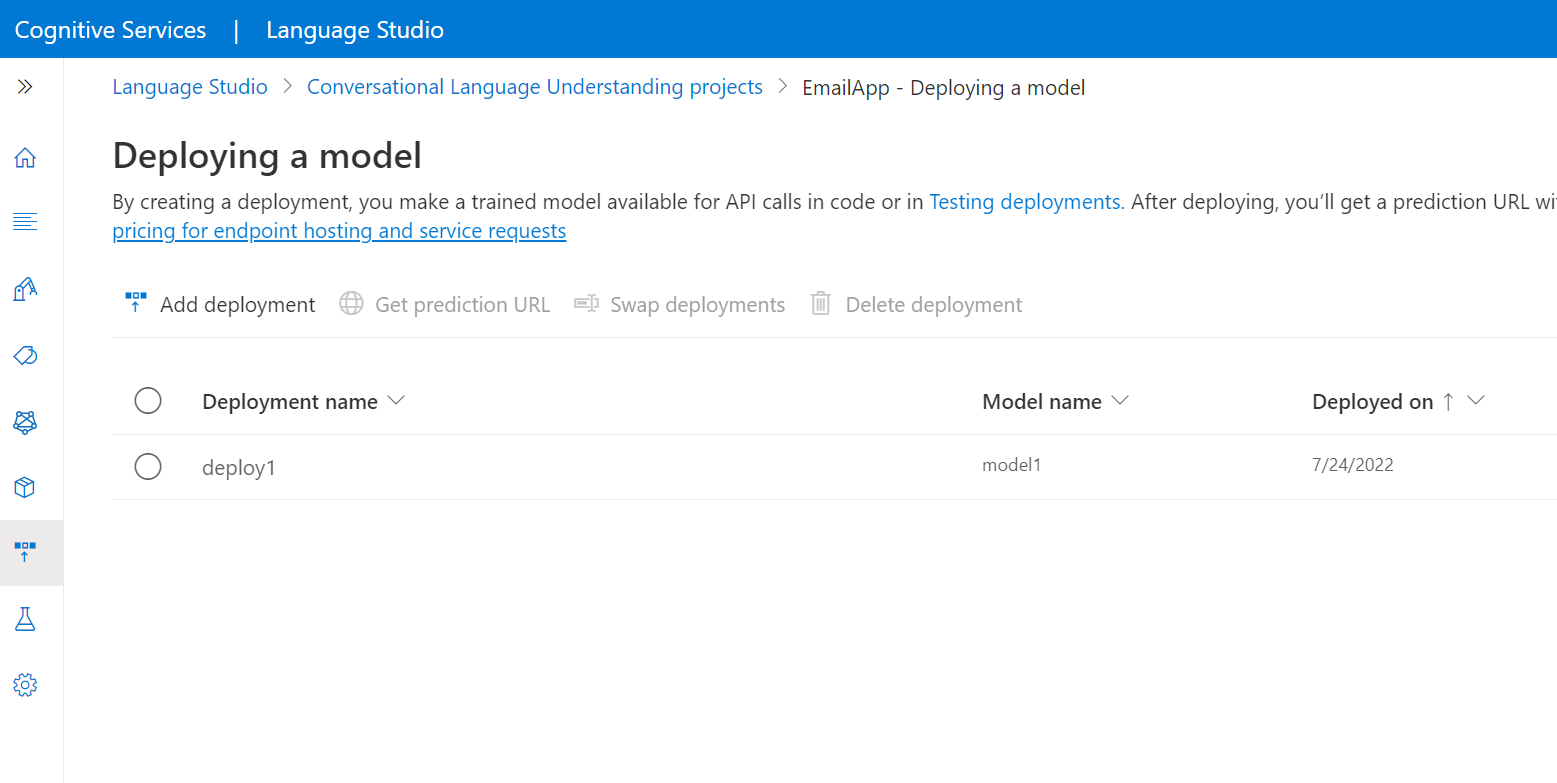
Select Deploying a model from the left side menu.
Select Add deployment to start the Add deployment wizard.
Select Create a new deployment name to create a new deployment and assign a trained model from the dropdown below. You can otherwise select Overwrite an existing deployment name to effectively replace the model that's used by an existing deployment.
Note
Overwriting an existing deployment doesn't require changes to your Prediction API call but the results you get will be based on the newly assigned model.
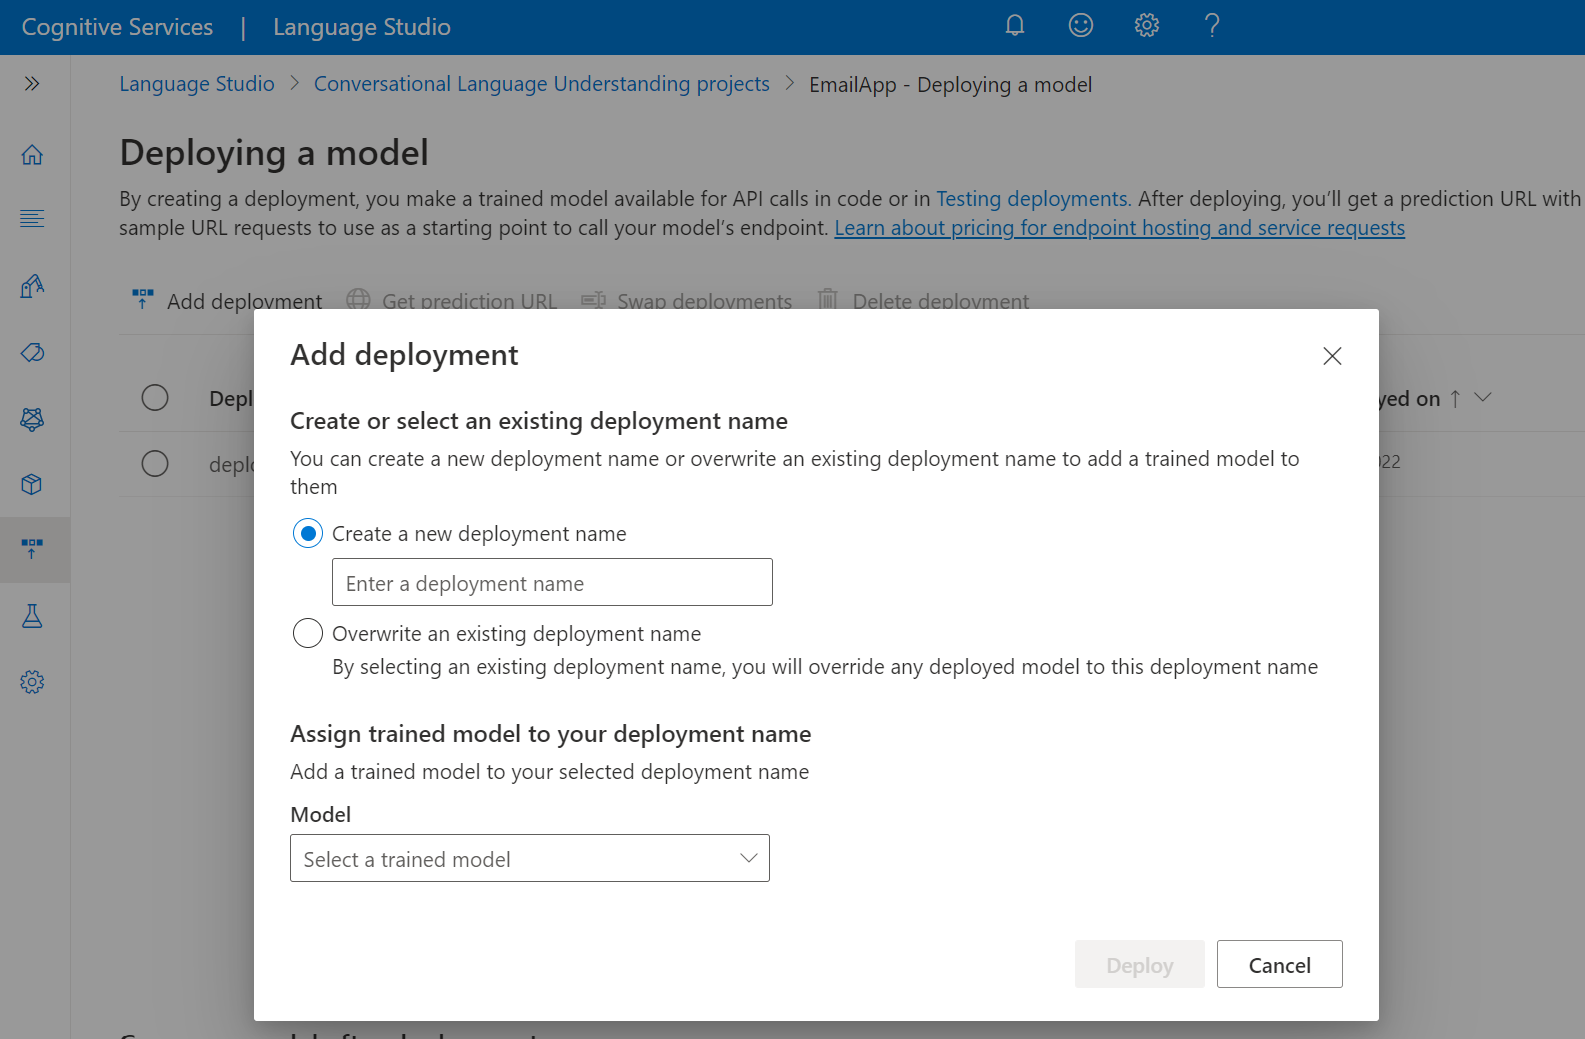
Select a trained model from the Model dropdown.
Select Deploy to start the deployment job.
After deployment is successful, an expiration date will appear next to it. Deployment expiration is when your deployed model will be unavailable to be used for prediction, which typically happens twelve months after a training configuration expires.


You'll use the project name and deployment name in the next section.
Recognize intents from a microphone
Follow these steps to create a new console application and install the Speech SDK.
Open a command prompt where you want the new project, and create a console application with the .NET CLI. The
Program.csfile should be created in the project directory.dotnet new consoleInstall the Speech SDK in your new project with the .NET CLI.
dotnet add package Microsoft.CognitiveServices.SpeechReplace the contents of
Program.cswith the following code.using Microsoft.CognitiveServices.Speech; using Microsoft.CognitiveServices.Speech.Audio; using Microsoft.CognitiveServices.Speech.Intent; class Program { // This example requires environment variables named: // "LANGUAGE_KEY", "LANGUAGE_ENDPOINT", "SPEECH_KEY", and "SPEECH_REGION" static string languageKey = Environment.GetEnvironmentVariable("LANGUAGE_KEY"); static string languageEndpoint = Environment.GetEnvironmentVariable("LANGUAGE_ENDPOINT"); static string speechKey = Environment.GetEnvironmentVariable("SPEECH_KEY"); static string speechRegion = Environment.GetEnvironmentVariable("SPEECH_REGION"); // Your CLU project name and deployment name. static string cluProjectName = "YourProjectNameGoesHere"; static string cluDeploymentName = "YourDeploymentNameGoesHere"; async static Task Main(string[] args) { var speechConfig = SpeechConfig.FromSubscription(speechKey, speechRegion); speechConfig.SpeechRecognitionLanguage = "en-US"; using var audioConfig = AudioConfig.FromDefaultMicrophoneInput(); // Creates an intent recognizer in the specified language using microphone as audio input. using (var intentRecognizer = new IntentRecognizer(speechConfig, audioConfig)) { var cluModel = new ConversationalLanguageUnderstandingModel( languageKey, languageEndpoint, cluProjectName, cluDeploymentName); var collection = new LanguageUnderstandingModelCollection(); collection.Add(cluModel); intentRecognizer.ApplyLanguageModels(collection); Console.WriteLine("Speak into your microphone."); var recognitionResult = await intentRecognizer.RecognizeOnceAsync().ConfigureAwait(false); // Checks result. if (recognitionResult.Reason == ResultReason.RecognizedIntent) { Console.WriteLine($"RECOGNIZED: Text={recognitionResult.Text}"); Console.WriteLine($" Intent Id: {recognitionResult.IntentId}."); Console.WriteLine($" Language Understanding JSON: {recognitionResult.Properties.GetProperty(PropertyId.LanguageUnderstandingServiceResponse_JsonResult)}."); } else if (recognitionResult.Reason == ResultReason.RecognizedSpeech) { Console.WriteLine($"RECOGNIZED: Text={recognitionResult.Text}"); Console.WriteLine($" Intent not recognized."); } else if (recognitionResult.Reason == ResultReason.NoMatch) { Console.WriteLine($"NOMATCH: Speech could not be recognized."); } else if (recognitionResult.Reason == ResultReason.Canceled) { var cancellation = CancellationDetails.FromResult(recognitionResult); Console.WriteLine($"CANCELED: Reason={cancellation.Reason}"); if (cancellation.Reason == CancellationReason.Error) { Console.WriteLine($"CANCELED: ErrorCode={cancellation.ErrorCode}"); Console.WriteLine($"CANCELED: ErrorDetails={cancellation.ErrorDetails}"); Console.WriteLine($"CANCELED: Did you update the subscription info?"); } } } } }In
Program.csset thecluProjectNameandcluDeploymentNamevariables to the names of your project and deployment. For information about how to create a CLU project and deployment, see Create a Conversational Language Understanding project.To change the speech recognition language, replace
en-USwith another supported language. For example,es-ESfor Spanish (Spain). The default language isen-USif you don't specify a language. For details about how to identify one of multiple languages that might be spoken, see language identification.
Run your new console application to start speech recognition from a microphone:
dotnet run
Important
Make sure that you set the LANGUAGE_KEY, LANGUAGE_ENDPOINT, SPEECH_KEY, and SPEECH_REGION environment variables as described above. If you don't set these variables, the sample will fail with an error message.
Speak into your microphone when prompted. What you speak should be output as text:
Speak into your microphone.
RECOGNIZED: Text=Turn on the lights.
    Intent Id: HomeAutomation.TurnOn.
    Language Understanding JSON: {"kind":"ConversationResult","result":{"query":"turn on the lights","prediction":{"topIntent":"HomeAutomation.TurnOn","projectKind":"Conversation","intents":[{"category":"HomeAutomation.TurnOn","confidenceScore":0.97712576},{"category":"HomeAutomation.TurnOff","confidenceScore":0.8431633},{"category":"None","confidenceScore":0.782861}],"entities":[{"category":"HomeAutomation.DeviceType","text":"lights","offset":12,"length":6,"confidenceScore":1,"extraInformation":[{"extraInformationKind":"ListKey","key":"light"}]}]}}}.
Note
Support for the JSON response for CLU via the LanguageUnderstandingServiceResponse_JsonResult property was added in the Speech SDK version 1.26.
The intents are returned in the probability order of most likely to least likely. Here's a formatted version of the JSON output where the topIntent is HomeAutomation.TurnOn with a confidence score of 0.97712576 (97.71%). The second most likely intent might be HomeAutomation.TurnOff with a confidence score of 0.8985081 (84.31%).
{
  "kind": "ConversationResult",
  "result": {
    "query": "turn on the lights",
    "prediction": {
      "topIntent": "HomeAutomation.TurnOn",
      "projectKind": "Conversation",
      "intents": [
        {
          "category": "HomeAutomation.TurnOn",
          "confidenceScore": 0.97712576
        },
        {
          "category": "HomeAutomation.TurnOff",
          "confidenceScore": 0.8431633
        },
        {
          "category": "None",
          "confidenceScore": 0.782861
        }
      ],
      "entities": [
        {
          "category": "HomeAutomation.DeviceType",
          "text": "lights",
          "offset": 12,
          "length": 6,
          "confidenceScore": 1,
          "extraInformation": [
            {
              "extraInformationKind": "ListKey",
              "key": "light"
            }
          ]
        }
      ]
    }
  }
}
Remarks
Now that you've completed the quickstart, here are some additional considerations:
- This example uses the
RecognizeOnceAsyncoperation to transcribe utterances of up to 30 seconds, or until silence is detected. For information about continuous recognition for longer audio, including multi-lingual conversations, see How to recognize speech. - To recognize speech from an audio file, use
FromWavFileInputinstead ofFromDefaultMicrophoneInput:using var audioConfig = AudioConfig.FromWavFileInput("YourAudioFile.wav"); - For compressed audio files such as MP4, install GStreamer and use
PullAudioInputStreamorPushAudioInputStream. For more information, see How to use compressed input audio.
Clean up resources
You can use the Azure portal or Azure Command Line Interface (CLI) to remove the Language and Speech resources you created.
Reference documentation | Package (NuGet) | Additional Samples on GitHub
In this quickstart, you'll use Speech and Language services to recognize intents from audio data captured from a microphone. Specifically, you'll use the Speech service to recognize speech, and a Conversational Language Understanding (CLU) model to identify intents.
Important
Conversational Language Understanding (CLU) is available for C# and C++ with the Speech SDK version 1.25 or later.
Prerequisites
- Azure subscription - Create one for free
- Create a Language resource in the Azure portal.
- Get the Language resource key and endpoint. After your Language resource is deployed, select Go to resource to view and manage keys. For more information about Azure AI services resources, see Get the keys for your resource.
- Create a Speech resource in the Azure portal.
- Get the Speech resource key and region. After your Speech resource is deployed, select Go to resource to view and manage keys. For more information about Azure AI services resources, see Get the keys for your resource.
Set up the environment
The Speech SDK is available as a NuGet package and implements .NET Standard 2.0. You install the Speech SDK later in this guide, but first check the SDK installation guide for any more requirements.
Set environment variables
This example requires environment variables named LANGUAGE_KEY, LANGUAGE_ENDPOINT, SPEECH_KEY, and SPEECH_REGION.
Your application must be authenticated to access Azure AI services resources. For production, use a secure way of storing and accessing your credentials. For example, after you get a key for your Speech resource, write it to a new environment variable on the local machine running the application.
Tip
Don't include the key directly in your code, and never post it publicly. See the Azure AI services security article for more authentication options like Azure Key Vault.
To set the environment variables, open a console window, and follow the instructions for your operating system and development environment.
- To set the
LANGUAGE_KEYenvironment variable, replaceyour-language-keywith one of the keys for your resource. - To set the
LANGUAGE_ENDPOINTenvironment variable, replaceyour-language-endpointwith one of the regions for your resource. - To set the
SPEECH_KEYenvironment variable, replaceyour-speech-keywith one of the keys for your resource. - To set the
SPEECH_REGIONenvironment variable, replaceyour-speech-regionwith one of the regions for your resource.
setx LANGUAGE_KEY your-language-key
setx LANGUAGE_ENDPOINT your-language-endpoint
setx SPEECH_KEY your-speech-key
setx SPEECH_REGION your-speech-region
Note
If you only need to access the environment variable in the current running console, you can set the environment variable with set instead of setx.
After you add the environment variables, you may need to restart any running programs that will need to read the environment variable, including the console window. For example, if you are using Visual Studio as your editor, restart Visual Studio before running the example.
Create a Conversational Language Understanding project
Once you have a Language resource created, create a conversational language understanding project in Language Studio. A project is a work area for building your custom ML models based on your data. Your project can only be accessed by you and others who have access to the Language resource being used.
Go to the Language Studio and sign in with your Azure account.
Create a conversational language understanding project
For this quickstart, you can download this sample home automation project and import it. This project can predict the intended commands from user input, such as turning lights on and off.
Under the Understand questions and conversational language section of Language Studio, select Conversational language understanding.
This will bring you to the Conversational language understanding projects page. Next to the Create new project button select Import.
In the window that appears, upload the JSON file you want to import. Make sure that your file follows the supported JSON format.
Once the upload is complete, you will land on Schema definition page. For this quickstart, the schema is already built, and utterances are already labeled with intents and entities.
Train your model
Typically, after you create a project, you should build a schema and label utterances. For this quickstart, we already imported a ready project with built schema and labeled utterances.
To train a model, you need to start a training job. The output of a successful training job is your trained model.
To start training your model from within the Language Studio:
Select Train model from the left side menu.
Select Start a training job from the top menu.
Select Train a new model and enter a new model name in the text box. Otherwise to replace an existing model with a model trained on the new data, select Overwrite an existing model and then select an existing model. Overwriting a trained model is irreversible, but it won't affect your deployed models until you deploy the new model.
Select training mode. You can choose Standard training for faster training, but it is only available for English. Or you can choose Advanced training which is supported for other languages and multilingual projects, but it involves longer training times. Learn more about training modes.
Select a data splitting method. You can choose Automatically splitting the testing set from training data where the system will split your utterances between the training and testing sets, according to the specified percentages. Or you can Use a manual split of training and testing data, this option is only enabled if you have added utterances to your testing set when you labeled your utterances.
Select the Train button.
Select the training job ID from the list. A panel will appear where you can check the training progress, job status, and other details for this job.
Note
- Only successfully completed training jobs will generate models.
- Training can take some time between a couple of minutes and couple of hours based on the count of utterances.
- You can only have one training job running at a time. You can't start other training jobs within the same project until the running job is completed.
- The machine learning used to train models is regularly updated. To train on a previous configuration version, select Select here to change from the Start a training job page and choose a previous version.
Deploy your model
Generally after training a model you would review its evaluation details. In this quickstart, you will just deploy your model, and make it available for you to try in Language studio, or you can call the prediction API.
To deploy your model from within the Language Studio:
Select Deploying a model from the left side menu.
Select Add deployment to start the Add deployment wizard.
Select Create a new deployment name to create a new deployment and assign a trained model from the dropdown below. You can otherwise select Overwrite an existing deployment name to effectively replace the model that's used by an existing deployment.
Note
Overwriting an existing deployment doesn't require changes to your Prediction API call but the results you get will be based on the newly assigned model.
Select a trained model from the Model dropdown.
Select Deploy to start the deployment job.
After deployment is successful, an expiration date will appear next to it. Deployment expiration is when your deployed model will be unavailable to be used for prediction, which typically happens twelve months after a training configuration expires.
You'll use the project name and deployment name in the next section.
Recognize intents from a microphone
Follow these steps to create a new console application and install the Speech SDK.
Create a new C++ console project in Visual Studio Community 2022 named
SpeechRecognition.Install the Speech SDK in your new project with the NuGet package manager.
Install-Package Microsoft.CognitiveServices.SpeechReplace the contents of
SpeechRecognition.cppwith the following code:#include <iostream> #include <stdlib.h> #include <speechapi_cxx.h> using namespace Microsoft::CognitiveServices::Speech; using namespace Microsoft::CognitiveServices::Speech::Audio; using namespace Microsoft::CognitiveServices::Speech::Intent; std::string GetEnvironmentVariable(const char* name); int main() { // This example requires environment variables named: // "LANGUAGE_KEY", "LANGUAGE_ENDPOINT", "SPEECH_KEY", and "SPEECH_REGION" auto languageKey = GetEnvironmentVariable("LANGUAGE_KEY"); auto languageEndpoint = GetEnvironmentVariable("LANGUAGE_ENDPOINT"); auto speechKey = GetEnvironmentVariable("SPEECH_KEY"); auto speechRegion = GetEnvironmentVariable("SPEECH_REGION"); auto cluProjectName = "YourProjectNameGoesHere"; auto cluDeploymentName = "YourDeploymentNameGoesHere"; if ((size(languageKey) == 0) || (size(languageEndpoint) == 0) || (size(speechKey) == 0) || (size(speechRegion) == 0)) { std::cout << "Please set LANGUAGE_KEY, LANGUAGE_ENDPOINT, SPEECH_KEY, and SPEECH_REGION environment variables." << std::endl; return -1; } auto speechConfig = SpeechConfig::FromSubscription(speechKey, speechRegion); speechConfig->SetSpeechRecognitionLanguage("en-US"); auto audioConfig = AudioConfig::FromDefaultMicrophoneInput(); auto intentRecognizer = IntentRecognizer::FromConfig(speechConfig, audioConfig); std::vector<std::shared_ptr<LanguageUnderstandingModel>> models; auto cluModel = ConversationalLanguageUnderstandingModel::FromResource( languageKey, languageEndpoint, cluProjectName, cluDeploymentName); models.push_back(cluModel); intentRecognizer->ApplyLanguageModels(models); std::cout << "Speak into your microphone.\n"; auto result = intentRecognizer->RecognizeOnceAsync().get(); if (result->Reason == ResultReason::RecognizedIntent) { std::cout << "RECOGNIZED: Text=" << result->Text << std::endl; std::cout << " Intent Id: " << result->IntentId << std::endl; std::cout << " Intent Service JSON: " << result->Properties.GetProperty(PropertyId::LanguageUnderstandingServiceResponse_JsonResult) << std::endl; } else if (result->Reason == ResultReason::RecognizedSpeech) { std::cout << "RECOGNIZED: Text=" << result->Text << " (intent could not be recognized)" << std::endl; } else if (result->Reason == ResultReason::NoMatch) { std::cout << "NOMATCH: Speech could not be recognized." << std::endl; } else if (result->Reason == ResultReason::Canceled) { auto cancellation = CancellationDetails::FromResult(result); std::cout << "CANCELED: Reason=" << (int)cancellation->Reason << std::endl; if (cancellation->Reason == CancellationReason::Error) { std::cout << "CANCELED: ErrorCode=" << (int)cancellation->ErrorCode << std::endl; std::cout << "CANCELED: ErrorDetails=" << cancellation->ErrorDetails << std::endl; std::cout << "CANCELED: Did you update the subscription info?" << std::endl; } } } std::string GetEnvironmentVariable(const char* name) { #if defined(_MSC_VER) size_t requiredSize = 0; (void)getenv_s(&requiredSize, nullptr, 0, name); if (requiredSize == 0) { return ""; } auto buffer = std::make_unique<char[]>(requiredSize); (void)getenv_s(&requiredSize, buffer.get(), requiredSize, name); return buffer.get(); #else auto value = getenv(name); return value ? value : ""; #endif }In
SpeechRecognition.cppset thecluProjectNameandcluDeploymentNamevariables to the names of your project and deployment. For information about how to create a CLU project and deployment, see Create a Conversational Language Understanding project.To change the speech recognition language, replace
en-USwith another supported language. For example,es-ESfor Spanish (Spain). The default language isen-USif you don't specify a language. For details about how to identify one of multiple languages that might be spoken, see language identification.
Build and run your new console application to start speech recognition from a microphone.
Important
Make sure that you set the LANGUAGE_KEY, LANGUAGE_ENDPOINT, SPEECH_KEY, and SPEECH_REGION environment variables as described above. If you don't set these variables, the sample will fail with an error message.
Speak into your microphone when prompted. What you speak should be output as text:
Speak into your microphone.
RECOGNIZED: Text=Turn on the lights.
    Intent Id: HomeAutomation.TurnOn.
    Language Understanding JSON: {"kind":"ConversationResult","result":{"query":"turn on the lights","prediction":{"topIntent":"HomeAutomation.TurnOn","projectKind":"Conversation","intents":[{"category":"HomeAutomation.TurnOn","confidenceScore":0.97712576},{"category":"HomeAutomation.TurnOff","confidenceScore":0.8431633},{"category":"None","confidenceScore":0.782861}],"entities":[{"category":"HomeAutomation.DeviceType","text":"lights","offset":12,"length":6,"confidenceScore":1,"extraInformation":[{"extraInformationKind":"ListKey","key":"light"}]}]}}}.
Note
Support for the JSON response for CLU via the LanguageUnderstandingServiceResponse_JsonResult property was added in the Speech SDK version 1.26.
The intents are returned in the probability order of most likely to least likely. Here's a formatted version of the JSON output where the topIntent is HomeAutomation.TurnOn with a confidence score of 0.97712576 (97.71%). The second most likely intent might be HomeAutomation.TurnOff with a confidence score of 0.8985081 (84.31%).
{
  "kind": "ConversationResult",
  "result": {
    "query": "turn on the lights",
    "prediction": {
      "topIntent": "HomeAutomation.TurnOn",
      "projectKind": "Conversation",
      "intents": [
        {
          "category": "HomeAutomation.TurnOn",
          "confidenceScore": 0.97712576
        },
        {
          "category": "HomeAutomation.TurnOff",
          "confidenceScore": 0.8431633
        },
        {
          "category": "None",
          "confidenceScore": 0.782861
        }
      ],
      "entities": [
        {
          "category": "HomeAutomation.DeviceType",
          "text": "lights",
          "offset": 12,
          "length": 6,
          "confidenceScore": 1,
          "extraInformation": [
            {
              "extraInformationKind": "ListKey",
              "key": "light"
            }
          ]
        }
      ]
    }
  }
}
Remarks
Now that you've completed the quickstart, here are some additional considerations:
- This example uses the
RecognizeOnceAsyncoperation to transcribe utterances of up to 30 seconds, or until silence is detected. For information about continuous recognition for longer audio, including multi-lingual conversations, see How to recognize speech. - To recognize speech from an audio file, use
FromWavFileInputinstead ofFromDefaultMicrophoneInput:auto audioInput = AudioConfig::FromWavFileInput("YourAudioFile.wav"); - For compressed audio files such as MP4, install GStreamer and use
PullAudioInputStreamorPushAudioInputStream. For more information, see How to use compressed input audio.
Clean up resources
You can use the Azure portal or Azure Command Line Interface (CLI) to remove the Language and Speech resources you created.
Reference documentation | Additional Samples on GitHub
The Speech SDK for Java doesn't support intent recognition with conversational language understanding (CLU). Please select another programming language or the Java reference and samples linked from the beginning of this article.
Next steps
Feedback
Coming soon: Throughout 2024 we will be phasing out GitHub Issues as the feedback mechanism for content and replacing it with a new feedback system. For more information see: https://aka.ms/ContentUserFeedback.
Submit and view feedback for