Use Tanzu Service Registry
Note
Azure Spring Apps is the new name for the Azure Spring Cloud service. Although the service has a new name, you'll see the old name in some places for a while as we work to update assets such as screenshots, videos, and diagrams.
This article applies to: ❌ Basic/Standard ✔️ Enterprise
This article shows you how to use VMware Tanzu Service Registry with the Azure Spring Apps Enterprise plan.
Tanzu Service Registry is one of the commercial VMware Tanzu components. This component helps you apply the service discovery design pattern to your applications.
Service discovery is one of the main ideas of the microservices architecture. Without service discovery, you'd have to hand-configure each client of a service or adopt some form of access convention. This process can be difficult, and the configurations and conventions can be brittle in production. Instead, you can use the Tanzu Service Registry to dynamically discover and invoke registered services in your application.
with the Azure Spring Apps Enterprise plan, you don't have to create or start the Service Registry yourself. You can use the Tanzu Service Registry by selecting it when you create your Azure Spring Apps Enterprise plan instance.
Prerequisites
- An already provisioned Azure Spring Apps Enterprise plan instance with Tanzu Service Registry enabled. For more information, see Quickstart: Build and deploy apps to Azure Spring Apps using the Enterprise plan.
-
The Azure Spring Apps Enterprise plan extension. Use the following command to remove previous versions and install the latest Enterprise plan extension. If you previously installed the
spring-cloudextension, uninstall it to avoid configuration and version mismatches.az extension add --upgrade --name spring az extension remove --name spring-cloud
Create applications that use Service Registry
In this article, you create two services and register them with Azure Spring Apps Service Registry. After registration, one service will be able to use Service Registry to discover and invoke the other service. The following diagram summarizes the required steps:
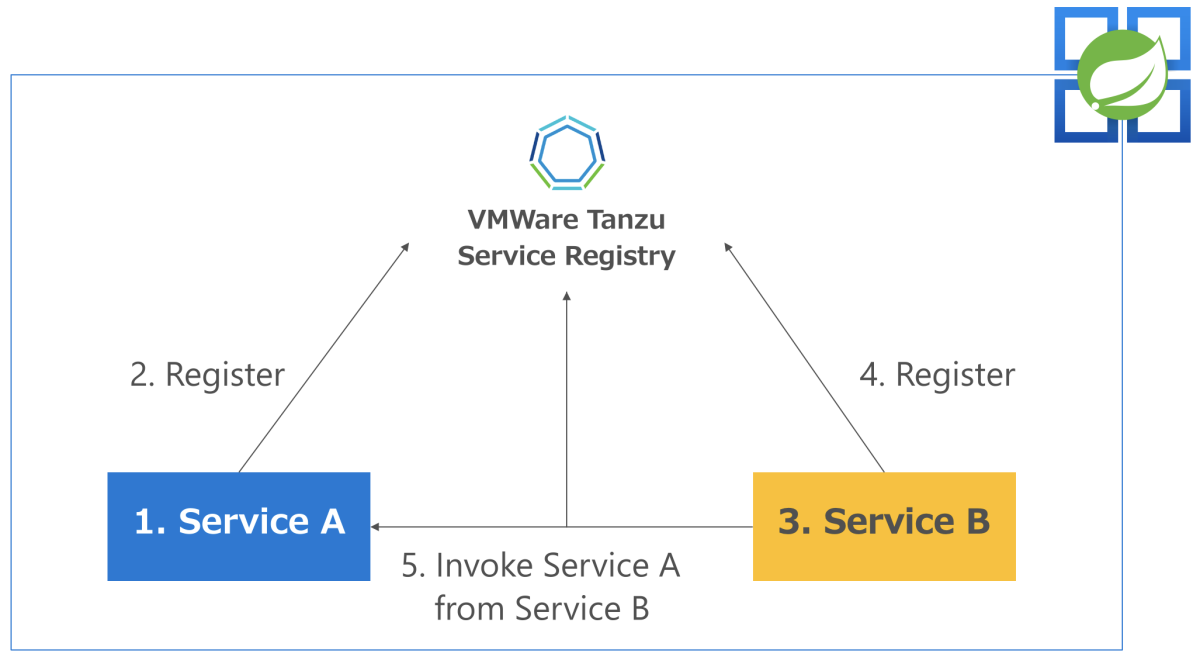
These steps are described in more detail in the following sections.
- Create Service A.
- Deploy Service A to Azure Spring Apps and register it with Service Registry.
- Create Service B and implement it to call Service A.
- Deploy Service B and register it with Service Registry.
- Invoke Service A through Service B.
Create environment variables
This article uses the following environment variables. Set these variables to the values you used when you created your Azure Spring Apps Enterprise plan instance.
| Variable | Description |
|---|---|
| $RESOURCE_GROUP | Resource group name. |
| $AZURE_SPRING_APPS_NAME | Azure Spring Apps instance name. |
Create Service A with Spring Boot
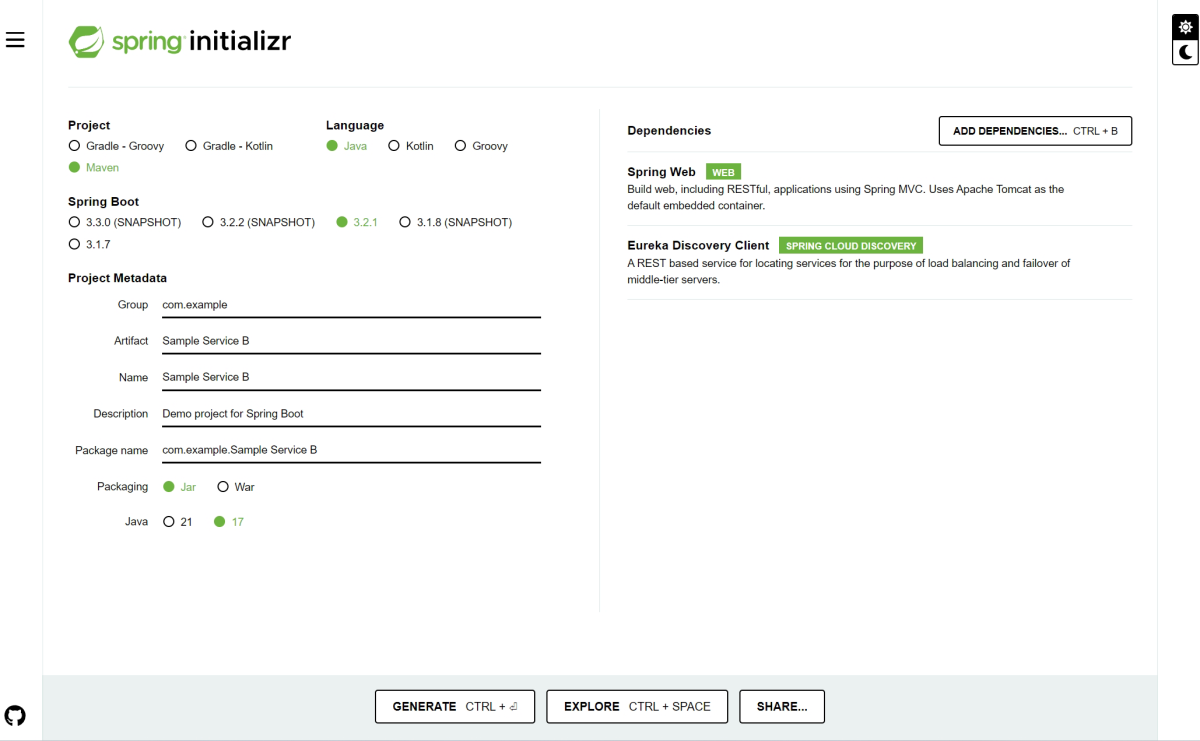
Navigate to Spring Initializr to create sample Service A. This link uses the following URL to initialize the settings.
https://start.spring.io/#!type=maven-project&language=java&packaging=jar&groupId=com.example&artifactId=Sample%20Service%20A&name=Sample%20Service%20A&description=Demo%20project%20for%20Spring%20Boot&packageName=com.example.Sample%20Service%20A&dependencies=web,cloud-eureka
The following screenshot shows Spring Initializr with the required settings.
Next, select GENERATE to get a sample project for Spring Boot with the following directory structure.
├── HELP.md
├── mvnw
├── mvnw.cmd
├── pom.xml
└── src
    ├── main
    │   ├── java
    │   │   └── com
    │   │       └── example
    │   │           └── Sample
    │   │               └── Service
    │   │                   └── A
    │   │                       └── SampleServiceAApplication.java
    │   └── resources
    │       ├── application.properties
    │       ├── static
    │       └── templates
    └── test
        └── java
            └── com
                └── example
                    └── Sample
                        └── Service
                            └── A
                                └── SampleServiceAApplicationTests.java
Confirm the configuration of dependent libraries for the Service Registry client (Eureka client)
Next, confirm that the pom.xml file for the project contains the following dependency. Add the dependency if it's missing.
<dependency>
    <groupId>org.springframework.cloud</groupId>
    <artifactId>spring-cloud-starter-netflix-eureka-client</artifactId>
</dependency>
Implement the Service Registry client
Add an @EnableEurekaClient annotation to the SampleServiceAApplication.java file to configure it as a Eureka Client.
package com.example.Sample.Service.A;

import org.springframework.boot.SpringApplication;
import org.springframework.boot.autoconfigure.SpringBootApplication;
import org.springframework.cloud.netflix.eureka.EnableEurekaClient;

@SpringBootApplication
@EnableEurekaClient
public class SampleServiceAApplication {

    public static void main(String[] args) {
        SpringApplication.run(SampleServiceAApplication.class, args);
    }
}
Create a REST endpoint for testing
You can now register the service to Service Registry, but you can't verify it until you implement a service endpoint. To create RESTful endpoints that external services can call, add a ServiceAEndpoint.java file to your project with the following code.
package com.example.Sample.Service.A;
import java.util.Map;

import org.springframework.web.bind.annotation.GetMapping;
import org.springframework.web.bind.annotation.RestController;

@RestController
public class ServiceAEndpoint {

    @GetMapping("/serviceA")
    public String getServiceA(){
        return "This is a result of Service A";
    }

    @GetMapping("/env")
    public Map<String, String> getEnv(){
        Map<String, String> env = System.getenv();
        return env;
    }
}
Build a Spring Boot application
Now that you have a simple service, compile and build the source code by running the following command:
mvn clean package
Deploy Service A and register with Service Registry
This section explains how to deploy Service A to an Azure Spring Apps Enterprise plan instance and register it with Service Registry.
Create an Azure Spring Apps application
First, create an application in Azure Spring Apps by using the following command:
az spring app create \
    --resource-group $RESOURCE_GROUP \
    --service $AZURE_SPRING_APPS_NAME  \
    --name serviceA \
    --instance-count 1 \
    --memory 2Gi \
    --assign-endpoint
The --assign-endpoint argument grants a public IP for validation and enables access from the external network.
Connect to the Service Registry from the app
After you create a service instance with Spring Boot and create an application in Azure Spring Apps, you deploy the application and confirm the operation. Before that, however, you must bind your application to the Service Registry so that it can get connection information from the registry.
Typically, a Eureka client needs to write the following connection information settings in the application.properties configuration file of a Spring Boot application so that you can connect to the server:
eureka.client.service-url.defaultZone=http://eureka:8761/eureka/
However, if you write these settings directly in your application, you need to re-edit and rebuild the project again each time the Service Registry server changes. To avoid this effort, Azure Spring Apps enables your applications to get connection information from the service registry by binding to it. Specifically, after binding the application to the Service Registry, you can get the service registry connection information (eureka.client.service-url.defaultZone) from the Java environment variable. In this way, you can connect to the Service Registry by loading the contents of the environment variables when the application starts.
In practice, the following environment variables are added to the JAVA_TOOL_OPTIONS variable:
-Deureka.client.service-url.defaultZone=https://$AZURE_SPRING_APPS_NAME.svc.azuremicroservices.io/eureka/default/eureka
Bind a service to the Service Registry
Use the following command to bind the service to Azure Service Registry, enabling it to connect to the server.
az spring service-registry bind \
    --resource-group $RESOURCE_GROUP \
    --service $AZURE_SPRING_APPS_NAME \
    --app serviceA
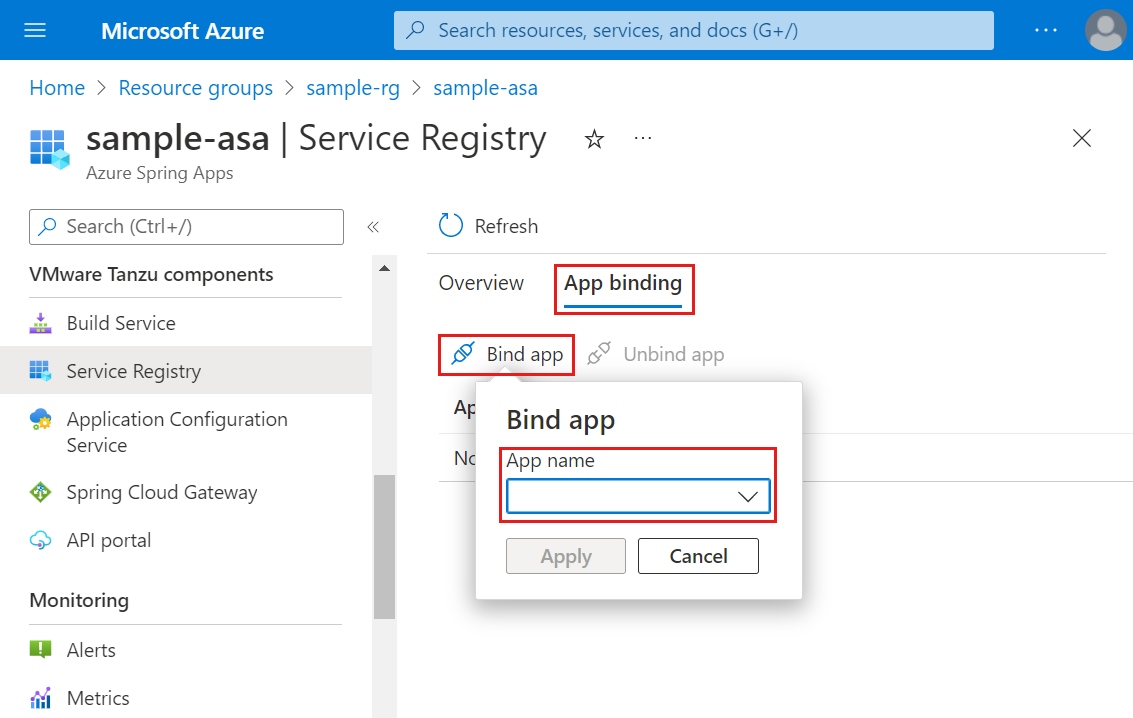
You can also set up the application bindings from the Azure portal, as shown in the following screenshot:
Note
These changes will take a few minutes to propagate to all applications when the service registry status changes.
If you change the binding/unbinding status, you need to restart or redeploy the application.
You can now choose to bind your application to the Service Registry directly when creating a new app by using the following commands:
az spring app create \
    --resource-group <resource-group> \
    --service <service-name> \
    --name <app-name> \
    --bind-service-registry
You can also bind your application to the Service Registry from the Azure portal, as shown in the following screenshot:

Deploy an application to Azure Spring Apps
Now that you bound your application, deploy the Spring Boot artifact file Sample-Service-A-A-0.0.1-SNAPSHOT.jar to Azure Spring Apps. To deploy, use the following command:
az spring app deploy \
    --resource-group $RESOURCE_GROUP \
    --service $AZURE_SPRING_APPS_NAME \
    --name serviceA \
    --artifact-path ./target/Sample-Service-A-0.0.1-SNAPSHOT.jar \
    --jvm-options="-Xms1024m -Xmx1024m"
Use the following command to see if your deployment is successful.
az spring app list \
    --resource-group $RESOURCE_GROUP \
    --service $AZURE_SPRING_APPS_NAME \
    --output table
This command produces output similar to the following example.
Name                      Location       ResourceGroup           Public Url                                                           Production Deployment    Provisioning State    CPU    Memory    Running Instance    Registered Instance    Persistent Storage    Bind Service Registry    Bind Application Configuration Service
------------------------  -------------  ----------------------  -------------------------------------------------------------------  -----------------------  --------------------  -----  --------  ------------------  ---------------------  --------------------  -----------------------  ----------------------------------------
servicea                  southeastasia  $RESOURCE_GROUP         https://$AZURE_SPRING_APPS_NAME-servicea.azuremicroservices.io       default                  Succeeded             1      2Gi       1/1                 N/A                    -                     default                  -
Confirm that the Service A application is running
The output of the previous command includes the public URL for the service. To access the RESTful endpoint, append /serviceA to the URL, as shown in the following command:
curl https://$AZURE_SPRING_APPS_NAME-servicea.azuremicroservices.io/serviceA
This command produces the following output.
This is a result of Service A
Service A includes a RESTful endpoint that displays a list of environment variables. Access the endpoint with /env to see the environment variables, as shown in the following command:
curl https://$AZURE_SPRING_APPS_NAME-servicea.azuremicroservices.io/env
This command produces the following output.
"JAVA_TOOL_OPTIONS":"-Deureka.client.service-url.defaultZone=https://$AZURE_SPRING_APPS_NAME.svc.azuremicroservices.io/eureka/default/eureka
As you can see, eureka.client.service-url.defaultZone is added to JAVA_TOOL_OPTIONS. In this way, the application can register the service to the Service Registry and make it available from other services.
You can now register the service to the Service Registry (Eureka Server) in Azure Spring Apps. Other services can now access the service by using service registry.
Implement a new Service B that accesses Service A through Service Registry
Implement Service B with Spring Boot
Navigate to Spring Initializr to create a new project for Service B. This link uses the following URL to initialize the settings:
https://start.spring.io/#!type=maven-project&language=java&packaging=jar&groupId=com.example&artifactId=Sample%20Service%20B&name=Sample%20Service%20B&description=Demo%20project%20for%20Spring%20Boot&packageName=com.example.Sample%20Service%20B&dependencies=web,cloud-eureka
Then, select GENERATE to get the new project.
Implement Service B as a Service Registry client (Eureka client)
Like Service A, add the @EnableEurekaClient annotation to Service B to configure it as a Eureka client.
package com.example.Sample.Service.B;

import org.springframework.boot.SpringApplication;
import org.springframework.boot.autoconfigure.SpringBootApplication;
import org.springframework.cloud.netflix.eureka.EnableEurekaClient;

@SpringBootApplication
@EnableEurekaClient
public class SampleServiceBApplication {

    public static void main(String[] args) {
        SpringApplication.run(SampleServiceBApplication.class, args);
    }
}
Implement service endpoints in Service B
Next, implement a new service endpoint (/invoke-serviceA) that invokes Service A. Add a ServiceBEndpoint.java file to your project with the following code.
package com.example.Sample.Service.B;
import java.util.List;
import java.util.stream.Collectors;
import com.netflix.discovery.EurekaClient;
import com.netflix.discovery.shared.Application;
import com.netflix.discovery.shared.Applications;
import org.springframework.beans.factory.annotation.Autowired;
import org.springframework.web.bind.annotation.GetMapping;
import org.springframework.web.bind.annotation.RestController;
import org.springframework.web.client.RestTemplate;

@RestController
public class ServiceBEndpoint {
    @Autowired
    private EurekaClient discoveryClient;

    @GetMapping(value = "/invoke-serviceA")
    public String invokeServiceA()
    {
        RestTemplate  restTemplate = new RestTemplate();
        String response = restTemplate.getForObject("http://servicea/serviceA",String.class);
        return "INVOKE SERVICE A FROM SERVICE B: " + response;
    }

    @GetMapping(value = "/list-all")
    public List<String> listsAllServices() {
        Applications applications = discoveryClient.getApplications();
        List<Application> registeredApplications = applications.getRegisteredApplications();
        List<String> appNames = registeredApplications.stream().map(app -> app.getName()).collect(Collectors.toList());
        return appNames;
    }
}
This example uses RestTemplate for simplicity. The endpoint returns the response string with another string (INVOKE SERVICE A FROM SERVICE B: ") to indicate that it was called by Service B.
This example also implements another endpoint (/list-all) for validation. This implementation ensures that the service is communicating correctly with the Service Registry. You can call this endpoint to get the list of applications registered in the Service Registry.
This example invokes Service A as http://servicea. The service name is the name that you specified during the creation of the Azure Spring Apps application. (For example: az spring app create --name ServiceA.) The application name matches the service name you registered with the service registry, making it easier to manage the service name.
Build Service B
Use the following command to build your project.
mvn clean package
Deploy Service B to Azure Spring Apps
Use the following command to create an application in Azure Spring Apps to deploy Service B.
az spring app create \
    --resource-group $RESOURCE_GROUP \
    --service $AZURE_SPRING_APPS_NAME \
    --name serviceB \
    --instance-count 1 \
    --memory 2Gi \
    --assign-endpoint
Next, use the following command to bind the application to the Service Registry.
az spring service-registry bind \
    --resource-group $RESOURCE_GROUP \
    --service $AZURE_SPRING_APPS_NAME \
    --app serviceB
Next, use the following command to deploy the service.
az spring app deploy \
    --resource-group $RESOURCE_GROUP \
    --service $AZURE_SPRING_APPS_NAME \
    --name serviceB \
    --artifact-path ./target/Sample-Service-B-0.0.1-SNAPSHOT.jar \
    --jvm-options="-Xms1024m -Xmx1024m"
Next, use the following command to check the status of the application.
az spring app list \
    --resource-group $RESOURCE_GROUP \
    --service $AZURE_SPRING_APPS_NAME \
    --output table
If Service A and Service B are deployed correctly, this command produces output similar to the following example.
Name      Location       ResourceGroup           Public Url                                                       Production Deployment    Provisioning State    CPU    Memory    Running Instance    Registered Instance    Persistent Storage    Bind Service Registry    Bind Application Configuration Service
--------  -------------  ----------------------  ---------------------------------------------------------------  -----------------------  --------------------  -----  --------  ------------------  ---------------------  --------------------  -----------------------  ----------------------------------------
servicea  southeastasia  SpringCloud-Enterprise  https://$AZURE_SPRING_APPS_NAME-servicea.azuremicroservices.io  default                  Succeeded             1      2Gi       1/1                 1/1                    -                     default                  -
serviceb  southeastasia  SpringCloud-Enterprise  https://$AZURE_SPRING_APPS_NAME-serviceb.azuremicroservices.io  default                  Succeeded             1      2Gi       1/1                 1/1                    -                     default                  -
Invoke Service A from Service B
The output of the previous command includes the public URL for the service. To access the RESTful endpoint, append /invoke-serviceA to the URL, as shown in the following command:
curl https://$AZURE_SPRING_APPS_NAME-serviceb.azuremicroservices.io/invoke-serviceA
This command produces the following output:
INVOKE SERVICE A FROM SERVICE B: This is a result of Service A
Get some information from Service Registry
Finally, access the /list-all endpoint and retrieve some information from the Service Registry. The following command retrieves a list of services registered in the Service Registry.
curl https://$AZURE_SPRING_APPS_NAME-serviceb.azuremicroservices.io/list-all
This command produces the following output.
["SERVICEA","EUREKA-SERVER","SERVICEB"]
In this way, you can obtain detailed information from the program as needed.
Enable/disable Service Registry after service creation
You can enable and disable Service Registry after service creation using the Azure portal or Azure CLI. Before disabling Service Registry, you're required to unbind all of your apps from it.
Use the following steps to enable or disable Service Registry using the Azure portal:
- Navigate to your service resource, and then select Service Registry.
- Select Manage.
- Select or unselect the Enable Service Registry, and then select Save.
- You can now view the state of Service Registry on the Service Registry page.
Next steps
Feedback
Coming soon: Throughout 2024 we will be phasing out GitHub Issues as the feedback mechanism for content and replacing it with a new feedback system. For more information see: https://aka.ms/ContentUserFeedback.
Submit and view feedback for