How to create a Network Virtual Appliance in an Azure Virtual WAN hub
This article shows you how to use Virtual WAN to connect to your resources in Azure through a Network Virtual Appliance (NVA) in Azure. This type of connection requires a VPN device located on-premises that has an externally facing public IP address assigned to it. For more information about Virtual WAN, see What is Virtual WAN?
The steps in this article help you create a Barracuda CloudGen WAN Network Virtual Appliance in the Virtual WAN hub. To complete this exercise, you must have a Barracuda Cloud Premise Device (CPE) and a license for the Barracuda CloudGen WAN appliance that you deploy into the hub before you begin.
For deployment documentation of Cisco SD-WAN within Azure Virtual WAN, see Cisco Cloud OnRamp for Multi-Cloud.
For deployment documentation of VMware SD-WAN within Azure Virtual WAN, see Deployment Guide for VMware SD-WAN in Virtual WAN Hub
Prerequisites
Verify that you've met the following criteria before beginning your configuration:
Obtain a license for your Barracuda CloudGen WAN gateway. To learn more about how to do this, see the Barracuda CloudGen WAN Documentation
You have a virtual network that you want to connect to. Verify that none of the subnets of your on-premises networks overlap with the virtual networks that you want to connect to. To create a virtual network in the Azure portal, see the Quickstart.
Your virtual network doesn't have any virtual network gateways. If your virtual network has a gateway (either VPN or ExpressRoute), you must remove all gateways. This configuration requires that virtual networks are connected instead, to the Virtual WAN hub gateway.
Obtain an IP address range for your hub region. The hub is a virtual network that is created and used by Virtual WAN. The address range that you specify for the hub can't overlap with any of your existing virtual networks that you connect to. It also can't overlap with your address ranges that you connect to your on-premises sites. If you're unfamiliar with the IP address ranges located in your on-premises network configuration, coordinate with someone who can provide those details for you.
If you don't have an Azure subscription, create a free account.
Create a virtual WAN
In the portal, in the Search resources bar, type Virtual WAN in the search box and select Enter.
Select Virtual WANs from the results. On the Virtual WANs page, select + Create to open the Create WAN page.
On the Create WAN page, on the Basics tab, fill in the fields. Modify the example values to apply to your environment.
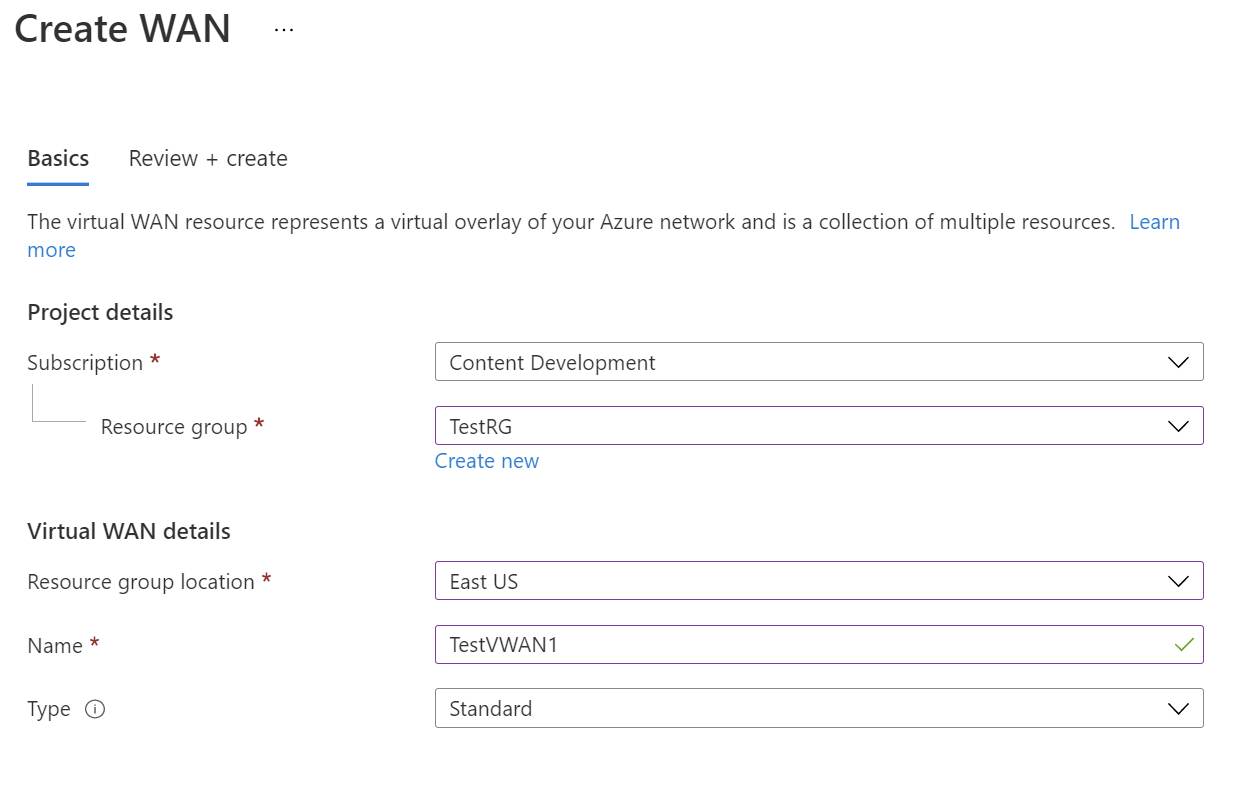
- Subscription: Select the subscription that you want to use.
- Resource group: Create new or use existing.
- Resource group location: Choose a resource location from the dropdown. A WAN is a global resource and doesn't live in a particular region. However, you must select a region in order to manage and locate the WAN resource that you create.
- Name: Type the Name that you want to call your virtual WAN.
- Type: Basic or Standard. Select Standard. If you select Basic, understand that Basic virtual WANs can only contain Basic hubs. Basic hubs can only be used for site-to-site connections.
After you finish filling out the fields, at the bottom of the page, select Review +Create.
Once validation passes, click Create to create the virtual WAN.
Create a hub
Create a virtual hub by filling out the Basics tab to create an empty virtual hub (a virtual hub that doesn't contain any gateways).
Go to the virtual WAN that you created. On the virtual WAN page left pane, under the Connectivity, select Hubs.
On the Hubs page, select +New Hub to open the Create virtual hub page.

On the Create virtual hub page Basics tab, complete the following fields:
- Region: Select the region in which you want to deploy the virtual hub.
- Name: The name by which you want the virtual hub to be known.
- Hub private address space: The hub's address range in CIDR notation. The minimum address space is /24 to create a hub.
- Virtual hub capacity: Select from the dropdown. For more information, see Virtual hub settings.
- Hub routing preference: Leave as default. For more information, see Virtual hub routing preference.

Create the Network Virtual Appliance in the hub
In this step, you'll create a Network Virtual Appliance in the hub. The procedure for each NVA will be different for each NVA partner's product. For this example, we're creating a Barracuda CloudGen WAN gateway.
Locate the Virtual WAN hub you created in the previous step and open it.

Find the Network Virtual Appliance tile and select the Create link.
On the Network Virtual Appliance page, from the dropdown, select Barracuda CloudGen WAN, then select the Create button and Leave. This takes you to the Azure Marketplace offer for the Barracuda CloudGen WAN gateway.
Read the terms, select Get it now, then click Continue when you're ready. The page will automatically change to the page for the Barracuda CloudGen WAN Gateway. Select Create to open the Basics page for gateway settings.

On the Create Barracuda CloudGen WAN Gateway Basics page, provide the following information:
- Subscription - Choose the subscription you used to deploy the Virtual WAN and hub.
- Resource Group - Choose the same Resource Group you used to deploy the Virtual WAN and hub.
- Region - Choose the same Region in which your Virtual hub resource is located.
- Application Name - The Barracuda NextGen WAN is a Managed Application. Choose a name that makes it easy to identify this resource, as this is what it will be called when it appears in your subscription.
- Managed Resource Group - This is the name of the Managed Resource Group in which Barracuda will deploy resources that are managed by them. The name should be pre-populated for this.
Select Next: CloudGen WAN gateway to open the Create Barracuda CloudGen WAN Gateway page.
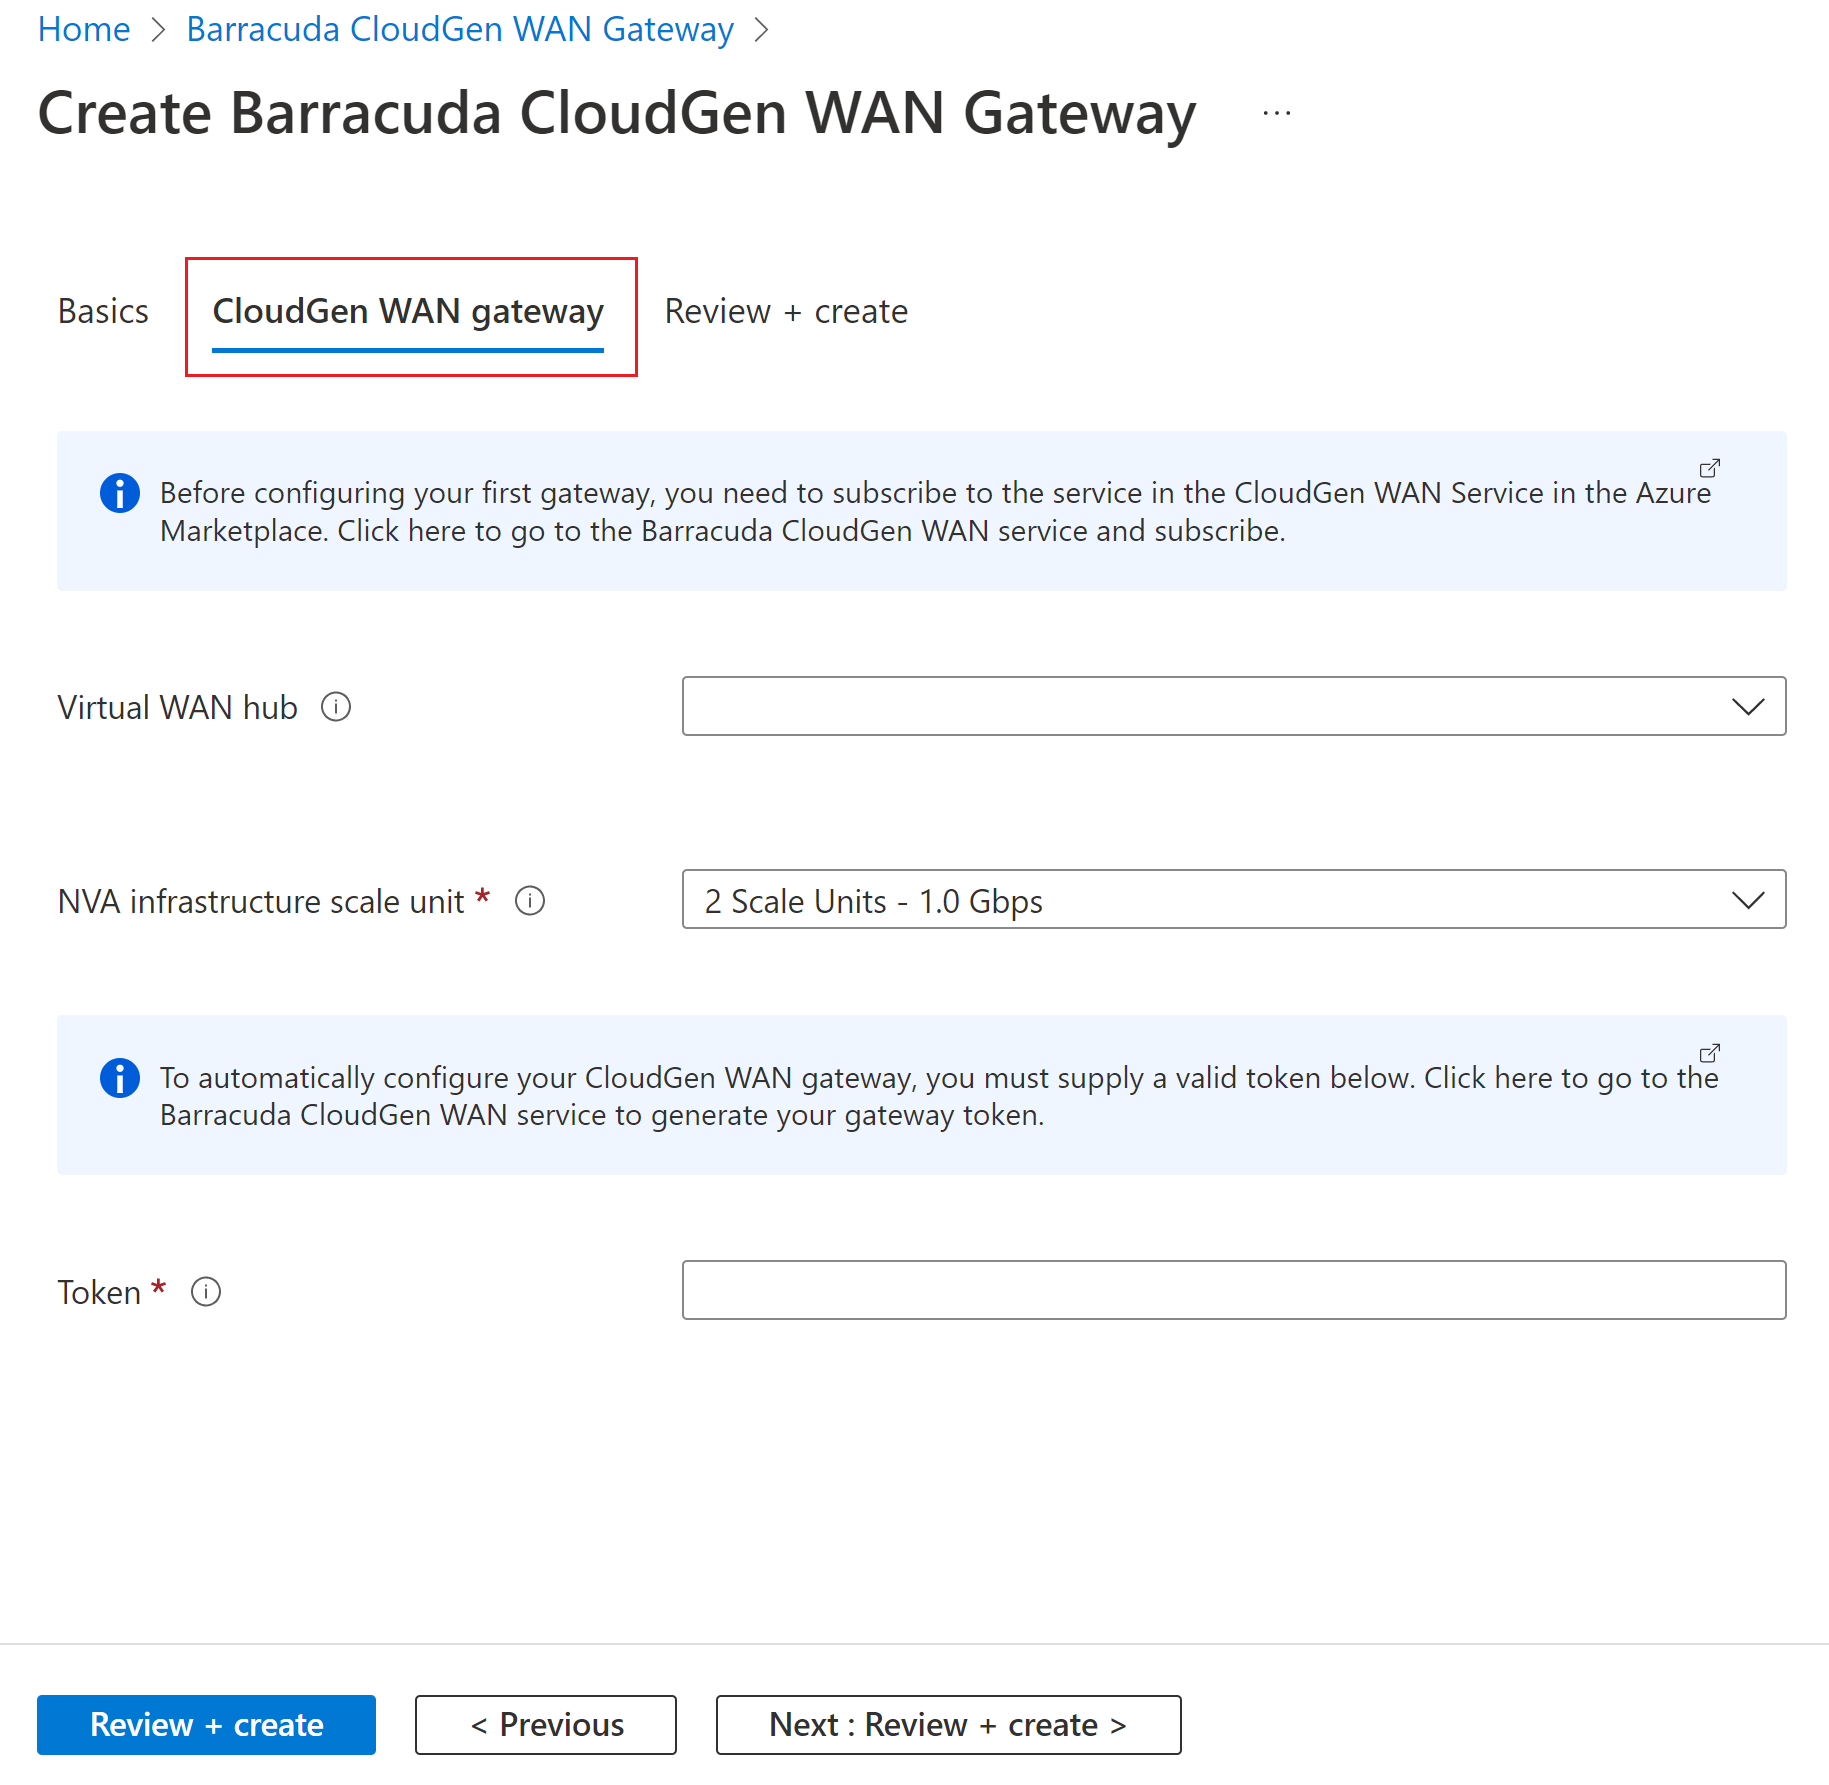
On the Create Barracuda CloudGen WAN Gateway page, provide the following information:
- Virtual WAN Hub - The Virtual WAN hub you want to deploy this NVA into.
- NVA Infrastructure Units - Indicate the number of NVA Infrastructure Units you want to deploy this NVA with. Choose the amount of aggregate bandwidth capacity you want to provide across all of the branch sites that will be connecting to this hub through this NVA.
- Token - Barracuda requires that you provide an authentication token here in order to identify yourself as a registered user of this product. You'll need to obtain this from Barracuda.
Select the Review and Create button to proceed.
On this page, you'll be asked to accept the terms of the Co-Admin Access agreement. This is standard with Managed Applications where the Publisher will have access to some resources in this deployment. Check the I agree to the terms and conditions above box, and then select Create.


Connect the VNet to the hub
In this section, you create a connection between your hub and VNet.
In the Azure portal, go to your Virtual WAN In the left pane, select Virtual network connections.
On the Virtual network connections page, select + Add connection.
On the Add connection page, configure the connection settings. For information about routing settings, see About routing.
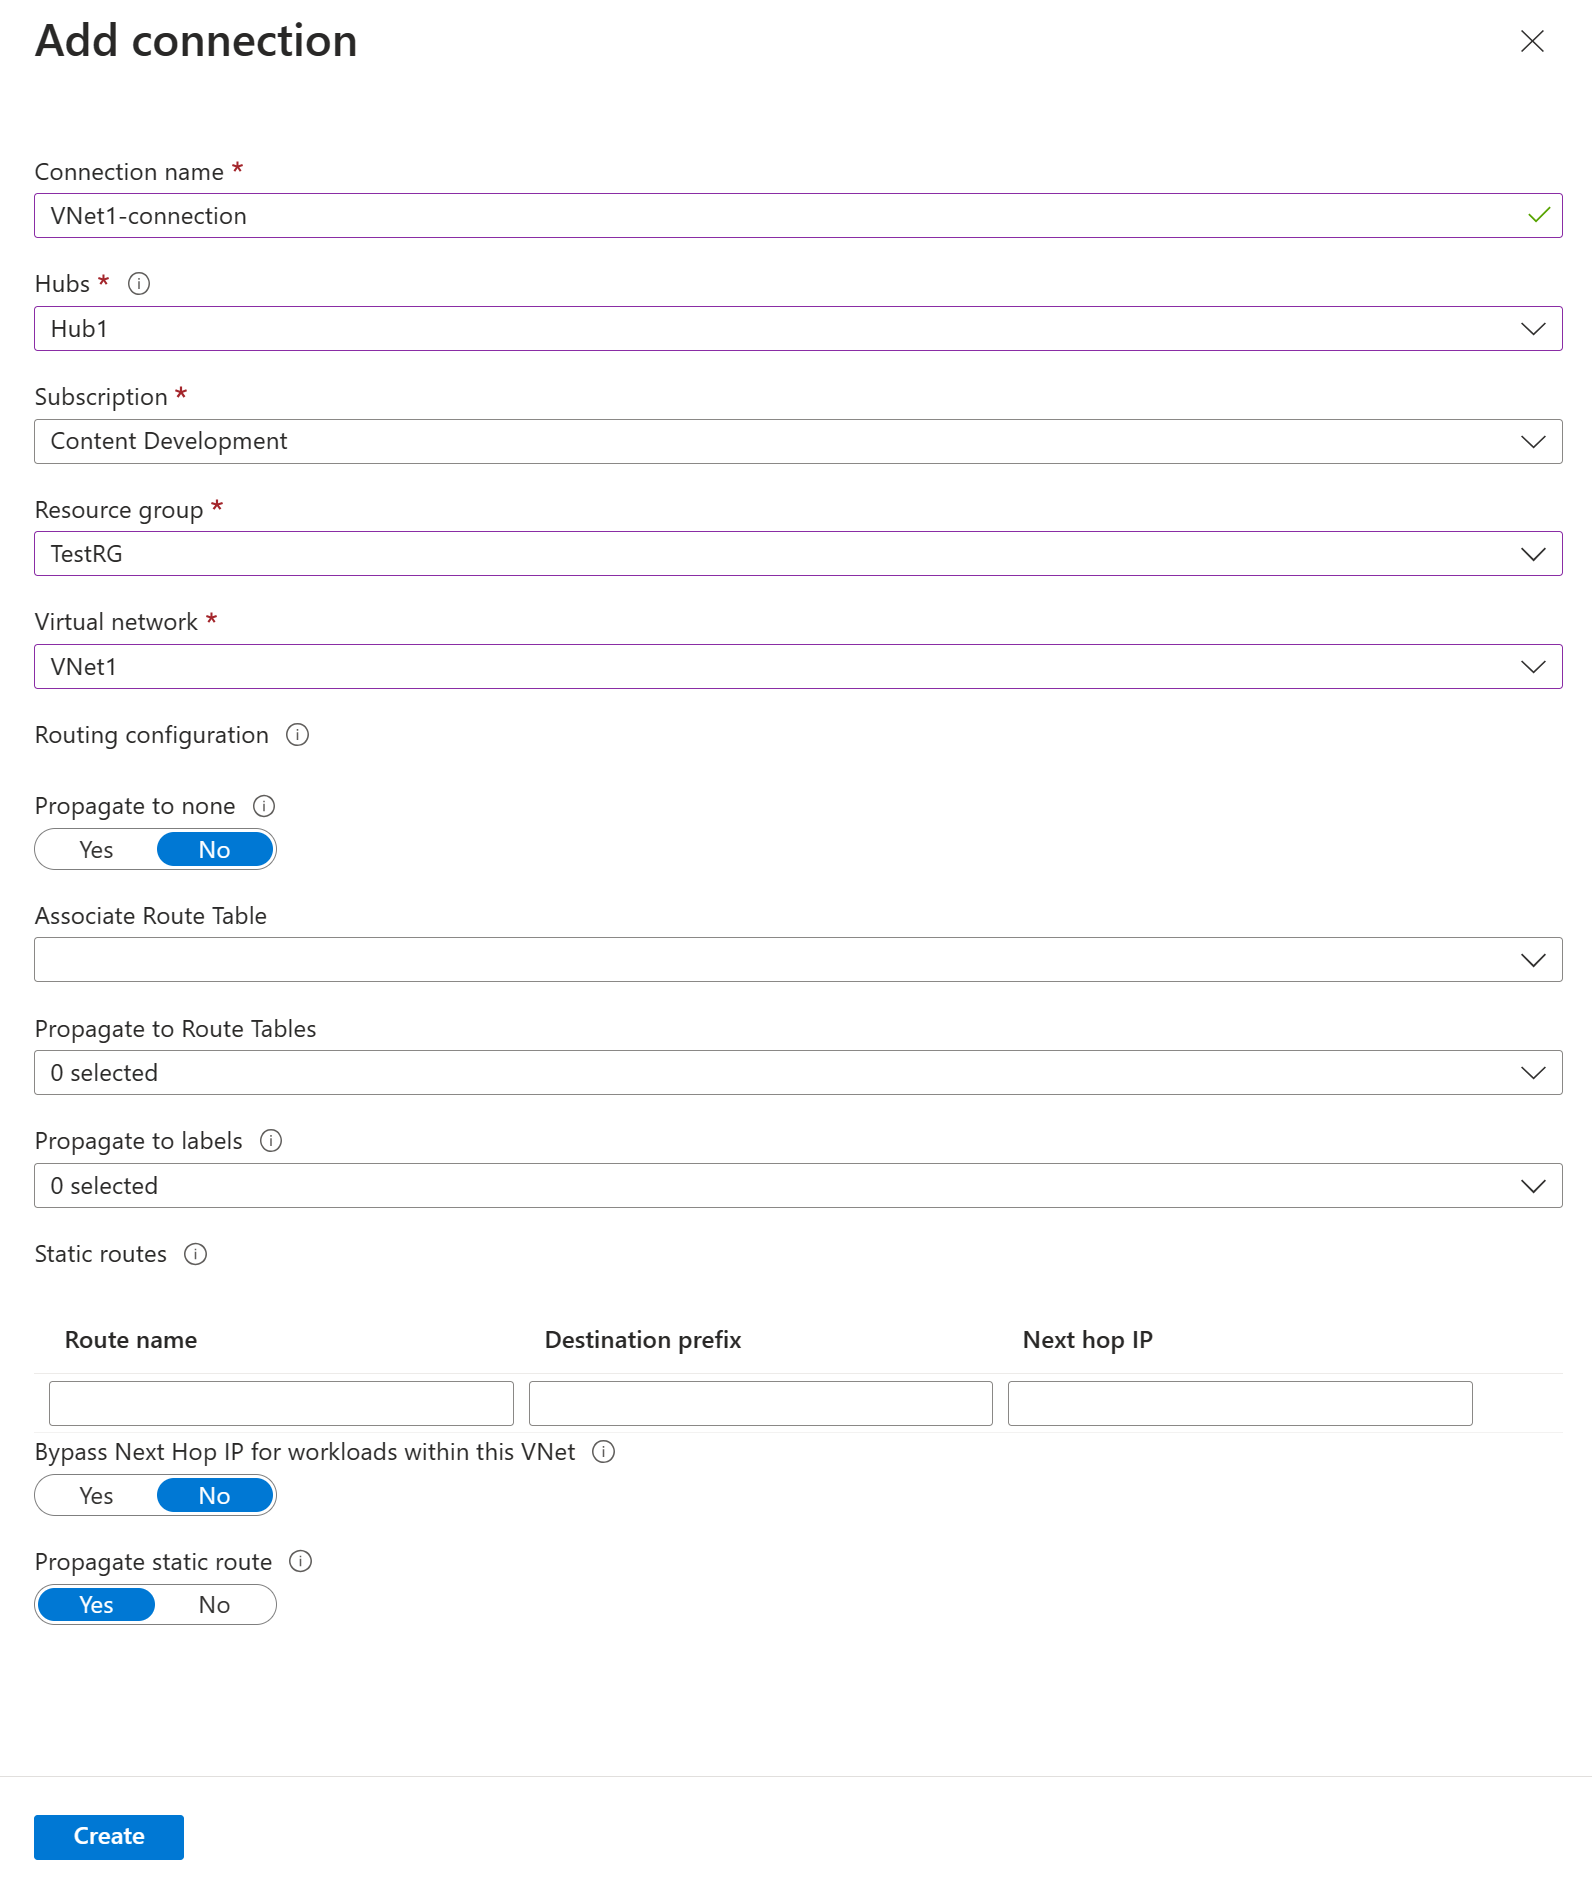
- Connection name: Name your connection.
- Hubs: Select the hub you want to associate with this connection.
- Subscription: Verify the subscription.
- Resource group: Select the resource group that contains the virtual network to which you want to connect.
- Virtual network: Select the virtual network you want to connect to this hub. The virtual network you select can't have an already existing virtual network gateway.
- Propagate to none: This is set to No by default. Changing the switch to Yes makes the configuration options for Propagate to Route Tables and Propagate to labels unavailable for configuration.
- Associate Route Table: From the dropdown, you can select a route table that you want to associate.
- Propagate to labels: Labels are a logical group of route tables. For this setting, select from the dropdown.
- Static routes: Configure static routes, if necessary. Configure static routes for Network Virtual Appliances (if applicable). Virtual WAN supports a single next hop IP for static route in a virtual network connection. For example, if you have a separate virtual appliance for ingress and egress traffic flows, it would be best to have the virtual appliances in separate VNets and attach the VNets to the virtual hub.
- Bypass Next Hop IP for workloads within this VNet: This setting lets you deploy NVAs and other workloads into the same VNet without forcing all the traffic through the NVA. This setting can only be configured when you're configuring a new connection. If you want to use this setting for a connection you've already created, delete the connection, then add a new connection.
- Propagate static route: This setting is currently being rolled out. This setting lets you propagate static routes defined in the Static routes section to route tables specified in Propagate to Route Tables. Additionally, routes will be propagated to route tables that have labels specified as Propagate to labels. These routes can be propagated inter-hub, except for the default route 0/0. This feature is in the process of rolling out. If you need this feature enabled please reach out to vwanpm@microsoft.com
Once you've completed the settings you want to configure, click Create to create the connection.

Next steps
- To learn more about Virtual WAN, see What is Virtual WAN?
- To learn more about NVAs in a Virtual WAN hub, see About Network Virtual Appliance in the Virtual WAN hub.
Feedback
Coming soon: Throughout 2024 we will be phasing out GitHub Issues as the feedback mechanism for content and replacing it with a new feedback system. For more information see: https://aka.ms/ContentUserFeedback.
Submit and view feedback for