Exercise - Build the application image
In this unit, you create your GitHub Actions staging pipeline by building the application image and pushing it to Azure Container Registry.
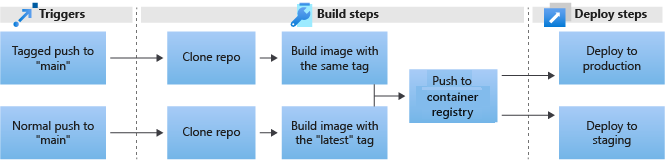
The following image shows the CI/CD pipeline you designed:
In this exercise, you create the staging pipeline by doing the following steps:
- Create the GitHub Actions workflow.
- Create the
on pushtrigger. - Build and push the application image.
- Set secrets.
- Run the job.
Create the GitHub Actions workflow
GitHub workflows are divided into jobs, and jobs are divided into steps. Each step can have multiple commands and use multiple actions to execute.
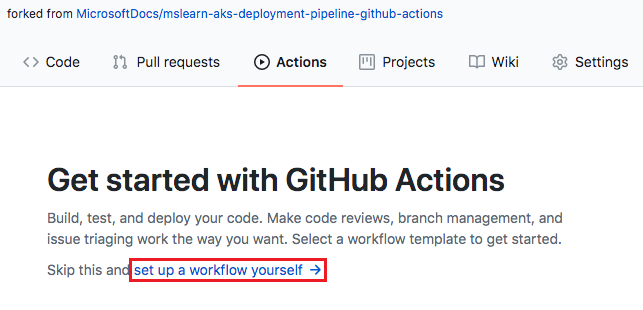
To start building your pipeline, go to your fork of the sample repository in the GitHub website.
Select the Actions tab.
Select the link to set up a workflow yourself.
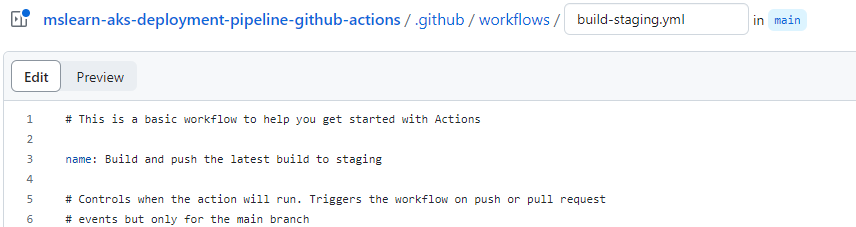
At this point, the pipeline is just a blank file in the .github/workflows directory in your repository. GitHub provides the prebuilt components that you need to build most of the pipelines. To get started, copy and paste the following code into the Edit new file pane:
# This is a basic workflow to help you get started with Actions

name: CI

# Controls when the action will run. Triggers the workflow on push or pull request
# events but only for the main branch
on:
  push:
    branches: [ main ]
  pull_request:
    branches: [ main ]

# A workflow run is made up of one or more jobs that can run sequentially or in parallel
jobs:
  # This workflow contains a single job called "build"
  build:
    # The type of runner that the job will run on
    runs-on: ubuntu-latest

    # Steps represent a sequence of tasks that will be executed as part of the job
    steps:
      # Checks out your repository under $GITHUB_WORKSPACE, so your job can access it
      - uses: actions/checkout@v2

      # Runs a single command using the runners shell
      - name: Run a one-line script
        run: echo Hello, world!

      # Runs a set of commands using the runners shell
      - name: Run a multi-line script
        run: |
          echo Add other actions to build,
          echo test, and deploy your project.
Above the Edit new file pane, rename the file from main.yml to build-staging.yml.
Change the
namekey fromCItoBuild and push the latest build to staging.# This is a basic workflow to help you get started with Actions name: Build and push the latest build to staging
Modify the 'on' trigger
The basic workflow template comes with two triggers:
- Any push to the main branch.
- Any pull request on the main branch.
You don't need the pipeline to run on a pull request, so modify it to keep only the push trigger by changing the triggers in the on key. Remove the second trigger and leave only the push tags.
name: Build and push the latest build to staging

on:
  push:
    branches: [ main ]
Configure the checkout step
Next, start working on the job steps. In this process, you implement both the build tasks and the deploy tasks in your pipeline design diagram.
Under
jobs, rename thebuildkey tobuild_push_image.You want this workflow to run on Ubuntu 20.04, so change the
runs-onkey fromubuntu-latesttoubuntu-20.04.Delete the last two commands in the
stepskey, which are just examples for the template.Your file, without the comments, should look like this example:
name: Build and push the latest build to staging

on:
  push:
    branches: [ main ]

jobs:
  build_push_image:
    runs-on: ubuntu-20.04

    steps:
      - uses: actions/checkout@v2
You now have a step that uses the checkout action. This action clones the repository into the job environment. This step is equivalent to the first action, Clone repo, in the pipeline design diagram.
Add Docker steps
Next, add actions to build your Docker image. You can adjust usage for these actions. This example uses only a few of the parameters available. For more information, see the GitHub build-push-action documentation.
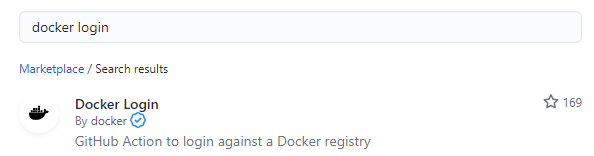
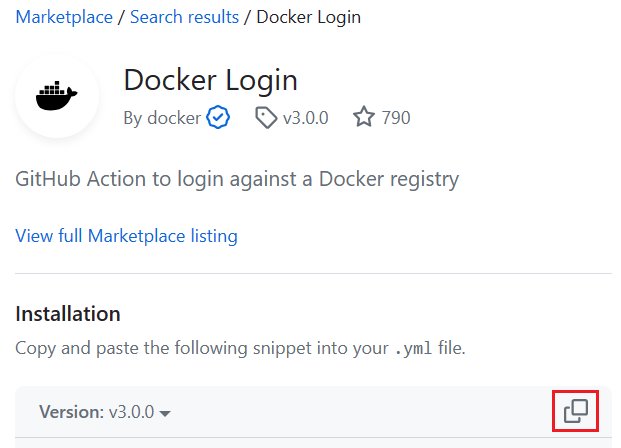
In the Marketplace tab in the right panel, search for docker login, and select the first result published by docker.
Note
Docker actions prior to version 2 had the login flow built-in, but on versions 2 and above, these actions are separated, so you need two actions to set the workflow correctly.
Under Installation, select the copy icon to copy the usage YAML.
Paste the copied YAML below the
actions/checkout@v2action.Important
Be careful with indentation when you use YAML. The
namekey should be aligned with the precedinguseskey.Add the following values to the
registry,username, andpasswordkeys:registry:${{ secrets.ACR_NAME }}username:${{ secrets.ACR_LOGIN }}password:${{ secrets.ACR_PASSWORD }}
Delete the other keys, because they aren't used in this exercise.
In the right panel under Marketplace, search for build and push docker images, and select the first result published by docker.
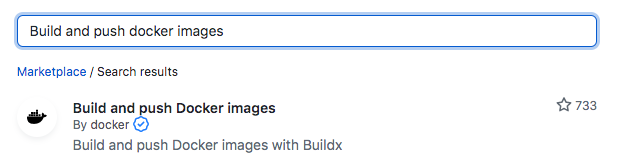
Under Installation, select the copy icon to copy the usage YAML.
Paste the copied YAML below the last key from the previously copied
docker-loginaction.Rename the
namekey fromBuild and push Docker imagestoBuild and push staging images.Add the following values to the
context,push, andtagskeys:context:.push:truetags:${{secrets.ACR_NAME}}/contoso-website:latest
Delete the other keys, because they aren't used in this exercise.
Add another action called
docker/setup-buildx-actionbetween the checkout action and the login action, to set up the build engine for Docker to use. Copy the following snippet and paste it between thecheckoutandloginactions.- name: Set up Buildx uses: docker/setup-buildx-action@v3.0.0Your final file, without the comments, should look like the following example:
name: Build and push the latest build to staging

on:
  push:
    branches: [ main ]

jobs:
  build_push_image:
    runs-on: ubuntu-20.04

    steps:
      - uses: actions/checkout@v2

      - name: Set up Buildx
        uses: docker/setup-buildx-action@v3.0.0

      - name: Docker Login
        uses: docker/login-action@v3.0.0
        with:
          registry: ${{ secrets.ACR_NAME }}
          username: ${{ secrets.ACR_LOGIN }}
          password: ${{ secrets.ACR_PASSWORD }}

      - name: Build and push staging images
        uses: docker/build-push-action@v5.0.0
        with:
          context: .
          push: true
          tags: ${{secrets.ACR_NAME}}/contoso-website:latest
Commit the changes
To commit your changes, select the Commit changes button at upper right. On the Commit changes screen, enter a description for the commit, and then select Commit changes.
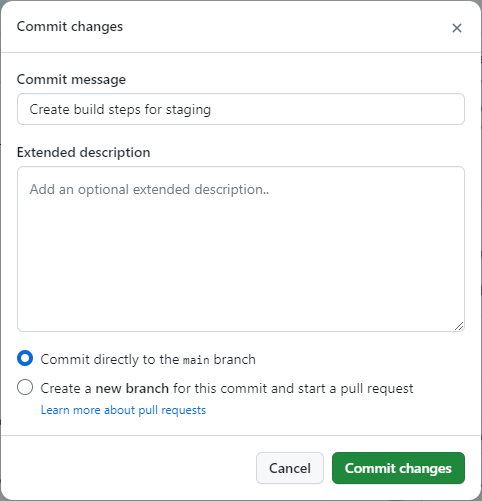
Selecting Commit changes triggers a new build, but this build fails because you haven't set the secrets yet.
Set the secrets
To set the secrets, on your GitHub repository page, select the Settings tab, and then select Secrets and variables > Actions from the left menu. Define the following secrets that your workflow uses:
ACR_NAME: TheACR_Namevalue returned by the setup scriptACR_LOGIN: TheACR Login Usernamevalue returned by the setup scriptACR_PASSWORD: TheACR Login Passwordvalue returned by the setup scriptRESOURCE_GROUP: TheResource Group Namevalue returned by the setup scriptCLUSTER_NAME: contoso-video
To define each secret:
- Select New repository secret.
- For Name, enter the secret name from the preceding list.
- For Secret, enter the value you saved from the setup script, or run a Cloud Shell query to get the value.
- Select Add secret.
Run optional queries to get the secrets values
If you don't have the values the setup script returned, you can run the following commands in Azure Cloud Shell to get the information:
ACR_NAME:az acr list --query "[?contains(resourceGroup, 'mslearn-gh-pipelines')].loginServer" -o tableACR_LOGIN:az acr credential show --name <ACR_NAME> --query "username" -o tableACR_PASSWORD:az acr credential show --name <ACR_NAME> --query "passwords[0].value" -o tableRESOURCE_GROUP:az aks list -o tsv --query "[?name=='contoso-video'].resourceGroup"
Run the job
Select the Actions tab.
Select the only execution in the list, the failed build-staging.yml job.
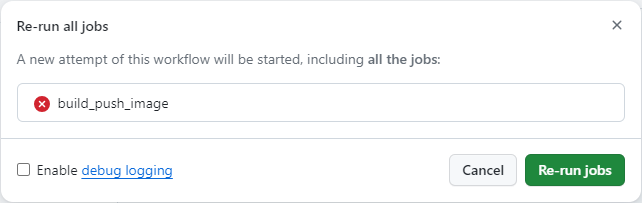
At upper right, select Re-run jobs > Re-run all jobs, and on the Re-run all jobs screen, select Re-run jobs.
When the build completes, run
az acr repository list --name <ACR_NAME> -o tablein Cloud Shell to confirm that thecontoso-websiteContainer Registry repository appears in the results.
Continue to the next unit to build your production workflow.